计划一周时间,理解Tomcat的设计思想,为什么这么设计,以及Tomcat设计带来的特点是什么。
今天是第一天,tomcat源码阅读。其实很奇怪的事情是什么,目前我平时的工作中,其实对Tomcat的使用很少,就是单纯自己去配置它。现在集成在SpringBoot中,好像只是单纯的作为一个工具在使用,但是我依然还是秉持着自己的复习路线。凡是日常开发中需要使用到的东西,至少要知道怎么用,以及它的设计原理。架构是一件很有艺术的事情,而这些Tomcat,Sping包,包括Java的核心包的设计,就是学习设计思想上的经典之作。
怎么看源码,这其实是一个很细致的问题。像Tomcat这种,我自己不会选择同SpringBoot一样的看法。我会选择它重要的组件,去进行阅读。
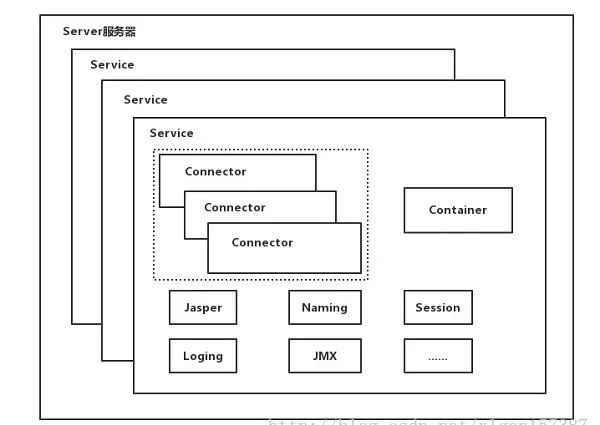
首先这张顶级架构图,可以看出我们主要需要看的几个部分。先看完组件,知道组件是为什么的,然后再看启动流程,知道他们之间是如何进行关联的。我一般是选择这种方式来进行源码的阅读。
先看下Connector。在这个类的Doc上,有个很简短的一句话:"Implementation of a Coyote connector."翻译过来,这是一个土狼连接器。然后看下这个类的继承图
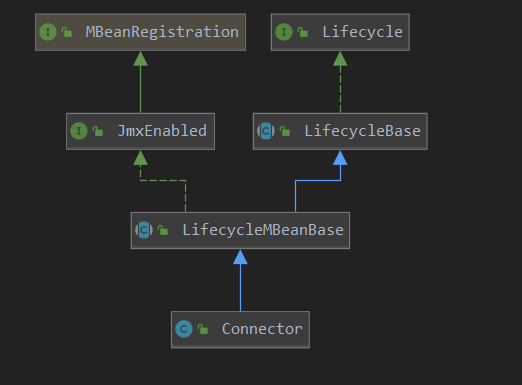
看下这些都是什么作用。先从最顶层的Lifecycle是管理生命周期用的,Catalina组件可以实现这个接口用来管理自己的生命周期。

根据Doc里面给的流程,差不多就是以下几个状态之间的转换,主要是auto是如何实现的。在代码中,定义了很多具体的常量

剩余的代码:
 // --------------------------------------------------------- Public Methods


    /**
     * 将LifecycleEvent侦听器添加到此组件。
     * 侦听器的作用:在发生关联状态更改之后,将触发该侦听器。
     * 侦听器里面有方法 public void lifecycleEvent(LifecycleEvent event);
     * void反过来说就是侦听器里面大概率会有一个成员变量来暂存状态
     * @param listener The listener to add
     */
    public void addLifecycleListener(LifecycleListener listener);


    /**
     * 获取与此生命周期相关联的生命周期侦听器
     * @return An array containing the life cycle listeners associated with this
     *         life cycle. If this component has no listeners registered, a
     *         zero-length array is returned.
     */
    public LifecycleListener[] findLifecycleListeners();


    /**
     * Remove a LifecycleEvent listener from this component.
     *
     * @param listener The listener to remove
     */
    public void removeLifecycleListener(LifecycleListener listener);


    /**
     * 准备要启动的组件。此方法应执行对象创建后所需的任何初始化。
     * The following {@link LifecycleEvent}s will be fired in the following order:
     * <ol>
     *   <li>INIT_EVENT: On the successful completion of component initialization.</li>
     * </ol>
     *
     * @exception LifecycleException if this component detects a fatal error
     *  that prevents this component from being used
     */
    public void init() throws LifecycleException;

    /**
     * Prepare for the beginning of active use of the public methods other than
     * property getters/setters and life cycle methods of this component. This
     * method should be called before any of the public methods other than
     * property getters/setters and life cycle methods of this component are
     * utilized. The following {@link LifecycleEvent}s will be fired in the
     * following order:
     * <ol>
     *   <li>BEFORE_START_EVENT: At the beginning of the method. It is as this
     *                           point the state transitions to
     *                           {@link LifecycleState#STARTING_PREP}.</li>
     *   <li>START_EVENT: During the method once it is safe to call start() for
     *                    any child components. It is at this point that the
     *                    state transitions to {@link LifecycleState#STARTING}
     *                    and that the public methods other than property
     *                    getters/setters and life cycle methods may be
     *                    used.</li>
     *   <li>AFTER_START_EVENT: At the end of the method, immediately before it
     *                          returns. It is at this point that the state
     *                          transitions to {@link LifecycleState#STARTED}.
     *                          </li>
     * </ol>
     *
     * @exception LifecycleException if this component detects a fatal error
     *  that prevents this component from being used
     */
    public void start() throws LifecycleException;


    /**
     * Gracefully terminate the active use of the public methods other than
     * property getters/setters and life cycle methods of this component. Once
     * the STOP_EVENT is fired, the public methods other than property
     * getters/setters and life cycle methods should not be used. The following
     * {@link LifecycleEvent}s will be fired in the following order:
     * <ol>
     *   <li>BEFORE_STOP_EVENT: At the beginning of the method. It is at this
     *                          point that the state transitions to
     *                          {@link LifecycleState#STOPPING_PREP}.</li>
     *   <li>STOP_EVENT: During the method once it is safe to call stop() for
     *                   any child components. It is at this point that the
     *                   state transitions to {@link LifecycleState#STOPPING}
     *                   and that the public methods other than property
     *                   getters/setters and life cycle methods may no longer be
     *                   used.</li>
     *   <li>AFTER_STOP_EVENT: At the end of the method, immediately before it
     *                         returns. It is at this point that the state
     *                         transitions to {@link LifecycleState#STOPPED}.
     *                         </li>
     * </ol>
     *
     * Note that if transitioning from {@link LifecycleState#FAILED} then the
     * three events above will be fired but the component will transition
     * directly from {@link LifecycleState#FAILED} to
     * {@link LifecycleState#STOPPING}, bypassing
     * {@link LifecycleState#STOPPING_PREP}
     *
     * @exception LifecycleException if this component detects a fatal error
     *  that needs to be reported
     */
    public void stop() throws LifecycleException;

    /**
     * Prepare to discard the object. The following {@link LifecycleEvent}s will
     * be fired in the following order:
     * <ol>
     *   <li>DESTROY_EVENT: On the successful completion of component
     *                      destruction.</li>
     * </ol>
     *
     * @exception LifecycleException if this component detects a fatal error
     *  that prevents this component from being used
     */
    public void destroy() throws LifecycleException;


    /**
     * Obtain the current state of the source component.
     *
     * @return The current state of the source component.
     */
    public LifecycleState getState();


    /**
     * Obtain a textual representation of the current component state. Useful
     * for JMX. The format of this string may vary between point releases and
     * should not be relied upon to determine component state. To determine
     * component state, use {@link #getState()}.
     *
     * @return The name of the current component state.
     */
    public String getStateName();


    /**
     * Marker interface used to indicate that the instance should only be used
     * once. Calling {@link #stop()} on an instance that supports this interface
     * will automatically call {@link #destroy()} after {@link #stop()}
     * completes.
     */
    public interface SingleUse {
    }
Lifecycle这个接口主要是定义了监听和生命周期。实现这个接口,就有了组件的生命周期概念。
然后看一下MBeanRegistration接口的作用,MBean是一个什么pojo?Mean一般是MeanServer,实现了MBeanServerConnection接口,MBeanServerConnection接口中定义了一些创建MeanServer的方法。
也就是说MeanServer这个接口主要是用来生成对象的,这个对象的作用是:MBean Server是一个集中的管理MBean对象实例的地方。通过MBeanServer,你可以查询、管理、操作Agent应用发布的特定的MBean。
而MBean是一种规范的JavaBean,通过集成和实现一套标准的Bean接口,这种叫MBean,Mbean注册到MBeanServer中。之后将被MBeanServer中注册过的Adapter(比如渲染为HTML的HtmlAdapter)渲染为直观的页面将MBean的属性和方法展示给用户。
这边我看网上的一些介绍,要牵涉到JMX架构。那就顺带把这个先给看了。
JMX,全称为Java Management Extensions
JMX(Java Management Extensions)是一个为应用程序植入管理功能的框架。JMX是一套标准的代理和服务,实际上,用户可以在任何Java应用程序中使用这些代理和服务实现管理。这是官方文档上的定义,我看过很多次也无法很好的理解。我个人的理解是JMX让程序有被管理的功能,例如你开发一个WEB网站,它是在24小时不间断运行,那么你肯定会对网站进行监控,如每天的UV、PV是多少;又或者在业务高峰的期间,你想对接口进行限流,就必须去修改接口并发的配置值。
应用场景:中间件软件WebLogic的管理页面就是基于JMX开发的,而JBoss则整个系统都基于JMX构架。
对于一些参数的修改,网上有一段描述还是比较形象的:
1、程序初哥一般是写死在程序中,到要改变的时候就去修改代码,然后重新编译发布。
2、程序熟手则配置在文件中(JAVA一般都是properties文件),到要改变的时候只要修改配置文件,但还是必须重启系统,以便读取配置文件里最新的值。
3、程序好手则会写一段代码,把配置值缓存起来,系统在获取的时候,先看看配置文件有没有改动,如有改动则重新从配置里读取,否则从缓存里读取。
4、程序高手则懂得物为我所用,用JMX把需要配置的属性集中在一个类中,然后写一个MBean,再进行相关配置。另外JMX还提供了一个工具页,以方便我们对参数值进行修改。
那么Connector至少先具备了生命周期,被JMX拓展的特点,然后看看它自身是有什么方法。
首先它是默认默认为使用HTTP / 1.1 NIO实现。同时它也支持HTTP/1.1,AJP/1.3。
看它的构造函数
public Connector(String protocol) {
        boolean aprConnector = AprLifecycleListener.isAprAvailable() &&
                AprLifecycleListener.getUseAprConnector();

        if ("HTTP/1.1".equals(protocol) || protocol == null) {
            if (aprConnector) {
                protocolHandlerClassName = "org.apache.coyote.http11.Http11AprProtocol";
            } else {
                protocolHandlerClassName = "org.apache.coyote.http11.Http11NioProtocol";
            }
        } else if ("AJP/1.3".equals(protocol)) {
            if (aprConnector) {
                protocolHandlerClassName = "org.apache.coyote.ajp.AjpAprProtocol";
            } else {
                protocolHandlerClassName = "org.apache.coyote.ajp.AjpNioProtocol";
            }
        } else {
            protocolHandlerClassName = protocol;
        }

        // Instantiate protocol handler
        ProtocolHandler p = null;
        try {
            Class<?> clazz = Class.forName(protocolHandlerClassName);
            p = (ProtocolHandler) clazz.getConstructor().newInstance();
        } catch (Exception e) {
            log.error(sm.getString(
                    "coyoteConnector.protocolHandlerInstantiationFailed"), e);
        } finally {
            this.protocolHandler = p;
        }

        // Default for Connector depends on this system property
        setThrowOnFailure(Boolean.getBoolean("org.apache.catalina.startup.EXIT_ON_INIT_FAILURE"));
    }
首先是确定协议,然后反射根据名字来创建出处理类。protocolHandler的作用是抽象协议实现,包括线程等,这边重要的是,这玩意里面有很多的细节配置,例如连接中Post,Get请求的最大数据量,异步时间等。
Connector组件其中包含Protocol组件、Mapper组件和CoyoteAdapter组件;这三个是最关键的,可以这样理解,Connector其实只是一个外壳,真正的内在驱动力还是要靠这三个组件。
例如Protocol组件,封装了Netty
public class Http11NioProtocol extends AbstractHttp11JsseProtocol<NioChannel> {

    private static final Log log = LogFactory.getLog(Http11NioProtocol.class);


    public Http11NioProtocol() {
        super(new NioEndpoint());
    }


    @Override
    protected Log getLog() { return log; }


    // -------------------- Pool setup --------------------

    /**
     * NO-OP.
     *
     * @param count Unused
     */
    public void setPollerThreadCount(int count) {
    }

    public int getPollerThreadCount() {
        return 1;
    }

    public void setSelectorTimeout(long timeout) {
        ((NioEndpoint)getEndpoint()).setSelectorTimeout(timeout);
    }

    public long getSelectorTimeout() {
        return ((NioEndpoint)getEndpoint()).getSelectorTimeout();
    }

    public void setPollerThreadPriority(int threadPriority) {
        ((NioEndpoint)getEndpoint()).setPollerThreadPriority(threadPriority);
    }

    public int getPollerThreadPriority() {
      return ((NioEndpoint)getEndpoint()).getPollerThreadPriority();
    }


    // ----------------------------------------------------- JMX related methods

    @Override
    protected String getNamePrefix() {
        if (isSSLEnabled()) {
            return "https-" + getSslImplementationShortName()+ "-nio";
        } else {
            return "http-nio";
        }
    }
}
CoyoteAdapter组件是一个适配器,它负责将Connector组件和Engine容器适配连接起来。把接收到的客户端请求报文解析生成的请求对象Request和响应对象Response传递到Engine容器,交由容器处理;
Mapper组件可以称为路由器,它提供了对客户端请求URL的映射功能,即可以通过它将请求转发到对应的Host组件、Context组件、Wrapper组件以进行处理并响应客户端,也就是我们说的将某客户端请求发送到某虚拟机上的某个Web应用的某个Servlet。