转载请注明出处:http://www.cnblogs.com/Starshot/p/7050084.html
Soap即简单对象访问协议,也可理解为一种用于程序之间通讯的规范,它主要基于XML和http,也正因为基于XML和http,所以这个协议具有很强的通用性,能够很好地实现不同语言平台之间的交流通讯。缺点是相对比较重量级。
Java的Soap框架有很多,例如xfire,CXF。说到soap不得不提一下rest,因为这些概念很容易弄混。
rest是一种结构风格,而实现了rest风格的程序设计就叫做restful。它提倡更加轻量级、无状态、自描述,更充分地利用http本身的特性,例如get,post,put,delete,以获得更加高效的性能,使交互更加简洁易懂。例如要获取图书集合中的某本书AAA,可以直接通过uri:/books/AAA来表示。
而soap则都是通过post来请求的,没有充分利用http的其它方法,仅将http作为传输协议来使用,而具体需要获取的资源信息则包含在post的xml报文中。
需要注意的是,rest是一种风格,它不限制于某个程序某个框架。例如CXF框架,它既可以实现rest风格的webService,也可以实现SOAP规范的webService。例如在我另一篇博文中的CXF简单例子(http://www.cnblogs.com/Starshot/p/6889751.html),就可以看做是rest风格的webService。
现在就先以JAX-WS这个轻量级的框架 (后面再和Spring合在一起) 来实现一个soap规范的超简单的webService。
首先建一个WebService的web工程,这个作为服务的提供方。然后建一个HelloService类,如下所示:
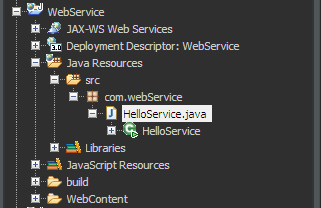
然后类的代码如下:
package com.webService;

import javax.jws.WebService;
import javax.xml.ws.Endpoint;

@WebService
public class HelloService {

    public String sayIt(String str){
        return "say it:"+str;
    }

    public static void main(String[] args) {
        Endpoint.publish("http://localhost:9009/hello/HelloService", new HelloService());
        System.out.println("publish done!");
    }
}
是不是很简单,是不是很惊喜,然后直接执行,出现publish done!然后打开浏览器,输入http://localhost:9009/hello/HelloService?wsdl,出现wsdl文件信息的话,就算是成功了。
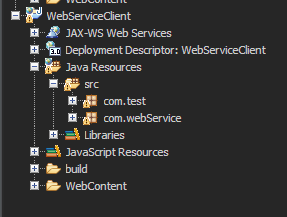
接下来再建一个客户端工程,如下所示:
这个时候需要生成wsdl的客户端,对这工程点击右键,然后新建WebService client:
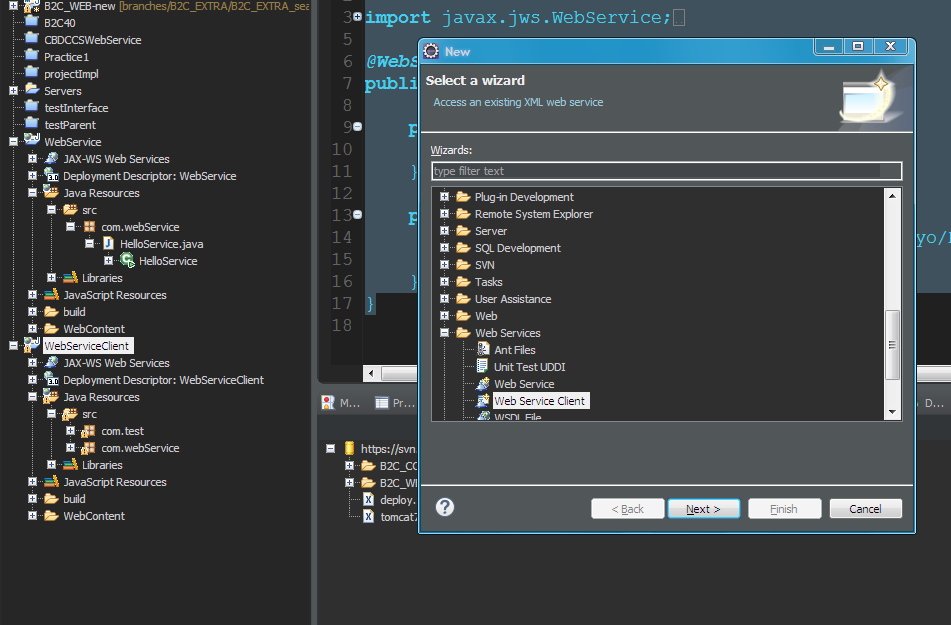
点下一步,输入刚刚在浏览器输入的地址:
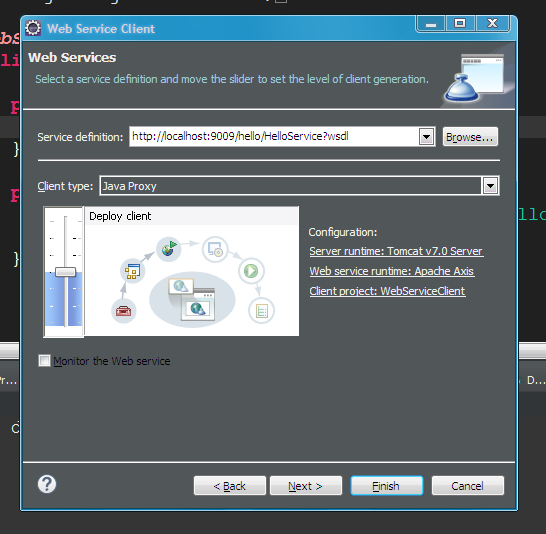
然后再点击下一步设置了代码的路径之后按确定就可以了,成功之后如下图所示:

其中com.webService里面的就是客户端程序了。然后再如上图新建一个测试类test1,内容如下:
package com.test;

import java.rmi.RemoteException;

import javax.xml.rpc.ServiceException;

import com.webService.HelloService;
import com.webService.HelloServiceProxy;
import com.webService.HelloServiceServiceLocator;

public class test1 {

    public static void main(String[] args) throws ServiceException, RemoteException {
        HelloService hs=new HelloServiceProxy();
         System.out.println(hs.sayIt("Yohoo!!"));
    }
}
执行,该程序,控制台输出:Yohoo!!,这就表示成功了。
通过查看客户端代码可以知道,HelloServiceProxy,HelloServiceServiceLocator,HelloServicePortBindingStub三个类其实都可以用来调用服务。而所有类最终都是通过HelloServicePortBindingStub类中的sayIt方法来实现的,HelloServiceProxy和HelloServiceServiceLocator其实是对HelloServicePortBindingStub进行了进一步的加工,这也是代理模式的一种体现。
再然后,上面这种方式发布服务虽然简单,但在实际应用中肯定不是这样子发布服务的,实际肯定是要发布在web中的。JAX-WS和Spring结合起来发布一个WebService服务:
首先在原来的WebServiec工程加入以下jar包:
commons-logging-1.0.4.jar
gmbal-api-only.jar
ha-api.jar
jaxb-impl.jar
jaxws-api.jar
jaxws-rt.jar
jaxws-spring-1.8.jar
management-api.jar
policy.jar
spring-beans-3.2.14.RELEASE.jar
spring-context-3.2.14.RELEASE.jar
spring-core-3.2.14.RELEASE.jar
spring-expression-3.2.14.RELEASE.jar
spring-web-3.2.14.RELEASE.jar
stax-ex.jar
streambuffer.jar
xbean-spring-3.0.jar
因为涉及jar包比较多,如果有需要的话,可以留下邮箱,我发过去。
然后建一个SpeakingService类,Component注解是表示这个类将被spring容器管理,如下所示,
package com.webService;

import javax.jws.WebService;

import org.springframework.stereotype.Component;


@Component
@WebService
public class SpeakingService  {

    public String speak(String content) {
        return "speaking:"+content;
    }

}
然后在WEB-INF下建web.xml文件,内容如下:
<!DOCTYPE web-app PUBLIC
 "-//Sun Microsystems, Inc.//DTD Web Application 2.3//EN"
 "http://java.sun.com/dtd/web-app_2_3.dtd" >

<web-app>

    <context-param>
        <param-name>contextConfigLocation</param-name>
        <param-value>classpath:applicationContext.xml</param-value>
    </context-param>
    <listener>
        <listener-class>org.springframework.web.context.ContextLoaderListener</listener-class>
    </listener>

   <servlet>
  <servlet-name>jwsService</servlet-name>
  <servlet-class>
   com.sun.xml.ws.transport.http.servlet.WSSpringServlet
  </servlet-class>
  <load-on-startup>1</load-on-startup>
</servlet>

<servlet-mapping>
  <servlet-name>jwsService</servlet-name>
  <url-pattern>/SpeakingService</url-pattern>
 </servlet-mapping>

</web-app>
然后在src路径下建立applicationContext.xml文件,内容如下:
<beans xmlns="http://www.springframework.org/schema/beans"
 xmlns:xsi="http://www.w3.org/2001/XMLSchema-instance" xmlns:ws="http://jax-ws.dev.java.net/spring/core"
 xmlns:wss="http://jax-ws.dev.java.net/spring/servlet" xmlns:context="http://www.springframework.org/schema/context"
 xsi:schemaLocation="
http://www.springframework.org/schema/beans
http://www.springframework.org/schema/beans/spring-beans-2.5.xsd

http://jax-ws.dev.java.net/spring/core
http://jax-ws.dev.java.net/spring/core.xsd
http://jax-ws.dev.java.net/spring/servlet
http://jax-ws.dev.java.net/spring/servlet.xsd
http://www.springframework.org/schema/context
http://www.springframework.org/schema/context/spring-context-3.0.xsd
">

  <context:component-scan base-package="*"/>

 <wss:binding url="/SpeakingService">
  <wss:service>
   <ws:service bean="#speakingService" />
  </wss:service>
 </wss:binding>

</beans>
这里有个细节要注意的是<ws:service bean="#speakingService" />这里的speakingService首字母记得要小写,虽然原来的类名是大写开头,但是默认加载进spring容器之后,bean的id就是一小写开头了。
最后就是用tomcat将这个工程启动就可以了,访问的ip和端口以及资源名称就以tomcat容器的设定为准了。生成客户端的方法和刚开始说的一样。
如果有问题,欢迎指出交流。
转载请注明出处:http://www.cnblogs.com/Starshot/p/7050084.html