1. 下载源码包解压编译
启动多个,请看:在linux系统下安装两个nginx以及启动
查看nginx包路径:http://nginx.org/download/,两种下载方式:
①在官网下载使用Xftp上传到linux上
②在版本上选好,直接命令下载,如下:(下载nginx-1.20.1.tar.gz版本)建议到home目录执行该命令,方便找到
wget http://nginx.org/download/nginx-1.20.1.tar.gz
1.1. 解压
[root@localhost nginx]# tar -zvxf nginx-1.20.1.tar.gz -C /usr/local/
1.2. 安装相应的开发工具
yum groupinstall "Development tools"
yum -y install gcc wget gcc-c++ automake autoconf libtool libxml2-devel libxslt-devel perl-devel perl-ExtUtils-Embed pcre-devel openssl-devel
1.3. 进入Nginx目录进行编译安装
1.3.1. 进入目录
cd /usr/local/nginx-1.20.1/
1.3.2. 执行以下命令,直接粘贴即可
./configure
--prefix=/usr/local/nginx
--sbin-path=/usr/sbin/nginx
--conf-path=/etc/nginx/nginx.conf
--error-log-path=/var/log/nginx/error.log
--http-log-path=/var/log/nginx/access.log
--pid-path=/var/run/nginx.pid
--lock-path=/var/run/nginx.lock
--http-client-body-temp-path=/var/tmp/nginx/client
--http-proxy-temp-path=/var/tmp/nginx/proxy
--http-fastcgi-temp-path=/var/tmp/nginx/fcgi
--http-uwsgi-temp-path=/var/tmp/nginx/uwsgi
--http-scgi-temp-path=/var/tmp/nginx/scgi
--user=nginx
--group=nginx
--with-pcre
--with-http_v2_module
--with-http_ssl_module
--with-http_realip_module
--with-http_addition_module
--with-http_sub_module
--with-http_dav_module
--with-http_flv_module
--with-http_mp4_module
--with-http_gunzip_module
--with-http_gzip_static_module
--with-http_random_index_module
--with-http_secure_link_module
--with-http_stub_status_module
--with-http_auth_request_module
--with-mail
--with-mail_ssl_module
--with-file-aio
--with-ipv6
--with-http_v2_module
--with-threads
--with-stream
--with-stream_ssl_module
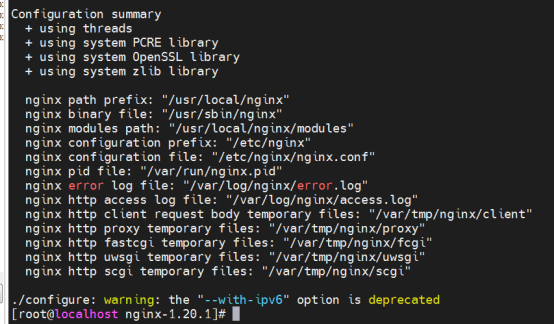
执行结果如下:

1.3.3. 完成编译安装
make && make install
mkdir -pv /var/tmp/nginx/client

2. 添加SysV启动脚本
2.1. 创建文件
vi /etc/init.d/nginx
2.2. 按i进入编辑状态
#!/bin/sh
#
# nginx - this script starts and stops the nginx daemon
#
# chkconfig: - 85 15
# description: Nginx is an HTTP(S) server, HTTP(S) reverse
# proxy and IMAP/POP3 proxy server
# processname: nginx
# config: /etc/nginx/nginx.conf
# config: /etc/sysconfig/nginx
# pidfile: /var/run/nginx.pid
# Source function library.
. /etc/rc.d/init.d/functions
# Source networking configuration.
. /etc/sysconfig/network
# Check that networking is up.
[ "$NETWORKING" = "no" ] && exit 0
nginx="/usr/sbin/nginx"
prog=$(basename $nginx)
NGINX_CONF_FILE="/etc/nginx/nginx.conf"
[ -f /etc/sysconfig/nginx ] && . /etc/sysconfig/nginx
lockfile=/var/lock/subsys/nginx
start() {
[ -x $nginx ] || exit 5
[ -f $NGINX_CONF_FILE ] || exit 6
echo -n $"Starting $prog: "
daemon $nginx -c $NGINX_CONF_FILE
retval=$?
echo
[ $retval -eq 0 ] && touch $lockfile
return $retval
}
stop() {
echo -n $"Stopping $prog: "
killproc $prog -QUIT
retval=$?
echo
[ $retval -eq 0 ] && rm -f $lockfile
return $retval
killall -9 nginx
}
restart() {
configtest || return $?
stop
sleep 1
start
}
reload() {
configtest || return $?
echo -n $"Reloading $prog: "
killproc $nginx -HUP
RETVAL=$?
echo
}
force_reload() {
restart
}
configtest() {
$nginx -t -c $NGINX_CONF_FILE
}
rh_status() {
status $prog
}
rh_status_q() {
rh_status >/dev/null 2>&1
}
case "$1" in
start)
rh_status_q && exit 0
$1
;;
stop)
rh_status_q || exit 0
$1
;;
restart|configtest)
$1
;;
reload)
rh_status_q || exit 7
$1
;;
force-reload)
force_reload
;;
status)
rh_status
;;
condrestart|try-restart)
rh_status_q || exit 0
;;
*)
echo $"Usage: $0 {start|stop|status|restart|condrestart|try-restart|reload|force-reload|configtest}"
exit 2
esac
2.3. 按Esc退出编辑状态,输入:wq!保存并退出
2.4. 赋予脚本执行权限
chmod +x /etc/init.d/nginx
2.5. 添加Nginx服务进程用户
groupadd -r nginx
useradd -r -g nginx nginx
2.6. 添加至服务管理列表,设置开机自启
chkconfig --add nginx
chkconfig nginx on

3. 启动Nginx
3.1. 方法一:启动服务
关闭防火墙:systemctl stop firewalld
service nginx start
3.2. 方法二:平滑重启
平滑重启命令:/usr/sbin/nginx -s reload
①修改配置后,需要检查配置是否正确
nginx -t -c /etc/nginx/nginx.conf
或者
/usr/sbin/nginx -t
②修改配置后重新加载生效
nginx -s reload
备注:第一次启动nginx,使用方法一启动服务
启动成功后,可访问,如下:
