Git简介

环境:
服务器 CentOS7 + git(version 1.8.3.1-6.el7_2.1.x86_64)
客户端 Windows7 + git(version 2.13.0-64-bit)
① 安装 Git
centos7 做为服务器端系统,Windows 作为客户端系统,分别安装 Git
服务器端:
先检查服务器有没有自带或者安装git;查询Git版本
[root@localhost ~]# git --version
git version 1.8.3.1

[root@localhost ~]# rpm -qa git
git-1.8.3.1-6.el7_2.1.x86_64
查询到没有的话就yum安装一下;
#yum install -y git
安装完后,查看 Git 版本
[root@localhost ~]# git --version

git version 1.8.3.1
客户端:
下载 Git for Windows,地址:https://git-for-windows.github.io/
安装完之后,可以使用 Git Bash 作为命令行客户端。
安装完之后,查看 Git 版本
Administrator@SG MINGW64 ~
$ git --version
git version 2.13.0.windows.1
② 服务器端创建 git 用户,用来管理 Git 服务,并为 git 用户设置密码
[root@localhost home]# id git
id: git:无此用户
[root@localhost home]# useradd git
[root@localhost home]# passwd git
③ 服务器端创建 Git 仓库
设置 /home/data/git/gittest.git 为 Git 仓库
然后把 Git 仓库的 owner 修改为 git
[root@localhost home]# mkdir -p data/git/gittest.git
[root@localhost home]# git init --bare data/git/gittest.git
初始化空的 Git 版本库于 /home/data/git/gittest.git/
[root@localhost home]# cd data/git/
[root@localhost git]# chown -R git:git gittest.git/
④ 客户端 clone 远程仓库
首先解释一下wamp这个目录,这个是一组常用来搭建动态网站或者服务器的开源软件,我安装的目录是D盘;
进入 Git Bash 命令行客户端,创建项目地址(设置在 d:/wamp/www/gittest_gitbash)并进入:
Administrator@SG-20170206ABCD MINGW64 ~
$ cd /d
Administrator@SG-20170206ABCD MINGW64 /d
$ cd wamp/www
Administrator@SG-20170206ABCD MINGW64 /d/wamp/www
$ mkdir gittest_gitbash
Administrator@SG-20170206ABCD MINGW64 /d/wamp/www
$ cd gittest_gitbash
Administrator@SG-20170206ABCD MINGW64 /d/wamp/www/gittest_gitbash
$ git clone git@192.168.20.101:/home/data/gittest.git
然后从Centos7 Git 服务器上 clone 项目:
$ git clone git@192.168.20.101:/home/data/gittest.git
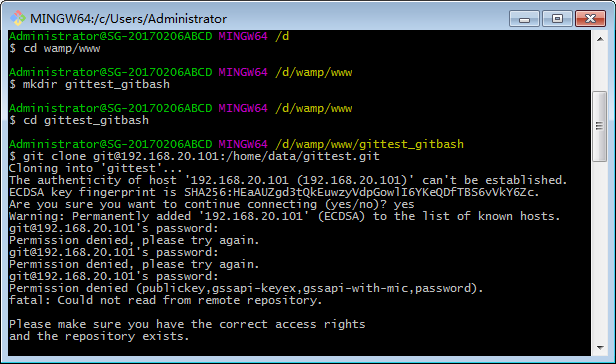
执行过程如下图所示:

当第一次连接到目标 Git 服务器时会得到一个提示:
输入 yes:
The authenticity of host '192.168.20.101 (192.168.20.101)' can't be established.
ECDSA key fingerprint is SHA256:HEaAUZgd3tQkEuwzyVdpGowlI6YKeQDfTBS6vVkY6Zc.
Are you sure you want to continue connecting (yes/no)?
输入git设置的密码:
Warning: Permanently added '192.168.20.101' (ECDSA) to the list of known hosts.
git@192.168.20.101's password:
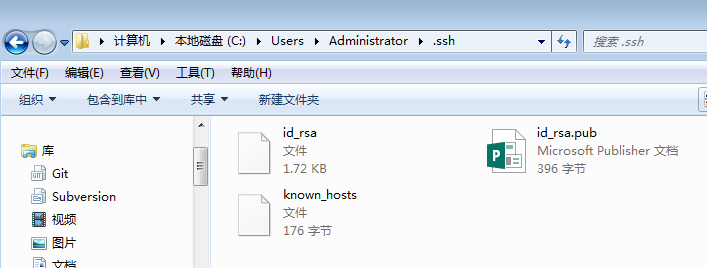
此时 C:Users用户名.ssh 下会多出一个文件 known_hosts,以后在这台电脑上再次连接目标 Git 服务器时不会再提示上面的语句。

后面提示要输入密码,可以采用 SSH 公钥来进行验证。
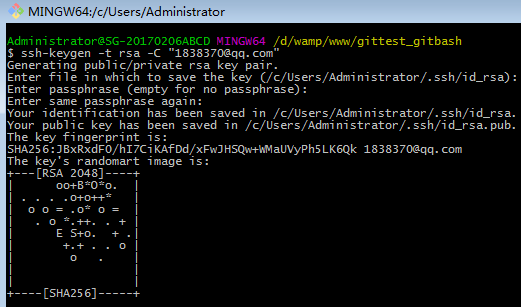
⑤ 客户端创建 SSH 公钥和私钥
$ ssh-keygen -t rsa -C "1838370@qq.com"

此时 C:Users用户名.ssh 下会多出两个文件 id_rsa 和 id_rsa.pub
id_rsa 是私钥
id_rsa.pub 是公钥

⑥ 服务器端 Git 打开 RSA 认证
进入 /etc/ssh 目录,编辑 sshd_config,打开以下三个配置的注释:
[root@localhost git]# cd /etc/ssh/
[root@localhost ssh]# vim sshd_config
RSAAuthentication yes
PubkeyAuthentication yes
AuthorizedKeysFile .ssh/authorized_keys
:wq 保存
保存并重启 sshd 服务:
[root@localhost ssh]# systemctl restart sshd.service
由 AuthorizedKeysFile 得知公钥的存放路径是 .ssh/authorized_keys,
实际上是 $Home/.ssh/authorized_keys,
由于管理 Git 服务的用户是 git,所以实际存放公钥的路径是 /home/git/.ssh/authorized_keys
在 /home/git/ 下创建目录 .ssh
[root@localhost git]# pwd
/home/git
[root@localhost git]# mkdir .ssh
[root@localhost git]# ls -a
. .. .bash_logout .bash_profile .bashrc .gnome2 .mozilla .ssh
然后把 .ssh 文件夹的 owner 修改为 git
[root@localhost git]# chown -R git:git .ssh
[root@localhost git]# ll -a
总用量 32
drwx------. 5 git  git  4096 8月  28 20:04 .
drwxr-xr-x. 8 root root 4096 8月  28 19:32 ..
-rw-r--r--. 1 git  git    18 10月 16 2014 .bash_logout
-rw-r--r--. 1 git  git   176 10月 16 2014 .bash_profile
-rw-r--r--. 1 git  git   124 10月 16 2014 .bashrc
drwxr-xr-x. 2 git  git  4096 11月 12 2010 .gnome2
drwxr-xr-x. 4 git  git  4096 5月   8 12:22 .mozilla
drwxr-xr-x. 2 git  git  4096 8月  28 20:08 .ssh
⑦ 将客户端公钥导入服务器端 /home/git/.ssh/authorized_keys 文件
回到 Git Bash 下,导入文件:
Administrator@SG-20170206ABCD MINGW64 /d/wamp/www/gittest_gitbash
$ ssh git@192.168.20.101 'cat >> .ssh/authorized_keys' < ~/.ssh/id_rsa.pub
需要输入服务器端 git 用户的密码

回到服务器端,查看 .ssh 下是否存在 authorized_keys 文件:
[root@localhost git]# cd .ssh
[root@localhost .ssh]# ll
总用量 4
-rw-rw-r--. 1 git git 398 8月  28 20:08 authorized_keys
可以查看一下是否是客户端生成的公钥。
重要:
修改 .ssh 目录的权限为 700
修改 .ssh/authorized_keys 文件的权限为 600
[root@localhost git]# chmod 700 .ssh
[root@localhost git]# cd .ssh
[root@localhost .ssh]# chmod 600 authorized_keys
⑧ 客户端再次 clone 远程仓库
$ git clone git@192.168.20.101:/home/data/git/gittest.git

查看客户端项目目录:
项目已经 clone 了。

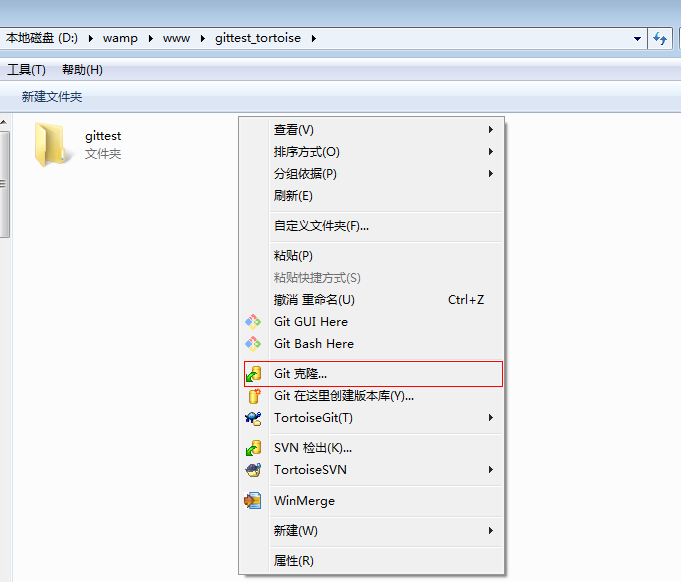
也可以使用 tortoiseGit 客户端来管理项目:


⑨ 禁止 git 用户 ssh 登录服务器
之前在服务器端创建的 git 用户不允许 ssh 登录服务器
编辑 /etc/passwd
[root@localhost .ssh]# vim /etc/passwd
找到:
git:x:502:504::/home/git:/bin/bash
修改为
git:x:502:504::/home/git:/bin/git-shell
此时 git 用户可以正常通过 ssh 使用 git,但无法通过 ssh 登录系统。
管理公钥
如果团队很小,把每个人的公钥收集起来放到服务器的/home/git/.ssh/authorized_keys文件里就是可行的。如果团队有几百号人,就没法这么玩了,这时,可以用Gitosis来管理公钥。
这里我们不介绍怎么玩Gitosis了,几百号人的团队基本都在500强了,相信找个高水平的Linux管理员问题不大。
管理权限
有很多不但视源代码如生命,而且视员工为窃贼的公司,会在版本控制系统里设置一套完善的权限控制,每个人是否有读写权限会精确到每个分支甚至每个目录下。因为Git是为Linux源代码托管而开发的,所以Git也继承了开源社区的精神,不支持权限控制。不过,因为Git支持钩子(hook),所以,可以在服务器端编写一系列脚本来控制提交等操作,达到权限控制的目的。Gitolite就是这个工具。
这里我们也不介绍Gitolite了,不要把有限的生命浪费到权限斗争中。
小结
介绍一个很不错的git教程 参考:杜雪峰-git