人一生必定会杀一个人 为了最后让自己死去 我们仅有一次可能性
爷爷的死没有人能承受 最后会去往无尽的虚空
杀人 只有一次 杀了别人 把它用尽后 却永远无法杀死自己 作为一个人 求死不得
——空之境界·两仪式
最近笔者获得了一台公网服务器的root权限,按耐不住要做一些好玩的事情了。
学习GNU/Linux这么长时间了,这是笔者第一次控制一台真正的公网服务器。
请访问http://eecs.cc:8080/测试本文最终结果,您可以使用ssh客户端尝试登陆并刷新页面进行验证。
我们开始吧!
第一步:
访问http://www.openssh.com/下载最新的源码包,我下的是 openssh-6.6p1.tar.gz 。
看下图:
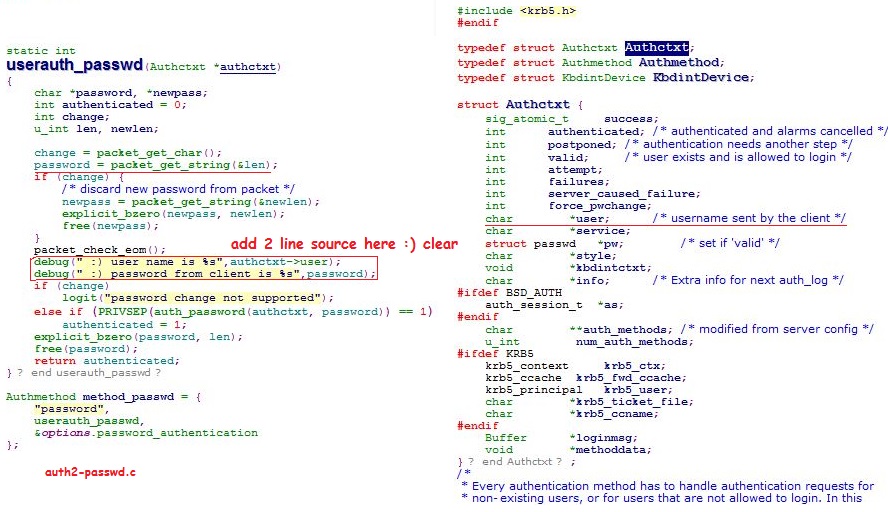
解压源码包,打开源码根下auth2-passwd.c文件,找到上图中 userauth_passwd 函数定义所在,添加上面红色框中的两行代码。
yum install -y zlib-devel openssl openssl-devel
./configure --with-pid-dir=/usr/local/etc && make && make install
现在配置我们的 ssh daemon 的运行参数:
vim /usr/local/etc/sshd_config
# 重要参数配置

Port 22
Protocol 2
HostKey /usr/local/etc/ssh_host_rsa_key
SyslogFacility AUTHPRIV

LogLevel DEBUG
DenyUsers *

MaxAuthTries 2
PasswordAuthentication yes
启动‘陷阱’sshd:
/usr/local/sbin/sshd
第二步:
建立web服务器:
 1 import web
 2 import MySQLdb
 3 import commands
 4
 5
 6 web.config.debug = False
 7 render=web.template.render('templates/')
 8 urls = (
 9     "/", "hello",
10     "/log","viewlog",
11     '/list','list',
12     '/secure','secure',
13     "(.*)","notfound"
14     )
15 app = web.application(urls, globals())
16
17 class hello:
18     def GET(self):
19     #name='Jack'
20     i=web.input(name=None)
21     bb='bobo'
22         return render.a(i.name,bb)
23
24 class viewlog:
25     def GET(self):
26         named='log'
27     bb='wa'
28         return render.a(named,bb)
29
30 class notfound:
31     def GET(self,path):
32         #name='notfound'
33     return render.notfound(path)
34
35 class list:
36     def GET(self):
37     conn=MySQLdb.connect(host='172.16.31.99',user='web',passwd='webyun',db='web')
38     cur=conn.cursor()
39     lis=cur.execute( ' show tables; ' )
40     lis=cur.fetchall()
41     cur.close()
42     conn.close()
43     #lis=[1,2,3,'123123',123,'abc' ]
44         return render.list(lis)
45
46 class secure:
47     def GET(self):
48         try:
49             return commands.getoutput(' grep -E -C 2 ":)" /var/log/secure ')
50         except:
51             return 'file access error :('
52
53 if __name__ == "__main__":
54     app.run()
启动web服务器:
nohup python web3c.py 8080 &>log &
最终效果展示:
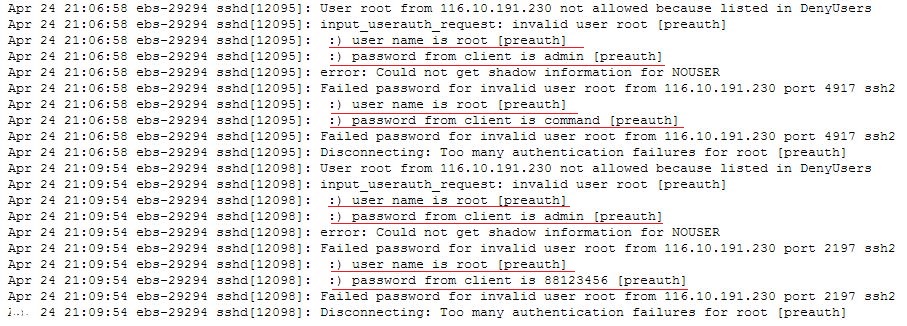
额。。。
文章短小,却也花费了一番精力,如有建议和看法,欢迎提出一起讨论!