1渐进增强原则
2私有前缀
不同浏览器在发布不同版本(一般测试版)时会加前缀,新增属性加上前缀进行支持测试:
Chrome浏览器:-webkit-border-radius: 5px;
火狐浏览器:-moz- border-radius: 5px;
IE浏览器:-ms-border-radius: 5px;
欧朋浏览器:-o-border-radius: 5px;
3选择器
① 属性选择器
[href] { color: red }: 选取具有href属性的元素
[href^=a]{color:red}: 选取以a开头的具有href属性的元素
[href$=3]{color:red}: 选取以3结尾的具有href属性的元素
[href*=m]{color:red}: 选取href中任意位置具有m的,具备这样href属性的元素
[href=”a.mp3”]{color:red}: 选取href=”a.mp3”的元素
<a href=”a.mp3”></a>
<a href=”b.mp3”></a>
② 伪类选择器
(1)后代伪类选择器
父标签无其他元素,页面中所有父标签下的li都会按选择条件被选中
li:first-child { color:red }: 选择第一个li
li:last-child { color:red }: 选择最后一个li
li:nth-child(n) { color:red }: 选择第n个li,n的取值为(1,2,3,4,……)
li:nth-child(3n) { color:red }: 选择第3n个li,n的取值为(1,2,3,4,……)
li:nth-child(2n+1) { color:red }: 选择所有奇数项li,n的取值为(0,1,2,3,4,……)
li:nth-child(odd) { color:red }: 选择所有奇数项li
li:nth-child(even) { color:red }: 选择所有偶数项li
li:nth-child(-n+3) { color:red }: 选择所有前三个li, n的取值为(0,1,2,3,4,……)
li:nth-last-child(n) { color:red }: 选择倒数第n个li,n的取值为(1,2,3,4,……)
li:nth-last-child(-n+5) { color:red }: 选择倒数5个li, n的取值为(0,1,2,3,4,……)
<ul>
<li>1</li>
<li>2</li>
<li>3</li>
</ul>
如果父标签下有其他元素n从第一个元素开始计算
li: nth-child(2) { color:red }: 这个设置无效,因为第二个child不是li
li: nth-child(4) { line-height: 150%;"><ul>
<p>这是类容</p>
<p>这是类容</p>
<p>这是类容</p>
<li></li> 这个li会被选中
<li></li>
<li></li>
</ul>
可使用nth-of-type ( )按顺序选择到该类型元素 first-of-type ; last-of-type
li:nth-of-type(2) { 上述代码中的第二个li会被选中
background-color: red;
}
(2) empty伪类选择器 选择内容为空的元素
span: empty { display:none; }只有第一个<span>会被选中
<span></span>
<span>这是内容</span>
(3)target伪类选择器
h2:target { color:red; } 选择处于锚点状态的元素
<ul>
<li> <a href=”#title2”> 这是标题2 </a> </li> (这就是一个锚点,用id关联)</ul>
<div>
<h2 id = “title2”>这是一个title2</h2>
</div>
(4)not伪类选择器 选择条件取反选择该类元素
li:not(.class) { color: red; } 选择类名不是class的所有li
<ul>
<li>1</li>
<li class = “class”>2</li> 这个li不会被选中
<li>3</li>
</ul>
(5)伪元素选择器
a ) 伪元素 before、after在元素的最前面和最后面添加一个元素,可以像正常元素一样定义样式 (伪元素CSS3书写格式双冒号“::” CSS2中格式是单冒号“:”)由于浏览器具备兼容性优化,CSS3中单冒号“:”写法也是可以被浏览器识别的,推荐使用单冒号“:”写法
li::before {
content:””; (content属性必须存在,可以不写内容)
display: block; (创建出来是一个行内元素,可以转换为块级元素)
background-color:red;
}
li::after {
content:””; (content属性必须存在,可以不写内容)
display: block; (创建出来是一个行内元素,可以转换为块级元素)
background-color:blue;
}

如果不以block形式展现,都会被原element元素遮挡住
b ) 伪元素选择器
一. li::first-letter { (选择第一个子母设置样式)
font-size: 22px;
color: red;
}
<ul>
<li>abcdefgh</li>
<li>这是一段中文</li>
</ul>
二. li::first-line { (选择第一行设置样式)
line-height: 150%;">}
三. p::selection { (选中的区域设置样式,不能设置字体大小)
line-height: 150%;">color:red;
}
4 CSS3基本属性
① 文本阴影text-shadow: npx npx npx color, npx npx npx color;(可以重叠设置)
第一个参数:水平偏移量 正值向右,负值向左
第二个参数:垂直偏移量 正值向下,负值向上
第三个参数:模糊度 不能为负值,如果为0可以不设置
第四个参数:颜色(color)
#li {
text-shadow: 2px 2px 2px blue;
}
② 边框属性
(1) 正圆border-radius:边框圆角 可以使用百分比表示大小
border-radius: 5px 5px 5px 5px; (左上,右上,右下,左下)
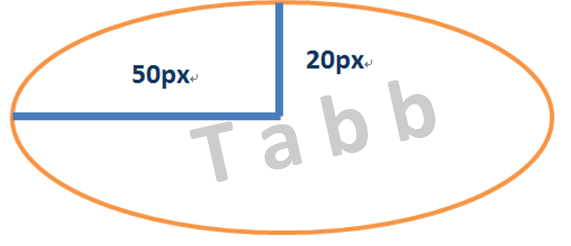
(2) 椭圆border-radius:边框圆角 可以使用百分比表示大小
border-radius: 50px 5px 5px 5px/20px 0px 0px 0px;
(3)盒子阴影box-shadow: npx npx npx npx color, npx npx npx npx color inset(内阴影);(可以重叠设置)使用方法和text-shadow基本相同,多inset内阴影属性
第一个参数:水平偏移量 正值向右,负值向左
第二个参数:垂直偏移量 正值向下,负值向上
第三个参数:模糊度 不能为负值,如果为0可以不设置
第四个参数:延伸度 与border类似,设置后阴影可以看到宽度效果,可不设
第五个参数:颜色(color)
第六个参数:内阴影
(4) 边框背景图片:border-image
border-image: url(./images/border.png) 27 stretch repeat;
border-image-suorce: url(./images/border.png) 表示边框引用路径
border-image-slice: 27 27 27 27 表示边框裁切尺寸(单位像素px,设置时不写px),四条直线将背景图片按设置尺寸裁剪为九宫格
border-image-repeat: stretch(表示拉伸) repeat(表示重复平铺) round(调整剪切后背景图片大小自动适应元素宽度平铺)
border-image- 边框宽度
③ 盒子大小计算属性box-sizing:
box-sizing: content-box; 按照content,padding,border总和计算盒子大小(默认方式)
box-sizing: border-box; 按照设置的宽高计算,即宽高不变,改变padding或border值,盒子大小不发生变化
④ 颜色设置
background: hsla( 120, 50%, 40%, 0.6 ) hsla与rgba使用类似
H色调:取值范围0~360,0或360表示红色,120表示绿色,240表示蓝色
S饱和度:取值范围0%~100%
L亮度:取值范围0%~100%
A透明度:取值范围0~1
⑤ 渐变设置
(1) 线性渐变linear-gradient() 颜色透明度等可使用rgba设置
background: linear-gradient(to right, yellow, green);
background: linear-gradient(45deg, yellow 25%, transparent 50% , rgba(112,1113,87,0.3));设置度数方向,25%为设置的黄色的长度,
background-image: linear-gradient(); 背景图片也可以设置线性渐变
background-size: 200px 100px; 可以设置背景图片大小
(2) 径向渐变radial-gradient()
background-image: radial-gradient(120px 80px at 25% 40% yellow,green); 120px 80px表示半径,两个值为椭圆,25%、40%为水平和竖直的位置值
⑥ 过渡设置transition 可以过渡大部分属性例如:宽、高、颜色等
transition:all 3s; 全部过渡 过渡速度模式默认为:ease
transition: margin 3s,opacity 5s; 设置属性分别过渡
transition-property: background-color; 设置过渡属性
transition-duration: 2s; 设置过渡时间
transition-delay: 2s; 设置过渡延迟时间
transition-timing-function: ease、linear或ease-in等; 设置过渡的速度模式
过渡四个属性完全设置方式:
transition: all 3s 4s linear; 第一个时间为执行时间,第二个时间为延迟时间,其他参数之间没有顺序要求
⑦ 转换 transform:用来设置2D或3D转换的属性
(1) 2D转换
缩放:transform: scale(0.6) 放大或缩小倍数
位置:transform: translate(100px,50px) 100px为水平,50px为竖直
旋转:transform: rotate(180deg) 180deg为旋转度数
倾斜:transform: skew(0deg,40deg) 0deg为盒子竖直边与x轴夹角度数,40deg为盒子水平边与y轴夹角度数
转换初始位置:transform-origin: 0% 80% 0%为水平,80%为竖直
同时设置多个属性值transform: translate(100px,50px)(空格)rotate(180deg);
(2) 3D转换

X旋转:transform: rotateX(180deg) 180deg为旋转度数
Y旋转:transform: rotateY(180deg) 180deg为旋转度数
Z旋转:transform: rotateZ(180deg) 180deg为旋转度数
可根据transform-origin设置旋转的初始点
X移动:transform: translateX(100px) 100px为沿X轴移动距离
Y移动:transform: translateY(100px) 100px为沿Y轴移动距离
Z移动:transform: translateZ(100px) 100px为沿Z轴移动距离 必须给要设置Z轴数值的元素的父元素设置透视属性perspective:500px; 500px为设置的透视距离可改,该设置才能生效,实现3D效果
设置元素背面隐藏:backface-visibility: hidden 可配合3D旋转使用
立方体盒子demo:
必须给父盒子添加transform-style: preserve-3d这个属性,同时将perspective属性值添加给父盒子的上一级元素代码如下:
        body{
            background-color: orange;
            perspective: 1000px;
        }
        .box {
             300px;
            height: 300px;
            position: relative;
            margin: 200px 0 0 700px;
            transition: all 5s;
            transform-style: preserve-3d;
        }
        .item {
             100%;
            height: 100%;
            position: absolute;
            font-size: 100px;
            font-weight: 700;
            line-height: 300px;
            text-align: center;
        }
        .item:nth-child(1) {
            background-color: slateblue;
        }
        .item:nth-child(2) {
            background-color: red;
            transform: rotateY(-90deg) translateZ(150px) translateX(-150px);
        }
        .item:nth-child(3) {
            background-color: yellow;
            transform: rotateY(90deg) translateZ(150px) translateX(150px);
        }
        .item:nth-child(4) {
            background-color: green;
            transform: rotateX(90deg) translateZ(150px) translateY(-150px);
        }
        .item:nth-child(5) {
            background-color: palevioletred;
            transform: rotateX(-90deg) translateZ(150px) translateY(150px);
        }
        .item:nth-child(6) {
            background-color: dimgray;
            transform: translateZ(-300px);
        }
        .box:hover {
            transform: rotateY(200deg) rotateZ(200deg) rotateX(200deg);
        }
<div class="box">
    <div class="item">①</div>
    <div class="item">②</div>
    <div class="item">③</div>
    <div class="item">④</div>
    <div class="item">⑤</div>
    <div class="item">⑥</div>
</div>
⑧ 背景background
background-image: url(“images/picture.jpg”); 设置背景图片
background-repeat: no-repeat; 设置背景格式为不重复
background-size: 200px 100px; 设置背景图片宽高
background-size: contain; 设置背景图片等比例拉伸直到顶到一边为止
background-size: cover; 设置背景图片等比例拉伸铺满全部空间
background-origin: border-box 设置背景图从边框开始, padding-box 从padding开始 , content-box从content开始
background-clip: padding-box 设置背景图将padding之外的剪切掉也可以设置border-box和content-box
设置多张图片为背景图片
background-image: url(“images/picture01.jpg”), url(“images/picture02.jpg”);
background-size: 200px 100px,150px 300px;
background-position: top left,100px 150px;
background: url(“images/picture.jpg”) no-repeat 115px 70px/100px 50px 设置复合属性需要用”/”进行分割
⑨ 动画animate
准备动画的关键字定义@keyframes
@keyframes name { } name为自定义的名称,可以随意更改
如:@keyframes toRightX {
form { } (设置动画的开始位置,如果不设置默认为初始状态)
to{ (设置动画结束的状态)
transform: translateX( 1000px );
}
}
创建一个类名定义动画效果例如.animation
.animation {
animation-name: toRightX; (添加之前创建的动画名)
animation-duration: 3s; (动画持续时间)
animation-iteration-count: 3或者infinite (动画播放次数,infinite无穷)
animation-timing-function: linear (动画的速度模式,默认为ease)
animation-delay: 2s (动画延迟播放时间)
animation-fill-mode: both (动画的填充方式)
animation: linear infinite 2s 4s toRightX (动画复合写法,时间顺序固定第一个为持续时间,第二个为延迟时间,其他属性顺序可更改)
}
分步骤设置动画:
@keyframes stepAnimation {
0% { } (起始状态)
50% { transform:translateX(1000px) }
100% { transform: translateX(0) }
}
animation: linear infinite 2s 4s stepAnimation;
animation-play-state: paused (停止播放动画)
⑩ 弹性布局 flex
使用弹性布局需要在父元素中开启flex;即设置display: flex;
弹性布局开启后元素默认分为两个轴排布:主轴X轴,副轴Y轴
设置元素在主轴X轴位置: 针对父元素进行设置
Justify-content: flex-end(到主轴末尾)
flex-start(到主轴开始处,是默认值)
center (居中)
space-between (左右靠边缘,中间有间隙,相等排布)
space-around (左右有间隙,所有间隙相等排布)
设置元素在副轴Y轴位置: 针对父元素进行设置
align-items: flex-end(到副轴末尾)
flex-start(到副轴开始处,是默认值)
center (居中)
space-between (左右靠边缘,中间有间隙,相等排布)
space-around (左右有间隙,所有间隙相等排布)
设置子元素位置:
设置子元素在副轴Y轴上的位置
align-self: center align-self: flex-start (单独设置元素)
调整主轴方向为垂直:(主轴变为Y方向,同时副轴也随之改变,为X方向)
flex-direction: column
Justify-content 依旧对应的主轴,方向变为Y
align-items 依旧对应的副轴,方向变为X
开启弹性布局换行: flex-wrap: wrap
开启换行后align-items属性失效,使用align-content设置副轴方向位置
align-content (只有在多行时才生效,单行时无效)
弹性布局百分比设置:
<div class="container">
<div class="header"></div>
<div class="main"></div>
<div class="footer"></div>
</div>
.container{
display: flex
height: 100%;
}
.header {
flex: 1 (占父元素百分比为10%)
}
.main {
flex: 8 (占父元素百分比为80%)
}
.footer{
flex: 1 (占父元素百分比为10%)
}
补充: 添加web字体 web图标
(1) web字体 给html页面加载字体 有选择的加载减少浏量
a) 登录www.iconfont.cn 下载需要的字体模板
b) 设置@font-face可按照下载模板中的使用说明操作
c) 定义.web-font样式可按说明操作
d) 只能使用制作出的文字的字体,其他字无法使用
注意加载文字的路径,按照需求修改
(2) web 图标 使用创建的字体图标
类比web字体加载操作,登录www.iconfont.cn 下载模板按说明操作即可