代码如下:
#import <UIKit/UIKit.h>
@interface BSJTabBarViewController : UITabBarController
@end
#import "BSJTabBarViewController.h"
#import "BSJTabBar.h"
@interface BSJTabBarViewController ()
@end
@implementation BSJTabBarViewController
#pragma mark --- life cycle
- (void)viewDidLoad {
[super viewDidLoad];
// Do any additional setup after loading the view.
// self.tabBarItem = [UITabBarItem application]
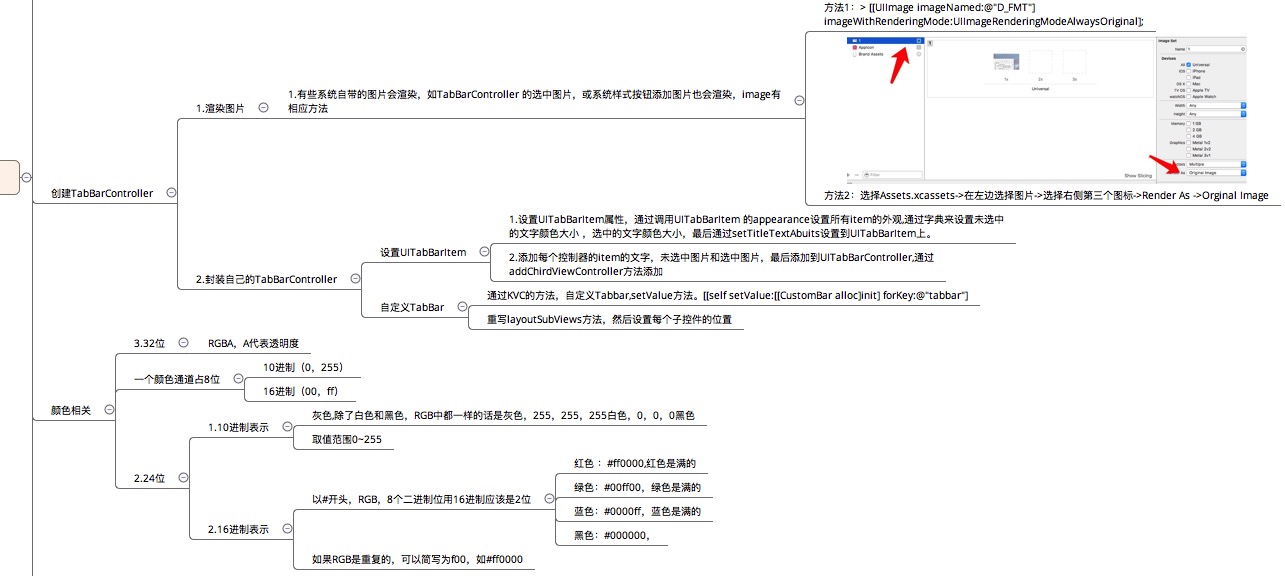
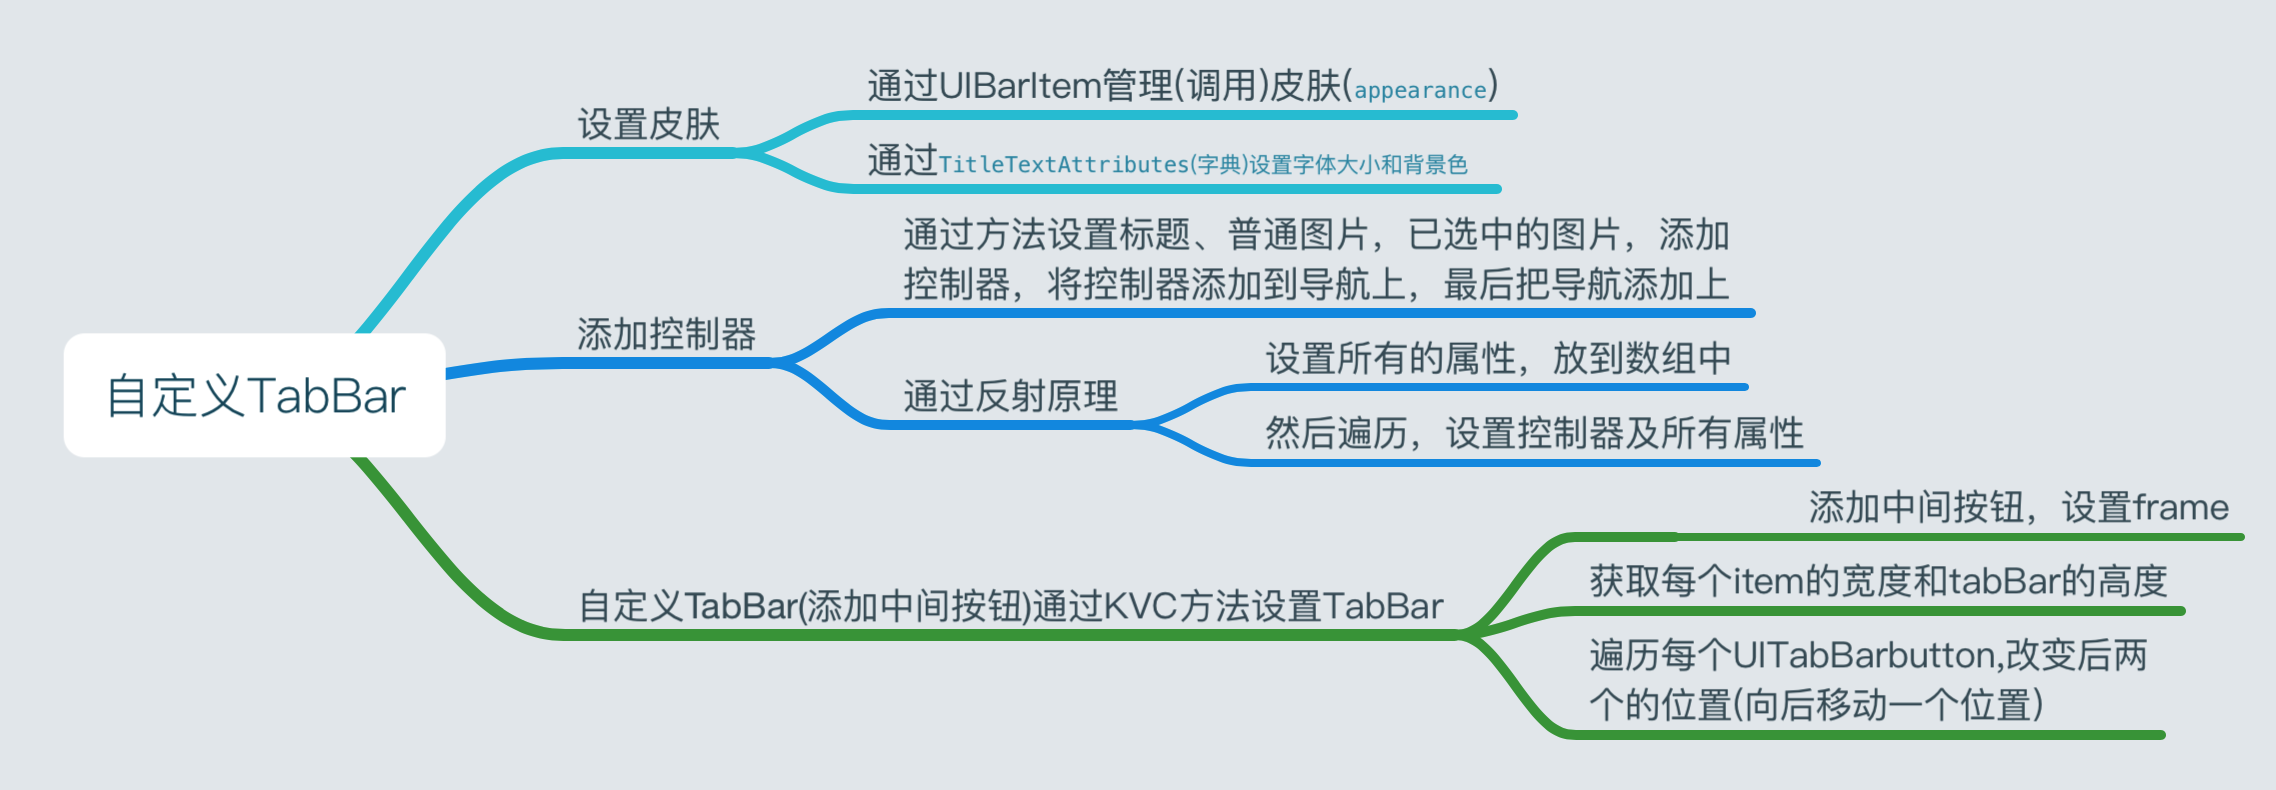
UITabBarItem *tabBarItem = [UITabBarItem appearance];
//未选中的
NSMutableDictionary *norAttri = [NSMutableDictionary dictionary];
norAttri[NSFontAttributeName] = [UIFont systemFontOfSize:14];
norAttri[NSForegroundColorAttributeName] = [UIColor grayColor];
[tabBarItem setTitleTextAttributes:norAttri forState:UIControlStateNormal];
//选中的
NSMutableDictionary *selectAttri = [NSMutableDictionary dictionary];
selectAttri[NSForegroundColorAttributeName] = [UIColor darkGrayColor];
[tabBarItem setTitleTextAttributes:selectAttri forState:UIControlStateSelected];
//精华
[self setupChridViewController:[[UITableViewController alloc] init] title:NSLocalizedString(@"精华", nil) normalImage:@"tabBar_essence_icon" selectedImage:@"tabBar_essence_click_icon"];
[self setupChridViewController:[[UIViewController alloc] init] title:NSLocalizedString(@"关注", nil) normalImage:@"tabBar_friendTrends_icon" selectedImage:@"tabBar_friendTrends_click_icon"];
[self setupChridViewController:[[UITableViewController alloc] init] title:NSLocalizedString(@"新帖", nil) normalImage:@"tabBar_new_icon" selectedImage:@"tabBar_new_click_icon"];
[self setupChridViewController:[[UITableViewController alloc] init] title:NSLocalizedString(@"我", nil) normalImage:@"tabBar_me_icon" selectedImage:@"tabBar_me_click_icon"];
// 通过KVC,可以改变属性为readOnly,改变它的Key,也就是通过它的value找到它的key
[self setValue:[[BSJTabBar alloc] init] forKey:@"tabBar"];
}
- (void)setupChridViewController:(UIViewController *)vc title:(NSString *)title normalImage:(NSString *)normalImage selectedImage:(NSString *)selectedImage{ vc.title = title;
if (normalImage.length && selectedImage.length )
{ vc.tabBarItem.image = [UIImage imageNamed:normalImage];
vc.tabBarItem.selectedImage = [UIImage imageNamed:selectedImage]; }
[self addChildViewController:vc]; }
//tabBar
#import <UIKit/UIKit.h>
@interface BSJTabBar : UITabBar
@end
#import "BSJTabBar.h"
@interface BSJTabBar() @property (nonatomic, weak)UIButton *publicButton;
@end
@implementation BSJTabBar
- (void)layoutSubviews{ [super layoutSubviews];
// BSJLogFunc CGFloat buttonW = self.frame.size.width/5;
CGFloat buttonH = self.frame.size.height;
CGFloat buttonY = 0;
CGFloat i = 0;
for (UIView *subView in self.subviews)
{ BSJLog(@"%@",NSStringFromClass(subView.class));
// if (![subView.class isSubclassOfClass:[NSClassFromString(@"UITabBarButton") class]]) continue;
if (![@"UITabBarButton" isEqualToString:NSStringFromClass(subView.class)]) continue; CGFloat buttonX = i*buttonW; if (i >= 2) { buttonX += buttonW; } subView.frame = CGRectMake(buttonX, buttonY, buttonW, buttonH); i++; }
// [
self.publicButton setFrame:CGRectMake(0, 0, self.frame.size.width/5, self.frame.size.height)];
//
self.publicButton.center = CGPointMake(self.center.x, self.center.y);
}
#pragma mark --- response methods
- (void)buttonClick:(UIButton *)sender{
}
#pragma mark --- setters and getters
- (UIButton *)publicButton{
if (!_publicButton)
{ UIButton *button = [UIButton buttonWithType:UIButtonTypeCustom];
[button setImage:[UIImage imageNamed:@"tabBar_publish_icon"] forState:UIControlStateNormal];
[button setImage:[UIImage imageNamed:@"tabBar_publish_click_icon"] forState:UIControlStateHighlighted];
[button addTarget:self action:@selector(buttonClick:) forControlEvents:UIControlEventTouchUpInside];
[self addSubview:button]; _publicButton = button; } return _publicButton;
}
@end