开发工具:STS
代码下载链接:https://github.com/theIndoorTrain/SpringBoot_Mybatis/tree/7892801d804d2060774f3720f82e776ff318e3ba
前言:
在调用mybatis的查询条件时,之前,遇到需要验证多个参数的查询时,往往需要把所有参数都绑定到一个实体中去,然后调用获取。
现在,我们来详细描述mybatis传递参数的细节。
一、单个参数:
1.定义mapper接口:


 1 package com.xm.mapper;
 2
 3 import java.util.List;
 4
 5 import com.xm.pojo.Student;
 6
 7 public interface StudentMapper {
 8
 9
10     /**
11      * 根据name查询
12      * @param name
13      * @return
14      */
15     public Student getByName(String name);
16
17 }
2.实现mapper映射:
 1 <?xml version="1.0" encoding="UTF-8" ?>
 2 <!DOCTYPE mapper PUBLIC "-//mybatis.org//DTD Mapper 3.0//EN" "http://mybatis.org/dtd/mybatis-3-mapper.dtd" >
 3 <mapper namespace="com.xm.mapper.StudentMapper">
 4
 5
 6
 7     <!-- 根据name查询 -->
 8     <select id="getByName" resultType="student">
 9     select * from student where name=#{name}
10     </select>
11 </mapper>
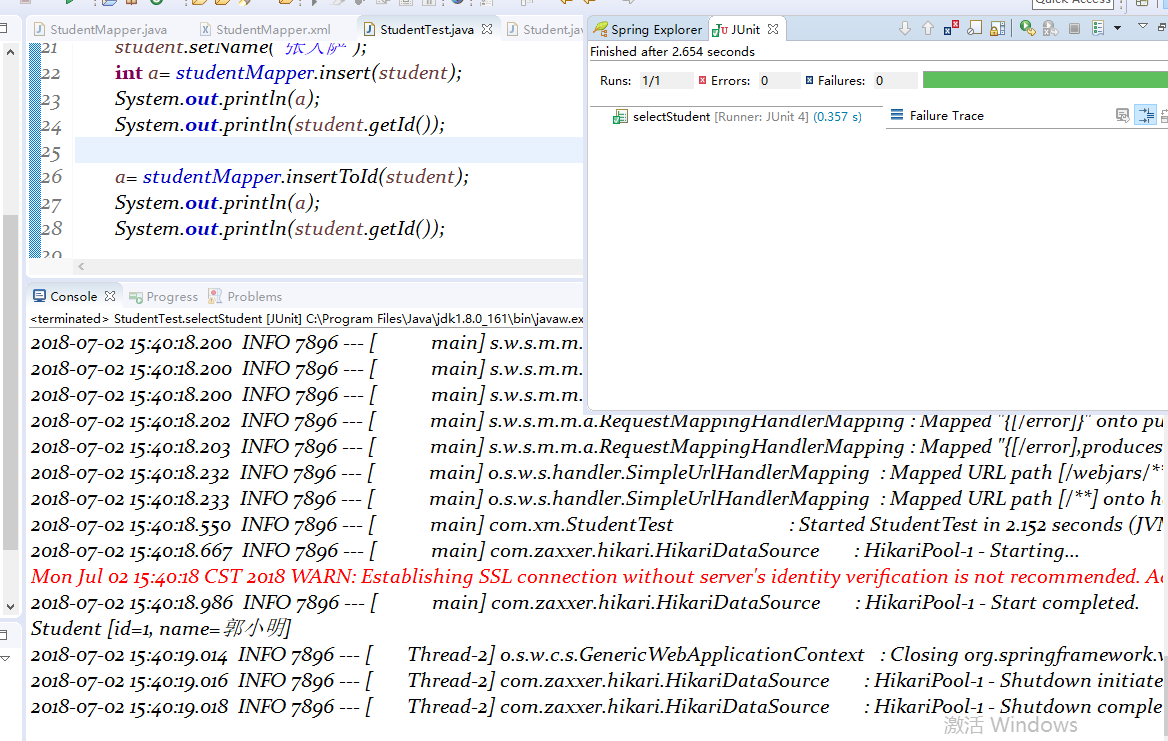
3.定义测试用例:
 1 package com.xm;
 2
 3 import org.junit.Test;
 4 import org.junit.runner.RunWith;
 5 import org.springframework.beans.factory.annotation.Autowired;
 6 import org.springframework.boot.test.context.SpringBootTest;
 7 import org.springframework.test.context.junit4.SpringRunner;
 8
 9 import com.xm.mapper.StudentMapper;
10 import com.xm.pojo.Student;
11
12 @RunWith(SpringRunner.class)
13 @SpringBootTest
14 public class StudentTest {
15     @Autowired
16     private StudentMapper studentMapper;
17
18     @Test
19     public void selectStudent() {
20
21         Student student = studentMapper.getByName("郭小明");
22         System.out.println(student);
23
24     }
25
26
27 }
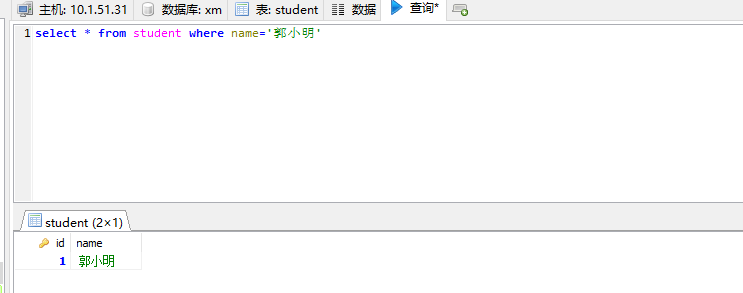
4.测试结果:
(1)数据库查询结果:
(2)测试结果输出:

注意在mapper映射中,单个参数类型,也可以不写 parameterType="",参数名可以随意写,比如#{names}
实现mapper映射:
 1 <?xml version="1.0" encoding="UTF-8" ?>
 2 <!DOCTYPE mapper PUBLIC "-//mybatis.org//DTD Mapper 3.0//EN" "http://mybatis.org/dtd/mybatis-3-mapper.dtd" >
 3 <mapper namespace="com.xm.mapper.StudentMapper">
 4
 5
 6
 7     <!-- 根据name查询 -->
 8     <select id="getByName" resultType="student">
 9     <!-- select * from student where name=#{name} -->
10     select * from student where name=#{names}
11     </select>
12 </mapper>
二、多个参数
1.根据参数名查询
(1)定义mapper接口:
 1 package com.xm.mapper;
 2
 3 import java.util.List;
 4
 5 import com.xm.pojo.Student;
 6
 7 public interface StudentMapper {
 8
 9
10     /**
11      * 根据用户名和id同时查询
12      * @param id
13      * @param name
14      * @return
15      */
16     public Student getStudentByIdAndName(Integer id,String name);
17
18 }
(2)实现mapper映射:
 1 <?xml version="1.0" encoding="UTF-8" ?>
 2 <!DOCTYPE mapper PUBLIC "-//mybatis.org//DTD Mapper 3.0//EN" "http://mybatis.org/dtd/mybatis-3-mapper.dtd" >
 3 <mapper namespace="com.xm.mapper.StudentMapper">
 4
 5
 6     <!-- 根据用户名和id同时查询 -->
 7     <select id="getStudentByIdAndName" resultType="student">
 8     select * from student where name=#{name} and id=#{id}
 9     </select>
10 </mapper>
(3)定义测试用例:
 1 package com.xm;
 2
 3 import org.junit.Test;
 4 import org.junit.runner.RunWith;
 5 import org.springframework.beans.factory.annotation.Autowired;
 6 import org.springframework.boot.test.context.SpringBootTest;
 7 import org.springframework.test.context.junit4.SpringRunner;
 8
 9 import com.xm.mapper.StudentMapper;
10 import com.xm.pojo.Student;
11
12 @RunWith(SpringRunner.class)
13 @SpringBootTest
14 public class StudentTest {
15     @Autowired
16     private StudentMapper studentMapper;
17
18
19     @Test
20     public void selectStudent() {
21
22         /*Student student = studentMapper.getByName("郭小明");*/
23         Student student = studentMapper.getStudentByIdAndName(1, "郭小明");
24         System.out.println(student);
25
26     }
27
28
29 }
(4)测试结果:

说明:这种简单的根据参数名传参是失败的
2.根据参数key值获取,获取规则为param1,param2,param3.........:
(1)实现mapper映射:
 1 <?xml version="1.0" encoding="UTF-8" ?>
 2 <!DOCTYPE mapper PUBLIC "-//mybatis.org//DTD Mapper 3.0//EN" "http://mybatis.org/dtd/mybatis-3-mapper.dtd" >
 3 <mapper namespace="com.xm.mapper.StudentMapper">
 4
 5
 6     <!-- 根据用户名和id同时查询 -->
 7     <select id="getStudentByIdAndName" resultType="student">
 8     <!-- select * from student where name=#{name} and id=#{id}  -->
 9     select * from student where name=#{param2} and id=#{param1}
10     </select>
11 </mapper>
(2)测试结果:
说明:针对这种情况,如果参数较多的情况下,获取准确的参数名更好一些
3.绑定参数名
(1)定义mapper接口:
 1 package com.xm.mapper;
 2
 3 import java.util.List;
 4
 5 import org.apache.ibatis.annotations.Param;
 6
 7 import com.xm.pojo.Student;
 8
 9 public interface StudentMapper {
10
11
12
13     /**
14      * 根据用户名和id同时查询
15      * @param id
16      * @param name
17      * @return
18      */
19     public Student getStudentByIdAndName(@Param("id")Integer id,@Param("name")String name);
20
21 }
(2)实现mapper映射:
 1 <?xml version="1.0" encoding="UTF-8" ?>
 2 <!DOCTYPE mapper PUBLIC "-//mybatis.org//DTD Mapper 3.0//EN" "http://mybatis.org/dtd/mybatis-3-mapper.dtd" >
 3 <mapper namespace="com.xm.mapper.StudentMapper">
 4
 5
 6     <!-- 根据用户名和id同时查询 -->
 7     <select id="getStudentByIdAndName" resultType="student">
 8     select * from student where name=#{name} and id=#{id}
 9     <!-- select * from student where name=#{param2} and id=#{param1}  -->
10     </select>
11 </mapper>
(3)测试结果:

说明:针对参数较多,且参数都属于同一个pojo类的时候,可以把参数先封装入实体,再获取
4.封装实体参数:
(1)定义mapper接口:
 1 package com.xm.mapper;
 2
 3 import java.util.List;
 4
 5 import org.apache.ibatis.annotations.Param;
 6
 7 import com.xm.pojo.Student;
 8
 9 public interface StudentMapper {
10
11
12
13     /**
14      * 根据用户名和id同时查询
15      * @param id
16      * @param name
17      * @return
18      */
19     public Student getStudentByIdAndName(Student student);
20
21 }
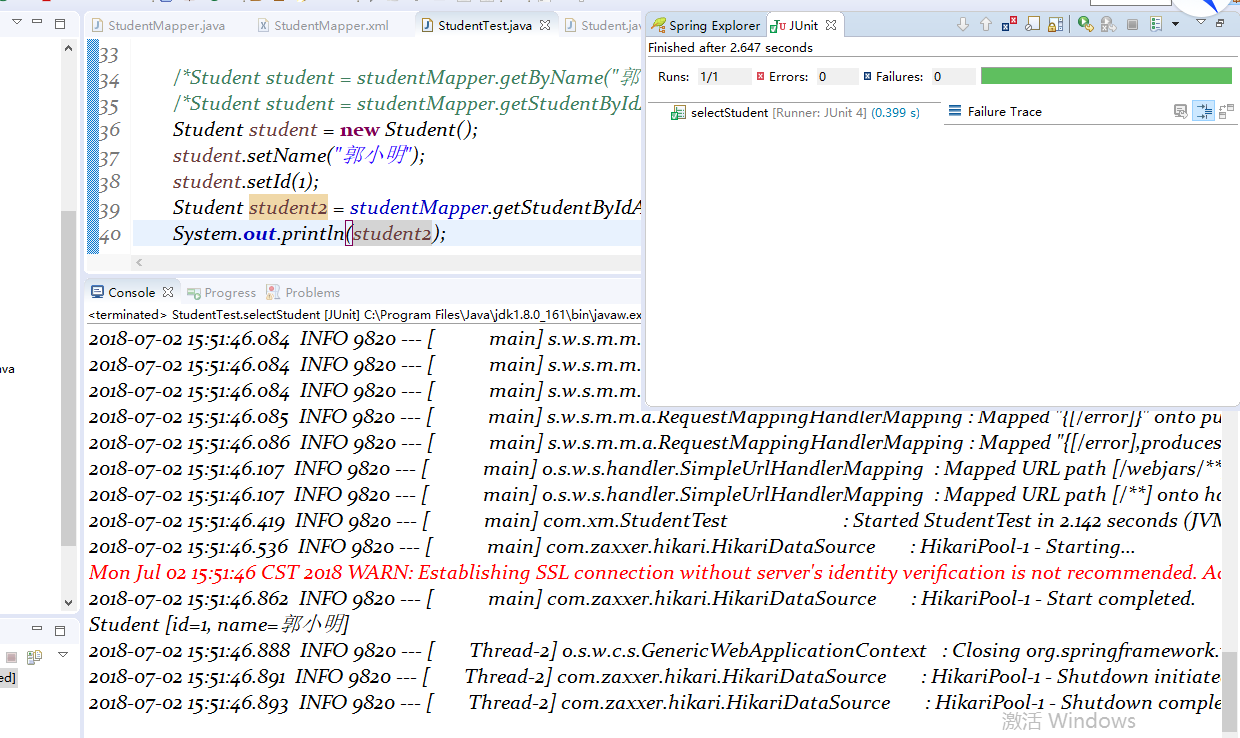
(2)定义测试用例:
 1 package com.xm;
 2
 3 import org.junit.Test;
 4 import org.junit.runner.RunWith;
 5 import org.springframework.beans.factory.annotation.Autowired;
 6 import org.springframework.boot.test.context.SpringBootTest;
 7 import org.springframework.test.context.junit4.SpringRunner;
 8
 9 import com.xm.mapper.StudentMapper;
10 import com.xm.pojo.Student;
11
12 @RunWith(SpringRunner.class)
13 @SpringBootTest
14 public class StudentTest {
15     @Autowired
16     private StudentMapper studentMapper;
17
18     @Test
19     public void selectStudent() {
20
21         /*Student student = studentMapper.getByName("郭小明");*/
22         /*Student student = studentMapper.getStudentByIdAndName(1, "郭小明");*/
23         Student student = new Student();
24         student.setName("郭小明");
25         student.setId(1);
26         Student student2 = studentMapper.getStudentByIdAndName(student);
27         System.out.println(student2);
28
29     }
30
31
32 }
(3)测试结果:
2018-07-02