来自于仕琪老师的人脸检测库,可以实现高达1500fps的人脸检测
算法源码已经开源
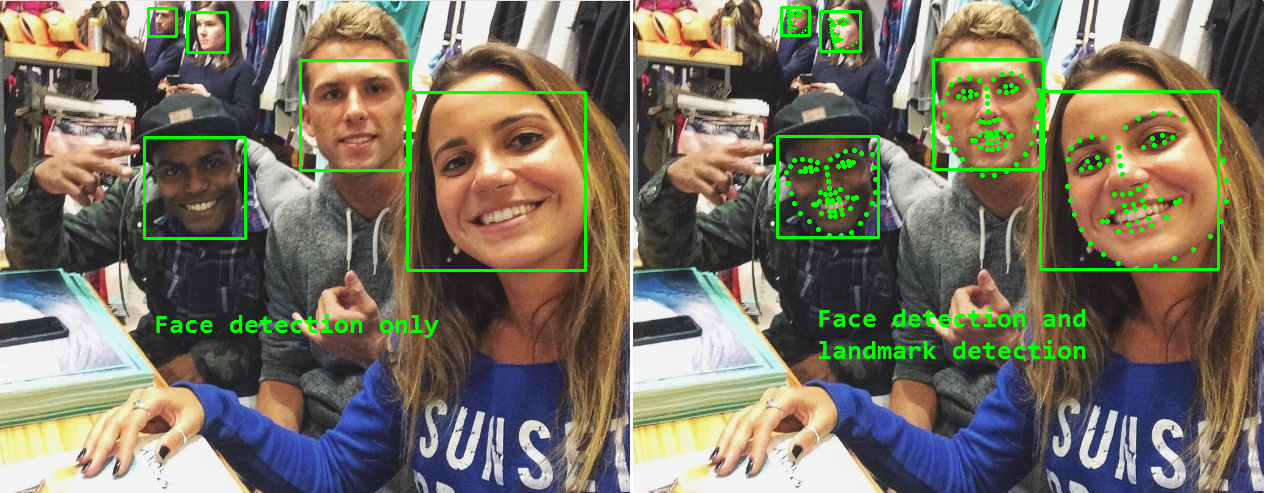
1.简介
libfacedetection是一个优秀的人脸检测算法库,在pc和树莓派上都能达到十分优秀的检测结果:
windows上的表现
| Method | Time | FPS | Time | FPS |
|---|---|---|---|---|
| X64 | X64 | X64 | X64 | |
| Single-thread | Single-thread | Multi-thread | Multi-thread | |
| OpenCV Haar+AdaBoost (640x480) | – | – | 12.33ms | 81.1 |
| cnn (CPU, 640x480) | 64.21ms | 15.57 | 15.59ms | 64.16 |
| cnn (CPU, 320x240) | 15.23ms | 65.68 | 3.99ms | 250.40 |
| cnn (CPU, 160x120) | 3.47ms | 288.08 | 0.95ms | 1052.20 |
| cnn (CPU, 128x96) | 2.35ms | 425.95 | 0.64ms | 1562.10 |
- OpenCV Haar+AdaBoost runs with minimal face size 48x48
- Face detection only, and no landmark detection included.
- Minimal face size ~12x12
- Intel® Core™ i7-7700 CPU @ 3.6GHz.
嵌入式设备Raspberry Pi 3 B+上的表现
| Method | Time | FPS | Time | FPS |
|---|---|---|---|---|
| Single-thread | Single-thread | Multi-thread | Multi-thread | |
| cnn (CPU, 640x480) | 512.04ms | 1.95 | 174.89ms | 5.72 |
| cnn (CPU, 320x240) | 123.47ms | 8.10 | 42.13ms | 23.74 |
| cnn (CPU, 160x120) | 27.42ms | 36.47 | 9.75ms | 102.58 |
| cnn (CPU, 128x96) | 17.78ms | 56.24 | 6.12ms | 163.50 |
- Face detection only, and no landmark detection included.
- Minimal face size ~12x12
- Raspberry Pi 3 B+, Broadcom BCM2837B0, Cortex-A53 (ARMv8) 64-bit SoC @ 1.4GHz
近日算法的源码已经开源:

2.源码
源码中主要包含了四个文件,包括了模型数据、人脸检测cnn模型的定义和卷积操作的实现等:
facedetectcnn-floatdata.cpp   //模型数据
facedetectcnn-int8data.cpp   //模型数据
facedetectcnn-model.cpp	     //cnn定义
facedetectcnn.cpp            //基本操作定义
facedetectcnn.h
1.使用样例
API是这样的:int * facedetect_cnn(unsigned char * result_buffer, //buffer memory for storing face detection results, !!its size must be 0x20000 Bytes!! unsigned char * rgb_image_data, int width, int height, int step); //input image, it must be RGB (three-channel) image!
//copy from https://github.com/ShiqiYu/libfacedetection/blob/master/example/libfacedetectcnn-example.cpp
#include <stdio.h>
#include <opencv2/opencv.hpp>
#include "facedetectcnn.h"

//定义缓冲区大学. Do not change the size!
#define DETECT_BUFFER_SIZE 0x20000
using namespace cv;

int main(int argc, char* argv[])
{
    if(argc != 2)
    {
    	//图像的路径输入
        printf("Usage: %s <image_file_name>
", argv[0]);
        return -1;
    }

	//load an image and convert it to gray (single-channel)
	Mat image = imread(argv[1]);
	if(image.empty())
	{
		fprintf(stderr, "Can not load the image file %s.
", argv[1]);
		return -1;
	}

	int * pResults = NULL;
    //pBuffer is used in the detection functions.
    //If you call functions in multiple threads, please create one buffer for each thread!
    unsigned char * pBuffer = (unsigned char *)malloc(DETECT_BUFFER_SIZE);
    if(!pBuffer)
    {
        fprintf(stderr, "Can not alloc buffer.
");
        return -1;
    }


	///////////////////////////////////////////
	// CNN face detection
	// Best detection rate
	//////////////////////////////////////////
	//!!! The input image must be a RGB one (three-channel)
	//!!! DO NOT RELEASE pResults !!!
	pResults = facedetect_cnn(pBuffer, (unsigned char*)(image.ptr(0)), image.cols, image.rows, (int)image.step);
	//这个api用于检测

    printf("%d faces detected.
", (pResults ? *pResults : 0));
	Mat result_cnn = image.clone();
	//print the detection results
	for(int i = 0; i < (pResults ? *pResults : 0); i++)
	{

        //返回值position坐标点
        short * p = ((short*)(pResults+1))+142*i;
		int x = p[0];
		int y = p[1];
		int w = p[2];
		int h = p[3];
		//int neighbors = p[4];
		int confidence = p[4];
		int angle = p[5];

		//printf("face_rect=[%d, %d, %d, %d], neighbors=%d, angle=%d
", x,y,w,h,neighbors, angle);
		//update neifhbors to confidence,05302019
		printf("face_rect=[%d, %d, %d, %d], confidence=%d, angle=%d
", x,y,w,h,confidence, angle);
		rectangle(result_cnn, Rect(x, y, w, h), Scalar(0, 255, 0), 2);   //画框框
	}
	imshow("result_cnn", result_cnn);

	waitKey();

    //release the buffer
    free(pBuffer);

	return 0;
}
注:
1.可以使用avx2指令集编译得到更大的加速。
2.于老师曾经写了著名的《OpenCV入门教程》
ref:
https://blog.csdn.net/m0_37733057/article/details/68059552
https://blog.csdn.net/CV_Jason/article/details/78819088 https://blog.csdn.net/CV_Jason/article/details/78819088
https://blog.csdn.net/sinat_31425585/article/details/77891844