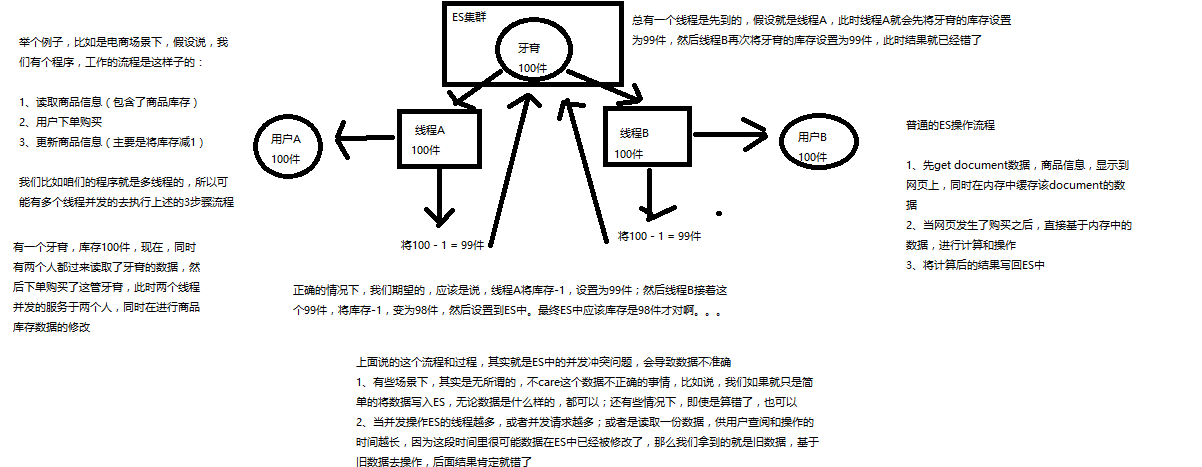
1.图解剖析Elasticsearch并发冲突问题
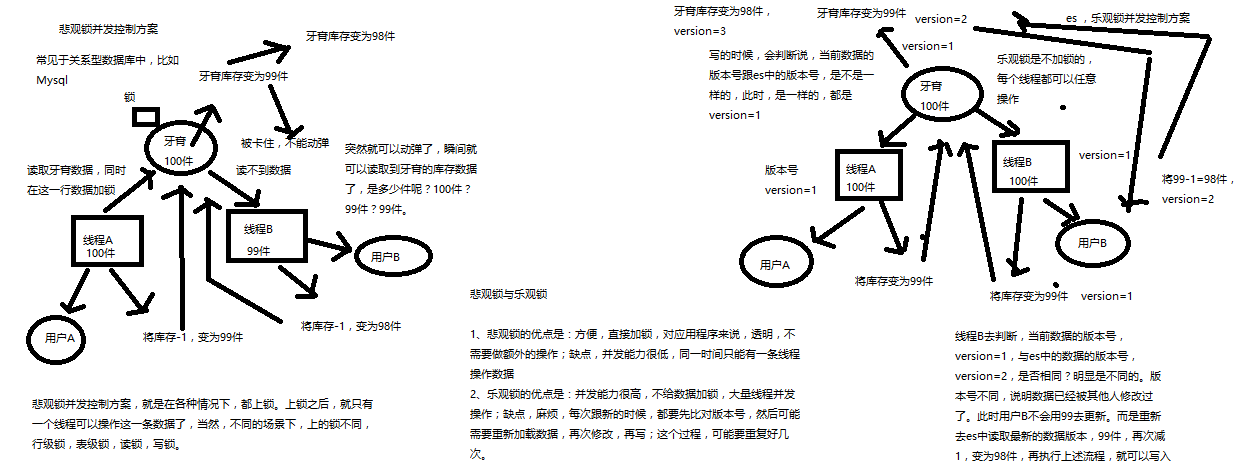
2.图解剖析悲观锁与乐观锁两种并发控制方案
3、图解Elasticsearch内部如何基于_version进行乐观锁并发控制
(1)_version元数据
PUT /test_index/test_type/6
{
"test_field": "test test"
}
{
"_index": "test_index",
"_type": "test_type",
"_id": "6",
"_version": 1,
"result": "created",
"_shards": {
"total": 2,
"successful": 1,
"failed": 0
},
"created": true
}

第一次创建一个document的时候,它的_version内部版本号就是1;以后,每次对这个document执行修改或者删除操作,都会对这个_version版本号自动加1;哪怕是删除,也会对这条数据的版本号加1
{
"found": true,
"_index": "test_index",
"_type": "test_type",
"_id": "6",
"_version": 4,
"result": "deleted",
"_shards": {
"total": 2,
"successful": 1,
"failed": 0
}
}
我们会发现,在删除一个document之后,可以从一个侧面证明,它不是立即物理删除掉的,因为它的一些版本号等信息还是保留着的。先删除一条document,再重新创建这条document,其实会在delete version基础之上,再把version号加1
4、上机动手实战演练基于_version进行乐观锁并发控制
(1)先构造一条数据出来
PUT /test_index/test_type/7
{
"test_field": "test test"
}
(2)模拟两个客户端,都获取到了同一条数据
GET test_index/test_type/7
{
"_index": "test_index",
"_type": "test_type",
"_id": "7",
"_version": 1,
"found": true,
"_source": {
"test_field": "test test"
}
}
(3)其中一个客户端,先更新了一下这个数据
同时带上数据的版本号,确保说,es中的数据的版本号,跟客户端中的数据的版本号是相同的,才能修改
PUT /test_index/test_type/7?version=1
{
"test_field": "test client 1"
}
{
"_index": "test_index",
"_type": "test_type",
"_id": "7",
"_version": 2,
"result": "updated",
"_shards": {
"total": 2,
"successful": 1,
"failed": 0
},
"created": false
}
(4)另外一个客户端,尝试基于version=1的数据去进行修改,同样带上version版本号,进行乐观锁的并发控制
PUT /test_index/test_type/7?version=1
{
"test_field": "test client 2"
}
{
"error": {
"root_cause": [
{
"type": "version_conflict_engine_exception",
"reason": "[test_type][7]: version conflict, current version [2] is different than the one provided [1]",
"index_uuid": "6m0G7yx7R1KECWWGnfH1sw",
"shard": "3",
"index": "test_index"
}
],
"type": "version_conflict_engine_exception",
"reason": "[test_type][7]: version conflict, current version [2] is different than the one provided [1]",
"index_uuid": "6m0G7yx7R1KECWWGnfH1sw",
"shard": "3",
"index": "test_index"
},
"status": 409
}
(5)在乐观锁成功阻止并发问题之后,尝试正确的完成更新
GET /test_index/test_type/7
{
"_index": "test_index",
"_type": "test_type",
"_id": "7",
"_version": 2,
"found": true,
"_source": {
"test_field": "test client 1"
}
}
基于最新的数据和版本号,去进行修改,修改后,带上最新的版本号,可能这个步骤会需要反复执行好几次,才能成功,特别是在多线程并发更新同一条数据很频繁的情况下
PUT /test_index/test_type/7?version=2
{
"test_field": "test client 2"
}
{
"_index": "test_index",
"_type": "test_type",
"_id": "7",
"_version": 3,
"result": "updated",
"_shards": {
"total": 2,
"successful": 1,
"failed": 0
},
"created": false
}
5.上机动手实战演练基于external version进行乐观锁并发控制
external version
es提供了一个feature,就是说,你可以不用它提供的内部_version版本号来进行并发控制,可以基于你自己维护的一个版本号来进行并发控制。举个列子,加入你的数据在mysql里也有一份,然后你的应用系统本身就维护了一个版本号,无论是什么自己生成的,程序控制的。这个时候,你进行乐观锁并发控制的时候,可能并不是想要用es内部的_version来进行控制,而是用你自己维护的那个version来进行控制。
?version=1
?version=1&version_type=external
version_type=external,唯一的区别在于,_version,只有当你提供的version与es中的_version一模一样的时候,才可以进行修改,只要不一样,就报错;当version_type=external的时候,只有当你提供的version比es中的_version大的时候,才能完成修改
es,_version=1,?version=1,才能更新成功
es,_version=1,?version>1&version_type=external,才能成功,比如说?version=2&version_type=external
(1)先构造一条数据
PUT /test_index/test_type/8
{
"test_field": "test"
}
{
"_index": "test_index",
"_type": "test_type",
"_id": "8",
"_version": 1,
"result": "created",
"_shards": {
"total": 2,
"successful": 1,
"failed": 0
},
"created": true
}
(2)模拟两个客户端同时查询到这条数据
GET /test_index/test_type/8
{
"_index": "test_index",
"_type": "test_type",
"_id": "8",
"_version": 1,
"found": true,
"_source": {
"test_field": "test"
}
}
(3)第一个客户端先进行修改,此时客户端程序是在自己的数据库中获取到了这条数据的最新版本号,比如说是2
PUT /test_index/test_type/8?version=2&version_type=external
{
"test_field": "test client 1"
}
{
"_index": "test_index",
"_type": "test_type",
"_id": "8",
"_version": 2,
"result": "updated",
"_shards": {
"total": 2,
"successful": 1,
"failed": 0
},
"created": false
}
(4)模拟第二个客户端,同时拿到了自己数据库中维护的那个版本号,也是2,同时基于version=2发起了修改
PUT /test_index/test_type/8?version=2&version_type=external
{
"test_field": "test client 2"
}
{
"error": {
"root_cause": [
{
"type": "version_conflict_engine_exception",
"reason": "[test_type][8]: version conflict, current version [2] is higher or equal to the one provided [2]",
"index_uuid": "6m0G7yx7R1KECWWGnfH1sw",
"shard": "1",
"index": "test_index"
}
],
"type": "version_conflict_engine_exception",
"reason": "[test_type][8]: version conflict, current version [2] is higher or equal to the one provided [2]",
"index_uuid": "6m0G7yx7R1KECWWGnfH1sw",
"shard": "1",
"index": "test_index"
},
"status": 409
}
(5)在并发控制成功后,重新基于最新的版本号发起更新
GET /test_index/test_type/8
{
"_index": "test_index",
"_type": "test_type",
"_id": "8",
"_version": 2,
"found": true,
"_source": {
"test_field": "test client 1"
}
}
PUT /test_index/test_type/8?version=3&version_type=external
{
"test_field": "test client 2"
}
{
"_index": "test_index",
"_type": "test_type",
"_id": "8",
"_version": 3,
"result": "updated",
"_shards": {
"total": 2,
"successful": 1,
"failed": 0
},
"created": false
}