1.canny边缘检测算法
原理:https://www.cnblogs.com/mightycode/p/6394810.html
1)使用高斯滤波,滤除噪声
2)计算图像中每个像素点的梯度和方向
3)应用非极大值抑制,以消除边缘带来的杂散影响
4)应用双阈值,检测和确定真实和潜在边缘
5)通过抑制孤立的弱边缘完成边缘检测
import cv2 as cv
import numpy as np
#canny边缘检测算法
def cvshow(img):
    cv.imshow("img",img)
    cv.waitKey(0)
    cv.destroyAllWindows()
img = cv.imread("lena.jpg")
img1 = cv.Canny(img,50,100)
img2= cv.Canny(img,50,200)
res = np.hstack((img1,img2))
cvshow(res)#左边细节比右边多

2.轮廓检测
cv.findContours(img,mode,method)返回一个两个参数的列表 contours:检测到的轮廓 和 hierarchy:各个轮廓的继承关系
一般我们使用在contours就可以了
img:是你要检测的图像,必须是灰度图或者二值图像才行
mode 轮廓模式
。RETR_EXTERNAL 只检测最外面的轮廓
。RETR_LIST 检测所有轮廓并保存到一张链表中
。RETR_CCOMP 检测所有轮廓,并将他们分成两层,顶层是外部边界,第二层是空洞的边界
。RETR_TREE 检测所有轮廓,并重构轮廓的嵌套层次
mothod 轮廓靠近方法
。CHAIN_APPROX_NONE 以Freeman链码方式输出轮廓 (就是保存了所有轮廓的点)
。CHAIN_APPROX_SIMPLE 压缩水平的垂直的和斜线部分(就是将点简化连接成线)
边缘检测的一般步骤:
1.原图像
2.转化到灰度图
3.转化成二值图像
4.使用findContours做边缘检测
5.使用drawContours画出来
比如这里我们读进来一张这张图片,对他进行边缘检测
import cv2 as cv
import numpy as np
#canny边缘检测算法
def cvshow(img):
    cv.imshow("img",img)
    cv.waitKey(0)
    cv.destroyAllWindows()
img = cv.imread("graph.jpg")
cvshow(img)
gray = cv.cvtColor(img,cv.COLOR_BGR2GRAY)
thresh = cv.threshold(gray,150,255,cv.THRESH_BINARY_INV)[1]#简便方法
cvshow(thresh)
contours = cv.findContours(thres,cv.RETR_EXTERNAL,cv.CHAIN_APPROX_SIMPLE)[0]#简便方法
#contours,heriarchy = cv.findContours(thresh,cv.RETR_EXTERNAL,cv.CHAIN_APPROX_SIMPLE)
print(np.shape(contours))
res = cv.drawContours(img,contours,-1,(0,0,255),1)
cvshow(res)
结果:它一共检测到6个轮廓,这里你用cv.RETR_TREE的话会检测12个(内轮廓外轮廓)

比如这是使用cv.RETR_TREE检测的

这个是使用cv.RETR_EXTERNAL检测的

在contours中包含了这些轮廓的坐标信息,我们可以利用这些坐标信息进一步画出该图像的外界矩形
轮廓近似
epsilon = 0.15*cv.arcLength(cnt,True)#修改数值,数值越小越接近边缘
approx = cv.approxPolyDP(cnt,epsilon,True)
draw_img = img.copy()
res = cv.drawContours(draw_img,[approx],0,(0,0,255),3)
imshow(res)
外界矩形
contours, hierarchy=cv.findContours(thresh, cv.RETR_TREE,cv.CHAIN_APPROX_NONE )
draw_img = img.copy()
res = cv.drawContours(draw_img,contours,-1,(0,0,255),2)
cnt = contours[0]#cnt为第1个轮廓的位置点信息
x,y,w,h = cv.boundingRect(cnt)//boundingRect计算轮廓的垂直边界最小矩形,矩形是与图像上下边界平行的
img = cv.rectangle(img,(x,y),(x+w,y+h),(0,0,255),2)#画出矩形
外接圆
(x,y),radius = cv.minEnclosingCircle(cnt)#圆心和半径
center = (int(x),int(y))
radius = int(radius)
img = cv.circle(img,center,radius,(0,0,255),2)
模板匹配
在这个版本的执行中如果报错depth == CV_8U || depth == CV_32F) && type == _templ.type() && _img.dims() <= 2 in function 'cv::mat 就执行cv.COLOR_BGR2RGB将你的照片转换为RGB
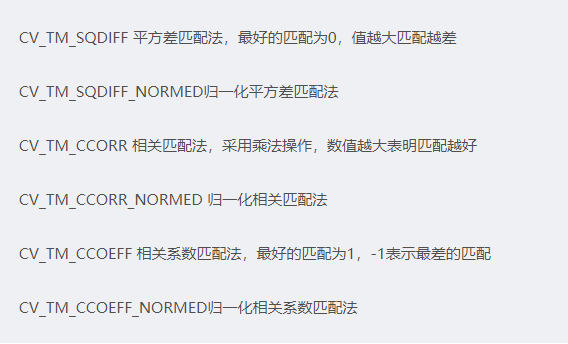
模板匹配的6种方法
# All the 6 methods for comparison in a list
methods = ['cv.TM_CCOEFF', 'cv.TM_CCOEFF_NORMED', 'cv.TM_CCORR',
            'cv.TM_CCORR_NORMED', 'cv.TM_SQDIFF', 'cv.TM_SQDIFF_NORMED']
使用方法
res = cv.matchTemplate(people,template,cv.TM_CCOEFF)#参数为匹配对象,匹配模板,和匹配方法
res.shape
#结果为(A-a+1)*(B-b+1)
6种方法对比
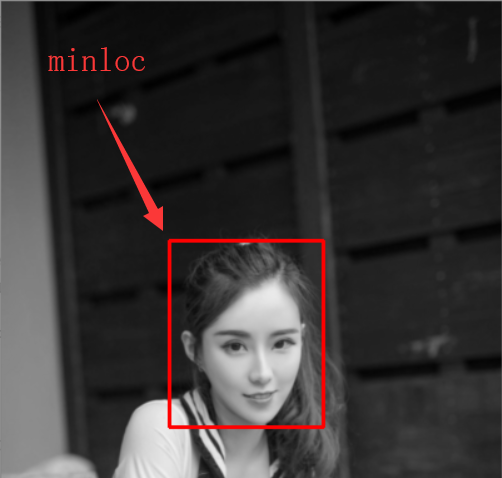
for meth in methods:
    img2 = people.copy()
    method = eval(meth)
    print(method)
    res = cv.matchTemplate(people,template,method)
    min_val,max_val,min_loc,max_loc = cv.minMaxLoc(res)#匹配的最小值,最大值,位置

    if method in [cv.TM_SQDIFF,cv.TM_SQDIFF_NORMED]:
        top_left = min_loc
    else :
        top_left = max_loc
    bottom_right = (top_left[0]+w,top_left[1]+h)

    cv.rectangle(img2,top_left,bottom_right,(0,0,255),2)
    plt.subplot(121),plt.imshow(res,cmap="gray")
    plt.xticks([]),plt.yticks([])
    plt.subplot(122),plt.imshow(img2,cmap="gray")
    plt.suptitle(meth)
    plt.show()
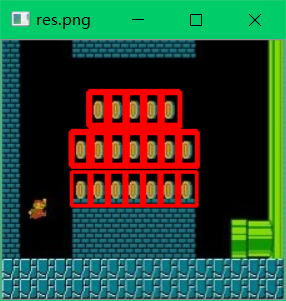
多模板匹配
img_rgb = cv.imread('images/mario.jpg')
img_gray = cv.cvtColor(img_rgb, cv.COLOR_BGR2GRAY)
template = cv.imread('images/mario_coin.jpg',0)
w, h = template.shape[::-1]
res = cv.matchTemplate(img_gray,template,cv.TM_CCOEFF_NORMED)
threshold = 0.85#达到相似程度,越大相似要求越高
loc = np.where( res >= threshold)
for pt in zip(*loc[::-1]):
    cv.rectangle(img_rgb, pt, (pt[0] + w, pt[1] + h), (0,0,255), 2)
cvshow('res.png',img_rgb)
plt.subplot(121),pltshow(img_gray)
plt.subplot(122),pltshow(img_rgb)
#loc[::-1]将输出的索引变换成x,y坐标,因为索引和x,y坐标是正好相反的,所以要对换下位置。然后再循环坐标,分别画出红色边界。