一、布局
Ionic模板提供了一个侧边栏菜单示例项目和标签选项卡示例项目。本案例将两个布局进行结合,简单介绍下Ionic的布局。Ionic采用自定义标签和标准Html标签相结合。相对于全部使用div方式来说,自定义标签的可读性更强。Ionic的界面呈现既可以使用静态页面方式呈现,也可以使用Angular提供的路由机制和控制器来控制控制页面的呈现及数据绑定。
使用VS创建一个空白的Ionic项目。项目中包含一个index.html页面和app.js的脚本。依照惯例修改项目的基本属性后,打开index.html页面和app.js脚本。
<body ng-app="starter">
    <ion-pane>
        <ion-header-bar class="bar-stable">
            <h1 class="title">Ionic Blank Starter</h1>
        </ion-header-bar>
        <ion-content>
        </ion-content>
    </ion-pane>
</body>
在body标签上有一个自定义的属性ng-app,该属性是Angular用于标识应用程序模块的,一般为程序启动模块。<ion-pane>标签内容为ionic标签,关于Ionic标签请查阅相关文档,这里不再赘述。
angular.module('starter', ['ionic'])
.run(function ($ionicPlatform) {
    $ionicPlatform.ready(function () {
        if (cordova.platformId === 'ios' && window.cordova && window.cordova.plugins.Keyboard) {
            cordova.plugins.Keyboard.hideKeyboardAccessoryBar(true);
            cordova.plugins.Keyboard.disableScroll(true);
        }
        if (window.StatusBar) {
            StatusBar.styleDefault();
        }
    });
})
angular.module('starter',[])用于定义应用程序的启动模块,同时加载ionic模块。以上代码是连缀写法,正常写法如下:
angular.module().run().config();
或者:
var app = angular.module();
app.run();
app.config();
这样写,基本阅读起来就没有问题了。
run()方法用于启动运行程序。后续会加入config()等相关方法。
二、路由和控制器
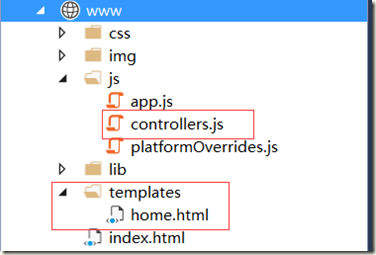
在www目录下创建一个templates文件夹并添加一个home.html空白页面。同时在js文件夹中创建一个controllers.js文件。
修改index.html内容如下:
<!DOCTYPE html>
<html>
<head>
    <meta charset="utf-8">
    <meta name="viewport" content="initial-scale=1, maximum-scale=1, user-scalable=no, width=device-width">
    <title></title>
    <link href="lib/ionic/css/ionic.css" rel="stylesheet">
    <link href="css/style.css" rel="stylesheet">
    <script src="js/platformOverrides.js"></script>
    <script src="lib/ionic/js/ionic.bundle.js"></script>
    <script src="cordova.js"></script>
    <script src="js/app.js"></script>
    <!--添加controllers引用-->
    <script src="js/controllers.js"></script>
</head>
<body ng-app="starter">
    <!--添加导航视图标签-->
    <ion-nav-view></ion-nav-view>
</body>
</html>
将原来body内容添加到home.html中,并添加一个视图标签:
<ion-view view-title="Home">
    <ion-pane>
        <ion-header-bar class="bar-stable">
            <h1 class="title">标题</h1>
        </ion-header-bar>
        <ion-content>
        </ion-content>
    </ion-pane>
</ion-view>
打开app.js,在run()方法后连缀config()方法,配置内容如下:
.config(function ($stateProvider, $urlRouterProvider) {
    $stateProvider.state('app', {
        url: '/app',
        templateUrl: 'templates/home.html'
    });

    $urlRouterProvider.otherwise('/app');
});
这里使用$stateProvider.state()方法声明一个状态(路由)。$urlRouterProvider.otherwise('/app')设置默认路由。上述代码功能是在程序启动时,请求/app的路由,该路由导向home.html视图模板,并将该视图内容渲染到<ion-nav-view>导航视图标签上。
控制器的作用就是在视图渲染前将数据送到视图处理。而数据内容我们可以使用网络请求从服务器上获取,也可以使用本地数据等。
例如上述案例需要在视图渲染之前,动态显示标题,在控制器中处理如下:
打开controllers.js文件,添加如下代码:
angular.module('starter.controllers', [])
.controller('HomeCtrl', function ($scope) {
    $scope.msg = 'Hello';
});
同时修改app.js文件相关配置,完整app.js为内容如下:
angular.module('starter', ['ionic', "starter.controllers"]) //添加控制器模块
.run(function ($ionicPlatform) {
    $ionicPlatform.ready(function () {
        if (cordova.platformId === 'ios' && window.cordova && window.cordova.plugins.Keyboard) {
            cordova.plugins.Keyboard.hideKeyboardAccessoryBar(true);
            cordova.plugins.Keyboard.disableScroll(true);
        }
        if (window.StatusBar) {
            StatusBar.styleDefault();
        }
    });
})
.config(function ($stateProvider, $urlRouterProvider) {
    $stateProvider.state('app', {
        url: '/app',
        templateUrl: 'templates/home.html',
        controller: 'HomeCtrl' //增加控制器处理
    });

    $urlRouterProvider.otherwise('/app');
});
在home.html中就可以使用表达式进行数据绑定了。
<ion-view view-title="Home">
    <ion-pane>
        <ion-header-bar class="bar-stable">
            <!--这里修改为数据绑定,动态上下文中获取-->
            <h1 class="title">{{msg}}</h1>
        </ion-header-bar>
        <ion-content>
        </ion-content>
    </ion-pane>
</ion-view>
angular的绑定表达式使用{{}}这种方式。
结束语:以上就是一个最简单的请求-路由-控制的案例。对于数据的操作一般是放在服务端处理的,手机程序使用$http对象从服务器上获取数据即可。本地数据存储,最简单的方式就是使用json存储。下篇给一个侧边栏菜单和标签选项卡的案例,作为日后开发的一个基础骨架。
