Spring-SpringBoot启动源码分析和自动配置原理
SpringBoot实在是我们的一个福音啊,记得使用Spring搭建项目的时候,很多的配置文件。而SpringBoot可以实现0配置,当然配置都变成了一个个bean了。而且我们都知道,启动一个SpringBoot的项目,重点就在一个main方法。所以下面我们就来分析一下他的【启动源码】,以及他的一个重要的特性【自动装配】的原理。
SpringBoot启动源码分析
实际上他的启动主要是干了两件事情,接下来我们就从以下这两个方向去探索他的源码,看看是不是这样。
- 【Spring容器的启动】,目的把所有需要使用的类进行实例化
- 【Servlet容器的启动】,目的是接受请求。
【Spring容器的启动】
大体流程:
- 通过spi的方式加载监听类SpringApplicationRunListener,
- 生成environment对象,
- 创建SpringBoot的上下文对象AnnotationConfigServletWebServerApplicationContext,
- 对对象进行初始化,调用对象的refresh方法彻底对Spring进行初始化
源码分析:
public ConfigurableApplicationContext run(String... args) {
    StopWatch stopWatch = new StopWatch();
    stopWatch.start();
    ConfigurableApplicationContext context = null;
    Collection<SpringBootExceptionReporter> exceptionReporters = new ArrayList<>();
    configureHeadlessProperty();
     //SPI的方式获取SpringApplicationRunListener实例
    SpringApplicationRunListeners listeners = getRunListeners(args);
     //这里实际上就是一个触发机制,他内部有一个list去存储所有实现了SpringApplicationRunListener的实例
    listeners.starting();
    try {
       ApplicationArguments applicationArguments = new DefaultApplicationArguments(args);
        //生成Environment对象
       ConfigurableEnvironment environment = prepareEnvironment(listeners, applicationArguments);
       configureIgnoreBeanInfo(environment);
        //打印banner图,启动的时候,我们经常看见的那个springboot的图标。
       Banner printedBanner = printBanner(environment);
        //创建springboot的上下文对象AnnotationConfigServletWebServerApplicationContext
       context = createApplicationContext();
       exceptionReporters = getSpringFactoriesInstances(SpringBootExceptionReporter.class,
             new Class[] { ConfigurableApplicationContext.class }, context);
        // 上面创建了这样一个对象,这里肯定对这个对象进行初始化
       prepareContext(context, environment, listeners, applicationArguments, printedBanner);
        //上面的对象已经初始化了,这里调用SrpingBoot的上下文对象,在这里对Spring容器彻底的进行初始化。
       refreshContext(context);
       afterRefresh(context, applicationArguments);
       stopWatch.stop();
       if (this.logStartupInfo) {
          new StartupInfoLogger(this.mainApplicationClass).logStarted(getApplicationLog(), stopWatch);
       }
       listeners.started(context);
       callRunners(context, applicationArguments);
    }
    catch (Throwable ex) {
       handleRunFailure(context, ex, exceptionReporters, listeners);
       throw new IllegalStateException(ex);
    }

    try {
       listeners.running(context);
    }
    catch (Throwable ex) {
       handleRunFailure(context, ex, exceptionReporters, null);
       throw new IllegalStateException(ex);
    }
    return context;
    }
【Servlet容器的启动】
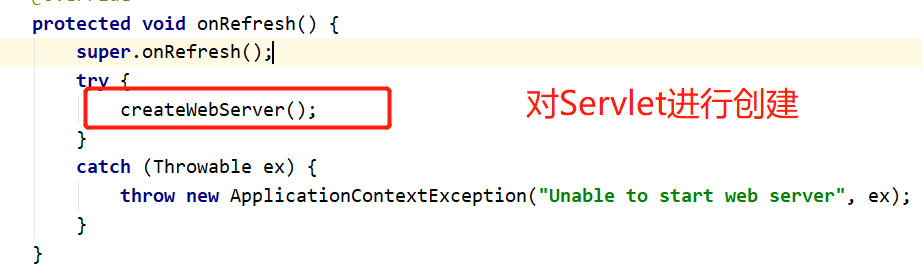
Tomcat的启动(默认):上面聊到#refresh是核心,所以tomcat也是在这里进行启动的,在#refresh中有个onrefresh的方法,就是在这里对它进行启动的,我们点击去看#onrefresh,发现实际上他是一个钩子方法,这里使用的是一个模板模式,所以我们上面实例化出来的那个子类完成对方法的实现的,下面我们看看这个方法。
private void createWebServer() {
   WebServer webServer = this.webServer;
   ServletContext servletContext = getServletContext();
   if (webServer == null && servletContext == null) {
       //获取tomcat的对象,我们SpringBoot默认使用的tomcat,使用的是Spi的机制。
      ServletWebServerFactory factory = getWebServerFactory();
       //创建tomcat对象,包括设置一系列参数,并且顺便启动tomcat.
      this.webServer = factory.getWebServer(getSelfInitializer());
      getBeanFactory().registerSingleton("webServerGracefulShutdown",
            new WebServerGracefulShutdownLifecycle(this.webServer));
      getBeanFactory().registerSingleton("webServerStartStop",
            new WebServerStartStopLifecycle(this, this.webServer));
   }
   else if (servletContext != null) {
      try {
         getSelfInitializer().onStartup(servletContext);
      }
      catch (ServletException ex) {
         throw new ApplicationContextException("Cannot initialize servlet context", ex);
      }
   }
   initPropertySources();
}
自动装配分析
他的理念就是:【约定大于配置】,在老的Spring中我们要手动增加一些功能,比如aop,mvc,但是使用它,他会自动把这些东西装配到我们的项目中。那它是如何把这些个功能默认装配到我们的项目中的呢?那我们就要从他的spi机制是如何使用和实现的开始聊起。
【jdk的spi】
spi我们在聊shardingSphere实现自己的分片算法的时候就已经聊过。主要就是把实现类的路径放在配置文件中,从而加载到项目中,而不去改变项目的结构,具体看ShardingSphere的那一章节哈。]
【SpringBoot中的spi】:
【使用方法】
- 首先定义几个接口
- 使用几个类对接口进行实现
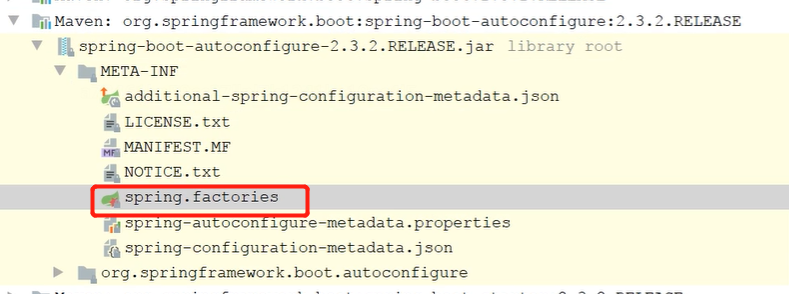
- 在工程的resources下面创建META-INF文件夹,在文件夹下创建spring.factories文件,在文件夹中配置内容如下
- com.li.glen.spi.Log=
- com.li.glen.spi.Log4j,
- 【com.li.glen.spi.Log】:就是接口的完整限定名,下面的这些就是对接口的实现。
SpringBoot中提供了相关的接口对这这些实现类进行获取
- 【loadFactoryNames】:方法获取实现了接口的所有类的名称
 View Code@Test public void test() { List<String> strings = SpringFactoriesLoader.loadFactoryNames(Log.class, ClassUtils.getDefaultClassLoader()); for (String string : strings) { System.out.println(string); } }
- 【loadFactories】:方法获取实现了接口的所有类的实例
【源码分析】
【#loadFactoryNames】:
- 大体流程:
- 首先去缓存中读取,如果没有走下一步
- 循环读取META-INF/spring.factories下的内容,并且把他们变成key和value的形式,key就是接口名称,value就是他们的实现类的名称
- 通过名称去获取value即可
- 实际上他们两个方法的不同之处就是,一个对这些类进行了实例化,而一些没有实例化,所以这里只分析一个方法。
【源码解读】:
private static Map<String, List<String>> loadSpringFactories(@Nullable ClassLoader classLoader) { //首先去缓存中获取 MultiValueMap<String, String> result = cache.get(classLoader); if (result != null) { return result; } try { //去加载FACTORIES_RESOURCE_LOCATION(META-INF/spring.factories)下的文件 //注意:这里加载的不仅仅是当前项目下面的这个文件,还有所有项目jar中的这个文件 Enumeration<URL> urls = (classLoader != null ? classLoader.getResources(FACTORIES_RESOURCE_LOCATION) : ClassLoader.getSystemResources(FACTORIES_RESOURCE_LOCATION)); result = new LinkedMultiValueMap<>(); //循环所有的文件 while (urls.hasMoreElements()) { URL url = urls.nextElement(); //把他们变成resource对象 UrlResource resource = new UrlResource(url); //然后通过Properties读取文件,并且把他们变成一个map //key就是咱们的接口名,value就是咱们的实现类名,通过逗号分隔,所以value的内容就变成了一个个list Properties properties = PropertiesLoaderUtils.loadProperties(resource); for (Map.Entry<?, ?> entry : properties.entrySet()) { String factoryTypeName = ((String) entry.getKey()).trim(); for (String factoryImplementationName : StringUtils.commaDelimitedListToStringArray((String) entry.getValue())) { result.add(factoryTypeName, factoryImplementationName.trim()); } } } //最终给他塞进去所有的spring.factories下路径的文件名称,并且返回 cache.put(classLoader, result); return result; } catch (IOException ex) { throw new IllegalArgumentException("Unable to load factories from location [" + FACTORIES_RESOURCE_LOCATION + "]", ex); } }【注意】:在通过api对这些类进行调用的过程中,并没有把这些类放在Spring中,那么什么时候他这些类放在Spring容器中的呢?我们这里就要增加一个接口的知识点【DeferredImportSelector 】通过这个接口,我们就能了解他的装配过程。
【做法】:我们现在把一个没有任何注解的类,给他加载到Spring容器中,我们知道在Spring中我们想把一个bean交给它进行保存,我们就需要把该类的完整限定名在【org.springframework.context.annotation.ImportSelector#selectImports】进行返回。
【流程】:
- 我们定义一个类实现DeferredImportSelector的接口,当外部调用#selectImports进行实例化bean的时候,他首先调用#getImportGroup返回的类中的#proces,然后再调用#selectImports。而我们在#process中调用的是当前类的返回值【也就是说,SpringBoot没有调用我们的方法,而是我们自己把我们的方法放在了SpringBoot会调用的一个group中】,实际上是大家看我们ImportBean的这个类中上有一个@Import注解,Spring会去扫描这个注解,同时执行这个注解后面的类的方法。这样就到了咱们写的类中了。
【代码】:**我们要实例化的类为DeferredBean,里面是空的,什么都没有。
public class DeferredImportSelectorDemo implements DeferredImportSelector {
    @Override
    public String[] selectImports(AnnotationMetadata importingClassMetadata) {
        System.out.println("==============DeferredImportSelectorDemo.selectImports===========");
        //如果需要把类实例化,就需要把该类的完整限定名返回
        return new String[]{DeferredBean.class.getName()};
    }

    //这里要返回实现了Group接口的类
    @Override
    public Class<? extends Group> getImportGroup() {
        return DeferredImportSelectorGroupDemo.class;
    }

    private static class DeferredImportSelectorGroupDemo implements Group {

        List<Entry> list = new ArrayList<>();
        //收集需要实例化的类
        @Override
        public void process(AnnotationMetadata metadata, DeferredImportSelector selector) {
            System.out.println("==============DeferredImportSelectorGroupDemo.process===========");
            String[] strings = selector.selectImports(metadata);
            for (String string : strings) {
                list.add(new Entry(metadata,string));
            }
        }

        //复杂把process收集的结果返回,返回的类必须包装成entry对象
        @Override
        public Iterable<Entry> selectImports() {
            System.out.println("==============DeferredImportSelectorGroupDemo.selectImports===========");
            return list;
        }
    }
}
但是没有地方触发我们上面写的类,所以我们需要去增加一个类,这样我们就完成了一个bean的装配。
@Component
@Import(DeferredImportSelectorDemo.class)
public class ImportBean {
}
【SpringBoot自动装配】:
【整体流程】:
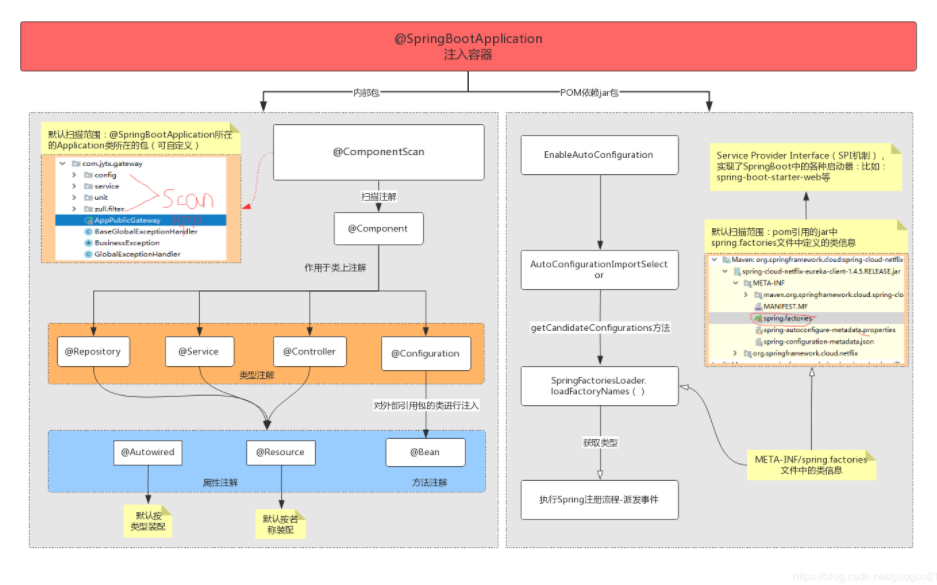
- 在EnableAutoConfifiguration注解中有一个@Import注解,这个注解中import中有一个类【AutoConfigurationImportSelector】,这个类实现了【DeferredImportSelector】这个接口。Spring会去扫描【@import】注解后的的类【AutoConfigurationImportSelector】从而调用一个内部类(【group】)中的俩个方法
- 这个类中实现了一个内部接口group。这个内部接口中有一个内部的类。
- 这个内部类中有两个方法process和selectImports,就是Spring会调用的两个方法。
- process通过去调用loadFactoryNames# 并且传入【@import】中的类名【EnableAutoConfiguration】作为key去查询autconfig中的spring,factories中已经配置好的类。
- SpringBoot会在初始Spring容器的时候把这个类进行装配
【细节】:
上面我们自己装配一个类发现Spring主要是循环类上面的有@import注解的类,然后操作的。接着我们看这个AutoConfigurationImportSelector类。这个类是@EnableAutoConfifiguration注解中@Import进来的类。而EnableAutoConfifiguration是在@SpringBootApplication中一个注解。我们发现,这个类也实现了【DeferredImportSelector】接口,那他肯定和我们上面干的事情是一样的,也就是说它里面肯定有一个内部类,并且有两个方法(#process和#selectImports)去收集需要交给Spring去装配的类。
【源码解析】:我们来看看他这个类中的两个方法。
// 这里获取需要实例化的类
@Override
public void process(AnnotationMetadata annotationMetadata, DeferredImportSelector deferredImportSelector) {
   Assert.state(deferredImportSelector instanceof AutoConfigurationImportSelector,
         () -> String.format("Only %s implementations are supported, got %s",
               AutoConfigurationImportSelector.class.getSimpleName(),
               deferredImportSelector.getClass().getName()));
    //这里拿到自动配置的实例
   AutoConfigurationEntry autoConfigurationEntry = ((AutoConfigurationImportSelector) deferredImportSelector)
         .getAutoConfigurationEntry(annotationMetadata);
   this.autoConfigurationEntries.add(autoConfigurationEntry);
   for (String importClassName : autoConfigurationEntry.getConfigurations()) {
      this.entries.putIfAbsent(importClassName, annotationMetadata);
   }
}

//这里返回需要实例化的类,并且包装他们
@Override
public Iterable<Entry> selectImports() {
   if (this.autoConfigurationEntries.isEmpty()) {
      return Collections.emptyList();
   }
   Set<String> allExclusions = this.autoConfigurationEntries.stream()
         .map(AutoConfigurationEntry::getExclusions).flatMap(Collection::stream).collect(Collectors.toSet());
   Set<String> processedConfigurations = this.autoConfigurationEntries.stream()
         .map(AutoConfigurationEntry::getConfigurations).flatMap(Collection::stream)
         .collect(Collectors.toCollection(LinkedHashSet::new));
   processedConfigurations.removeAll(allExclusions);

   return sortAutoConfigurations(processedConfigurations, getAutoConfigurationMetadata()).stream()
         .map((importClassName) -> new Entry(this.entries.get(importClassName), importClassName))
         .collect(Collectors.toList());
}
这里就是对包装需要装配的类
protected AutoConfigurationEntry getAutoConfigurationEntry(AnnotationMetadata annotationMetadata) { if (!isEnabled(annotationMetadata)) { return EMPTY_ENTRY; } //这里其实拿到的是SpringBootApplication对象 AnnotationAttributes attributes = getAttributes(annotationMetadata); //拿到自动配置类 List<String> configurations = getCandidateConfigurations(annotationMetadata, attributes);
//因为有些类我们不需要被装配,那就可以使用exclude注解排除他们,这里就是剔除我们不要的类, configurations = removeDuplicates(configurations); Set<String> exclusions = getExclusions(annotationMetadata, attributes); checkExcludedClasses(configurations, exclusions); configurations.removeAll(exclusions); configurations = getConfigurationClassFilter().filter(configurations); fireAutoConfigurationImportEvents(configurations, exclusions); return new AutoConfigurationEntry(configurations, exclusions); }这里和咱们上面聊到的spi机制的代码就是一样的了,但是我们记得他的这个方式是通过类名去获取对应的value数组的,他这里的类的全限定名是EnableAutoConfiguration,
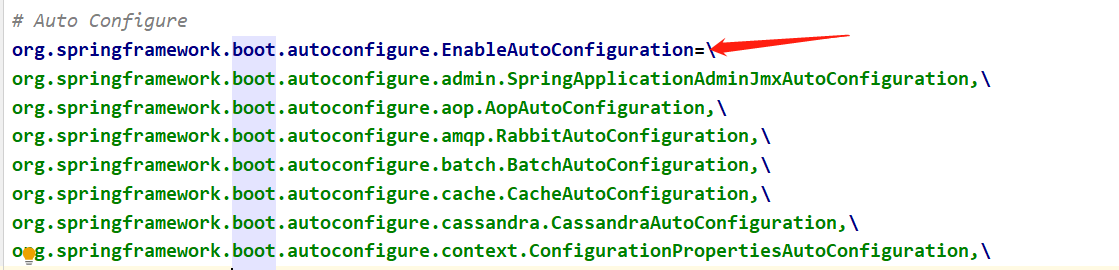
protected List<String> getCandidateConfigurations(AnnotationMetadata metadata, AnnotationAttributes attributes) {
   List<String> configurations = SpringFactoriesLoader.loadFactoryNames(getSpringFactoriesLoaderFactoryClass(),
         getBeanClassLoader());
   Assert.notEmpty(configurations, "No auto configuration classes found in META-INF/spring.factories. If you "
         + "are using a custom packaging, make sure that file is correct.");
   return configurations;
}
然后它就会通过这个key去获取value,在这个包下面,有所有的SpringBoot为我们准备的包
至此,SpringBoot把需要的类包装完毕,至于如何把类放在Spring中,这就是Spring需要做的事情了。这个东西还是在我们上面讲到的Spring容器初始化的那里的#refresh中做的。
那借助上面的源码,既然他自动装配的时候,会把key为EnableAutoConfiguration中的所有类都加载,那不是不是意味着我们可以写一个key和他名称一样的,然后value是自己的类放在我们自己的factories中让SpringBoot帮忙呢?答案是肯定的。就像这样,Spring就会帮忙管理我们自己的类了。
org.springframework.boot.autoconfigure.EnableAutoConfiguration=自己的类全限定名