项目是有很多个功能块组成的,我们开发的时候,当我们开发出来一个功能,想要测试这个功能是否正确,不可能等到前端和后端全部写好了再进行测试,这样太浪费时间,有没有什么方法能直接测试后台的功能写的是否正确(比如:service这个模块的功能)?当然有,下面讲解一个Junit单元测试。
我们是在Maven中进行测试的:
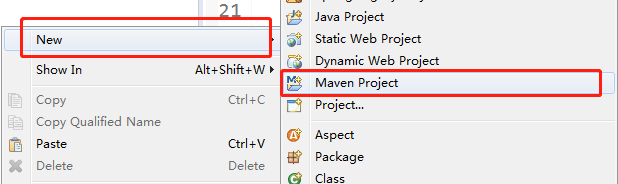
在maven中新建一个java EE工程:
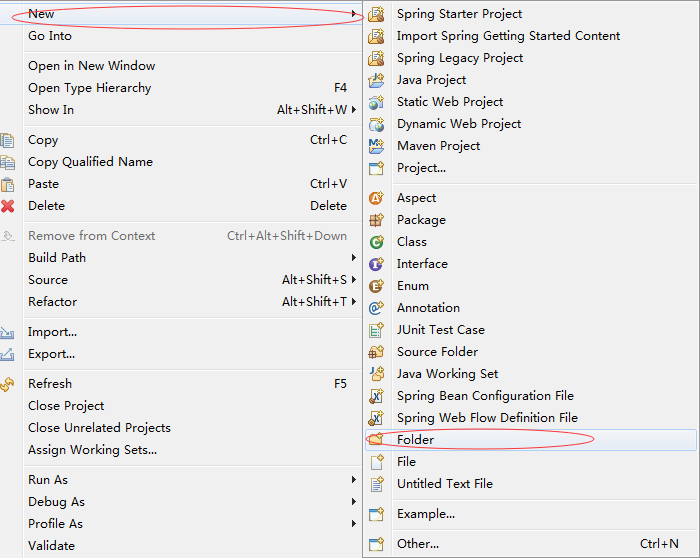
(1)打开maven,在左栏边,右键=>new=>Maven Project
(2)不要勾选create a simple project这一项,点击“next”

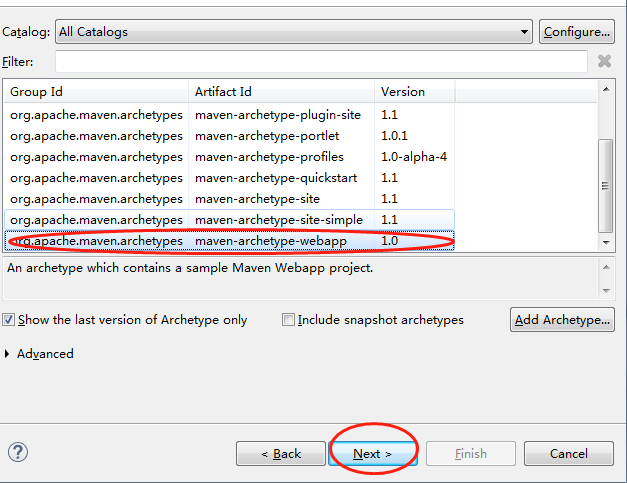
(3)选择后缀名为“webapp”这一栏,点击“next”
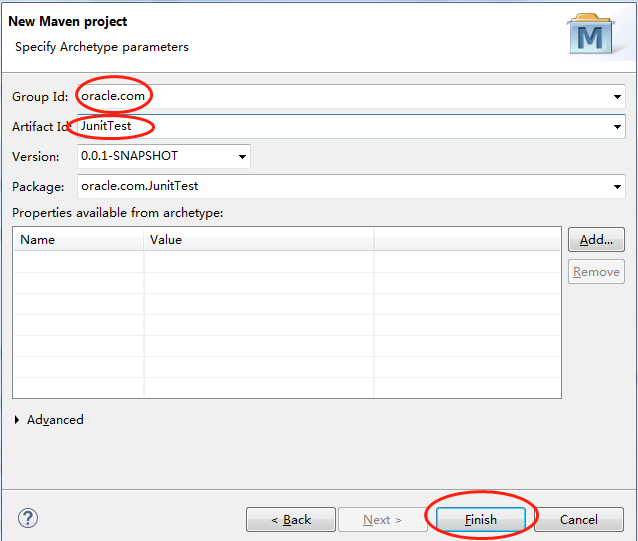
(4)填写“Group Id”和“Artifact Id”,点击“finish”
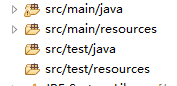
这样就可以创建一个javaEE工程了,但是一个完整的项目有四个目录,如下图:
但是它会缺少几个source folder,但是项目已经默认有,我们重新建缺少的那几个目录
使用Junit单元测试,需要两个依赖jar包 Junit和test
我们通过配置来导入这两个jar包及其所依赖的jar包,(通过maven中央仓库 https://mvnrepository.com/)
(1)在pom.xml文件里添加响应的jar依赖
<project xmlns="http://maven.apache.org/POM/4.0.0" xmlns:xsi="http://www.w3.org/2001/XMLSchema-instance"
  xsi:schemaLocation="http://maven.apache.org/POM/4.0.0 http://maven.apache.org/maven-v4_0_0.xsd">
  <modelVersion>4.0.0</modelVersion>
  <groupId>oracle.com</groupId>
  <artifactId>JunitTest</artifactId>
  <packaging>war</packaging>
  <version>0.0.1-SNAPSHOT</version>
  <name>JunitTest Maven Webapp</name>
  <url>http://maven.apache.org</url>
  <dependencies>
    <!-- https://mvnrepository.com/artifact/junit/junit -->
    <dependency>
        <groupId>junit</groupId>
        <artifactId>junit</artifactId>
        <version>4.12</version>
        <scope>test</scope>
    </dependency>
    <!-- https://mvnrepository.com/artifact/org.springframework/spring-test -->
    <dependency>
        <groupId>org.springframework</groupId>
        <artifactId>spring-test</artifactId>
        <version>5.1.2.RELEASE</version>
        <scope>test</scope>
    </dependency>
  </dependencies>
  <build>
    <finalName>JunitTest</finalName>
  </build>
</project>
下面我们通过一个小例子来说明,直接上代码:
在service层来测试,新建一个接口以及该接口的实现类
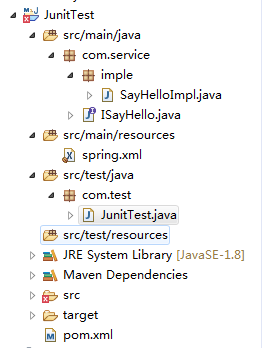
ISayHello.java的代码是:
package com.service;

public interface ISayHello {
    public void sayHello();
}
SayHelloImpl.java的代码是:
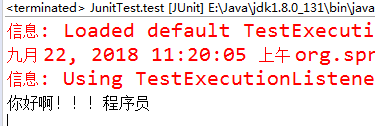
package com.service.imple;

import com.service.ISayHello;

public class SayHelloImpl implements ISayHello{

    @Override
    public void sayHello() {
        System.out.println("你好啊!!!程序员");
    }

}
spring.xml代码是:
<?xml version="1.0" encoding="UTF-8" ?>
<beans   xmlns="http://www.springframework.org/schema/beans"
         xmlns:xsi="http://www.w3.org/2001/XMLSchema-instance"
         xsi:schemaLocation="http://www.springframework.org/schema/beans
         http://www.springframework.org/schema/beans/spring-beans-3.0.xsd">
     <bean id="hello" class="com.service.imple.SayHelloImpl"></bean>
</beans>
spring.xml是实例化的第三方,是spring中IoC容器帮我们实例化对象的。其中class属性是实现类的全路径,id是实例化对象的名称。
pom.xml代码是:(我们还要导入spring的核心jar包)
<project xmlns="http://maven.apache.org/POM/4.0.0" xmlns:xsi="http://www.w3.org/2001/XMLSchema-instance"
  xsi:schemaLocation="http://maven.apache.org/POM/4.0.0 http://maven.apache.org/maven-v4_0_0.xsd">
  <modelVersion>4.0.0</modelVersion>
  <groupId>oracle.com</groupId>
  <artifactId>JunitTest</artifactId>
  <packaging>war</packaging>
  <version>0.0.1-SNAPSHOT</version>
  <name>JunitTest Maven Webapp</name>
  <url>http://maven.apache.org</url>
  <dependencies>
    <!-- https://mvnrepository.com/artifact/junit/junit -->
    <dependency>
        <groupId>junit</groupId>
        <artifactId>junit</artifactId>
        <version>4.12</version>
        <scope>test</scope>
    </dependency>
    <!-- https://mvnrepository.com/artifact/org.springframework/spring-test -->
    <dependency>
        <groupId>org.springframework</groupId>
        <artifactId>spring-test</artifactId>
        <version>5.1.2.RELEASE</version>
        <scope>test</scope>
    </dependency>
    <!-- https://mvnrepository.com/artifact/org.springframework/spring-core -->
    <dependency>
        <groupId>org.springframework</groupId>
        <artifactId>spring-core</artifactId>
        <version>5.1.1.RELEASE</version>
    </dependency>
  <!-- https://mvnrepository.com/artifact/org.springframework/spring-context -->
    <dependency>
        <groupId>org.springframework</groupId>
        <artifactId>spring-context</artifactId>
        <version>5.1.1.RELEASE</version>
    </dependency>
  </dependencies>
  <build>
    <finalName>JunitTest</finalName>
  </build>
</project>
在src/test/java该目录项目新建一个JunitTset类进行测试:
JunitTset.java代码是:
package com.test;

import org.junit.Test;
import org.junit.runner.RunWith;
import org.springframework.beans.factory.annotation.Autowired;
import org.springframework.test.context.ContextConfiguration;
import org.springframework.test.context.junit4.SpringJUnit4ClassRunner;

import com.service.ISayHello;

@RunWith(SpringJUnit4ClassRunner.class)
@ContextConfiguration(locations="classpath:spring.xml")
public class JunitTest {
    @Autowired
    private ISayHello sayhello;

    @Test
    public void test() {
        sayhello.sayHello();
    }
}
其中:
@RunWith(SpringJUnit4ClassRunner.class)
通过注解的形式,意思是使用JUnit4进行测试
@ContextConfiguration(locations="classpath:spring.xml")
通过注解的形式,意思是加载spring.xml配置文件
@Autowired
    private ISayHello sayhello;
因为是引入了ISayHello抽象,这个抽象是一个接口,使用@Autowired注解形式来帮我们注入,@Autowired是根据抽象类型,自动去spring容器中,帮我们找到类型是ISayHello的实现类,然后把对象自动注入进来,我们就可以直接使用了该对象了,然后可以调用到该抽象里的方法了。
@Test
    public void test() {
        sayhello.sayHello();
    }
其中:@Test是说明是单元测试,必须有的。
运行结果是: