一、Spring工厂类的结构
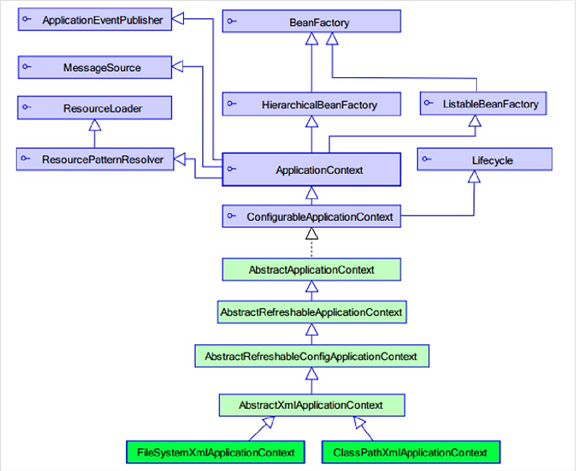
ApplicationContext继承BeanFactory
①、BeanFactory:老版本的工厂类
BeanFactory:调用getBean方法时,才会生成类的实例
②、ApplicationContext:新版本的工厂类
ApplicationContext:加载配置文件时,就会将Spring管理的类都实例化
ApplicationContext有两个实现类
ClassPathXmlApplicationContext:加载类路径(src)下的配置文件
FileSystemXmlApplicationContext:加载文件系统(绝对路径如:c\xxapplicationContext.xml)下的配置文件
二、Spring的配置
①、XML的提示配置(无网络情况下)

②、Bean的相关配置
Ⅰ、<bean>标签的id和name的配置
-
-
- id :使用了约束中的唯一约束。里面不能出现特殊字符的。
- name :没有使用约束中的唯一约束(理论上可以出现重复的,但是实际开发不能出现的)。里面可以出现特殊字符。
- Spring和Struts1框架整合的时候 <bean name=”/user” class=””/>
-
Ⅱ、Bean的生命周期的配置(了解)
-
-
- init-method :Bean被初始化的时候执行的方法
- destroy-method :Bean被销毁的时候执行的方法(Bean是单例创建,工厂关闭)
-
Ⅲ、Bean的作用范围的配置(重点)
scope :Bean的作用范围
-
-
- singleton :默认的,Spring会采用单例模式创建对象。
- prototype :多例模式。(Struts2和Spring整合一定会用到)
- request :应用在web项目中,Spring创建对象存入到request范围中。
- session :应用在web项目中,Spring创建对象存入到session范围中。
- globalsession :应用在web项目中,必须在porlet环境下使用。但是如果没有这种环境,相对于session。
-
三、Spring的Bean的实例化方式(Bean已经都交给Spring管理,Spring创建这些类的时候,有几种方式:)
①、无参构造方法的方式(默认)
public class Bean1 {

    public Bean1() {
    super();
    System.out.println("Bean1的无参的构造方法执行...");
    }
}
编写配置
<bean id="bean1" class="com.xx.spring.demo1.Bean1"></bean>
②、静态工厂实例化
public class Bean2Factory {
    public static Bean2 createBean2() {
    System.out.println("Bean2Factory中方法执行了....");
    return new Bean2();
    }
}
编写配置
<bean id="bean2" class="com.xx.spring.demo1.Bean2Factory" factory-method="createBean2" ></bean>
③、实例工厂(非静态工厂)实例化
public class Bean3Factory {
    public Bean3 createBean3() {
       System.out.println("Bean3Factory中方法执行了....");
       return new Bean3();
       }
}
编写配置
    <!-- 1、实例化工厂 -->
    <bean id="bean3Factory" class="com.xx.spring.demo1.Bean3Factory" ></bean>
    <!-- 2、调用实例化工厂的方法 -->
    <bean id="bean3" factory-bean="bean3Factory" factory-method="createBean3" ></bean>
四、Spring的属性注入
①、构造方法的属性注入
编写类
public class Car {
    private String name;
    private Long price;
    /**
     * @param name
     * @param price
     */
    public Car(String name, Long price) {
    this.name = name;
    this.price = price;
    }
    @Override
    public String toString() {
    return "Car [name=" + name + ", price=" + price + "]";
    }
}
编写配置
    <bean id="car" class="com.xxx.spring.demo2.Car">
        <constructor-arg name="name" value="WAMA"/>
        <constructor-arg name="price" value="1000000"/>
    </bean>
测试方法
    @Test
    public void demo2() {
    // 创建Spring的工厂
    ApplicationContext applicationContext = new ClassPathXmlApplicationContext("applicationContext.xml");

    Car car = (Car) applicationContext.getBean("car");

    System.out.println(car);
    }
②、Set方法的方式的属性注入
Ⅰ、set方法的属性注入(属性类型:非自定义对象类型)
编写类
public class Car {
    private String name;
    private Long price;

    public void setName(String name) {
        this.name = name;
    }

    public void setPrice(Long price) {
        this.price = price;
    }

    @Override
    public String toString() {
    return "Car [name=" + name + ", price=" + price + "]";
    }
}
编写配置
    <bean id="car" class="com.xxx.spring.demo2.Car">
        <property name="name" value="WAMA"/>
        <property name="price" value="1000000"/>
    </bean>
测试方法使用①测试方法
Ⅱ、set方法的属性注入(属性类型:自定义对象类型)
编写类
public class Employee {
    private String name;
    private Car car;
    public void setName(String name) {
        this.name = name;
    }
    public void setCar(Car car) {
        this.car = car;
    }
    @Override
    public String toString() {
    return "Employee [name=" + name + ", car=" + car + "]";
    }

}
编写配置
    <bean id="car" class="com.xxx.spring.demo2.Car">
        <property name="name" value="WAMA"/>
        <property name="price" value="1000000"/>
    </bean>

    <bean id="employee" class="com.xxx.spring.demo2.Employee">
        <property name="name" value="zhangsan"/>
        <!-- name:与employee类中的属性名一致( private Car car;)
            ref:与配置文件中对应对象的bean中的id/name一致
         -->
        <property name="car" ref="car"/>
    </bean>
测试方法
    @Test
    public void demo2() {
    // 创建Spring的工厂
    ApplicationContext applicationContext = new ClassPathXmlApplicationContext("applicationContext.xml");

    Employee employee = (Employee) applicationContext.getBean("employee");
    System.out.println(employee);
    }
③、P名称空间的属性注入(Spring2.5以后)
Ⅰ、写法:
- 普通属性:p:属性名="值"
- 对象属性:p:属性名-ref="值"
Ⅱ、P名称空间的引入
<beans xmlns="http://www.springframework.org/schema/beans"
    xmlns:p="http://www.springframework.org/schema/p"
    xmlns:xsi="http://www.w3.org/2001/XMLSchema-instance"
    xsi:schemaLocation="
        http://www.springframework.org/schema/beans
        http://www.springframework.org/schema/beans/spring-beans.xsd">
Ⅲ、使用p名称空间
    <bean id="car" class="com.xxx.spring.demo2.Car" p:name="WAMA" p:price="3000000"></bean>

    <bean id="employee" class="com.xxx.spring.demo2.Employee" p:name="lisi" p:car-ref="car"></bean>
④、SpEL的属性注入(Spring3.0以后)
SpEL:Spring Expression Language ,Spring的表达式语言
语法:#{SpEL}
    <bean id="car" class="com.xxx.spring.demo2.Car">
        <property name="name" value="#{'BWA'}"/>
        <property name="price" value="#{8000000}"/>
    </bean>

    <bean id="employee" class="com.xxx.spring.demo2.Employee">
        <property name="name" value="#{'wangwu'}"/>
        <property name="car" value="#{car}"/>
    </bean>
更多语法链接: https://pan.baidu.com/s/1XBCKU7rXRO07QBMGjzvhAQ 提取码: 26sc
五、集合类型属性注入
编写类
public class CollectionBean {
    private String[] arrs;
    private List<String> list;
    private Set<String> set;
    private HashMap<String, String> map;

    public void setArrs(String[] arrs) {
        this.arrs = arrs;
    }

    public void setList(List<String> list) {
        this.list = list;
    }

    public void setSet(Set<String> set) {
        this.set = set;
    }

    public void setMap(HashMap<String, String> map) {
        this.map = map;
    }

    @Override
    public String toString() {
    return "CollectionBean [arrs=" + Arrays.toString(arrs) + ", list=" + list + ", set=" + set + ", map=" + map
        + "]";
    }

}
编写配置
    <bean id="collectionBean" class="com.xxx.spring.demo2.CollectionBean">
        <!-- 数组类型 -->
        <property name="arrs">
            <list>
                <value>zhangsan</value>
                <value>lisi</value>
                <value>wangwu</value>
            </list>
        </property>

        <!-- list -->
        <property name="list">
            <list>
                <value>zhaoliu</value>
                <value>tianqi</value>
                <value>haoba</value>
            </list>
        </property>

        <!-- set -->
        <property name="set">
            <set>
                <value>jiujiu</value>
                <value>shishi</value>
                <value>xixi</value>
            </set>
        </property>

        <!-- map -->
        <property name="map">
            <map>
                <entry key="one" value="Vone"/>
                <entry key="two" value="Vtwo"/>
                <entry key="three" value="Vthree"/>
                <entry key="four" value="Vfour"/>
            </map>
        </property>
    </bean>
编写测试方法
    @Test
    public void demo3() {
    // 创建Spring的工厂
    ApplicationContext applicationContext = new ClassPathXmlApplicationContext("applicationContext.xml");

    CollectionBean collectionBean = (CollectionBean) applicationContext.getBean("collectionBean");
    System.out.println(collectionBean);
    }
六、Spring分模块开发的配置
①、在加载配置文件的时候加载多个配置文件
ApplicationContext applicationContext = new ClassPathXmlApplicationContext("applicationContext.xml",
        "applicationContext2.xml", "applicationContext3.xml");
②、在配置文件中引入其他配置文件
    <import resource="applicationContext2.xml"/>
    <import resource="applicationContext3.xml"/>
    <import resource="applicationContext4.xml"/>
    <import resource="applicationContext5.xml"/>