ToorBar的定制
在诸如社区类的app里面,很多都涉及到用户发布消息,如现今最流行的新浪微博,每条信息底部都会有个工具条,正如下图所示,有转发、评论和点赞三个按钮的工具条。

结构
1.作为一个独立存在的toolBar,必须要有个View作为载体,这里选择用UIImageView;
2.toolBar有三个可以点击的按钮,所以就要创建三个button。
下面直接上代码了!
YJYStatusToolBar.h文件
#import <UIKit/UIKit.h>

@class YJYStatusToolBar;
@class YJYStatus;
typedef enum{
    YJYStatusToolBarButtonTypeRetweet,        //转发
    YJYStatusToolBarButtonTypeComment,     //评论
    YJYStatusToolBarButtonTypeAttribude       //点赞
}YJYStatusToolBarButtonType;

//设置代理方法,标记点击了哪个按钮
@protocol  YJYStatusToolBarDelegate<NSObject>
-(void)statusToorBarButonClicked:(YJYStatusToolBarButtonType )type status:(YJYStatus *)status;
@end

@interface YJYStatusToolBar : UIImageView
@property (nonatomic, strong)YJYStatus *status;        //传入的数据模型
@property (nonatomic, weak)id<YJYStatusToolBarDelegate>delegate;

@end
YJYStatusToolBar.m文件

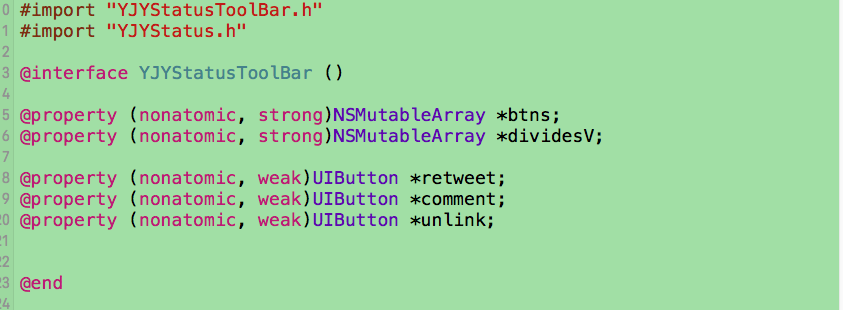
在.m文件里的私有属性有两个可变数组,和三个按钮,数组通过懒加载创建
-(NSMutableArray *)btns{
    if (!_btns) {
        _btns = [NSMutableArray array];
    }
    return _btns;
}

-(NSMutableArray *)dividesV{
    if (!_dividesV) {
        _dividesV = [NSMutableArray array];
    }
    return _dividesV;
}
重写initWithFrame方法:UIImageView交互必须要打开(self.userInteractionEnabled = YES)
-(instancetype)initWithFrame:(CGRect)frame
{
    if (self = [super initWithFrame:frame]) {
        [self setupAllChildView];
        self.userInteractionEnabled = YES;
        self.image = [UIImage strechableImage:@"timeline_card_bottom_background"];
    }
    return self;
}
在init方法里调用setupAllChildView方法
-(void)setupAllChildView
{
    UIButton *retweet = [self setupOneButtonWithImage:[UIImage imageNamed:@"timeline_icon_retweet"] title:@"转发" type:YJYStatusToolBarButtonTypeRetweet];
    _retweet = retweet;

    UIButton *comment = [self setupOneButtonWithImage:[UIImage imageNamed:@"timeline_icon_comment"] title:@"评论" type:YJYStatusToolBarButtonTypeComment];
    _comment = comment;

    UIButton *unlink = [self setupOneButtonWithImage:[UIImage imageNamed:@"timeline_icon_unlike"] title:@"赞" type:YJYStatusToolBarButtonTypeAttribude];
    _unlink = unlink;

    for (int i = 0; i < 2; i++) {
        UIImageView *divideV = [[UIImageView alloc]initWithImage:[UIImage imageNamed:@"timeline_card_bottom_line"]];
        [self addSubview:divideV];
        [self.dividesV addObject:divideV];
    }
}
再抽调方法setupOneButtonWithImage: title: type:
-(UIButton *)setupOneButtonWithImage:(UIImage *)image title:(NSString *)title type:(YJYStatusToolBarButtonType)type
{
    UIButton *button = [UIButton buttonWithType:UIButtonTypeCustom];
    [button setTitle:title forState:UIControlStateNormal];
    [button setTitleColor:[UIColor blackColor] forState:UIControlStateNormal];
    [button setImage:image forState:UIControlStateNormal];
    button.titleLabel.font = [UIFont systemFontOfSize:12];
    button.titleEdgeInsets = UIEdgeInsetsMake(0, 5, 0, 0);
    button.tag = type;
    [button addTarget:self action:@selector(btnClicked:) forControlEvents:UIControlEventTouchUpInside];

    [self addSubview:button];
    [self.btns addObject:button]; //每创建一个button就加入到数字里

    return button;
}
由于在一个View的控件上添加了三个button而没有设置frame值,所以要layoutSubView一下
-(void)layoutSubviews{
    [super layoutSubviews];

    NSUInteger count = self.btns.count;  //通过self.btn.count得出toolBar里button的数量,方便设置frame
    CGFloat w = YJYScreenWidth / count;
    CGFloat h = self.height;
    CGFloat x = 0;
    CGFloat y = 0;

    for (int i = 0; i < count; i++) {                                //设置button的frame
        UIButton *btn = self.btns[i];
        x = w * i;
        btn.frame = CGRectMake(x, y, w, h);
    }
    int i = 1;
    for (UIImageView *divide in self.dividesV) {          //设置间隔线的坐标
        UIButton *btn = self.btns[i];
        divide.x = btn.x;
        i++;
    }
}
实现代理方法:参数有type和status,即是按钮类型和这个消息的数据
-(void)btnClicked:(UIButton *)btn{
    if ([_delegate respondsToSelector:@selector(statusToorBarButonClicked:status:)]) {
        [_delegate statusToorBarButonClicked:(YJYStatusToolBarButtonType)btn.tag status:self.status];
    }
}
因为toolBar上有转发数,评论数和点赞数,涉及到数据模型YJYStatusModel,所以实现一下setter的方法
-(void)setStatus:(YJYStatus *)status
{
    _status = status;

    [self setBtn:_retweet title:status.reposts_count];
    [self setBtn:_comment title:status.comments_count];
    [self setBtn:_unlink title:status.attitudes_count];

}
-(void)setBtn:(UIButton *)btn title:(int)count
{
    NSString *title = nil;
    if (count) {
        if (count >= 10000) {
            CGFloat floatCount = count / 10000.0;
            title = [NSString stringWithFormat:@"%.1fW", floatCount];
            title = [title stringByReplacingOccurrencesOfString:@".0" withString:@""];
        }else{
            title = [NSString stringWithFormat:@"%i", count];
       }
        [btn setTitle:title forState:UIControlStateNormal];
    }
}
用到的工具类

UIImage+Image.m主要方法:图片渲染和图片拉伸的两个方法
+(instancetype)imageWithOriginName:(NSString *)imageName{
    UIImage *image = [UIImage imageNamed:imageName];
    return [image imageWithRenderingMode:UIImageRenderingModeAlwaysOriginal];
}
+(instancetype)strechableImage:(NSString *)imageName{
    UIImage *image = [UIImage imageNamed:imageName];
    return [image stretchableImageWithLeftCapWidth:image.size.width / 2 topCapHeight:image.size.height / 2];
}
UIView+Frame.m 坐标的拓展方法:x.y.with.height.size五个坐标属性的getter和setter方法
- (CGFloat)width
{
    return self.frame.size.width;
}
- (void)setWidth:(CGFloat)width
{
    CGRect frame = self.frame;
    frame.size.width = width;
    self.frame = frame;
}
- (CGFloat)height
{
    return self.frame.size.height;
}
- (void)setHeight:(CGFloat)height
{
    CGRect frame = self.frame;
    frame.size.height = height;
    self.frame = frame;
}
- (CGFloat)x
{
    return self.frame.origin.x;
}
- (void)setX:(CGFloat)x
{
    CGRect frame = self.frame;
    frame.origin.x = x;
    self.frame = frame;
}
- (CGFloat)y
{
    return self.frame.origin.y;
}
- (void)setY:(CGFloat)y
{
    CGRect frame = self.frame;
    frame.origin.y = y;
    self.frame = frame;
}
- (CGSize)size
{
    return self.frame.size;
}
- (void)setSize:(CGSize)size
{
    CGRect frame = self.frame;
    frame.size = size;
    self.frame = frame;
}