用CIFilter生成QRCode二维码图片
CIFilter不仅仅可以用来做滤镜,它还可以用来生成二维码.
CIFilterEffect.h + CIFilterEffect.m
//
//  CIFilterEffect.h
//  CIFilter
//
//  Created by YouXianMing on 14-5-9.
//  Copyright (c) 2014年 Y.X. All rights reserved.
//

#import <Foundation/Foundation.h>

/*

CILinearToSRGBToneCurve
CIPhotoEffectChrome
CIPhotoEffectFade
CIPhotoEffectInstant
CIPhotoEffectMono
CIPhotoEffectNoir
CIPhotoEffectProcess
CIPhotoEffectTonal
CIPhotoEffectTransfer
CISRGBToneCurveToLinear
CIVignetteEffect

*/

@interface CIFilterEffect : NSObject

@property (nonatomic, strong, readonly) UIImage *filterImage;
- (instancetype)initWithImage:(UIImage *)image filterName:(NSString *)name;

@property (nonatomic, strong, readonly) UIImage *QRCodeImage;
- (instancetype)initWithQRCodeString:(NSString *)string (CGFloat)width;

@end
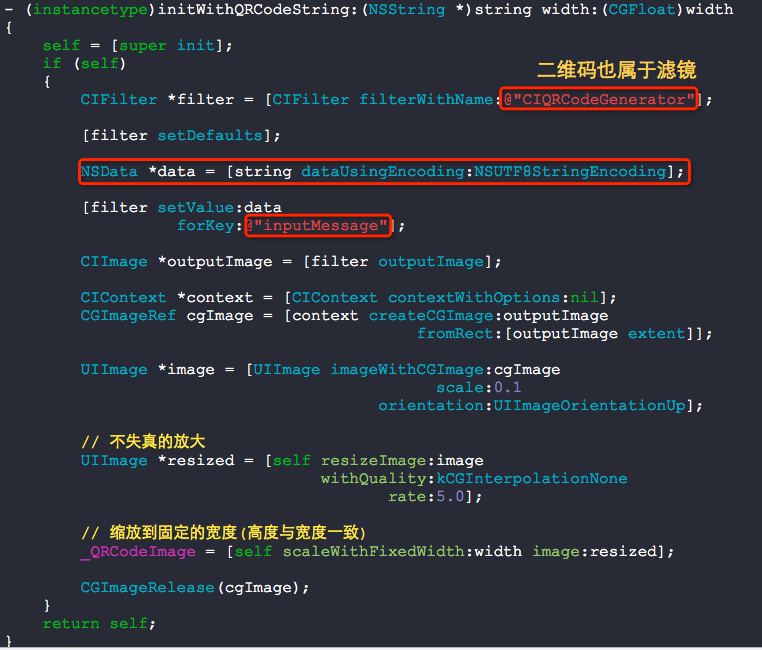
//
//  CIFilterEffect.m
//  CIFilter
//
//  Created by YouXianMing on 14-5-9.
//  Copyright (c) 2014年 Y.X. All rights reserved.
//

#import "CIFilterEffect.h"

@interface CIFilterEffect ()

@property (nonatomic, strong, readwrite) UIImage *filterImage;
@property (nonatomic, strong, readwrite) UIImage *QRCodeImage;

@end

@implementation CIFilterEffect

- (instancetype)initWithImage:(UIImage *)image filterName:(NSString *)name
{
    self = [super init];
    if (self)
    {
        // 将UIImage转换成CIImage
        CIImage *ciImage = [[CIImage alloc] initWithImage:image];

        // 创建滤镜
        CIFilter *filter = [CIFilter filterWithName:name
                                      keysAndValues:kCIInputImageKey, ciImage, nil];
        [filter setDefaults];

        // 获取绘制上下文
        CIContext *context = [CIContext contextWithOptions:nil];

        // 渲染并输出CIImage
        CIImage *outputImage = [filter outputImage];

        // 创建CGImage句柄
        CGImageRef cgImage = [context createCGImage:outputImage
                                           fromRect:[outputImage extent]];

        _filterImage = [UIImage imageWithCGImage:cgImage];

        // 释放CGImage句柄
        CGImageRelease(cgImage);
    }
    return self;
}

- (instancetype)initWithQRCodeString:(NSString *)string (CGFloat)width
{
    self = [super init];
    if (self)
    {
        CIFilter *filter = [CIFilter filterWithName:@"CIQRCodeGenerator"];

        [filter setDefaults];

        NSData *data = [string dataUsingEncoding:NSUTF8StringEncoding];

        [filter setValue:data
                  forKey:@"inputMessage"];

        CIImage *outputImage = [filter outputImage];

        CIContext *context = [CIContext contextWithOptions:nil];
        CGImageRef cgImage = [context createCGImage:outputImage
                                           fromRect:[outputImage extent]];

        UIImage *image = [UIImage imageWithCGImage:cgImage
                                             scale:0.1
                                       orientation:UIImageOrientationUp];

        // 不失真的放大
        UIImage *resized = [self resizeImage:image
                                 withQuality:kCGInterpolationNone
                                        rate:5.0];

        // 缩放到固定的宽度(高度与宽度一致)
        _QRCodeImage = [self scaleWithFixedWidth:width image:resized];

        CGImageRelease(cgImage);
    }
    return self;
}

- (UIImage *)scaleWithFixedWidth:(CGFloat)width image:(UIImage *)image
{
    float newHeight = image.size.height * (width / image.size.width);
    CGSize size = CGSizeMake(width, newHeight);
    UIGraphicsBeginImageContextWithOptions(size, NO, 0);

    CGContextRef context = UIGraphicsGetCurrentContext();

    CGContextTranslateCTM(context, 0.0, size.height);
    CGContextScaleCTM(context, 1.0, -1.0);

    CGContextSetBlendMode(context, kCGBlendModeCopy);
    CGContextDrawImage(context, CGRectMake(0.0f, 0.0f, size.width, size.height), image.CGImage);

    UIImage *imageOut = UIGraphicsGetImageFromCurrentImageContext();

    UIGraphicsEndImageContext();

    return imageOut;
}

- (UIImage *)resizeImage:(UIImage *)image
             withQuality:(CGInterpolationQuality)quality
                    rate:(CGFloat)rate
{
    UIImage *resized = nil;
    CGFloat width = image.size.width * rate;
    CGFloat height = image.size.height * rate;

    UIGraphicsBeginImageContext(CGSizeMake(width, height));
    CGContextRef context = UIGraphicsGetCurrentContext();
    CGContextSetInterpolationQuality(context, quality);
    [image drawInRect:CGRectMake(0, 0, width, height)];
    resized = UIGraphicsGetImageFromCurrentImageContext();
    UIGraphicsEndImageContext();

    return resized;
}

@end
看看以下使用情况,一行代码搞定!

以下几个二维码,闲得无聊可以扫一扫......


