本文翻译自:VBFJellyView tutorial
距离我上一篇文章已经过去很久了!
这个月非常疯狂。我去了马德里,在ironhack上面教了3天iOS知识(UIViews,CoreGraphics,Layers)。过程非常棒,所有人都很好,我非常享受。
同样,我也加入了minube团队来帮助他们开发一个新版本的app。这是一个非常令人兴奋的项目,非常荣幸跟这群天才一起工作!
今天,我将在这里聊一个非常有趣的东西。我叫它“果冻视图”。

在阅读了这篇关于重新设计Skype版的iOS应用,我对他们的活动视图非常感兴趣(上面的gif图),于是我开始用UIKit Dynamics 动态框架来实现这种效果。
特别感谢这篇文章Recreating Skype's Action Sheet Animation,他拯救了我。我必须承认,我一开始不知道CADisplay,我之前是使用NSTimer(你可以掐死我)来绘制这个图层的。不管怎么样,让我们开始吧!
怎么做呢?
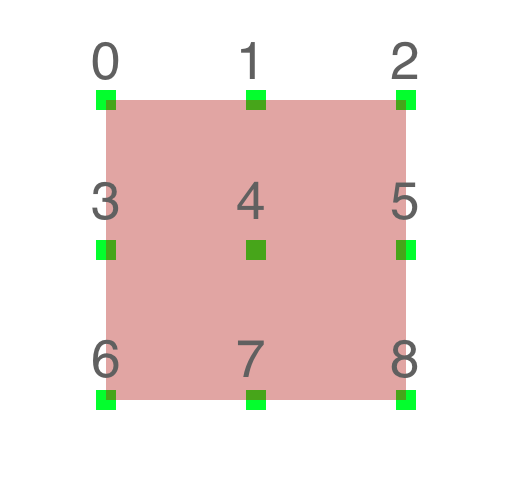
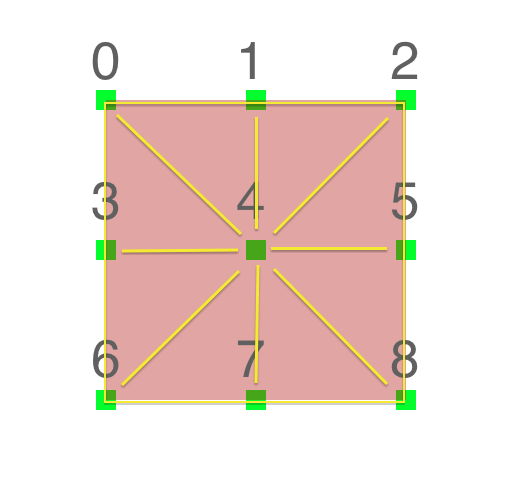
这里的技巧很简单:有9个小的视图使用UIAttachmentBehaviour一个个连接起来。下面的图片展示了全部子视图(绿色部分)和连接件(黄色部分)。
全部这些用代码实现如下,也非常简单:
- (void) setup {
    _nDivisions = 3;

    int item = 0;
    for (int i = 0; i < self.nDivisions; i++) {
        for (int k = 0; k < self.nDivisions; k++) {
            CGFloat hSeparation = self.viewSize.width/(self.nDivisions - 1);
            CGFloat vSeparation = self.viewSize.height/(self.nDivisions - 1);

            CGFloat hAmountToCenter = self.bounds.size.width/2 - self.viewSize.width/2;
            CGFloat vAmountToCenter = self.bounds.size.height/2 - self.viewSize.height/2;

            UIView *view = [[UIView alloc]initWithFrame:CGRectMake(self.bounds.origin.x + hAmountToCenter + hSeparation*k,
                                                               self.bounds.origin.y + vAmountToCenter + vSeparation*i,
                                                               10,
                                                               10)];
            view.tag = item;
            view.backgroundColor = [UIColor clearColor];
            [self addSubview:view];
            item += 1;
        }
    }

    [self attachViews];
}

- (void) attachViews {
    self.mainAnimator = [[UIDynamicAnimator alloc]initWithReferenceView:self];
    CGFloat separation = self.viewSize.width/(self.nDivisions - 1);
    for (int i = 0; i < [self.subviews count]; i++) {
        UIView *view = self.subviews[i];
        for (UIView *nextView in self.subviews) {
            if ((view.center.x - nextView.center.x == separation)||(view.center.y - nextView.center.y == separation)) {
                UIAttachmentBehavior *attach = [[UIAttachmentBehavior alloc]initWithItem:view
                                                                      attachedToItem:nextView];
                attach.damping = self.damping;
                attach.frequency = self.frequency;
                [self.mainAnimator addBehavior:attach];

                UIDynamicItemBehavior *bh = [[UIDynamicItemBehavior alloc]initWithItems:@[view]];
                bh.elasticity = self.elasticity;
                bh.density = self.density;
                [self.mainAnimator addBehavior:bh];
            }
        }
    }
}
这样就可以了。如果你添加其它的行为(例如重力,碰撞等)也仍然可以工作。下面是一个添加了一些重力和碰撞行为的例子。
在顶部添加一个CAShapeLayer
为了绘制这个“果冻视图”,我使用一个CAShapeLayer类。原因是如果你要添加一些子图层时会很方便。
这个Shape 图层的路径非常简单,就是3 X 3 的正方形。我们只需要使用中间点作为控制点,添加4个曲线(每条边一个)。
代码如下:
- (void) setupMainLayer {
    self.viewLayer = [CAShapeLayer layer];
    self.viewLayer.path = [self getViewPath].CGPath;
    self.viewLayer.fillColor = self.fillColor.CGColor;
    self.viewLayer.cornerRadius = 10;
    [self.layer addSublayer:self.viewLayer];
}

- (UIBezierPath *) getViewPath {
    UIBezierPath *bPath = [UIBezierPath bezierPath];
    [bPath moveToPoint:((UIView *)self.subviews[0]).center] ;
    [bPath addQuadCurveToPoint:((UIView *)self.subviews[2]).center
                  controlPoint:((UIView *)self.subviews[1]).center];
    [bPath addQuadCurveToPoint:((UIView *)self.subviews[8]).center
                  controlPoint:((UIView *)self.subviews[5]).center];
    [bPath addQuadCurveToPoint:((UIView *)self.subviews[6]).center
                  controlPoint:((UIView *)self.subviews[7]).center];
    [bPath addQuadCurveToPoint:((UIView *)self.subviews[0]).center
                  controlPoint:((UIView *)self.subviews[3]).center];
    return bPath;
}
添加魔力
这个魔力就是 CADisplayLink。
一个CADisplayLink对象就是一个定时器对象,允许你的应用以屏幕刷新频率异步地刷新它的绘制。
这么强大和简单。但这里的问题是我无法从9个正方形子视图中捕获所有的变化。只需提供一个绘制每个正方形的CGPath的函数,其余CADisplayLink会帮我们完成。
- (void) show {
    [self setupMainLayer];
    self.displayLink = [CADisplayLink displayLinkWithTarget:self selector:@selector(reDraw:)];
    [self.displayLink addToRunLoop:[NSRunLoop mainRunLoop] forMode:NSDefaultRunLoopMode];

}

- (void) reDraw:(CADisplayLink *)dLink {
    self.viewLayer.path = [self getViewPath].CGPath;
}
一些例子和包装
我已经创建了一个项目,包含了4个例子来展示一些关于如何在你的项目中使用的idea。我也上传了一个短的youtube视频来演示。
这些例子是:
-
普通的VBFJellyView + UIPanGestureRecognizer 。我只是移动边角,用新值来更新主的动画器,从而让它重新计算。中间点的位置是通过UIKit Dynamics更新的,感谢 snap behaviour。
-
JellyButton。我子类化了VBFJellyView,添加一个UITapGestureRecognizer。一旦这个视图被触摸,一个 push behaviour会应用到控制点上(向外)。
-
JellyAlert。我子类化了VBFJellyView,添加了一个重力和碰撞行为。对于碰撞行为,我添加了一个水平分界线。一旦这个视图被触摸,这个重力行为会移除,这个视图就会掉下来,进而离开屏幕。
4.普通的VBFJellyView + UIPanGestureRecognizer + 重力 + 碰撞行为。
Show me the code !!!
最后,去Github查找完整的代码。