Vue-Router
基本介绍
Vue-Router是Vue全家桶中至关重要的一个扩展化插件,使用它能够让我们的组件切换更加的方便,更加容易的开发前后端分离项目,目前Vue-Router版本已更新到4.x,我们就以4.x为例了解它的用法。

后端路由
学习Vue-Router之前,我们有必要了解一下什么是后端路由。
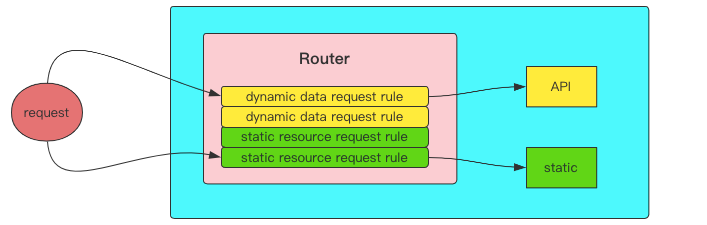
在早期前后端混合开发时,前端具体所展示的内容是由后端负责的,也就是说用户在浏览器中的一次请求操作会直接传递到后端服务器上,后端服务器会根据这个请求内容返回给浏览器不同的页面,如下所示:
前端路由
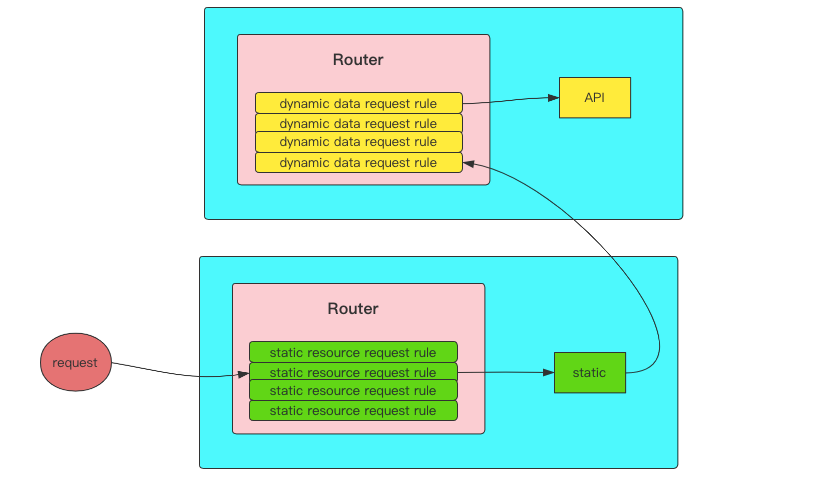
现在的项目越来越大,前后端混合的开发模式并不适用于大型项目,于是出现了前后端分离的开发模式,即用户在页面上所有静态资源请求大部分都是面向前端服务器发起的,然后再由前端服务器动态请求后端服务器的API接口获得所需要展示的数据最终结合前端服务器中的静态资源反馈给浏览器:
前置知识
简单认识url
用户与Web服务器之间是经由浏览器通过url打交道的,因此在学习Vue-Router插件之前你应该掌握一些必要的url相关知识。
下面是url的组成部分,截图自Node.js官网中对url的描述:
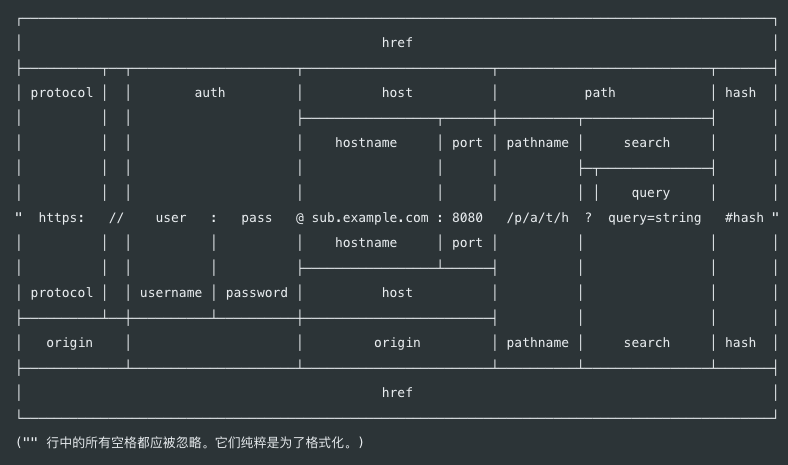
值得注意的是,auth部分是对身份权限的认证,目前在绝大多数应用中已经极少看到了,因此这里不再进行介绍。
我们以下面这个url进行说明:
https://localhost/book/1?page=2#caption_01
释义如下:
- https:代指请求协议,最常见的有http与https协议
- localhost:为host主机部分,其实完整写法应该是localhost:80,但是浏览器会自动为我们填上一个80的端口号,所以上面没有显式的写出来
- /book/1:这一段是path即请求的资源路径(服务器上不一定真实存在),通常情况下/book这一段是固定的。而/1这个只是一个书籍编号而已,它不是固定的,因此对于1来说他可以作为查询的params,即查询参数,这在RestAPI设计风格中极为常见
- ?page=2:这一段是请求的具体参数,即query部分,指的是我们请求book1这本书从第2页开始
- #caption_01:一个锚点的跳转,用于定位具体的内容,当打开这个url后它会直接跳转到第二章节,注意该部分绝大多数情况下都不会被路由系统所处理
单页面原理
Vue单页面开发的原理实际上就是利用<a>标签的锚点切换来完成的,举个例子。
访问下面的这个url就是主页:
http://loclhost/#/index
跳转时只需要修改锚点的定位即可,如从首页跳转到新闻页面:
http://loclhost/#/news
下面我们基于此原理利用原生的HTML+CSS来实现一个单页面应用:
代码示例:
<style>
    * {
        margin: 0;
        padding: 0;
        box-sizing: border-box;
        list-style: none;
    }

    .components {
        display: none;
    }

    :target {
        display: block;
    }

    body header {
        background-color: #565656;
        height: 48px;
    }

    body header ul {
        height: 100%;
        display: flex;
        flex-flow: row wrap;
        align-items: center;
        padding: 1rem;
    }

    body header ul li:first-of-type,
    body header ul li:nth-of-type(2) {
        margin-right: 2rem;
    }

    body header ul li:last-of-type {
        margin-left: auto;
    }

    body header ul li a {
        color: #fff;
        text-decoration: none;
    }

    body main {
        display: flex;
        justify-content: center;
        align-items: center;
        margin-top: 68px;
        font-size: 5rem;
    }
</style>

<body>
    <header>
        <ul>
            <li><a href="#/index">主页</a></li>
            <li><a href="#/news">新闻</a></li>
            <li><a href="#/backend">后台</a></li>
        </ul>
    </header>
    <main>
        <!-- 主页 -->
        <div id="/index" class="components">
            <span>HELLO INDEX</span>
        </div>
        <!-- 新闻 -->
        <div id="/news" class="components">
            <span>HELLO NEWS</span>
        </div>
        <!-- 后台 -->
        <div id="/backend" class="components">
            <span>HELLO BACKEND</span>
        </div>
    </main>
    <footer></footer>
</body>
hash与history
Vue-Router中对于组件的切换有2种模式,分别是hash模式和history模式。
当使用hash模式时,若你访问/index页面则浏览器地址栏中的url是这个样子的:
http://loclhost/#/index
而使用history模式时,url看起来会正常许多:
http://loclhost/index
使用hash模式的优缺点如下:
- 优点是#后面的信息永远不会被发送到Vue服务器的路由上,因此不会出现请求错误的情况
- 缺点是对SEO会有不好的影响,以及看起来不是那么美观
而使用history模式的优缺点如下:
- 优点是组件的切换看起来不再是锚点定位了,更加的美观了
- 缺点是如果用户在浏览器中直接访问某个嵌套的子组件时,会报404错误,并且我们还需要在服务器上加上一个回退路由,所以配置比较麻烦
hash模式是我们在开发时建议使用的,尽管history模式让url看起来美观了许多,但是你需要做一些额外的配置,过程比较繁琐,你可以参阅官方文档寻找这部分的资料。
hash和history其实都是window的2个子对象,使用location.hash可修改当前url中#后的部分,比如我们在浏览器的控制台中输入以下命令:
location.hash = "/index"
你会发现浏览器的地址栏中url会变更为:
http://localhost:5500/#/index
同理,history模式也提供了一些链接跳转的方法支持。
如,在浏览器的控制台中输入以下命令:
history.pushState({}, "", "/index")
你会发现浏览器的地址栏中url会变更为:
http://localhost:5500/index
如果你想了解更多,请参照之前JavaScript中的widnow对象章节。
历史记录栈
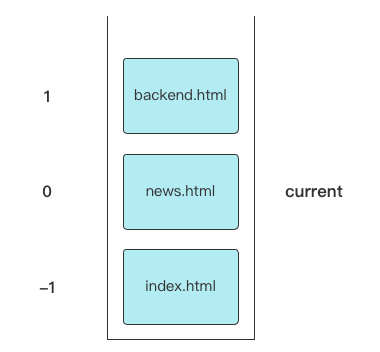
当浏览一个网页时,只要地址栏中的url发生改变都会被浏览器记录到一个“栈”中。
如下所示,我们先浏览了index.html、然后又浏览了news.html、最后浏览了backend.html:

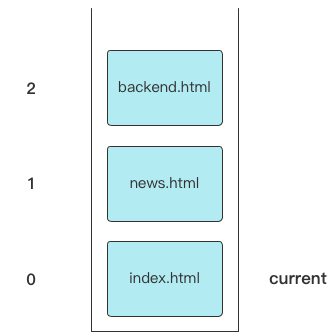
当你点击back按钮或者调用router.back()以及history.back()方法后,它会向后回退一格,同时图中左侧的计数器也会发生变化:
同理,当你点击forward按钮或者调用router.forward()以及history.forward()方法后,它又会向前推进一格,回到图1的状态:
如果你通过router.go()或者history.go()方法,并且填入的参数是-2时,那么它会向后回退2格,变成下面这种状态:
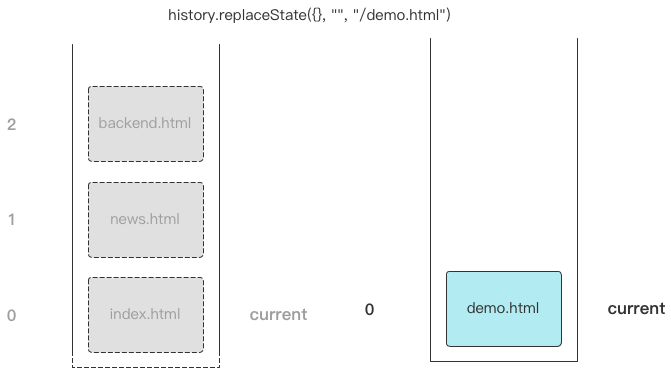
而router.replace()的意思是,跳转至新的页面,并且清空整个栈,如下所示,它等同于history.replaceState()方法:
基本使用
初始化项目
使用Vite生成项目,跟随指引一步一步的进行初始化:
$ npm init @vitejs/app <project-name>
进入到项目根目录下,安装Vue-Router插件,输入以下命令后它将会安装Vue-Router 4.x的最新版本:
$ npm install vue-router@4
在src下新建一个router目录,并在其中新建一个index.js文件,该文件将作为Vue-Router插件的配置文件存在:
$ mkdir ./src/router
$ touch ./src/router/index.js
删除.src/components/HelloWorld.vue:
$ rm -rf ./src/components/HelloWorld.vue
清空.src/App.vue中的代码,并粘贴下面的代码:
<template>
  <div>hello world</div>
</template>

<script setup>
</script>

<style>

</style>
接下来你就可以启动这个Vue项目了,默认项目的端口是3000:
$ npm run dev
快速的上手
我们需要先准备3个组件、分别是Index、Book、Hot,代码基本一致:
<template>
  <div>
    <h1>Hello Index</h1>
  </div>
</template>

<script setup>
</script>

<style scoped>
h1 {
  font-size: 8rem;
}
</style>
要想使用Vue-Router插件,我们就必须在.src/router/index.js文件中对其进行引入:
// 1. 导入使用hash模式、使用history模式、以及创建全局路由对象的方法
import { createWebHashHistory, createWebHistory, createRouter } from "vue-router";

// 2. 导入组件
import Index from "../components/Index.vue"
import Book from "../components/Book.vue"
import Hot from "../components/Hot.vue"

// 3.配置路由映射表
const routes = [
    { path: "/index", component: Index },
    { path: "/book", component: Book },
    { path: "/hot", component: Hot },
]

// 4.创建全局路由对象,并且使用hash模式初始化这个全局路由对象
const router = createRouter({
    routes,
    history: createWebHashHistory()
})

// 5.导出全局路由对象
export default router
然后需要到.src/main.js中为当前的Vue应用加载这个插件:
import { createApp } from 'vue'
import App from './App.vue'
import router from "./router/index"

const app = createApp(App);
// 加载插件
app.use(router);
app.mount('#app');
最后修改一下App.vue的代码,我们要在App.vue中使用<router-link>以及<router-view>组件来做路由的入口和出口,注意<router-link>以及<router-view>组件都是Vue-Router所自带的组件,内部已完成全局注册,可以直接使用:
<template>
  <div>
    <header id="header">
      <!-- 路由入口,相当于a标签 -->
      <router-link :to="{ path: '/index' }">主页</router-link>
      <router-link :to="{ path: '/book' }">书籍</router-link>
      <router-link :to="{ path: '/hot' }">热门</router-link>
    </header>
    <main id="main">
      <!-- 路由出口,当点击<router-link>后,路由表中的组件会在此处显示 -->
      <router-view></router-view>
    </main>
  </div>
</template>

<script setup>
// 注册组件
import Index from "./components/Index.vue";
import Book from "./components/Book.vue";
import Hot from "./components/Hot.vue";
</script>

<style>
/* 全局样式设置 */
* {
  margin: 0;
  padding: 0;
  box-sizing: border-box;
  list-style: none;
}

header#header {
  height: 50px;
  padding: 1rem;
  background: #565656;
  display: flex;
  justify-content: flex-start;
  align-items: center;
  box-shadow: #aaa 0 5px 5px;
}

header#header a {
  text-decoration: none;
  margin-right: 2rem;
  color: #fff;
}

main#main {
  display: flex;
  flex-flow: column;
  justify-content: center;
  align-items: center;
  height: 80vh;
}
</style>
实际上<router-link>中的to属性也可以不用进行动态绑定,而是直接填入path,但是我们并不推荐这样使用:
<!-- 不推荐 -->
<router-link to="/index">主页</router-link>

<!-- 推荐 -->
<router-link :to="{ path: '/index' }">主页</router-link>
name具名路由
对.src/index.js里routes中每一条rule对象,我们都可以为它们加上一个name属性:
const routes = [
    { path: "/index", name: "index", component: Index },
    { path: "/book", name: "book", component: Book },
    { path: "/hot", name: "hot", component: Hot },
]
这样在为模板中的<router-link>设置to属性时,可以动态的绑定一个对象并指定需要跳转的rule的name属性即可:
<header id="header">
  <!-- 路由入口,相当于a标签 -->
  <router-link :to="{ name: 'index' }">主页</router-link>
  <router-link :to="{ name: 'book' }">书籍</router-link>
  <router-link :to="{ name: 'hot' }">热门</router-link>
</header>
alias路由别名
对.src/index.js里routes中每一条rule对象,我们都可以为它们加上一个alias属性:
const routes = [
    {
        path: "/index",
        name: "index",
        alias: ["/index.htm", "/index.html"],
        component: Index
    }
]
配置好之后不管你访问下面那个url,它都会跳转至Index组件中:
http://localhost:3000/index
http://localhost:3000/index.htm
http://localhost:3000/index.html
redirect重定向
如果想在路由中定义重定向,则只需要配置redirect属性即可:
const routes = [
    {
        path: "/",
        redirect: { name: "index" }
    },
    {
        path: "/index",
        name: "index",
        alias: ["/index.htm", "/index.html"],
        component: Index
    },
]
这样当你访问 localhost:3000 时,它会自动跳转到Index中。
meta定义路由元信息
对.src/index.js里routes中每一条rule对象,我们都可以为它们加上一个meta属性:
const routes = [
    {
        path: "/index",
        name: "index",
        alias: ["/index.htm", "/index.html"],
        meta: { title: "主页", verify: false },
        component: Index
    }
]
在后续开发时,我们能通过一些方式拿到这些内容,因此你可以将meta属性定义成这个route的附加信息:
<script setup>
import { onMounted } from "vue";
import { useRoute } from "vue-router";

const route = useRoute();

onMounted(() => {
  console.log(route.meta.verify);
  console.log(route.meta.title);
});
</script>
router-link的点按效果
默认的<router-link>点击后没有任何样式,我们可以在App.vue中配置一个全局的style,它的作用在于所有的<router-link>点击后都会应用这个样式类,如下所示:
.router-link-active {
  text-shadow: #ddd 2px 5px 5px !important;
}
最终结果:
你也可以为每个<router-link>单独添加active-class属性,然后定义属性值的class style,它的优先值高于.router-link-active:
// template
<router-link to="/index" active-class="choice_index">主页</router-link>

// style
.choice_index{
  color : red !important;
}
路由对象
Router介绍
useRouter()是Vue-Router中提供的一个构造方法,调用它可以得到一个全局的Router对象,即整个routes路由映射表。
如果想在模板中使用这个全局路由对象,你可以直接像下面这样操作:
{{$router}}
要想在脚本中使用这个全局路由对象你必须先对其进行导入:
import { useRouter } from "vue-router";
接下来需要进行实例化操作:
const router = useRouter();
全局路由对象中可以调用很多方法、如push()、back()等,如下表所示:
| 方法 | 描述 |
|---|---|
| push() | 等同于window.history.pushState(),打开一个新的url |
| replace() | 等同于window.history.replaceState(),打开一个新的url,并清空当前活动窗口的历史记录 |
| back() | 等同于window.history.back(),执行页面回退操作 |
| forward() | 等同于window.history.forward(),执行页面前进操作 |
| go(±n) | 等同于window.history.go(),执行页面回退或前进n个操作 |
Route介绍
useRoute()是Vue-Router中提供的一个构造方法,调用它可以得到一个当前活动的Route对象,即当前所匹配到的rule。
如果想在模板中使用这个活动路由对象,你可以直接像下面这样操作:
{{$route}}
要想在脚本中使用这个活动路由对象你必须先对其进行导入:
import { useRoute } from "vue-router";
接下来需要进行实例化操作:
const route = useRoute();
活动路由对象中可以调用很多属性、如path、name等,如下表所示:
| 属性 | 描述 |
|---|---|
| path | 获取当前活动路由的path |
| name | 获取当前活动路由的name |
| params | 获取当前活动路由的params |
| query | 获取当前活动路由的query |
| meta | 获取当前活动路由的meta |
| hash | 获取当前活动路由的hash |
| redirectedFrom | 获取当前活动路由的前一个跳转链接 |
在脚本中进行跳转
如果你想在<script setup>进行路由跳转,可以调用router.push()或者router.replace()方法,如下所示:
<script setup>
import { onMounted } from "vue";
import { useRouter } from "vue-router";

const router = useRouter();

onMounted(() => {
  router.push({ name: "book" });
});
</script>
获取路由的元信息
如果你想在<script setup>中获取当前路由的meta元信息,可以调用route.meta获得整个meta对象,如下所示:
<script setup>
import { onMounted } from "vue";
import { useRoute } from "vue-router";

const route = useRoute();

onMounted(() => {
    console.log(route.meta);
});
</script>
路由视图
嵌套视图
组件是允许嵌套的,当然<router-view>也同样支持嵌套,举个例子,我们的Index中有2个子组件分别是login和register,当点击这2个组件中任何一个时我们希望在Index中展示这2个组件,而不是单独进行跳转。
首先我们需要在routes中为rule配置children选项,如下所示,注意第2层rule的path必须加上前缀:
const routes = [
    {
        path: "/index",
        name: "index",
        alias: ["/index.htm", "/index.html"],
        meta: { title: "主页", verify: false },
        component: Index,
        children: [
            { path: "/index/login", name: "login", meta: { title: "登录" }, component: Login },
            { path: "/index/register", name: "register", meta: { title: "注册" }, component: Register },
        ]
    },
]
其次是需要在Index组件中开放<router-link>和<router-view>,此外还需要在Index组件中对Login和Register组件进行注册:
<template>
  <div>
    <header id="index-header">
      <router-link :to="{ name: 'register' }">注册</router-link>
      <router-link :to="{ name: 'login' }">登录</router-link>
    </header>
    <main id="index-main">
      <router-view></router-view>
    </main>
  </div>
</template>

<script setup>
import Register from "./Register.vue";
import Login from "./Login.vue";

import { onMounted } from "vue";
import { useRoute } from "vue-router";

const route = useRoute();

onMounted(() => {
  console.log(route.meta);
});
</script>

<style scoped>
#index-header {
  height: 2rem;
  border: 1px solid #ddd;
  display: flex;
  align-items: center;
  padding: 0.5rem;
  background: #6b6b6b;
}

#index-header a {
  color: #fff;
  text-decoration: none;
}

#index-header a:first-of-type {
  margin-right: 0.5rem;
}

#index-main {
   200px;
  height: 100px;
  border: 1px solid #ddd;
  display: flex;
  justify-content: center;
  align-items: center;
}
</style>
下面是Login和Register组件的代码,它们的结构基本一致:
<template>
  <div>
    <form action="#">
      <div><input type="text" /></div>
      <div><input type="password" /></div>
      <div><button>login</button></div>
    </form>
  </div>
</template>

<script setup>
</script>

<style scoped>

</style>
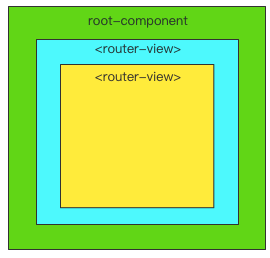
效果展示,首先最外部的App.vue中具有一个<router-view>,它主要作用于主页、书籍以及热门的切换,而在Index.vue中也具有一个<router-view>,它则只用于登录或者注册的切换,于是这个嵌套关系就出来了:
命名视图
嵌套视图是具有层级的,而命名视图没有层级,即可以在一个组件模板中多次使用<router-view>,它是一种扁平化的设计。
如,头部导航栏,左侧菜单栏,右边内容块三个组件,都显示在一个页面上,就可以使用命名视图,换而言之,命名视图是由多个组件构成一个页面的。
核心代码如下,由于命名视图使用较少,这里不再进行具体演示:
// template

<router-view></router-view>
<router-view name="menu"></router-view>
<router-view name="show"></router-view>


// .src/router/index.js

const routes = [
    {
        path: "/index",
        name: "index",
        alias: ["/index.htm", "/index.html"],
        meta: { title: "主页", verify: false },
        // 由于这个页面是由3个组件构成的,所以这里要使用components而不是component
        components: {
            // 如果<view-router>没有name属性,则用default
            default: header,
            menu: menu,
            show: show,
        }
    },
]
参数相关
params
从restAPI设计规范来看,url的路径不可能全部由routes进行配置,因为params总是动态变化的。
如下所示:
GET localhost:3000/#/book          // 查询所有书籍
GET localhost:3000/#/book/1       // 查询编号为1的书籍
GET localhost:3000/#/book/2      // 查询编号为2的书籍
我们需要有一个动态的路由机制,在rule中匹配时的代码如下:
{ path: "/book/:id?", name: "book", alias: ["/book.htm", "/book.html"], component: Book }

// id代表接收的这个params名称是id
// ?代表这个params可以有也可以没有
而<router-link>则需要向下面这样设置:
<router-link :to="{name : 'book', params : {id : book.id}}">{{book.name}}</router-link>
当你需要在模板中取得这个params时,需要通过当前路由对象route获得:
{{$route.params.id}}
当你需要在脚本中取得这个params时,也需要通过当前路由对象route获得:
import { useRoute } from "vue-router";
const route = useRoute();
route.params.id
我们以Book组件为例,默认它将使用AllBook组件展示所有图书,当你选中一本图书后它将使用BookDetails组件展示书籍详情:

Book组件代码如下:
<template>
  <div>
    <AllBook v-if="!$route.params.id" />
    <BookDetails v-else />
  </div>
</template>

<script setup>
import AllBook from "./AllBook.vue";
import BookDetails from "./BookDetails.vue";
import { provide } from "vue";
import { reactive } from "vue";
import { useRoute } from "vue-router";

const route = useRoute();

const bookAry = reactive([
  {
    id: 1,
    name: "红楼梦",
    author: "曹雪芹",
    chapter: [
      "第一回 甄士隐梦幻识通灵 贾雨村风尘怀闺秀",
      "第二回 贾夫人仙逝扬州城 冷子兴演说荣国府",
      "第三回 开生面梦演红楼梦 立新场情传幻境情",
    ],
  },
  {
    id: 2,
    name: "西游记",
    author: "吴承恩",
    chapter: [
      "第一回 灵根育孕源流出 心性修持大道生",
      "第二回 悟彻菩提真妙理 断魔归本合元神",
      "第三回 四海千山皆拱伏 九幽十类尽除名",
    ],
  },
  {
    id: 3,
    name: "三国演义",
    author: "罗贯中",
    chapter: [
      "第一回 宴桃园豪杰三结义 斩黄巾英雄首立功",
      "第二回 张翼德怒鞭督邮 何国舅谋诛宦竖",
      "第三回 议温明董卓叱丁原 馈金珠李肃说吕布",
    ],
  },
  {
    id: 4,
    name: "水浒传",
    author: "施耐庵",
    chapter: [
      "第一回 张天师祈禳瘟疫 洪太尉误走妖魔",
      "第二回 王教头私走延安府 九纹龙大闹史家村",
      "第三回 史大郎夜走华阴县 鲁提辖拳打镇关西",
    ],
  },
]);

provide("bookAry", bookAry);
</script>

<style scoped>
</style>
AllBook组件代码如下:
<template>
  <div>
    <ul>
      <li v-for="book in bookAry" :key="book.id">
        <router-link :to="{ name: 'book', params: { id: book.id } }">{{
          book.name
        }}</router-link>
      </li>
    </ul>
  </div>
</template>

<script setup>
import { inject } from "vue";

const bookAry = inject("bookAry");
</script>

<style scoped>
</style>
BookDetails组件代码如下:
<template>
  <div>
    <div v-for="book in bookAry" :key="book.id">
      <div v-if="book.id == $route.params.id">
        <h1>{{ book.name }}</h1>
        <h3>{{ book.author }}</h3>
        <ul>
          <li v-for="chapter in book.chapter" :key="chapter">{{ chapter }}</li>
        </ul>
      </div>
    </div>
  </div>
</template>

<script setup>
import { inject } from "vue";

const bookAry = inject("bookAry");
</script>

<style scoped>
</style>
query
在发送具有条件筛选的请求、或者提交具有数据的请求时query是非常常用的。
如下这个例子:
GET localhost:3000/#/book/1?chapter=2 // 查询编号为1的书籍的第二章
而对于<router-link>则需要向下面这样设置:
<router-link :to="{name : 'book', params : {id : book.id}, query : {chapter : bookChapter}}">{{book.name}}</router-link>
当你需要在模板中取得这个query时,需要通过当前路由对象route获得:
{{$route.query.chapter}}
当你需要在脚本中取得这个params时,也需要通过当前路由对象route获得:
import { useRoute } from "vue-router";
const route = useRoute();
route.query.chapter
这里我们不再进行演示,因为它和params是非常相似的。
导航守卫
基本概念
每个组件切换都需要经历两个阶段,你可以将它理解为2个保安。
- 前置守卫:对切换前的行为进行检查,检查通过后必须调用next()方法才能继续进行切换
- 后置守卫:对切换后的工作进行善后,可以理解为路由切换组件时最后运行的一个钩子函数
一般来说前置守卫使用较多,后置守卫使用较少。
全局守卫
在router全局路由对象中设置的导航守卫为全局守卫,如下所示我们希望组件在切换时能够获取当前活动路由对象的meta元信息中的title属性,以设置document的title。
下面这段代码可以放在./src/router/index.js中:
router.beforeEach((to, from, next) => {
    // from为当前活动路由对象
    // to为即将活动的下一个路由对象
    console.log(`from : ${from.path} => to : ${to.path}`);
    next();
})

router.afterEach((to, from)=>{
    document.title = to.meta.title || "Web Site"
})
路由守卫
我们也可以对某个route单独的配置守卫,当然这很少使用到:
const routes = [
    { path: "/", redirect: { name: "index" } },
    {
        path: "/index",
        name: "index",
        component: Index,
        beforeEnter: (to, from) => {
            // false拦截、true通过
            return false
        },
    }
]
组件守卫
我们也可以单独的为某一个组件添加以下守卫,当然这也很少使用到:
import { onBeforeRouteLeave, onBeforeRouteUpdate } from 'vue-router'

export default {
  setup() {
    onBeforeRouteLeave((to, from, next) => {
        next()
    })

    onBeforeRouteUpdate((to, from, next) => {
        next()
    })
  },
}
keep-alive
组件缓存
的时候我们希望当组件发生切换后,再次back回来时之前被切换的组件仍然保留被切换之前的状态,当出现这种需求时就可以采用<keep-alive>进行组件缓存。
如下示例,我们缓存了Register组件和Login组件,这样在用户输入过程中切换组件会保留组件的状态:
代码如下:
<main id="index-main">
    <!-- 固定格式! -->
    <router-view v-slot="{ Component }">
    <keep-alive>
        <component :is="Component"></component>
    </keep-alive>
    </router-view>
</main>
钩子函数
Vue3中提供了2个生命周期钩子函数:
- onActivated:被 keep-alive 缓存的组件激活时调用
- onDeactivated:被 keep-alive 缓存的组件失活时调用
常用属性
以下是<keep-alive>上可添加的一些属性:
- include : string | RegExp | Array 只有名称匹配的组件会被缓存。
- exclude : string | RegExp | Array 任何名称匹配的组件都不会被缓存。
- max : number | string 最多可以缓存多少组件实例。
示例演示:
<!-- 只缓存 Login 和 Register 组件 -->
<router-view v-slot="{ Component }">
  <keep-alive>
    <component :is="Component" :include="['Login', 'Register']"></component>
  </keep-alive>
</router-view>
其他知识
资源懒加载
在使用Vite进行项目打包后,所有的资源文件都会整合到一起,最终输出一个chunk。
这样做会带来一个问题,当你的项目过大时用户打开页面首次加载chunk会显得非常慢,因为它会将所有的组件、第三方库一次性加载出来。
这种情况下,我们就需要进行按需加载了,对于没有展示的组件或没有使用的第三方库暂时不进行加载,当进行路由跳转时才进行加载,如下所示:
// 将
// import UserDetails from './views/UserDetails'
// 替换成
const UserDetails = () => import('./views/UserDetails')

const router = createRouter({
  // ...
  routes: [{ path: '/users/:id', component: UserDetails }],
})
修改完成后再次打包,你会发现它将输出多个chunk。
组件切换动画
想要在你的路径组件上使用转场,并对导航进行动画处理,你需要使用 v-slot API:
<router-view v-slot="{ Component }">
  <transition name="fade">
    <component :is="Component" />
  </transition>
</router-view>
Transition 的所有功能 在这里同样适用。
上面的用法会对所有的路由使用相同的过渡。如果你想让每个路由的组件有不同的过渡,你可以将元信息和动态的name 结合在一起,放在<transition>上:
const routes = [
  {
    path: '/custom-transition',
    component: PanelLeft,
    meta: { transition: 'slide-left' },
  },
  {
    path: '/other-transition',
    component: PanelRight,
    meta: { transition: 'slide-right' },
  },
]
<router-view v-slot="{ Component, route }">
  <!-- 使用任何自定义过渡和回退到 `fade` -->
  <transition :name="route.meta.transition || 'fade'">
    <component :is="Component" />
  </transition>
</router-view>
也可以根据目标路由和当前路由之间的关系,动态地确定使用的过渡。使用和刚才非常相似的片段:
<!-- 使用动态过渡名称 -->
<router-view v-slot="{ Component, route }">
  <transition :name="route.meta.transition">
    <component :is="Component" />
  </transition>
</router-view>
我们可以添加一个 after navigation hook,根据路径的深度动态添加信息到meta字段。
router.afterEach((to, from) => {
  const toDepth = to.path.split('/').length
  const fromDepth = from.path.split('/').length
  to.meta.transitionName = toDepth < fromDepth ? 'slide-right' : 'slide-left'
})
版本区别
Route和Router
在Options API中,如果想要在<script>中获取Route或者Router需要使用this进行调用:
<script>
export default {
    name : "Index",
    data(){
        return {}
    },
    mounted(){
        console.log(this.$route);
        console.log(this.$router);
    }
}
</script>
组件守卫
在Options API中,组件守卫多了一个钩子函数,尽管很少使用,但是还是要列出来,如下所示:
const UserDetails = {
  template: `...`,
  beforeRouteEnter(to, from) {
    // 在渲染该组件的对应路由被验证前调用
    // 不能获取组件实例 `this` !
    // 因为当守卫执行时,组件实例还没被创建!
  },
  beforeRouteUpdate(to, from) {
    // 在当前路由改变,但是该组件被复用时调用
    // 举例来说,对于一个带有动态参数的路径 `/users/:id`,在 `/users/1` 和 `/users/2` 之间跳转的时候,
    // 由于会渲染同样的 `UserDetails` 组件,因此组件实例会被复用。而这个钩子就会在这个情况下被调用。
    // 因为在这种情况发生的时候,组件已经挂载好了,导航守卫可以访问组件实例 `this`
  },
  beforeRouteLeave(to, from) {
    // 在导航离开渲染该组件的对应路由时调用
    // 与 `beforeRouteUpdate` 一样,它可以访问组件实例 `this`
  },
}
keep-alive&transition
在Vue2中,keep-alive和transition调用很简单,如下所示:
<keep-alive>
  <router-view><router-view/>
</keep-alive>

<transition enter-active-class="animate__animated  animate__bounce">
  <router-view><router-view/>
</transition>