nginx与keepalived实现高可用
本实验使用了四台虚拟机
两台需要安装nginx及keepalived
两台安装Apache
nginx可以源码安装也可以用yum安装nginx
yum安装nginx需要epel源
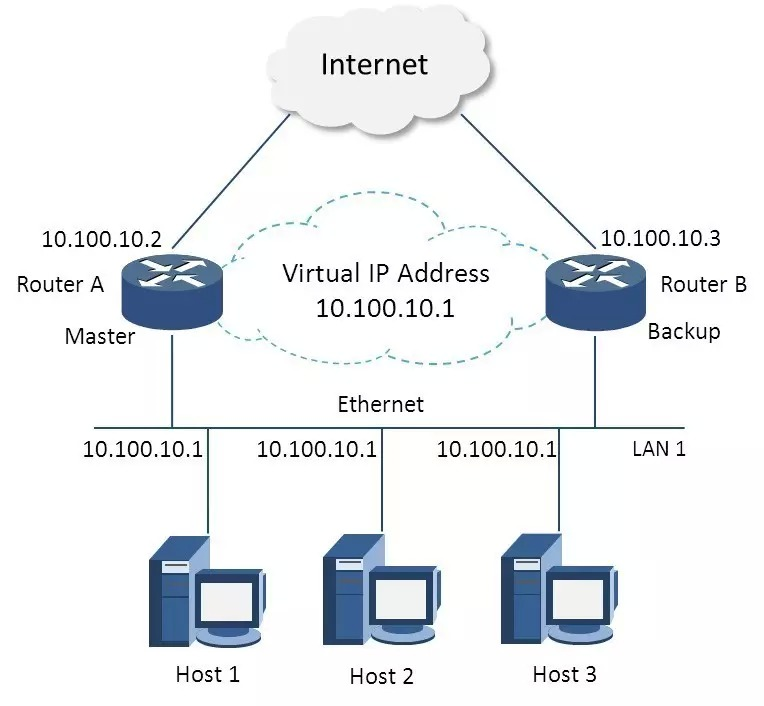
一:网络拓扑结构图
二:keepalived,nginx以及Apache安装
源码安装nginx
[root@localhost ~]#yum -y install pcre-devel zlib-devel make gcc gcc-c++ openssl-devel #安装Nginx依赖包
[root@localhost ~]#useradd -M -s /sbin/nologin nginx #创建一个Nginx测试用户
[root@localhost ~]#tar xf nginx -C /usr/src #将Nginx解包到/usr/src下
[root@localhost ~]#cd /usr/src/nginx
[root@localhost ~]#./configure --prefix=/usr/local/nginx --user=nginx --group=nginx --with-file-aio --with-http_stub_status_module --with-http_gzip_static_module --with-http_flv_module --with-http_ssl_module --with-pcre && make && make install #对Nginx进行编译安装
--prefix 设定Nginx的安装目录
--user和--group 指定Nginx运行用户和组
--with-http_stub_status_module 启用http_stub_status_module模块以支持状态统计
--with-http_ssl_module 启用SSL模块
--with-http_flv_module 启用FLV模块,提供寻求内存使用基于时间的偏移量文件
[root@localhost ~]#ln -s /usr/local/nginx/sbin/nginx /usr/local/bin #给Nginx一个软连接
[root@localhost ~]#nginx -t #检查语法
[root@localhost ~]# nginx #开启Nginx服务
[root@localhost ~]#netstat -lnpt | grep 80 #查看端口
yum安装nginx
#安装nginx
[root@localhost ~]# yum -y install nginx
输入命令:
whereis nginx
即可看到类似于如下的内容:
nginx: /usr/sbin/nginx /usr/lib64/nginx /etc/nginx /usr/share/nginx
以下是Nginx的默认路径:
(1) Nginx配置路径:/etc/nginx/
(2) PID目录:/var/run/nginx.pid
(3) 错误日志:/var/log/nginx/error.log
(4) 访问日志:/var/log/ginx/access.log
(5) 默认站点目录:/usr/share/nginx/html
事实上,只需知道Nginx配置路径,其他路径均可在/etc/nginx/nginx.conf 以及/etc/nginx/conf.d/default.conf 中查询到。
常用命令
(1) 启动:
nginx
(2) 测试Nginx配置是否正确:
nginx -t
(3) 优雅重启:
nginx -s reload
该命令与以下命令类似:
kill -HUP nginx进程号
#安装Keepalived
[root@localhost ~]# yum -y install keepalived
三:Keepalived配置
主Keepalived设置
[root@centos6-1 keepalived]# pwd
/etc/keepalived
[root@centos6-1 keepalived]# cp keepalived.conf keepalived.conf.bak
! Configuration File for keepalived #全局定义
notification_email { #指定keepalived在发生事件时(比如切换)发送通知邮件的邮箱
acassen@firewall.loc
failover@firewall.loc #设置报警邮件地址,可以设置多个,每行一个。 需开启本机的sendmail服务
sysadmin@firewall.loc
}
notification_email_from Alexandre.Cassen@firewall.loc #keepalived在发生诸如切换操作时需要发送email通知地址
smtp_server 192.168.200.1 #指定发送email的smtp服务器
smtp_connect_timeout 30 #设置连接smtp server的超时时间
router_id LVS_DEVEL #运行keepalived的机器的一个标识,通常可设为hostname。故障发生时,发邮件时显示在邮件主题中的信息。
vrrp_skip_check_adv_addr
vrrp_strict
vrrp_garp_interval 0
vrrp_gna_interval 0
}
script "/shell/nginx_check.sh"
interval 2
weight -20
}
state MASTER #指定 Keepalived 的角色,MASTER表示此主机是主用服务器,BACKUP表示是备用服务器。备份服务器上将 MASTER 改为 BACKUP。
interface ens32 #指定 HA监测网络的接口
virtual_router_id 51 #虚拟路由标识,这个标识是一个数字,并且同一个 vrrp 实例使用唯一的标识,即同一个 vrrp_instance下,MASTER 和 BACKUP必须是一致的。(0-255)
priority 100 #定义优先级,数字越大,优先级越高,在一个 vrrp_instance下,MASTER的优先级必须大于 BACKUP 的优先级。备份服务上将 100 改为 50
advert_int 1 #设定MASTER 与 BACKUP负载均衡器之间同步检查的时间间隔,单位是秒
authentication { #设定验证类型和密码
auth_type PASS #设置验证类型,主要有 PASS和 AH 两种
auth_pass 1111 #设置验证密码,在一个 vrrp_instance下,MASTER 与 BACKUP必须使用相同的密码才能正常通信。
}
virtual_ipaddress { #设置虚拟 IP地址,可以设置多个虚拟IP地址,每行一个
192.168.200.254
track_script {
check_nginx #引用脚本
}
}
[root@localhost ~]# vim /etc/keepalived/keepalived.conf
! Configuration File for keepalived
notification_email {
acassen@firewall.loc
failover@firewall.loc
sysadmin@firewall.loc
}
notification_email_from Alexandre.Cassen@firewall.loc
smtp_server 192.168.200.1
smtp_connect_timeout 30
router_id LVS_DEVEL
vrrp_skip_check_adv_addr
vrrp_strict
vrrp_garp_interval 0
vrrp_gna_interval 0
}
script "/shell/nginx_check.sh"
interval 2
weight -20
}
state BACKUP
interface eno16777728
virtual_router_id 51
priority 90
advert_int 1
authentication {
auth_type PASS
auth_pass 1111
}
virtual_ipaddress {
192.168.200.254
}
track_script {
check_nginx
}
}
[root@localhost ~]# yum -y install gcc //安装gcc
[root@localhost ~]# yum -y install make //安装make
[root[root@localhost ~]# yum -y install gcc-c++ //安装gcc-c++
[root@localhost ~]# yum -y install lynx //安装lynx
@localhost ~]# tar -xf httpd-2.2.17.tar.gz -C /usr/src //解包
[root@localhost ~]# cd /usr/src/httpd-2.2.17/ //进入httpd-2.2.17文件目录
[root@localhost httpd-2.2.17]# config --prefix =/usr/local/apache //安装目录
[root@localhost httpd-2.2.17]# make //执行make命令
[root@localhost httpd-2.2.17]# make install //执行make install命令
root@localhost httpd-2.2.17]# cd /usr/local/apache/conf //切换目录
[root@localhost conf]# cp httpd.conf httpd.conf.bak
[root@localhost conf]# cd /usr/src/httpd-2.2.17/
[root@localhost conf]# vim httpd.conf
ServerName www.example.com:80
[root@localhost ~]# /usr/local/apache/bin/apachectl start //启动Apache
[root[root@localhost ~]# lynx 127.0.0.1 //运行
四:nginx配置
两台nginx做同样的配置
[root@localhost ~]# vim /etc/nginx/nginx.conf
upstream nginx_server {
server 192.168.200.12:80 weight=1;
server 192.168.200.13:80 weight=1;
}
location / {
proxy_pass http://nginx_server;
proxy_set_header Host $http_host;
}
五:nginx_check.sh shell文件,配置为周期性任务
[root@localhost ~]# vim /shell/nginx.check.sh
脚本一
#!/bin/bash
count="$(ps -C nginx --no-header|wc -l)"
if [ $count -eq 0 ]
then
systemctl start nginx
sleep 2
if [ ps -C nginx --no-header | wc -l -eq 0 ]
then
systemctl stop keepalived
fi
fi
脚本二
#bin/bash
if [ $? -ne 0 ]
then
/usr/local/nginx/sbin/nginx -c /usr/local/nginx/conf/nginx.conf
sleep 2
ps -C nginx --no-heading >/dev/null
if [ $? -ne 0 ]
then
systemctl stop keepalived
#killall -9 keepalived
fi
fi
***
[root@localhost ~]# chmod +x /shell/nginx_check.sh
六:配置测试页
192.168.200.10
[root@localhost ~]# cat /usr/share/nginx/html/index.html
0000000000000000000000
0000000000000000000000
0000000000000000000000
0000000000000000000000
0000000000000000000000
0000000000000000000000
192.168.200.11
[root@localhost ~]# cat /usr/share/nginx/html/index.html
111111111111111111111
111111111111111111111
111111111111111111111
111111111111111111111
111111111111111111111
111111111111111111111
192.168.200.12
[root@localhost ~]# cat /var/www/html/index.html
222222222222222222
222222222222222222
222222222222222222
222222222222222222
222222222222222222
222222222222222222
192.168.200.10
[root@localhost ~]# cat /var/www/html/index.html
33333333333333
33333333333333
33333333333333
33333333333333
33333333333333
33333333333333
七:测试
访问192.168.200.254

