Linux 如何配置mycat?
3.配置mycat
    3.1.规定linux的用户名和全名不能叫mycat!!!否则mycat会不生效(原因是影响整个linux系统的环境变量导致mycat的配置环境变量没有生效)

    3.2.vim /etc/sysconfig/network也不能叫mycat

    3.3.mycat使用的是Java语言编写-->所以必须要在linux上配置jdk(要求jdk必须为64位,因为mycat是在64位的jdk8上进行编译的)

    3.4.配置jdk

    3.5.使用xftp把mycat的压缩包上传到linux服务器上

    3.6.解压mycat压缩包
        tar -zxvf xxxxx

    3.7.配置mycat的环境变量
        vim /etc/profile

        JAVA_HOME=/home/apps/jdkxxx
        MACAT_HOME=/home/apps/mycat

        PATH=$PATH:$JAVA_HOME/bin:$MACAT_HOME/bin

        source /etc/profile

    3.8.启动mycat
        进入mycat的bin目录
    //    ./mycat console


    //    mycat start

        在任意的位置直接使用
        mycat console

        console | start | stop | restart | status | dump
        启动mycat:
            mycat console 类似于IDEA中控制台,mycat会把日志打印出来
            mycat start 就是正常启动
            一般情况下推荐使用console启动

        一旦启动mycat就关不掉,kill -9关不掉 除非重启或者关机
        看到以下信息说明启动成功:
            jvm 1    | MyCAT Server startup successfully. see logs in logs/mycat.log


    3.8.9关闭的方法 直接reboot。  就是关不掉  直接reboot。


4.mycat的三个核心配置文件
    所有的读写分离/分库分表都必须要在这三个配置文件完成
    //  server.xml   rule.xml   schema.xml
    mycat的conf目录
二、分库分表的配置。 server.xml、 rule.xml 、(打酱油的。) scheam.xml 实现了读写分离和分库分表的具体配置。
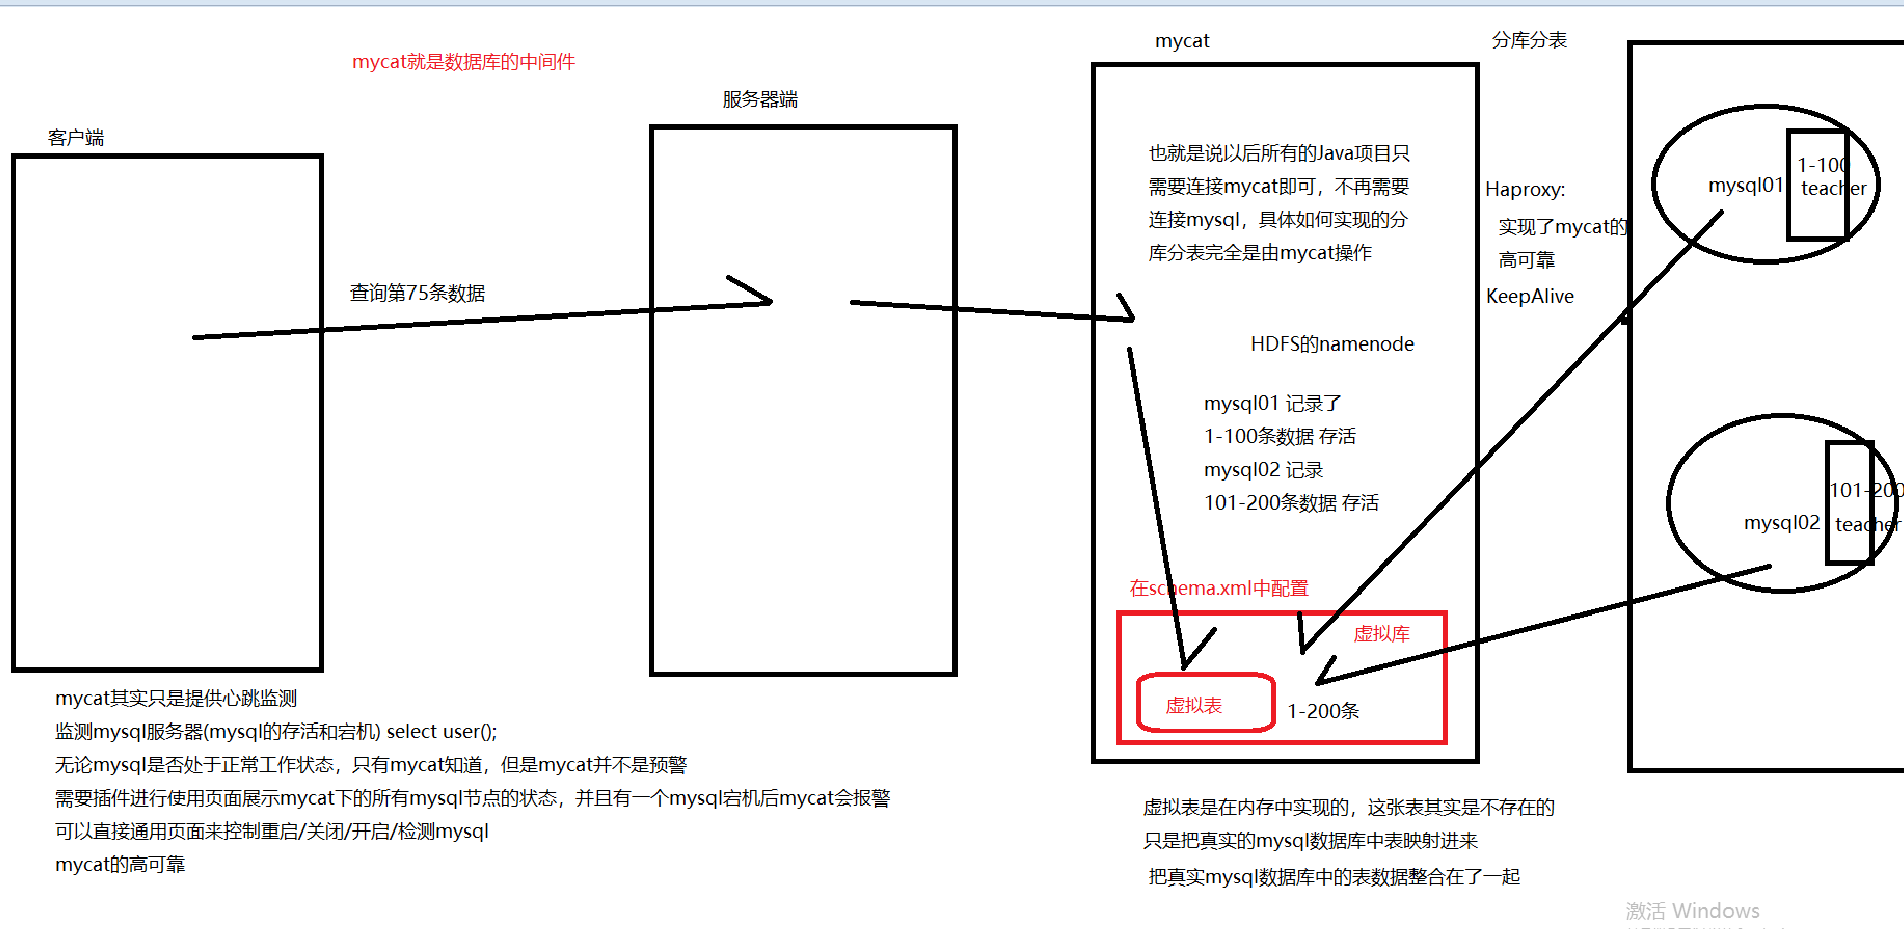
4.mycat的三个核心配置文件
    所有的读写分离/分库分表都必须要在这三个配置文件完成
    //  server.xml   rule.xml   schema.xml
    mycat的conf目录

//1.    server.xml:
        配置了mycat的用户(账号:root 密码:root) --> 账号和密码可以根据情况随意更改
        相当于mysql的用户(账号:root 密码:root)
        mycat也是可以直接使用数据库连接软件进行连接的

//2.    rule.xml:
        mycat的规则

//3.    schema.xml:
        实现了读写分离和分库分表的具体配置

    其实mycat也可以看成是一个数据库,只是这个数据库是虚拟的,把真实的mysql数据中的表数据/* 映射 */进了虚拟库中,使用Java项目连接的时候只需要连接mycat即可,不再需要连接mysql

注意报错:
    Caused by: io.mycat.config.util.ConfigException: Illegal table conf : table [ MYCAT_STUDENT ] rule function [ mod-long ] partition size : 3 > table datanode size : 2, please make sure table datanode size = function partition

启动成功后可以直接使用数据库连接工具连接mycat
    mycat的dbType配置的是什么数据库,就使用这一种数据库进行连接即可

mycat有两个端口号:
    9066:管理端口号(管理mycat使用的)
    8066:通讯端口号(连接端口号)
1.rule.xml
<?xml version="1.0" encoding="UTF-8"?>
<!-- - - Licensed under the Apache License, Version 2.0 (the "License");
    - you may not use this file except in compliance with the License. - You
    may obtain a copy of the License at - - http://www.apache.org/licenses/LICENSE-2.0
    - - Unless required by applicable law or agreed to in writing, software -
    distributed under the License is distributed on an "AS IS" BASIS, - WITHOUT
    WARRANTIES OR CONDITIONS OF ANY KIND, either express or implied. - See the
    License for the specific language governing permissions and - limitations
    under the License. -->
<!DOCTYPE mycat:rule SYSTEM "rule.dtd">
<mycat:rule xmlns:mycat="http://io.mycat/">

    <!--
        所有的规则配置一个tableRule对应一个function,如果需要进行配置必须要配置一对,不能单独配置一个(如果单独配置了一个的情况下,mycat启动的时候会直接报错)
        一共有十种规则:


        mod-long:(轮询)
            mysql01
                mysql数据库
                    teach
                        student
            mysql02
                mysql数据库
                    teach
                        student

            当客户端发送请求===插入数据===》mycat===请求mysql===》会把第一条数据插入进mysql01,
                                                             会把第二条数据插入进mysql02
                                                             依次循环

    -->

    <tableRule name="mod-long">
        <rule>
            <columns>id</columns>
            <algorithm>mod-long</algorithm>
        </rule>
    </tableRule>


    <function name="mod-long" class="io.mycat.route.function.PartitionByMod">
        <!--
            代表了datanode的节点数量
            如果只有两台datanode就必须要写2
        -->
        <property name="count">2</property>
    </function>

</mycat:rule>
2.server.xml
<?xml version="1.0" encoding="UTF-8"?>
<!-- - - Licensed under the Apache License, Version 2.0 (the "License");
    - you may not use this file except in compliance with the License. - You
    may obtain a copy of the License at - - http://www.apache.org/licenses/LICENSE-2.0
    - - Unless required by applicable law or agreed to in writing, software -
    distributed under the License is distributed on an "AS IS" BASIS, - WITHOUT
    WARRANTIES OR CONDITIONS OF ANY KIND, either express or implied. - See the
    License for the specific language governing permissions and - limitations
    under the License. -->
<!DOCTYPE mycat:server SYSTEM "server.dtd">
<mycat:server xmlns:mycat="http://io.mycat/">
    <system>
    <property name="nonePasswordLogin">0</property> <!-- 0为需要密码登陆、1为不需要密码登陆 ,默认为0,设置为1则需要指定默认账户-->
    <property name="useHandshakeV10">1</property>
    <property name="useSqlStat">0</property>  <!-- 1为开启实时统计、0为关闭 -->
    <property name="useGlobleTableCheck">0</property>  <!-- 1为开启全加班一致性检测、0为关闭 -->

        <property name="sequnceHandlerType">2</property>
        <!--<property name="sequnceHandlerPattern">(?:(s*nexts+values+fors*MYCATSEQ_(w+))(,|)|s)*)+</property>-->
        <!--必须带有MYCATSEQ_或者 mycatseq_进入序列匹配流程 注意MYCATSEQ_有空格的情况-->
        <property name="sequnceHandlerPattern">(?:(s*nexts+values+fors*MYCATSEQ_(w+))(,|)|s)*)+</property>
    <property name="subqueryRelationshipCheck">false</property> <!-- 子查询中存在关联查询的情况下,检查关联字段中是否有分片字段 .默认 false -->
      <!--  <property name="useCompression">1</property>--> <!--1为开启mysql压缩协议-->
        <!--  <property name="fakeMySQLVersion">5.6.20</property>--> <!--设置模拟的MySQL版本号-->
    <!-- <property name="processorBufferChunk">40960</property> -->
    <!--
    <property name="processors">1</property>
    <property name="processorExecutor">32</property>
     -->
        <!--默认为type 0: DirectByteBufferPool | type 1 ByteBufferArena | type 2 NettyBufferPool -->
        <property name="processorBufferPoolType">0</property>
        <!--默认是65535 64K 用于sql解析时最大文本长度 -->
        <!--<property name="maxStringLiteralLength">65535</property>-->
        <!--<property name="sequnceHandlerType">0</property>-->
        <!--<property name="backSocketNoDelay">1</property>-->
        <!--<property name="frontSocketNoDelay">1</property>-->
        <!--<property name="processorExecutor">16</property>-->
        <!--
            <property name="serverPort">8066</property> <property name="managerPort">9066</property>
            <property name="idleTimeout">300000</property> <property name="bindIp">0.0.0.0</property>
            <property name="frontWriteQueueSize">4096</property> <property name="processors">32</property> -->
        <!--分布式事务开关,0为不过滤分布式事务,1为过滤分布式事务(如果分布式事务内只涉及全局表,则不过滤),2为不过滤分布式事务,但是记录分布式事务日志-->
        <property name="handleDistributedTransactions">0</property>

            <!--
            off heap for merge/order/group/limit      1开启   0关闭
        -->
        <property name="useOffHeapForMerge">0</property>

        <!--
            单位为m
        -->
        <property name="memoryPageSize">64k</property>

        <!--
            单位为k
        -->
        <property name="spillsFileBufferSize">1k</property>

        <property name="useStreamOutput">0</property>

        <!--
            单位为m
        -->
        <property name="systemReserveMemorySize">384m</property>


        <!--是否采用zookeeper协调切换  -->
        <property name="useZKSwitch">false</property>

        <!-- XA Recovery Log日志路径 -->
        <!--<property name="XARecoveryLogBaseDir">./</property>-->

        <!-- XA Recovery Log日志名称 -->
        <!--<property name="XARecoveryLogBaseName">tmlog</property>-->
        <!--如果为 true的话 严格遵守隔离级别,不会在仅仅只有select语句的时候在事务中切换连接-->
        <property name="strictTxIsolation">false</property>

        <property name="useZKSwitch">true</property>

    </system>

    <!--

        从system标签开始到结束中的内容配置了
            连接 最大连接数 最小连接数 连接超时时间 隔离机制 事务切换....
            相当于在mybatis中配置数据库的最大最小连接数 连接超时时间
    -->

    <!-- 全局SQL防火墙设置 -->
    <!--白名单可以使用通配符%或着*-->
    <!--例如<host host="127.0.0.*" user="root"/>-->
    <!--例如<host host="127.0.*" user="root"/>-->
    <!--例如<host host="127.*" user="root"/>-->
    <!--例如<host host="1*7.*" user="root"/>-->
    <!--这些配置情况下对于127.0.0.1都能以root账户登录-->
    <!--
    <firewall>
       <whitehost>
          <host host="1*7.0.0.*" user="root"/>
       </whitehost>
       <blacklist check="false">
       </blacklist>
    </firewall>
    -->

    <!--
        整个user标签中就是配置了mycat的账号和密码
            name===》就是mycat的账号
            defaultAccount====》表示该账号为管理员账号,而且只能出现一次
            property:属性标签
                password===》就是name的密码
            无论是账号还是密码都可以随意定制,开心就好!!!
            readOnly:只读(该账号只能查询数据,不能写入数据)
        schemas:指向的是mycat的数据库(mycat的虚拟库!!!这个库并不是真实存在的,是需要通过mysql的数据库进行映射的),一个mycat中可以有多个schema
        隐藏mysql的真实库的名字
            连接mysql:
                jdbc:mysql:localhost:3306/数据库名
            连接mycat:
                jdbc:mysql:ip地址:端口号/mycat的虚拟库名
        schemas中的配置和mysql的数据库可以一样,也可以不一样
    -->
    <user name="root" defaultAccount="true">
        <property name="password">123456</property>
        <property name="schemas">TEACH</property>
    </user>
</mycat:server>
3.scheam.xml
<?xml version="1.0"?>
<!DOCTYPE mycat:schema SYSTEM "schema.dtd">
<mycat:schema xmlns:mycat="http://io.mycat/">

    <!--
        !!!schema标签的name属性值必须要和server.xml中的schames保持一致!!!
        schema就类似于mysql的数据库
        checkSQLschema:检查SQL语句是否错误(select * from user wher id = 1)
            默认值为false,不需要改为true,把对SQL语句的检查交给mysql处理
        sqlMaxLimit:最大执行SQL语句的数量
            一次性可以执行多少条SQL语句

        在schame标签中有table标签,这个标签就是定义了mycat中的表
            类似于mysql数据库中的表
            和mysql中的表名可以重复也可以不一致

        dataNode:数据节点
            在HDFS中存放数据
            在mycat中映射的就是真实mysql数据库(可以有多个,也可以只有一个),名字可以随意起
            今天的目标是实现分库分表,需要用到两台mysql数据库,所以只需要配置dn1和dn2

        rule:配置规则
            配置一定要和rule.xml中保持一致

    -->
    <schema name="TEACH" checkSQLschema="false" sqlMaxLimit="100">
        <!-- auto sharding by id (long) -->
        <table name="mycat_student" dataNode="dn1,dn2" rule="mod-long" />
    </schema>

    <!--
        datanode标签对应的是table标签中的datanode属性
            也就是说datanode属性值必须要和dataNode的标签name属性值保值一致
            dn1:代表了mysql01服务器==》mysql数据库
            dn2:代表了mysql02服务器==》mysql数据库
        dataHost:才是真正的配置了分库分表和读写分离的核心配置
        database:映射的是真实mysql的数据库名
    -->
    <dataNode name="dn1" dataHost="localhost1" database="mysql01" />
    <dataNode name="dn2" dataHost="localhost2" database="mysql02" />

    <!--
        dataHost标签必须要和dataNode标签中的dataHost属性保持一致
            如果dataHost属性名重复了,映射的是同一个dataHost
        每一个dataHost标签就是一个真实的mysql数据库
        maxCon:最大连接数
        minCon:最小连接数
        homework2:
            把balance,writeType,switchType弄明白,并且用自己的语言描述每个值代表什么意思,记录电子文档
        balance:负载均衡
        writeType:写入的类型(读写分离使用)
        switchType:转换的类型(读写分离所使用的数据)
        dbType:数据库的类型(在最早的版本mycat只支持mysql一种数据库,后来发展支持很多种数据库)
        dbDriver:数据库驱动(使用本地驱动,使用的是mycat所提供的驱动)
        slaveThreshold:
            master:主节点
            slave:从节点
            threshold:入口
    -->
    <dataHost name="localhost1" maxCon="1000" minCon="10" balance="0"
              writeType="0" dbType="mysql" dbDriver="native" switchType="1"  slaveThreshold="100">
              <!--
                heartbeat:心跳
                    mycat一直在监视mysql的user表(心跳),如果一旦发现mysql的user不再有心跳,就会认为这一台mysql处于宕机状态,也就不会再向这一台mysql进行做增删改查的操作
              -->
        <heartbeat>select user()</heartbeat>
        <!--
            writeHost:标签是该台mysql数据库为读和写的数据库
            readHost:标签是该台mysql数据库为读的数据库
            writeHost如果单独存在,标识该台mysql数据库为读和写的操作
                如果一旦和readHost一起使用,writeHost就只能做些的操作,所有的读操作都使用readHost完成
                readHost必须要配置在writeHost的内容,不允许单独存在
            host:属性只是标识了该台数据库的操作的内容,可以随意定义
            url:数据库的url
                jdbc:mysql://localhost:3306
            !!!!!如果配置了两个writeHost,那么host的值就必须不能重复!!!!!
        -->
        <writeHost host="write01" url="192.168.132.150:3306" user="root"
                   password="root" />
    </dataHost>

    <dataHost name="localhost2" maxCon="1000" minCon="10" balance="0"
              writeType="0" dbType="mysql" dbDriver="native" switchType="1"  slaveThreshold="100">
        <heartbeat>select user()</heartbeat>
        <writeHost host="write02" url="192.168.132.148:3306" user="root"
                   password="root" />
    </dataHost>
    <!--

        mycat中所映射的真实mysql的表必须要mycat所声明的table的名字保持一致
        也就是说mycat的表名必须要和mysql的表名一模一样,否则映射不到

    -->
</mycat:schema>