1、发生dpkg status database is locked by another process
原因是包管理器没有正确关闭。需要重启计算机或者重新打开终端 输入:
sudo rm /var/lib/dpkg/lock

sudo dpkg --configure -a
2、ubuntu配置初始root密码
sudo passwd #然后根据提示修改root密码即可
3、virtualbox给ubuntu设置共享文件夹
1》首先安装增强设置,然后在物理机选择一个文件夹作为设置的共享文件夹

2》ctrl+alt+t打开终端,切换到root用户,进入/mnt目录,执行命令:
lfy@lfy-pc:~$ su
密码:
root@lfy-pc:/home/lfy# ls
examples.desktop  fyliu  公共的  模板  视频  图片  文档  下载  音乐  桌面
root@lfy-pc:/home/lfy# cd /
root@lfy-pc:/# ls
bin    dev   initrd.img  lost+found  opt   run   srv  usr
boot   etc   lib         media       proc  sbin  sys  var
cdrom  home  lib64       mnt         root  snap  tmp  vmlinuz
root@lfy-pc:/# cd mnt
root@lfy-pc:/mnt# ls
root@lfy-pc:/mnt# mkdir share     #新建目录
root@lfy-pc:/mnt# ls
share
root@lfy-pc:/mnt# mount -t vboxsf sharefolder /mnt/share/   #挂载
root@lfy-pc:/mnt# ls
share
root@lfy-pc:/mnt# cd share
root@lfy-pc:/mnt/share# ls
sogoupinyin_2.3.1.0112_amd64.deb    #可以看到共享文件夹中的文件了
root@lfy-pc:/mnt/share#
3》设置自动加载
打开/etc/fstab文件,需要使用管理员权限
sudo vi /etc/fstab
然后在末尾另起一行,加上
share /mnt/share vboxsf rw,gid=100,uid=1000,auto 0 0
4》 卸载
sudo umount -f /mnt/share
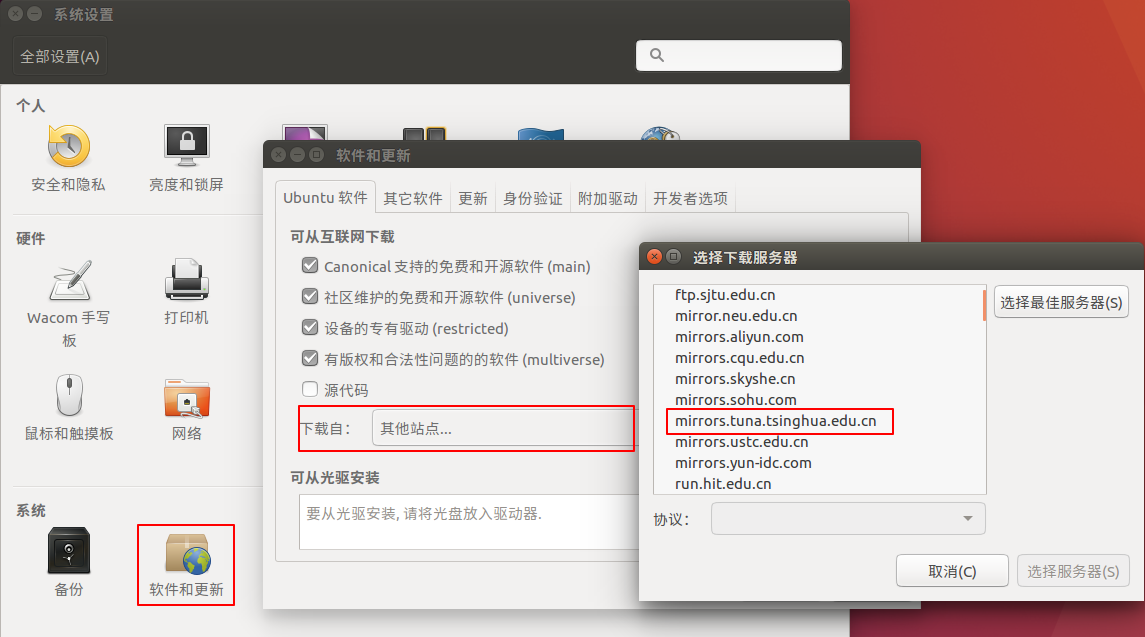
4、配置ubuntu软件源,使用国内的清华大学的镜像
5、ubuntu安装docker并使用加速hub镜像
1》在上一步我们已经选择了软件的镜像源为国内清华大学镜像源(软件源)。接下来
lfy@lfy-pc:~$ sudo apt-get update
[sudo] lfy 的密码:
命中:1 http://mirrors.tuna.tsinghua.edu.cn/ubuntu xenial InRelease
获取:2 http://mirrors.tuna.tsinghua.edu.cn/ubuntu xenial-updates InRelease [109 kB]
获取:3 http://mirrors.tuna.tsinghua.edu.cn/ubuntu xenial-backports InRelease [107 kB]
获取:4 http://mirrors.tuna.tsinghua.edu.cn/ubuntu xenial-security InRelease [109 kB]
获取:5 http://mirrors.tuna.tsinghua.edu.cn/ubuntu xenial/main Translation-zh_CN [74.8 kB]
获取:6 http://mirrors.tuna.tsinghua.edu.cn/ubuntu xenial/restricted Translation-zh_CN [1,652 B]
获取:7 http://mirrors.tuna.tsinghua.edu.cn/ubuntu xenial/universe Translation-zh_CN [172 kB]
获取:8 http://mirrors.tuna.tsinghua.edu.cn/ubuntu xenial/multiverse Translation-zh_CN [4,984 B]
已下载 578 kB,耗时 2秒 (199 kB/s)
正在读取软件包列表... 完成
lfy@lfy-pc:~$ sudo apt install docker.io
正在读取软件包列表... 完成
正在分析软件包的依赖关系树
正在读取状态信息... 完成
将会同时安装下列软件:
  bridge-utils cgroupfs-mount containerd git git-man liberror-perl libseccomp2
  pigz runc ubuntu-fan
建议安装:
  aufs-tools btrfs-tools debootstrap docker-doc rinse zfs-fuse | zfsutils
  git-daemon-run | git-daemon-sysvinit git-doc git-el git-email git-gui gitk
  gitweb git-arch git-cvs git-mediawiki git-svn
下列【新】软件包将被安装:
  bridge-utils cgroupfs-mount containerd docker.io git git-man liberror-perl
  pigz runc ubuntu-fan
下列软件包将被升级:
  libseccomp2
升级了 1 个软件包,新安装了 10 个软件包,要卸载 0 个软件包,有 721 个软件包未被升级。
需要下载 56.2 MB 的归档。
解压缩后会消耗 283 MB 的额外空间。
您希望继续执行吗? [Y/n] Y
...
2》然后,就安装好了老版本的docker
lfy@lfy-pc:~$ docker ps
Got permission denied while trying to connect to the Docker daemon socket at unix:...   #权限不足
lfy@lfy-pc:~$ su
密码:
root@lfy-pc:/home/lfy# docker ps
CONTAINER ID        IMAGE               COMMAND             CREATED             STATUS              PORTS               NAMES
root@lfy-pc:/home/lfy# docker version
Client:
 Version:           18.09.7
 API version:       1.39
 Go version:        go1.10.4
 Git commit:        2d0083d
 Built:             Fri Aug 16 14:19:38 2019
 OS/Arch:           linux/amd64
 Experimental:      false
Server:
 Engine:
  Version:          18.09.7
  API version:      1.39 (minimum version 1.12)
  Go version:       go1.10.4
  Git commit:       2d0083d
  Built:            Thu Aug 15 15:12:41 2019
  OS/Arch:          linux/amd64
  Experimental:     false
root@lfy-pc:/home/lfy#
3》配置docker hub国内加速镜像,用于拉取docker镜像
root@lfy-pc:/home/lfy# cd /
root@lfy-pc:/# ls
bin    dev   initrd.img  lost+found  opt   run   srv  usr
boot   etc   lib         media       proc  sbin  sys  var
cdrom  home  lib64       mnt         root  snap  tmp  vmlinuz
root@lfy-pc:/# cd etc
root@lfy-pc:/etc# ls
...
root@lfy-pc:/etc# cd docker
root@lfy-pc:/etc/docker# ls
key.json
root@lfy-pc:/etc/docker# vim daemon.json
root@lfy-pc:/etc/docker# cat daemon.json
{
  "registry-mirrors":["http://hub-mirror.c.163.com"]
}
root@lfy-pc:/etc/docker# reboot
4》重启完成之后,尝试拉取mysql镜像
root@lfy-pc:/home/lfy# docker pull mysql:5.6
5.6: Pulling from library/mysql
80369df48736: Pull complete
e8f52315cb10: Pull complete
cf2189b391fc: Pull complete
cc98f645c682: Pull complete
27a27ac83f74: Pull complete
f3f8d5bb9498: Pull complete
bbfacbe5a185: Pull complete
9db7adff1e15: Pull complete
f8402500c236: Pull complete
b0319efc9cd8: Pull complete
d19ab308a635: Pull complete
Digest: sha256:411c...
Status: Downloaded newer image for mysql:5.6
root@lfy-pc:/home/lfy# docker images
REPOSITORY          TAG                 IMAGE ID            CREATED             SIZE
mysql               5.6                 b3983ab...        10 days ago         302MB
root@lfy-pc:/home/lfy# docker run -p 3306:3306 --name mysql56 -v $PWD/conf:/etc/mysql/conf.d -v $PWD/logs:/logs -v $PWD/data:/var/lib/mysql -e MYSQL_ROOT_PASSWORD=root -d mysql:5.6  #启动容器
4717...
root@lfy-pc:/home/lfy# docker ps -a
CONTAINER ID        IMAGE               COMMAND                  CREATED             STATUS              PORTS                    NAMES
4717...        mysql:5.6           "docker-entrypoint.s…"   22 seconds ago      Up 20 seconds       0.0.0.0:3306->3306/tcp   mysql56
root@lfy-pc:/home/lfy# docker exec -it mysql56 bash      #登录容器命令行
root@47178154ee3b:/# mysql -uroot -p
Enter password:
Welcome to the MySQL monitor.  Commands end with ; or g.
Your MySQL connection id is 1
Server version: 5.6.46 MySQL Community Server (GPL)

Copyright (c) 2000, 2019, Oracle and/or its affiliates. All rights reserved.

Oracle is a registered trademark of Oracle Corporation and/or its
affiliates. Other names may be trademarks of their respective
owners.

Type 'help;' or 'h' for help. Type 'c' to clear the current input statement.

mysql> show databases;
+--------------------+
| Database           |
+--------------------+
| information_schema |
| mysql              |
| performance_schema |
+--------------------+
3 rows in set (0.00 sec)

mysql>
参数说明:
  -p 3306:3306:将容器的 3306 端口映射到主机的 3306 端口。

  -v $PWD/conf:/etc/mysql/conf.d:将主机当前目录下的 conf/my.cnf 挂载到容器的 /etc/mysql/my.cnf。

  -v $PWD/logs:/logs:将主机当前目录下的 logs 目录挂载到容器的 /logs。

  -v $PWD/data:/var/lib/mysql :将主机当前目录下的data目录挂载到容器的 /var/lib/mysql 。

  -e MYSQL_ROOT_PASSWORD=root:初始化 root 用户的密码。

  -d : 后台运行容器,并返回容器id
5》将普通用户添加到docker组,使他可以运行docker命令
lfy@lfy-pc:~$ docker images
Got permission denied while trying to connect to the Docker daemon socket at ...
lfy@lfy-pc:~$ sudo docker images
REPOSITORY          TAG                 IMAGE ID            CREATED             SIZE
mysql               5.6                 b3983abaa3fe        10 days ago         302MB
lfy@lfy-pc:~$ sudo groupadd docker
groupadd:“docker”组已存在
lfy@lfy-pc:~$ sudo usermod -aG docker ${USER_NAME}  #这里应该是 sudo usermod -aG docker ${USER}
用法:usermod [选项] 登录

选项:
  -c, --comment 注释            GECOS 字段的新值
  -d, --home HOME_DIR           用户的新主目录
  -e, --expiredate EXPIRE_DATE  设定帐户过期的日期为 EXPIRE_DATE
  -f, --inactive INACTIVE       过期 INACTIVE 天数后,设定密码为失效状态
  -g, --gid GROUP               强制使用 GROUP 为新主组
  -G, --groups GROUPS           新的附加组列表 GROUPS
  -a, --append GROUP            将用户追加至上边 -G 中提到的附加组中,
                                并不从其它组中删除此用户
  -h, --help                    显示此帮助信息并推出
  -l, --login LOGIN             新的登录名称
  -L, --lock                    锁定用户帐号
  -m, --move-home               将家目录内容移至新位置 (仅于 -d 一起使用)
  -o, --non-unique              允许使用重复的(非唯一的) UID
  -p, --password PASSWORD       将加密过的密码 (PASSWORD) 设为新密码
  -R, --root CHROOT_DIR         chroot 到的目录
  -s, --shell SHELL             该用户帐号的新登录 shell
  -u, --uid UID                 用户帐号的新 UID
  -U, --unlock                  解锁用户帐号
  -v, --add-subuids FIRST-LAST  add range of subordinate uids
  -V, --del-subuids FIRST-LAST  remove range of subordinate uids
  -w, --add-subgids FIRST-LAST  add range of subordinate gids
  -W, --del-subgids FIRST-LAST  remove range of subordinate gids
  -Z, --selinux-user  SEUSER       用户账户的新 SELinux 用户映射
lfy@lfy-pc:~$ sudo usermod -aG docker lfy
lfy@lfy-pc:~$ sudo systemctl restart docker        #或者重启系统
lfy@lfy-pc:~$ docker ps
CONTAINER ID    IMAGE    COMMAND    CREATED    STATUS    PORTS    NAMES
lfy@lfy-pc:~$
#或者通过以下方法
#sudo gpasswd -a ${USER} docker
eg: sudo apasswd -a lfy docker 或 sudo gpasswd -a ${USER} docker