参考Getting Started with PyTorch Part 1: Understanding how Automatic Differentiation works
非常好的文章,讲解的非常细致。
注意这篇文章基于v0.3,其中的Variable和Tensor在后来把版本中已经合并。
from torch import FloatTensor
from torch.autograd import Variable

# Define the leaf nodes
a = Variable(FloatTensor([4]))

weights = [Variable(FloatTensor([i]), requires_grad=True) for i in (2, 5, 9, 7)]

# unpack the weights for nicer assignment
w1, w2, w3, w4 = weights

b = w1 * a
c = w2 * a
d = w3 * b + w4 * c
L = (10 - d)

L.backward()

for index, weight in enumerate(weights, start=1):
    gradient, *_ = weight.grad.data
    print(f"Gradient of w{index} w.r.t to L: {gradient}")
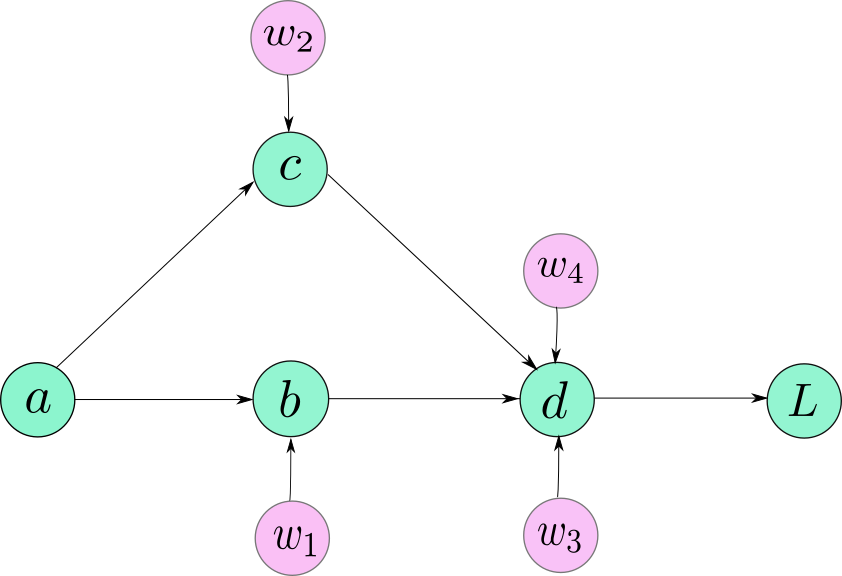
The computation graph is simply a data structure that allows you to efficiently apply the chain rule to compute gradients for all of your parameters.
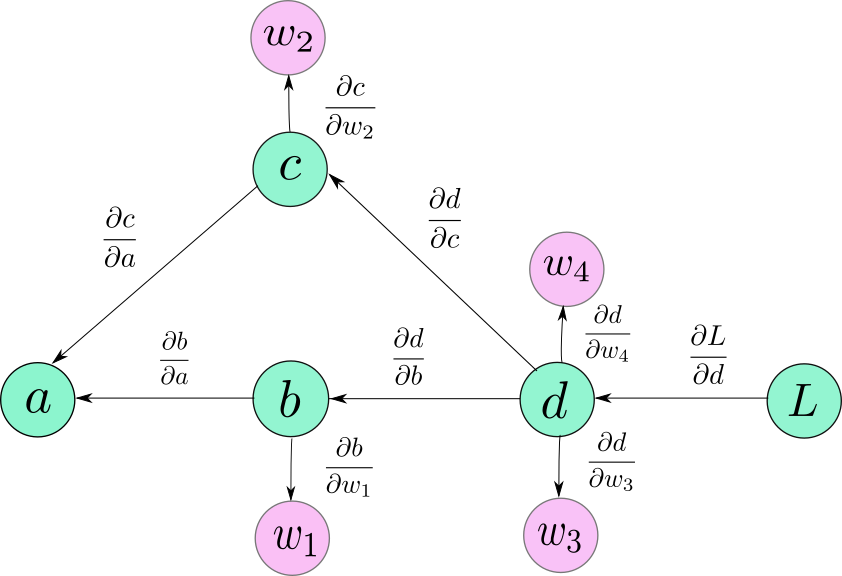
注意:前向传播计算图的边的方向是数据的流向,后向传播计算图的边的方向是梯度传播的流向,这两者的方向正好是相反的。对于计算某个节点直接后继节点的梯度,就是直接后继节点到该节点边上的导数,对于计算某个非直接后继节点的梯度,就是从非直接后继节点到该节点所经过的所有边上导数的乘积。
Graph leaves or leaf variables
官方文档中的"Graph leave" or "leaf variables"指的就是前向计算图中没有前驱的节点a,或者是反向计算图中没有后继的节点a。对于这样的节点我们一定要把requires_grad设置为True,否则,这些变量将不会包含在计算图中,并且叶不会计算它们的梯度。
当Python执行到我们上面写的代码时,也就是执行到节点a,b,c,w1[2,3,4],d,L的定义时,a computation graph is being generated on the fly. 当计算图的output被从input计算出来时,每个变量(节点)的forward function会cache输入的值,这些值在反向计算梯度时会被用到。(For example, if our forward function computes W*x, then d(W*x)/d(W) is x, the input that needs to be cached)
现在我要说的就是前面画的计算图并不是非常准确的,因为当PyTorch制造一个计算图时,并不是把Variable objects (Tensor objects)作为计算图的节点,而是把Function objects,准确的说是每个Variable的grad_fn属性作为计算图的节点。所以PyTorch的计算图看起来是这样的:
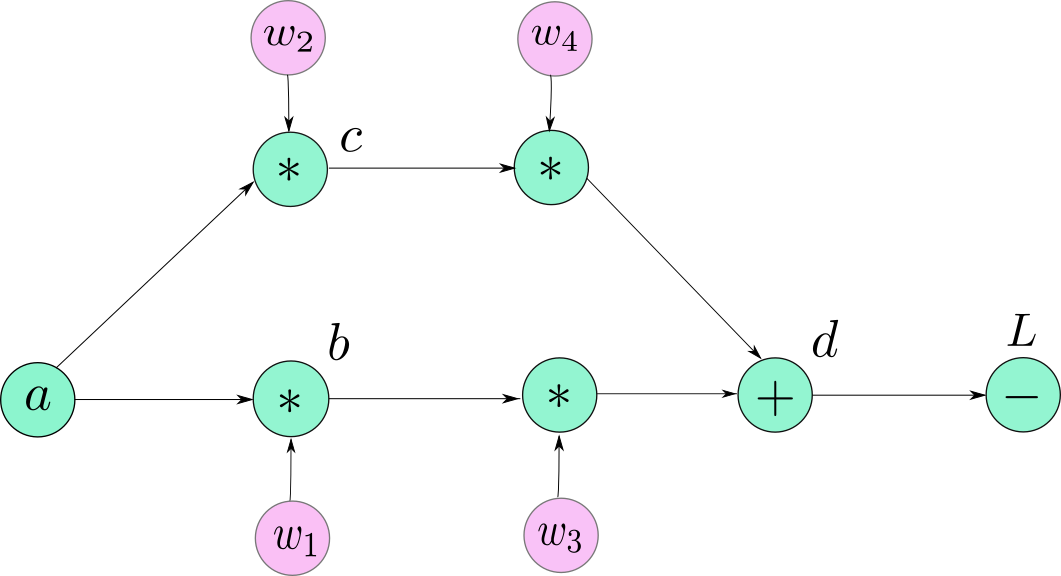
上图中,我仍然把原来的leaf node用Variable objects来表示,虽然它们也有自己的grad_fn的属性(叶子节点的grad_fn返回的是None。这很好理解,因为你不能在叶子节点上进行反向传播)。剩下的节点现在用它们的grad_fn来表示。我们可以看到有个节点d被用三个Functions(两个乘法一个加法)代替。
L节点对于任意叶子节点的梯度都可以通过该节点对应的Variable的.grad来访问(PyTorch默认的行为不允许访问非叶子节点的梯度)。
w1 = w1 — (learning_rate) * w1.grad #update the wieghts using GD
前面我说不能访问非叶子节点的梯度,这是Pytorch的默认行为。但是你可以改变这个默认行为,只要你在定义Variable后调用该Variable的.retain_grad(),你就可以访问它的grad属性。
import torch

x = torch.tensor([1., 1, 1, 1], requires_grad=True)
y = 2*x
z = y.mean()
z.backward()
print(x.grad, y.grad, z.grad)
'''
tensor([0.5000, 0.5000, 0.5000, 0.5000]) None None
'''
import torch

x = torch.tensor([1., 1, 1, 1], requires_grad=True)
y = 2*x
y.retain_grad()
z = y.mean()
z.retain_grad()
z.backward()
print(x.grad, y.grad, z.grad)
'''
tensor([0.5000, 0.5000, 0.5000, 0.5000]) tensor([0.2500, 0.2500, 0.2500, 0.2500]) tensor(1.)
'''
Dynamic Computation Graph
Pytorch 计算图的产生方式是 on the fly (不需要准备,随定义立即产生)。直到一个Variable(Tensor)的 forward function被调用之前,计算图中都不存在这个Variable(或者说是它的grad_fn) 的节点。计算图的产生是许多Variable被调用的结果。在那时,buffers会分配给计算图和中间值(用来后面计算梯度)。当你调用.backward(),梯度被计算出来后,这些buffers就被释放了,并且计算图被破坏了。你可以尝试在一个计算图上调用.backward()多次,你将会看到pytorch将会给你一个error。这时因为计算图在第一次调用backward()后就被销毁了,因此在第二次调用backward时是不存在计算图的。
如果你再一次调用forward,一个全新的计算图被产生。
这和Static Computation Graphs(TensorFlow使用的)是截然不同的,其中的静态图在执行程序之前要定义好。动态图机制允许你在运行时改变网络的架构,因为一个动态图仅仅在一段代码执行时产生。这意味着一个计算图可能在程序执行过程中被重复定义多次。动态图是debug更简单,更容易追踪错误来源。
Some Tricks of Trade
requires_grad 是Variable的一个属性,默认为False。这个属性在你不得不冻结某些layers并且阻止layers上的参数在训练中更新时是很方便的。你可以简单的将requires_grad设置为False,这样这些Variables将不会包括在计算图中。因此,没有梯度会传播到它们。
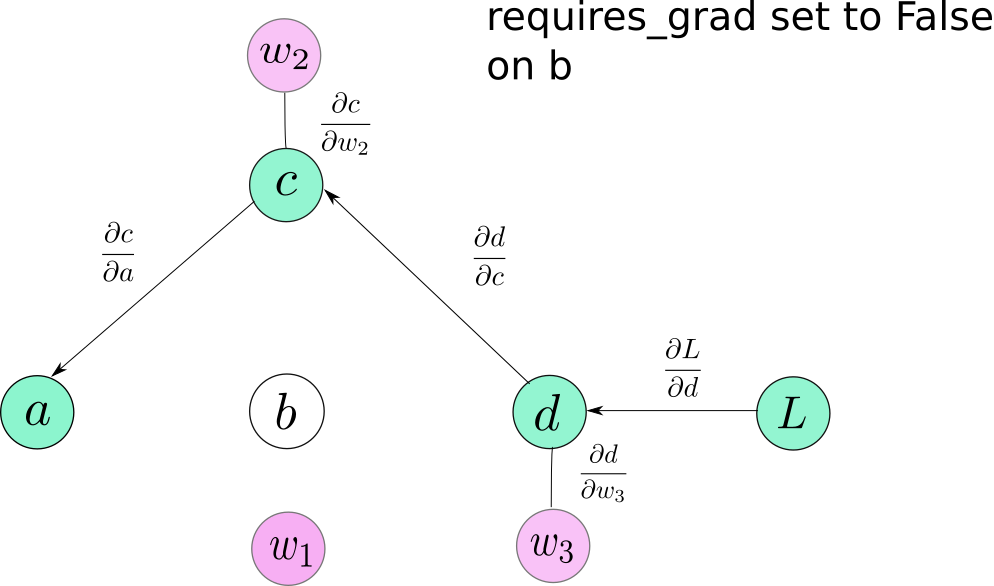
volatile 是Variable的另外一个属性,它会造成一个Variable从计算图中剔除当它被设置为True时。它和requires_grad是非常相似的,因为当它被设置为True时是具有传染性的。但是它比起requires_grad有一个更高的优先级,也就是一个Variable的requires_grad=True并且volatile=True,这个Variable就不会被包含到计算图中。
你可能会想为什么需要另外一个开关来覆盖requires_grad的值,而不是简单的将requires_grad设置为False,下面就说明原因。
当我们做推理(forward过程)而不需要梯度时,不去创建计算图是非常必要的。首先,创建计算图的开销可以消除,而且速度会提升。第二,如果我们创建一个计算图但是不调用backward(),用来缓存的buffers就不会被释放,这会导致你耗尽内存。
通常,我们的神经网络有许多层,我们在训练时可能会把requires_grad设置为True。为了避免在 inference时产生计算图,我们可以做两件事:1. 把所有layers的requires_grad设置为False; 2. 将input的volatile设置为True,这样可以保证后面的操作不会产生计算图。
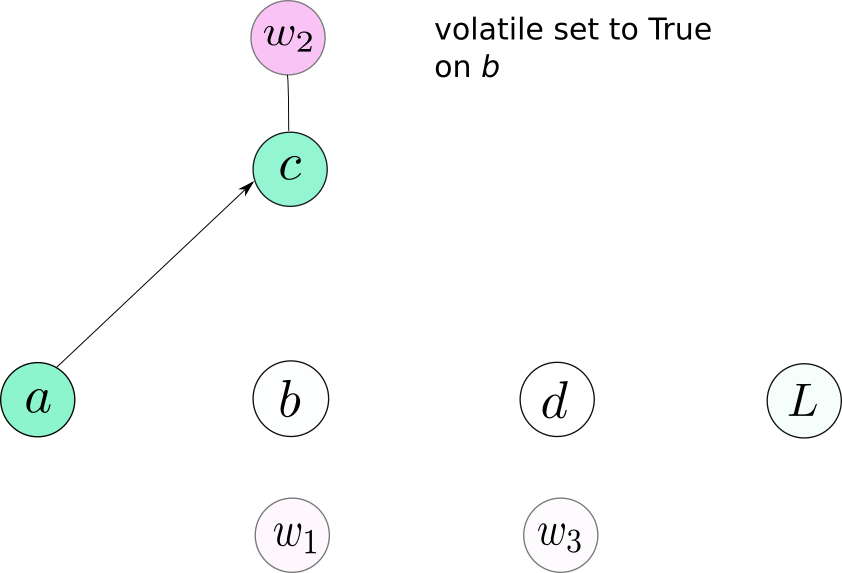
Note: Pytorch v0.4 has no volatile argument for a combined Tensor/Variable class. Instead, the inference code should be put in a torch.no_grad() context manager.
with torch.no_grad():
    # write your inference code here
So, that was Autograd for you. Understanding how Autograd works can save you a lot of headache when you’re stuck somewhere, or dealing with errors when you’re starting out.