一、新建一个.net core web项目作为Identity server 4验证服务。

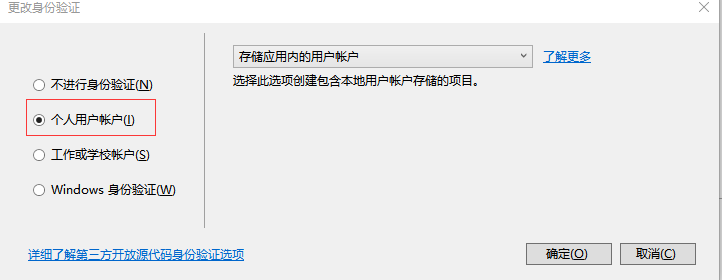
选择更改身份验证,然后再弹出的对话框里面选择个人用户账户。

nuget 安装Identity server相关的依赖包

添加Identity server相关的配置,首先新建config文件加,然后添加IdentityServer.cs,文件中代码如下:
对于相关配置想做详细了解的同学可以参考园友 晓晨Master的identity server 系列博客 https://www.cnblogs.com/stulzq/p/9019446.html
using IdentityModel;
using IdentityServer4;
using IdentityServer4.Models;
using System;
using System.Collections.Generic;
using System.Linq;
using System.Threading.Tasks;

namespace WebIdentityServer.Config
{
    public static class IdentityServer
    {
        public static List<Client> GetClients()
        {
            return new List<Client>()
            {
                new Client
                {
                    ClientId = "mvc",
                    ClientName = "MVC Client",
                    AllowedGrantTypes = GrantTypes.ResourceOwnerPassword,

                    RequireConsent = false,

                    ClientSecrets =
                    {
                        new Secret("secret".Sha256())
                    },

                    RedirectUris           = { "http://localhost:5002/signin-oidc" },
                    PostLogoutRedirectUris = { "http://localhost:5002/signout-callback-oidc" },

                    AllowedScopes =
                    {
                        IdentityServerConstants.StandardScopes.OpenId,
                        IdentityServerConstants.StandardScopes.Profile,
                        "api1"
                    },
                    AllowOfflineAccess = false,
                    AccessTokenType = AccessTokenType.Jwt,
                }
            };
        }

        public static IEnumerable<IdentityResource> GetIdentityResources()
        {
            var customProfile = new IdentityResource(
                name: "custom.profile",
                displayName: "Custom profile",
                claimTypes: new[] { "name", "email", "status" });

            return new List<IdentityResource>
            {
                new IdentityResources.OpenId(),
                new IdentityResources.Profile(),
                customProfile
            };
        }

        public static IEnumerable<ApiResource> GetApiResources()
        {
            return new[]
            {
                // simple API with a single scope (in this case the scope name is the same as the api name)
                new ApiResource("api1", "Some API 1"),

                // expanded version if more control is needed
                new ApiResource
                {
                    Name = "api2",

                    // secret for using introspection endpoint
                    ApiSecrets =
                    {
                        new Secret("secret".Sha256())
                    },

                    // include the following using claims in access token (in addition to subject id)
                    UserClaims = { JwtClaimTypes.Name, JwtClaimTypes.Email },

                    // this API defines two scopes
                    Scopes =
                    {
                        new Scope()
                        {
                            Name = "api2.full_access",
                            DisplayName = "Full access to API 2",
                        },
                        new Scope
                        {
                            Name = "api2.read_only",
                            DisplayName = "Read only access to API 2"
                        }
                    }
                }
            };
        }
    }
}
在Startup类中添加如下配置:
1. 在ConfigureServices方法中添加如下代码配置
public void ConfigureServices(IServiceCollection services)
        {
            services.AddDbContext<ApplicationDbContext>(options =>
                options.UseSqlServer(Configuration.GetConnectionString("DefaultConnection")));

            services.AddIdentity<ApplicationUser, IdentityRole>()
                .AddEntityFrameworkStores<ApplicationDbContext>()
                .AddDefaultTokenProviders();

            // Add application services.
            services.AddTransient<IEmailSender, EmailSender>();

            services.AddIdentityServer()
            .AddDeveloperSigningCredential()
            .AddInMemoryPersistedGrants()
            .AddInMemoryIdentityResources(IdentityServer.GetIdentityResources())
            .AddInMemoryApiResources(IdentityServer.GetApiResources())
            .AddInMemoryClients(IdentityServer.GetClients())
            .AddAspNetIdentity<ApplicationUser>();

            services.AddMvc();
        }
2. 在Configure方法中添加如下代码配置
public void Configure(IApplicationBuilder app, IHostingEnvironment env)
        {
            if (env.IsDevelopment())
            {
                app.UseBrowserLink();
                app.UseDeveloperExceptionPage();
                app.UseDatabaseErrorPage();
            }
            else
            {
                app.UseExceptionHandler("/Home/Error");
            }

            app.UseStaticFiles();

            // app.UseAuthentication(); // not needed, since UseIdentityServer adds the authentication middleware
            app.UseIdentityServer();

            app.UseMvc(routes =>
            {
                routes.MapRoute(
                    name: "default",
                    template: "{controller=Home}/{action=Index}/{id?}");
            });
        }
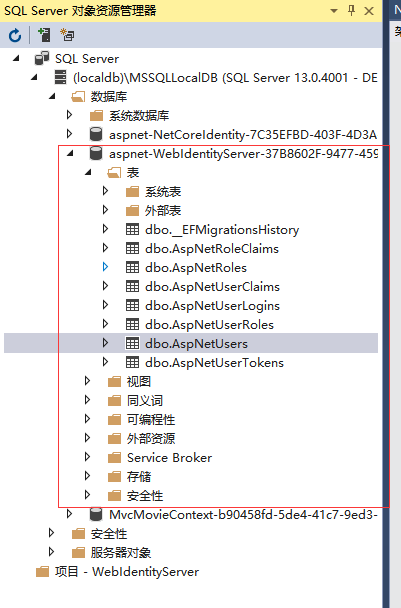
在程序包管理控制台使用Update-Database命令生成DB,然后再VS中打开Sql server 对象管理器中可以看到创建的数据库及表
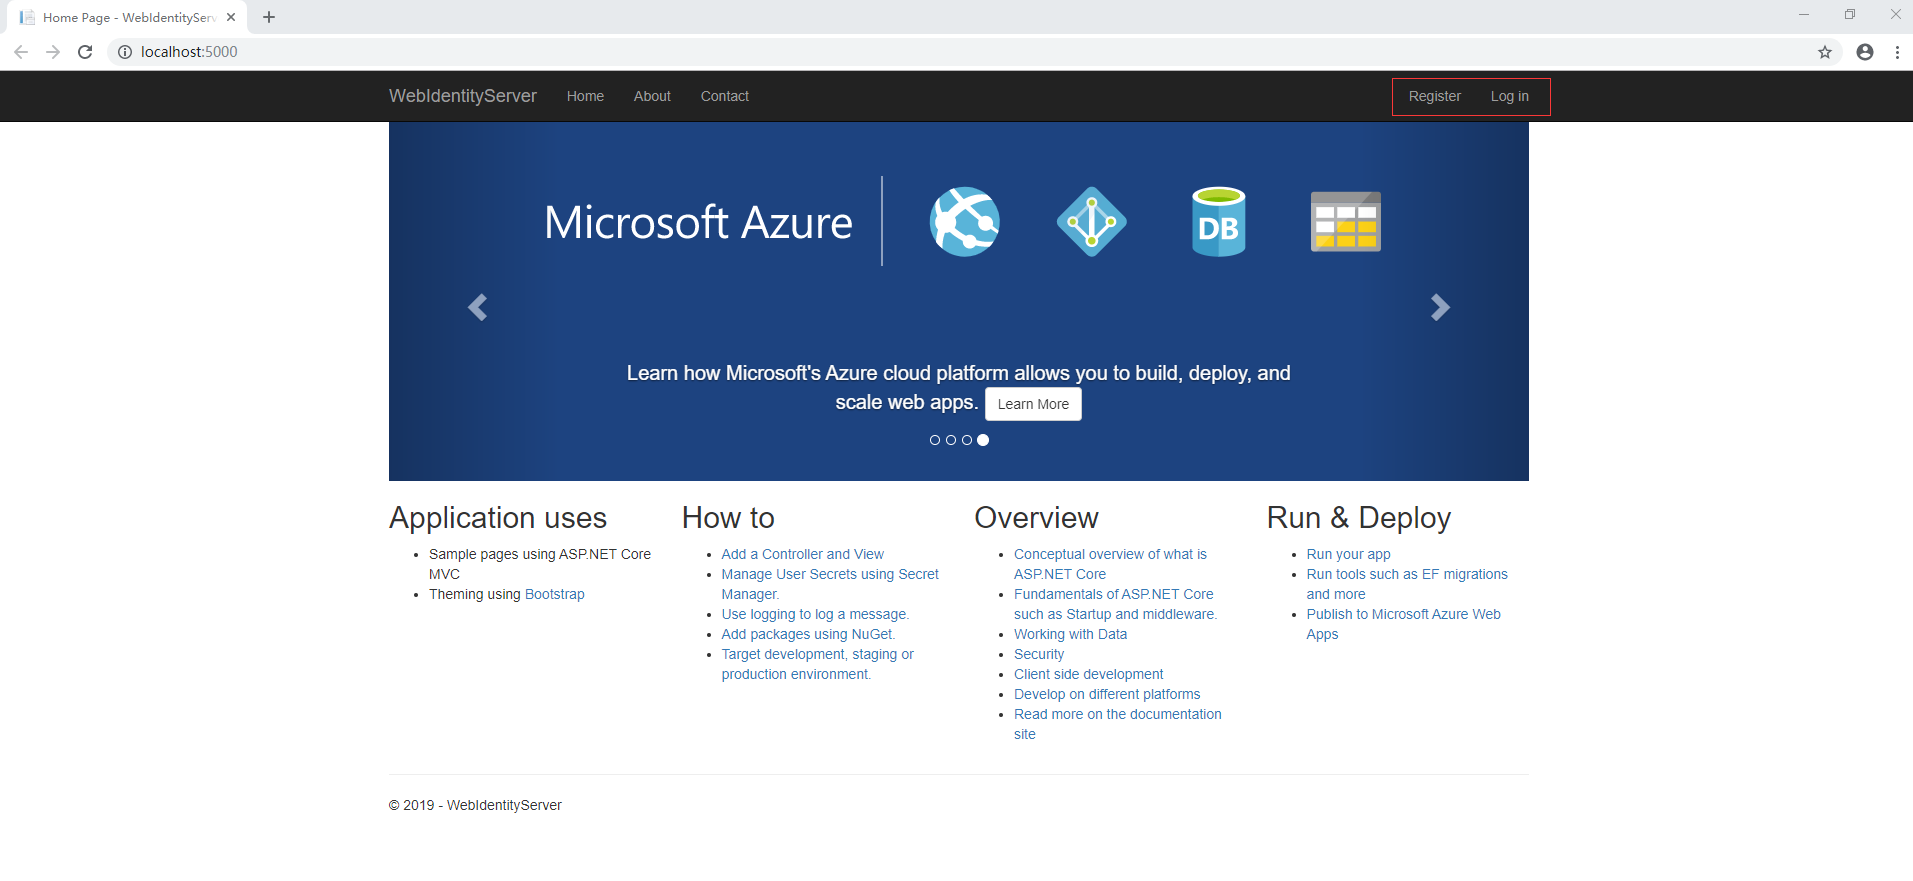
启动servers,然后看到以下界面,点击Register注册一个用户然后点击login用注册的用户登陆。
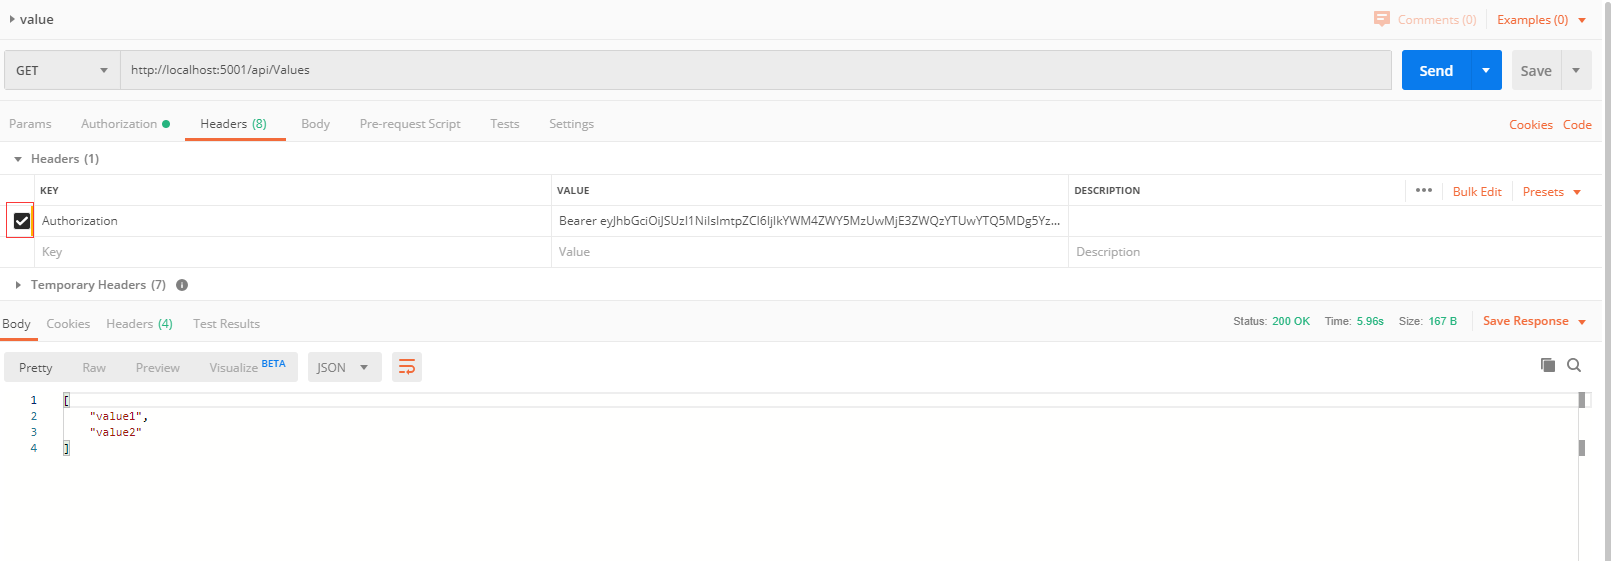
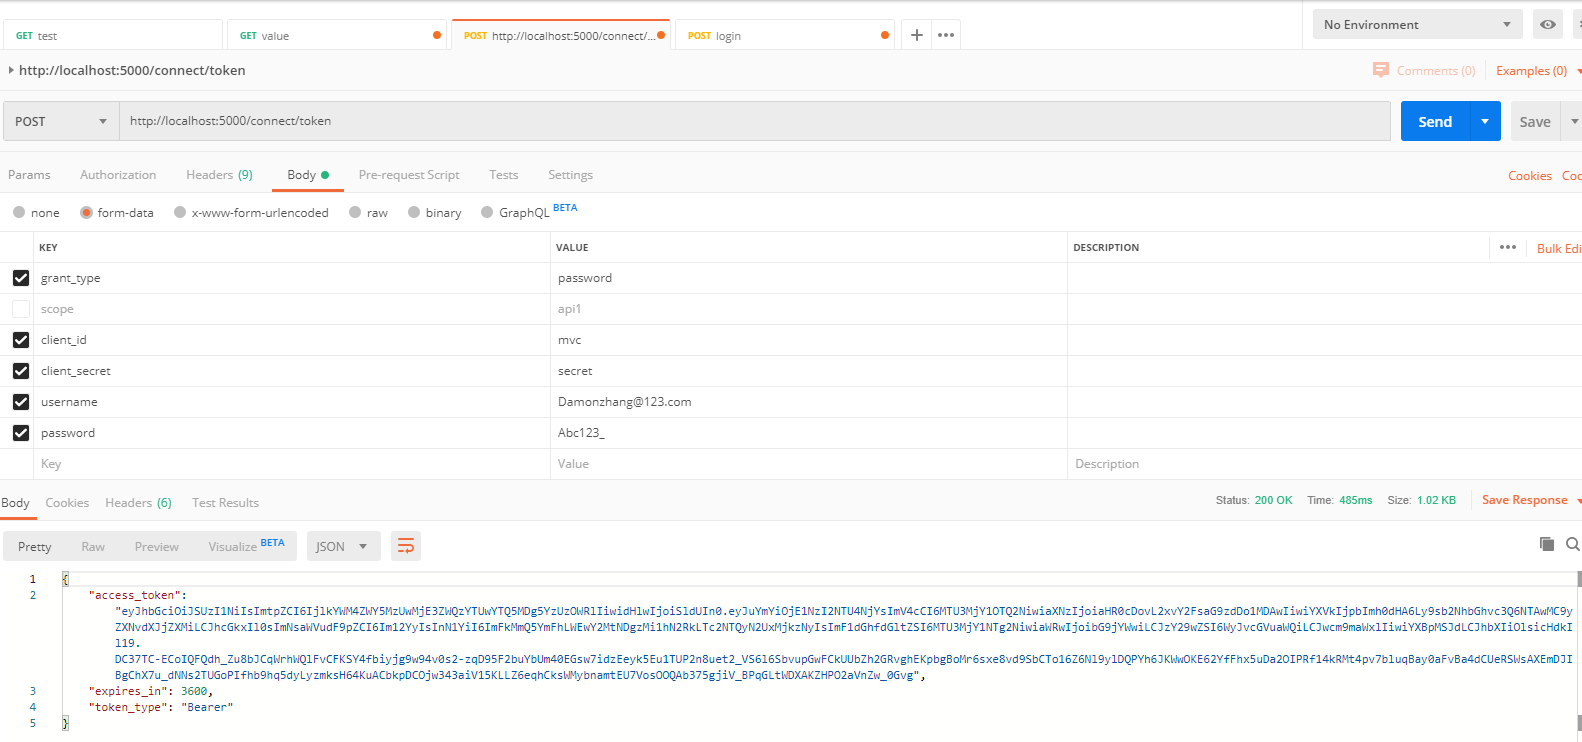
如果能够登陆成功则说明我们的Identity server搭建成功,然后我们用postman单独拿取token:
二、配置.net core web Api使用身份验证系统:
1. 在Startup类的ConfigureServices中添加下列配置,Authority 是我们Identity server启动使用的url。
services.AddAuthentication("Bearer")
            .AddJwtBearer("Bearer", options =>
            {
                options.Authority = "http://localhost:5000";
                options.RequireHttpsMetadata = false;
                options.Audience = "api1";
            });
2. 在Startup类的Configure中添加下列配置。
app.UseAuthentication();
3. Controller 添加属性(特性)[Authorize]
[Route("api/[controller]")]
    [ApiController]
    [Authorize]
    public class ValuesController : ControllerBase
然后我们验证是否可以Identity server验证token.
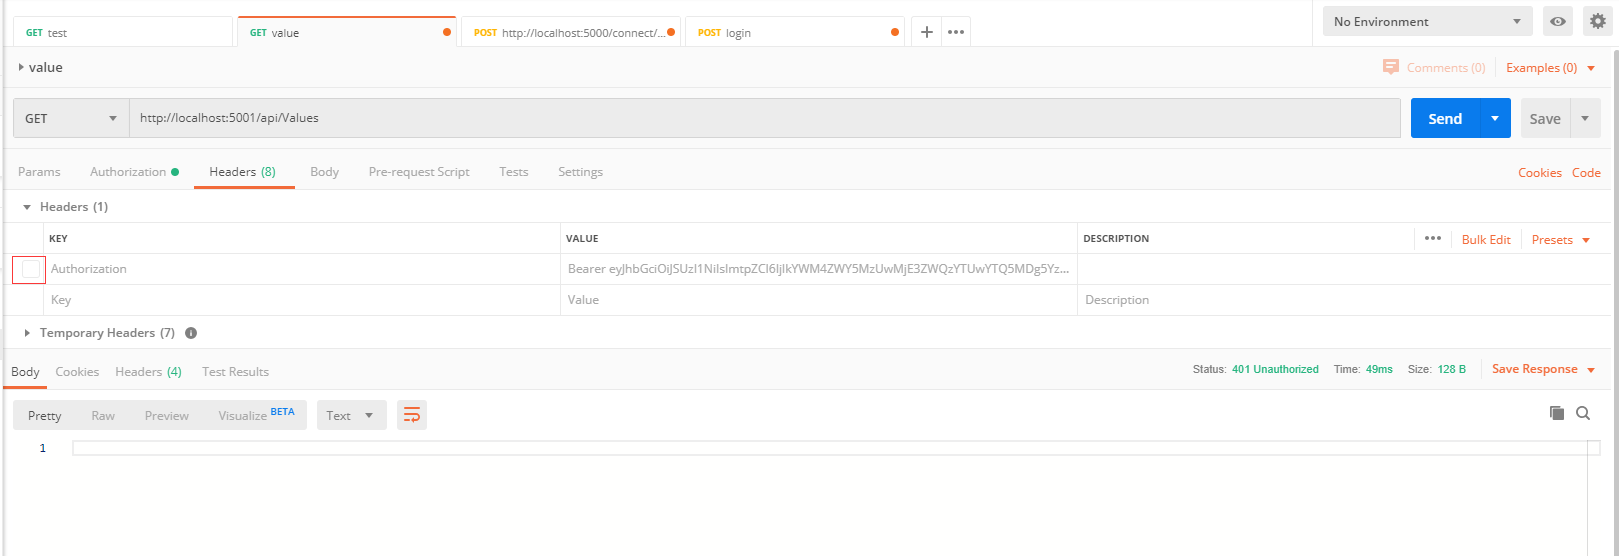
1. 不添加token,发送请求得到401 bad request 错误
2. 使用token,发送请求,得到200成功的状态码,并返回response。