使用spring整合shiro框架步骤:
1.导入jar包


        <dependency>
            <groupId>org.apache.shiro</groupId>
            <artifactId>shiro-core</artifactId>
            <version>1.3.2</version>
        </dependency>
        <dependency>
            <groupId>org.apache.shiro</groupId>
            <artifactId>shiro-ehcache</artifactId>
            <version>1.3.2</version>
        </dependency>
        <dependency>
            <groupId>org.apache.shiro</groupId>
            <artifactId>shiro-spring</artifactId>
            <version>1.3.2</version>
        </dependency>
        <dependency>
            <groupId>org.apache.shiro</groupId>
            <artifactId>shiro-web</artifactId>
            <version>1.3.2</version>
        </dependency>
2.配置shiro配置文件
<?xml version="1.0" encoding="UTF-8"?>
<beans xmlns="http://www.springframework.org/schema/beans"
       xmlns:xsi="http://www.w3.org/2001/XMLSchema-instance" xmlns:util="http://www.springframework.org/schema/util"
       xsi:schemaLocation="http://www.springframework.org/schema/beans http://www.springframework.org/schema/beans/spring-beans.xsd http://www.springframework.org/schema/util https://www.springframework.org/schema/util/spring-util.xsd">

    <!--shiro中的类型要交个spring容器管理-->
    <bean id="lifecycleBeanPostProcessor" class="org.apache.shiro.spring.LifecycleBeanPostProcessor"/>

    <!--安全管理器-->
    <bean id="securityManager" class="org.apache.shiro.web.mgt.DefaultWebSecurityManager">
        <!--缓存管理器-->
        <property name="cacheManager" ref="cacheManager"/>
        <!--会话的模式-->
        <property name="sessionMode" value="native"/>
        <!--配置realm-->
        <property name="realm" ref="loginRealm"/>
    </bean>

    <!--缓存管理器-->
    <bean id="cacheManager" class="org.apache.shiro.cache.ehcache.EhCacheManager"/>

    <!--配置自己的Realm-->
    <bean id="loginRealm" class="com.zs.realm.LoginRealm">
        <property name="name" value="loginRealm"/>
        <!--凭证(密码)匹配器-->
        <property name="credentialsMatcher">
            <bean class="org.apache.shiro.authc.credential.HashedCredentialsMatcher">
                <!--算法-->
                <property name="hashAlgorithmName" value="MD5"/>
                <!--存储的凭据16进制编码-->
                <property name="storedCredentialsHexEncoded" value="true"/>
                <!--迭代次数-->
                <property name="hashIterations" value="1024"/>
            </bean>
        </property>
    </bean>

    <!--启用注解配置-->
    <bean class="org.springframework.aop.framework.autoproxy.DefaultAdvisorAutoProxyCreator"
          depends-on="lifecycleBeanPostProcessor"/>

    <bean class="org.apache.shiro.spring.security.interceptor.AuthorizationAttributeSourceAdvisor">
        <property name="securityManager" ref="securityManager"/>
    </bean>

    <!--配置shiro过滤器,需要在web.xml中配置过滤器,且过滤器的名字要与这里的id一致-->
    <bean id="shiroFilter" class="org.apache.shiro.spring.web.ShiroFilterFactoryBean">
        <!--配置安全管理器-->
        <property name="securityManager" ref="securityManager"/>
        <!--配置登录的地址-->
        <property name="loginUrl" value="/view/login.jsp"/>
        <!--配置成功地址-->
        <property name="successUrl" value="/view/index.jsp"/>
        <!--配置未授权地址-->
        <property name="unauthorizedUrl" value="/unauthorized.jsp"/>

        <!--配置默认过滤器-->
        <property name="filterChainDefinitions">
            <value>
                /login=anon
                /home=authc
                /logout=logout
                /static/** =anon
            </value>
        </property>
    </bean>
</beans>
关于默认过滤器:
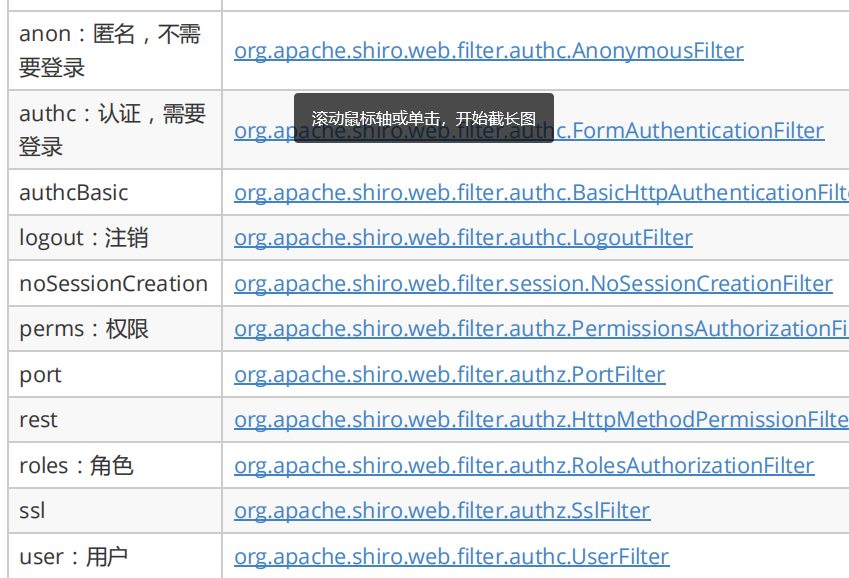
3.配置web.xml过滤器
注意过滤器名字要与shiro.xml中的过滤器名字相同。
 <!--shiro过滤器-->
    <filter>
        <filter-name>shiroFilter</filter-name>
        <filter-class>org.springframework.web.filter.DelegatingFilterProxy</filter-class>
        <init-param>
            <param-name>targetFilterLifecycle</param-name>
            <param-value>true</param-value>
        </init-param>
    </filter>
    <filter-mapping>
        <filter-name>shiroFilter</filter-name>
        <url-pattern>/*</url-pattern>
    </filter-mapping>
4.将shiro配置文件导入spring主配置文件:在applicationContext.xml中添加如下代码

至此,spring整合shiro的配置已经完成:下面编辑web页面进行测试:
编辑登陆页面:

编写Realm,要注意在上面的配置文件中,配置了Realm,这里编辑的Realm需要配置在上面的配置文件中;
package com.zs.realm;

import org.apache.shiro.authc.*;
import org.apache.shiro.crypto.hash.SimpleHash;
import org.apache.shiro.realm.AuthenticatingRealm;
import org.apache.shiro.util.ByteSource;
import org.junit.jupiter.api.Test;

public class LoginRealm extends AuthenticatingRealm {
    @Override
    protected AuthenticationInfo doGetAuthenticationInfo(AuthenticationToken token) throws AuthenticationException {

        UsernamePasswordToken usernamePasswordToken = (UsernamePasswordToken) token;
        String username = usernamePasswordToken.getUsername();
//        模拟从数据库中获取到的密码,并进行hash算法加密
        ByteSource salt = ByteSource.Util.bytes(username);
//     参数:"MD5":加密算法,"123456":模拟从数据库中取到的密码,salt:盐:为了使数据更安全,后面详述,1024:迭代次数
        SimpleHash simpleHash = new SimpleHash("MD5","123456",salt,1024);
        String password = simpleHash.toHex();
        SimpleAuthenticationInfo info = new SimpleAuthenticationInfo(username, password,salt,this.getName());
        return info;
    }
}
编辑控制器:
package com.zs.controller;

import com.zs.entity.User;
import org.apache.shiro.SecurityUtils;
import org.apache.shiro.authc.*;
import org.apache.shiro.subject.Subject;
import org.slf4j.Logger;
import org.slf4j.LoggerFactory;
import org.springframework.stereotype.Controller;
import org.springframework.ui.Model;
import org.springframework.web.bind.annotation.RequestMapping;
import org.springframework.web.bind.annotation.ResponseBody;
import org.springframework.web.bind.annotation.SessionAttributes;

@Controller
public class UserController {

    private static final transient Logger log = LoggerFactory.getLogger(UserController.class);
    @RequestMapping("/login")
    public String login(User user)  {

        Subject currentUser = SecurityUtils.getSubject();

        //判断是否认证
        if (!currentUser.isAuthenticated()) {
            UsernamePasswordToken token = new UsernamePasswordToken(user.getUsername(),user.getPassword());
            //记住我
//            token.setRememberMe(true);
            try {
                currentUser.login(token);
            } catch (UnknownAccountException uae) {
//                找不到用户
                log.info("There is no user with username of " + token.getPrincipal());
            } catch (IncorrectCredentialsException ice) {
//                密码错误
                log.info("Password for account " + token.getPrincipal() + " was incorrect!");
            } catch (LockedAccountException lae) {
//                账户锁定
                log.info("The account for username " + token.getPrincipal() + " is locked.  " +
                        "Please contact your administrator to unlock it.");
            } catch (AuthenticationException ae) {
                //unexpected condition?  error?
            }
        }
        return "redirect:/home";
    }

    @RequestMapping("/home")
    public String home() {
        System.out.println("hello");
        return "index";
    }
}
准备完毕,运行测试,123456为能登陆成功的密码,输入正确的密码和错误的密码进行测试。
在spring中shiro的工作流程
在上一篇我们已经写了shiro的主要工作流程架构,前端第三方用户subject发送请求,到安全管理器securityManager,安全管理器交给内部的子类组件进行处理,通过底层的realm获取数据域,进行验证授权等操作。
在spring整合的shiro中,前端发送请求,会先到web.xml中的过滤器,然后过滤器根据名字找到配置文件中的过滤器配置:

通过比对该过滤器中的配置信息,判断哪儿些请求需要认证,哪儿些请求需要权限验证等

将请求经过shiro的安全认证后,在决定哪儿些请求可以放行,哪儿些请求需要认证、权限、角色等。请求发送到控制器后,控制器执行到这里:

可以打断点,进入该方法,可以看到进入到了配置的LoginRealm数据域内,然后再该Realm内,进行密码的匹配认证,判断是否认证成功,具体可以一步一步的进入源码查看,底层是通过equals方法来进行判断的。
关于密码加密:
在之前我们的数据库用户表的密码数据都是没有经过加密的,这样的方式不安全,如果一个员工是管理数据库的,那么可以通过一句sql命令就查看到所有用户的账号密码,直接进行登录操作,如果涉及到隐私,财产安全等,。。。因此这种方式是很不安全的,使用shiro框架后,会将前端的密码进行加密,这里使用MD5方式加密,使用MD5加密的方式是不可逆的,也就是说只能加密,不能解密。这种加密方式会将你的密码生成一个32位的字符串,这样就可以提高数据的安全性:

这是我们在shiro配置文件中配置的密码加密,他会将密码按照MD5的算法进行加密,加密迭代的次数为1024次,
关于迭代:假如说原始密码是123,经过一次迭代后是aaa,然后将aaa作为密码进行第二次迭代得到密码bbb,再将bbb作为密码进行第三次迭代。。。。。。
由此可见,迭代的次数越多,那么密码就越安全,但是如果说数据库中有很多用户的密码是相同的,那么经过1024次迭代后,生成的字符串也是相同的,这样同样数据不安全,因为如果管理数据库的人看到这么多的重复的字符串,那么只需要破解出来一个字符串的原始密码,就可以知道其他用户的密码,因此我们就给他加盐salt:

如上图所示,本来我们只需要将123456,按照MD5算法进行1024次迭代,生成密码的字符串,但是这种方式不安全,于是就将用户名作为盐salt,一块添加到密码的加密过程中,因为用户名是唯一的,每个人的用户名都不一样,因此生成的加密后的字符串也都不一样,这样就提高了数据的安全性。
使用加密后的工作流程
前端发送密码到shiro,然后shiro将密码进行加密,将加密后的字符串与数据库中存储的字符串进行比较,如果相同则登录成功,如果不同则登录不成功
关于Realm
Realm是shiro最底层的连接shiro与数据库数据的桥梁,shiro通过Realm连接数据库数据进行数据的比较,要使用realm需要是实现Realm接口:
package com.zs.realm;

import org.apache.shiro.authc.AuthenticationException;
import org.apache.shiro.authc.AuthenticationInfo;
import org.apache.shiro.authc.AuthenticationToken;
import org.apache.shiro.realm.Realm;

public class MyRealm implements Realm {
    @Override
    public String getName() {
        return null;
    }

    @Override
    public boolean supports(AuthenticationToken token) {
        return false;
    }

    @Override
    public AuthenticationInfo getAuthenticationInfo(AuthenticationToken token) throws AuthenticationException {
        return null;
    }
}
可以看到,需要实现三个方法,为了使用方便,我们继承Realm的子类,子类封装好了一些方法,因此我们只需要重写我们需要的方法就好了,不需要每个方法都写。
Realm的实现类有很多,我们只继承我们需要的实现类,如:
package com.zs.realm;

import org.apache.shiro.authc.AuthenticationException;
import org.apache.shiro.authc.AuthenticationInfo;
import org.apache.shiro.authc.AuthenticationToken;
import org.apache.shiro.realm.AuthenticatingRealm;
import org.apache.shiro.realm.Realm;

public class MyRealm extends AuthenticatingRealm {
    @Override
    protected AuthenticationInfo doGetAuthenticationInfo(AuthenticationToken token) throws AuthenticationException {
        return null;
    }
}
这是个认证的Realm,我们只需要实现认证的方法,其他的方法 ,父类已经是实现过了