Hessian的使用以及理解
- Hessian版本:3.1.5
- 相关博客 http://blog.csdn.net/zpf336/article/details/45247289
- http://blog.csdn.net/wodediqizhang/article/details/51605441
将包括如下的内容:
- Hessian的基本使用
- Hessian的原理
- Hessian和Spring 的结合使用
- 扩展
简单说来,Hessian是一个轻量级的RPC框架(RPC是什么?请参考这里)。
它基于HTTP协议传输,使用Hessian二进制序列化,对于数据包比较大的情况比较友好。
但是它的参数和返回值都需要实现Serializable接口。
简单实现一个Hessian的例子:
- 创建接口和实现类
public interface Basic {
    String sayHello(String name);
}
接口实现
public class BasicImpl implements Basic{

    public String sayHello(String name) {
        return "This is Hello words from HESSIAN Server. " + name;
    }
}
- 配置HessianServlet, web.xml中:
<servlet>
    <servlet-name>HessianServlet</servlet-name>
    <servlet-class>com.caucho.hessian.server.HessianServlet</servlet-class>
    <init-param>
      <param-name>service-class</param-name>
      <param-value>example.impl.BasicImpl</param-value>
    </init-param>

  </servlet>

  <servlet-mapping>
    <servlet-name>HessianServlet</servlet-name>
    <url-pattern>/hessian</url-pattern>
  </servlet-mapping>
我们将会把Servlet部署在Tomcat上,端口8080。
- 编写客户端代码:
public class BasicClient {
    public static void main(String[] args) {
        try {
            String url = "http://localhost:8080/hessian";
            HessianProxyFactory factory = new HessianProxyFactory();
            factory.setOverloadEnabled(true);
            Basic basic = (Basic) factory.create(Basic.class, url);
            System.out.println(basic.sayHello("SW"));
        }catch (Exception e){
            e.printStackTrace();
        }
    }
创建HessianProxyFactory对象,创建Basic “对象”,然后调用sayHello()方法。
整个过程感觉很简单,并没有什么配置。
启动Tomcat,运行Client。
输出如下:
This is Hello words from HESSIAN Server. SW
可见是调用成功了。
等等,这个过程到底发生了些什么?
我们先从服务端说起,主要是有这几个步骤:
- 编写接口和实现类
- 在web.xml中声明HessianServlet,并且将上一步的实现类设置为Servlet的[service-class]属性值
- 将Servlet部署在Tomcat容器中
可见我们所有的工作都围绕在HessianServlet在展开。该Servlet中有两个比较重要的方法:init()、service();
init方法初始化服务和服务对象,主要分为3步:
通过home-class或者service-class创建服务端的实现类实例;
if (_homeImpl != null) {
      }
      else if (getInitParameter("home-class") != null) {
    String className = getInitParameter("home-class");

    Class homeClass = loadClass(className);

    _homeImpl = homeClass.newInstance();

    init(_homeImpl);
      }
      else if (getInitParameter("service-class") != null) {
    String className = getInitParameter("service-class");

    Class homeClass = loadClass(className);

    _homeImpl = homeClass.newInstance();

    init(_homeImpl);
      }
      else {
    if (getClass().equals(HessianServlet.class))
      throw new ServletException("server must extend HessianServlet");

    _homeImpl = this;
      }
通过home-api或者api-class加载实现类的接口对象;
   if (_homeAPI != null) {
      }
      else if (getInitParameter("home-api") != null) {
    String className = getInitParameter("home-api");

    _homeAPI = loadClass(className);
      }
      else if (getInitParameter("api-class") != null) {
    String className = getInitParameter("api-class");

    _homeAPI = loadClass(className);
      }
      else if (_homeImpl != null)
    _homeAPI = _homeImpl.getClass();
init方法还会创建HessianSkeleton对象,这是Hessian服务端的核心功能部分。
HessianSkeleton继承自AbstractSkeleton,其构造方法,将会从实现类中抽取方法和方法的Method对象,并且存储到_methodMap中。
对于一个Servlet来说其service方法是对外提供服务的方法:
/**
   * Execute a request.  The path-info of the request selects the bean.
   * Once the bean's selected, it will be applied.
   */
  public void service(ServletRequest request, ServletResponse response)
    throws IOException, ServletException
  {
    HttpServletRequest req = (HttpServletRequest) request;
    HttpServletResponse res = (HttpServletResponse) response;

    if (! req.getMethod().equals("POST")) {
      res.setStatus(500, "Hessian Requires POST");
      PrintWriter out = res.getWriter();

      res.setContentType("text/html");
      out.println("<h1>Hessian Requires POST</h1>");

      return;
    }

    String serviceId = req.getPathInfo();
    String objectId = req.getParameter("id");
    if (objectId == null)
      objectId = req.getParameter("ejbid");

    ServiceContext.begin(req, serviceId, objectId);

    try {
      InputStream is = request.getInputStream();
      OutputStream os = response.getOutputStream();

      HessianInput in = new HessianInput(is);
      HessianOutput out = new HessianOutput(os);

      if (objectId != null)
    _objectSkeleton.invoke(in, out);
      else
    _homeSkeleton.invoke(in, out);
    } catch (RuntimeException e) {
      throw e;
    } catch (ServletException e) {
      throw e;
    } catch (Throwable e) {
      throw new ServletException(e);
    } finally {
      ServiceContext.end();
    }
  }
最主要的是调用HessianSkeleton对象的invoke方法。注意,Servlet实例中有两个HessianSkeleton变量,分别是:_objectSkeleton和 _homeSkeleton,调用谁,是由objectid决定的。此处还有不明白的地方。
invoke方法:
首先从HessianInput对象中获取到Method信息,获取到真正的service对象。
根据反射机制,调用service对象的invoke方法,获取到返回值。
最后调用HessianOutput对象将结果写回到调用方。

======================================================================================================================
客户端代码
Hessian原生API编写客户端HessianClient:
public class BasicClient {
    public static void main(String[] args) {
        try {
            String url = "http://localhost:8080/hessian";
            HessianProxyFactory factory = new HessianProxyFactory();
            factory.setOverloadEnabled(true);
            Basic basic = (Basic) factory.create(Basic.class, url);
            System.out.println(basic.sayHello("SW"));
        }catch (Exception e){
            e.printStackTrace();
        }
    }
}
创建HessianProxyFacotry,创建接口Basic的代理对象,然后调用sayHello()方法。
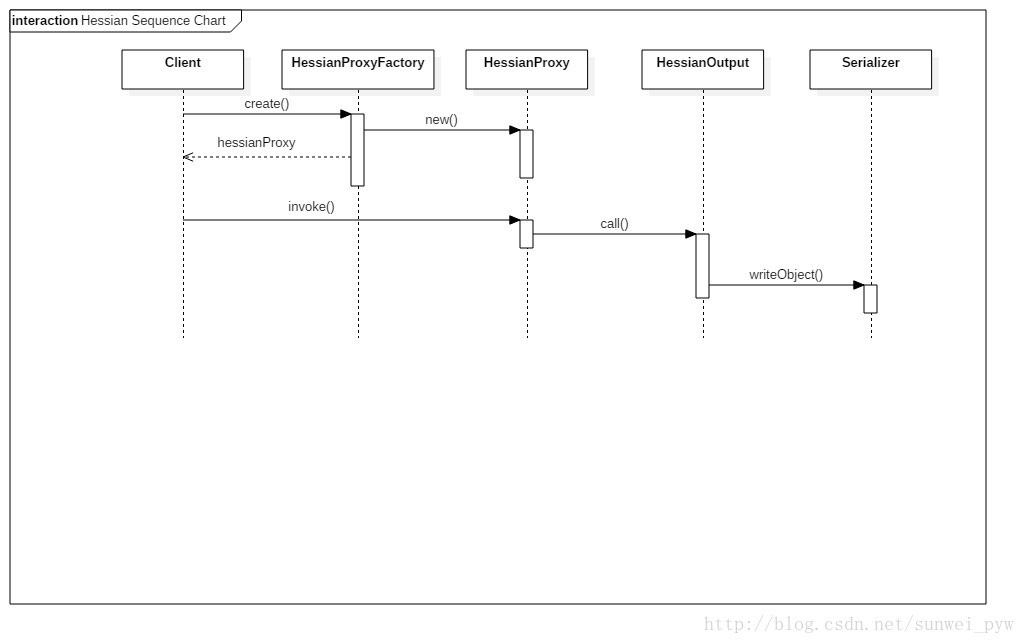
那么重点就在于创建代理对象,首先创建HessianProxyFacotry对象,构造方法中创建了一个HessianProxyResolver对象,这个对象的lookup方法将用来查找远程服务。此外HessianProxyFacotry还有包括权限验证方面的支持。
创建了factory之后,接下来就是通过Class对象和远程服务的URL创建代理对象了。
HessianProxyFactory使用HessianProxy对象作为代理的Handler,也就是说,我们对代理对象的所有操作,都会由这个handler来处理。handler的invoke方法,在进行一些方法名和参数的确认之后,创建HttpURLConnection对象,调用sendRequest方法,将方法名和参数用HessianOutput对象(设置序列化的方式)的call方法,写入到服务端。
主要代码如下:
protected URLConnection sendRequest(String methodName, Object []args)
    throws IOException
  {
    URLConnection conn = null;

    conn = _factory.openConnection(_url);

    // Used chunked mode when available, i.e. JDK 1.5.
    if (_factory.isChunkedPost() && conn instanceof HttpURLConnection) {
      try {
    HttpURLConnection httpConn = (HttpURLConnection) conn;

    httpConn.setChunkedStreamingMode(8 * 1024);
      } catch (Throwable e) {
      }
    }

    addRequestHeaders(conn);

    OutputStream os = null;

    try {
      os = conn.getOutputStream();
    } catch (Exception e) {
      throw new HessianRuntimeException(e);
    }

    try {
      if (log.isLoggable(Level.FINEST)) {
    PrintWriter dbg = new PrintWriter(new LogWriter(log));
    os = new HessianDebugOutputStream(os, dbg);
      }

      AbstractHessianOutput out = _factory.getHessianOutput(os);

      out.call(methodName, args);
      out.flush();

      return conn;
    } catch (IOException e) {
      if (conn instanceof HttpURLConnection)
    ((HttpURLConnection) conn).disconnect();

      throw e;
    } catch (RuntimeException e) {
      if (conn instanceof HttpURLConnection)
    ((HttpURLConnection) conn).disconnect();

      throw e;
    }
  }
服务端拿到请求,进行反序列化,然后将方法调用,再将结果序列化之后写回到connection。所以,客户端在sendRequest之后,所要做的就是将返回的结果进行解析,看返回的code是不是200:
conn = sendRequest(mangleName, args);

      if (conn instanceof HttpURLConnection) {
    httpConn = (HttpURLConnection) conn;
        int code = 500;

        try {
          code = httpConn.getResponseCode();
        } catch (Exception e) {
        }

        parseResponseHeaders(conn);

        if (code != 200) {
          StringBuffer sb = new StringBuffer();
          int ch;

.....

        AbstractHessianInput in = _factory.getHessianInput(is);

      in.startReply();

      Object value = in.readObject(method.getReturnType());

      if (value instanceof InputStream) {
    value = new ResultInputStream(httpConn, is, in, (InputStream) value);
    is = null;
    httpConn = null;
      }
      else
    in.completeReply();

      return value;
解析HessianInput对象,并且从中读取到结果返回。
至此,服务端和客户端的交互过程已经简单地介绍完毕。
Spring整合 Hessian
Spring也为Hessian提供了很友好的支持,通过使用spring-remoting包,我们可以很方便地发布和调用服务。
这部分提供一个简单的实现例子:
在web.xml中,我们配置SpringMVC的DispatcherServlet:
<servlet>
    <servlet-name>SpringMVC</servlet-name>
    <servlet-class>org.springframework.web.servlet.DispatcherServlet</servlet-class>
    <init-param>
      <param-name>contextConfigLocation</param-name>
      <param-value>classpath:applicationContext.xml</param-value>
    </init-param>
    <load-on-startup>1</load-on-startup>
  </servlet>

  <servlet-mapping>
    <servlet-name>SpringMVC</servlet-name>
    <url-pattern>/remote/*</url-pattern>
  </servlet-mapping>
applicationContext.xml
<?xml version="1.0" encoding="UTF-8"?>
<beans xmlns="http://www.springframework.org/schema/beans"
       xmlns:xsi="http://www.w3.org/2001/XMLSchema-instance"
       xsi:schemaLocation="http://www.springframework.org/schema/beans
    http://www.springframework.org/schema/beans/spring-beans-4.1.xsd"
       default-lazy-init="true">

    <bean id = "basicService" class="example.impl.BasicImpl"/>

    <bean name="/basicHessianService" class="org.springframework.remoting.caucho.HessianServiceExporter">
        <property name="service" ref="basicService"/>
        <property name="serviceInterface" value="example.Basic"/>
    </bean>
</beans>
这里,我们使用了org.springframework.remoting.caucho.HessianServiceExporter来发布服务。将程序部署在tomcat中。
客户端,使用org.springframework.remoting.caucho.HessianProxyFactoryBean来代理请求:
client.xml
<?xml version="1.0" encoding="UTF-8"?>
<beans xmlns="http://www.springframework.org/schema/beans"
       xmlns:xsi="http://www.w3.org/2001/XMLSchema-instance"
       xsi:schemaLocation="http://www.springframework.org/schema/beans
    http://www.springframework.org/schema/beans/spring-beans-4.1.xsd"
       default-lazy-init="true">


    <bean id="basicService" class="org.springframework.remoting.caucho.HessianProxyFactoryBean">
        <property name="serviceUrl" value="http://localhost:8080/remote/basicHessianService"/>
        <property name="serviceInterface" value="example.Basic"/>
    </bean>
</beans>
编写客户端:
public class SpringClient {
    public static void main(String[] args) {
        ClassPathXmlApplicationContext context = new ClassPathXmlApplicationContext(new String[]{"classpath:client.xml"});
        Basic basic = (Basic)context.getBean("basicService");
        System.out.println(basic.sayHello("SUNWEI"));
    }
}
这样,服务端/客户端的代码都已经编写完成。
最原始的实现,我们的服务是通过Servlet来绑定的,而Spring的实现,我们使用了SpringMVC的加载时机,将配置文件加载。HessianServiceExporter
public class HessianServiceExporter extends RemoteExporter implements HttpRequestHandler, InitializingBean {
....
这个类实现了InitializingBean接口,这是spring-beans包中很重要的一个扩展接口。
这个接口的说明如下:
Interface to be implemented by beans that need to react once all their
properties have been set by a BeanFactory: for example, to perform custom
initialization, or merely to check that all mandatory properties have been set.
也就是说,它会随着Spring容器(此处为Spring MVC容器)的启动而被加载。看看HessianServiceExporter的实现:
public void prepare() {
        HessianSkeleton skeleton = null;

        try {
            try {
                Constructor ctor = (class$com$caucho$hessian$server$HessianSkeleton == null?(class$com$caucho$hessian$server$HessianSkeleton = class$("com.caucho.hessian.server.HessianSkeleton")):class$com$caucho$hessian$server$HessianSkeleton).getConstructor(new Class[]{class$java$lang$Object == null?(class$java$lang$Object = class$("java.lang.Object")):class$java$lang$Object, class$java$lang$Class == null?(class$java$lang$Class = class$("java.lang.Class")):class$java$lang$Class});
                this.checkService();
                this.checkServiceInterface();
                skeleton = (HessianSkeleton)ctor.newInstance(new Object[]{this.getProxyForService(), this.getServiceInterface()});
            } catch (NoSuchMethodException var4) {
                Constructor ctor = (class$com$caucho$hessian$server$HessianSkeleton == null?(class$com$caucho$hessian$server$HessianSkeleton = class$("com.caucho.hessian.server.HessianSkeleton")):class$com$caucho$hessian$server$HessianSkeleton).getConstructor(new Class[]{class$java$lang$Object == null?(class$java$lang$Object = class$("java.lang.Object")):class$java$lang$Object});
                skeleton = (HessianSkeleton)ctor.newInstance(new Object[]{this.getProxyForService()});
            }
        } catch (Throwable var5) {
            throw new BeanInitializationException("Hessian skeleton initialization failed", var5);
        }

        if(hessian2Available) {
            this.skeletonInvoker = new Hessian2SkeletonInvoker(skeleton, this.serializerFactory);
        } else {
            this.skeletonInvoker = new Hessian1SkeletonInvoker(skeleton, this.serializerFactory);
        }

    }

    public void handleRequest(HttpServletRequest request, HttpServletResponse response) throws ServletException, IOException {
        Assert.notNull(this.skeletonInvoker, "HessianServiceExporter has not been initialized");
        if(!"POST".equals(request.getMethod())) {
            throw new HttpRequestMethodNotSupportedException("POST", "HessianServiceExporter only supports POST requests");
        } else {
            try {
                this.skeletonInvoker.invoke(request.getInputStream(), response.getOutputStream());
            } catch (Throwable var4) {
                throw new NestedServletException("Hessian skeleton invocation failed", var4);
            }
        }
    }
在prepare方法中,获取service和serviceInterface的配置,创建HessianSkeleton对象。
同时,还实现了HttpRequestHandler,spring-web中的接口。
又因为实现了HttpRequestHandler接口,所以在handleRequest方法中,可以像HessianServlet的service方法一样,调用Hessian2SkeletonInvoker的invoke方法进行实际的方法调用。
最后一点尾巴
定义一个自己的HttpRequestHandler对象,配置在applicationContext.xml中,然后通过页面访问:
public class MyHandler implements HttpRequestHandler, InitializingBean {
    public void afterPropertiesSet() throws Exception {
        System.out.println("初始化 MyHandler");
    }

    public void handleRequest(HttpServletRequest request, HttpServletResponse response) throws ServletException, IOException {
        System.out.println("执行 MyHandler");
    }
}
配置在applicationContext.xml中:
<bean id = "/myHandler" class="client.MyHandler"/>
通过Spring MVC的上下文加载该Handler,启动Tomcat的时候,可以看到控制台输出:
初始化 MyHandler
在浏览器中访问:http://localhost:8080/remote/myHandler
将触发执行:执行 MyHandler