1. SPRING简介
1.1. Spring作用
Spring封装了创建对象的功能
内部实现机制:框架写了自己的工厂类,读用户的配置文件,然后反射出配置文件中配置的各种对象
Spring是分层的JavaSE/EE应用一站式的轻量级(重量级EJB,SUN公司(Session Bean[控制层], Service Bean[业务层], Persistace Bean[DAO层]))开源框架(官网: http://spring.io/ ),以Ioc(Inverse of control)控制反转和Aop(Aspect Oriented Programming)面向切面编程为核心。
轻量级:针对EJB来说,使用方便。
一站式:spring针对各各层(表现层、业务层、持久层)提出解决方案。
表现层:springmvc,Struts1, Struts2(spring自己的mvc框架),提供和其它web框架整合方案。
业务层:spring基于aop(面向切面编程)思想进行事务控制。
持久层:spring自己提供JdbcTemplate,提供和其它持久层框架整合的方案。
1.2. Spring核心功能
Ioc(控制反转)和aop(面向切面编程)。
重点是:IOC(大容器Map, 放了很多对象),spring要管理各各层的bean。
2. SPRING工作机制模拟
2.1. 控制反转IOC和依赖注入DI
2.1.1. 什么是控制反转
IoC (Inverse of Control)即控制反转。是指将原来程序中自己创建实现类对象的控制权反转到IOC容器中。只需要通过IOC获了对象的实例,将IOC当成一个黑盒子、工厂、容器。
spring提供ioc容器,对 bean进行实例化。使用bean时候从容器中取。
IOC控制反转,将对象的创建权反转到了spring容器中。
2.1.2. 什么是依赖注入
Spring在创建一个类的实例时,如果这个类的里面依类型赖其他的引用,那么会自动将其引用的类型的类先实例化再注入到该实例里面
依赖注入的总结:
在配置文件中加入<property name=”userDao” ref=”userdao1”>
name=”userDao”,说明该bean有一个名字叫userDao的成员变量,并且该变量有setter方法。
ref=”userdao1”,说明,在spring容器中,有一个id或name为userdao1的bean
3. SPRING入门示例程序
3.1. 新建工程
3.2. 导入JAR包
•spring-beans-4.2.4.RELEASE.jar
•spring-context-4.2.4.RELEASE.jar
•spring-core-4.2.4.RELEASE.jar
•spring-expression-4.2.4.RELEASE.jar
spring使用JCL日志体系(commons-logging-1.2.jar)
commons-logging:相当 于原来的slf4j,只有日志接口
还需要加入日志实现:log4j
3.3. 业务类准备
3.4. SPRING配置文件
spring的ioc容器的配置文件:applicationContext.xml(默认名称)
配置schema约束:
http://www.springframework.org/schema/beans/spring-beans.xsd

spring的ioc容器的配置文件:applicationContext.xml(默认名称)
配置schema约束:
http://www.springframework.org/schema/beans/spring-beans.xsd
3.5. 配置BEAN
1、编写好接口及接口实现类
2、需要在spring的容器的配置文件中配置spring要管理的bean。
3.6. 运行测试
    // 从spring的容器中获取bean实例
    @Test
    public void test1() {
        // 创建spring容器的实例
        ApplicationContext applicationContext = new ClassPathXmlApplicationContext("spring/applicationContext.xml");
        // 通过容器实例对象获取bean实例
        // 通过 bean的名称来获取
        CustomerDao customerDao = (CustomerDao) applicationContext.getBean("customerDao");
        System.out.println(customerDao);
        CustomerService customerService = (CustomerService) applicationContext.getBean("customerService");
        System.out.println(customerService);
    }
4. IOC更多配置
4.1. BEAN的定义

4.2. BEAN的初始化配置
spring要对applicationContext.xml中配置的bean进行实例化(初始化)。
包括:通过无参构造器实例化、通过有参构造器实例化、通过静态工厂方法
<!-- 测试spring对bean的实例化方法 -->
    <!-- 默认通过无参构造器 -->
    <bean id="customer1" class="com.dohit.pojo.CstCustomer"></bean>
    <!-- 通过有参构造器
    构造器:public CstCustomer(Long custId,String custName)
     -->
    <bean id="customer2" class="com.dohit.pojo.CstCustomer">
        <!-- index:参数位置,第一个参数位置为0
        value:参数值
        type:参数类型
         -->
        <constructor-arg index="0" value="101" type="java.lang.Long"/>
        <constructor-arg index="1" value="牛牛" type="java.lang.String"/>

    </bean>
    <!-- 了解,通过静态工厂方法获取bean的实例
    class:配置工厂类的路径
    factory-method:调用工厂方法,获取对象
     -->
    <bean id="customer3" class="com.dohit.pojo.CustomerFactory" factory-method="getCustomer"></bean>

4.3. BEAN的获取
getBean(bean标识)
// 通过类型去获取bean时,spring配置文件中,该类型的bean只能有一个
getBean(bean类型.class)
4.4. ApplicationContext加载配置文件
ApplicationContext理解为spring容器的上下文,通过上下文操作容器中bean。
ClassPathXmlApplicationContext(“./文件夹名/spring.xml”):加载classpath下的配置文件创建一个容器实例
FileSystemXmlApplicationContext(“d:\testspring.xml”):加载文件系统中任意目录下的配置文件,创建一个容器实例
掌握:多文件的加载方法
        // ClassPathXmlApplicationContext applicationContext = new ClassPathXmlApplicationContext("applicationContext-dao.xml","applicationContext-service.xml");
        // ClassPathXmlApplicationContext applicationContext = new ClassPathXmlApplicationContext(new
        // String[]{"applicationContext-dao.xml","applicationContext-service.xml"});
        //ClassPathXmlApplicationContext applicationContext = new ClassPathXmlApplicationContext(new String[] { "classpath:applicationContext-dao.xml", "applicationContext-service.xml" });
        // ClassPathXmlApplicationContext applicationContext = new ClassPathXmlApplicationContext("applicationContext-*.xml");
        //ClassPathXmlApplicationContext applicationContext = new ClassPathXmlApplicationContext(new String[] { "classpath:applicationContext-*.xml", "beans.xml" });
        //ClassPathXmlApplicationContext applicationContext = new ClassPathXmlApplicationContext("classpath:*.xml");
        // ClassPathXmlApplicationContext applicationContext = new ClassPathXmlApplicationContext(new String[] { "classpath:*.xml", "classpath:springmvc/beans.xml" });
        //ClassPathXmlApplicationContext applicationContext = new ClassPathXmlApplicationContext("classpath*:*.xml");
5. DI依赖注入
5.1. DI的概念
依赖注入(Dependency Injection)”。所谓依赖注入,就是由IOC容器在运行期间,动态地将对象的依赖关系注入到对象的属性中。
service:依赖dao,如何实现依赖注入?
1、spring要管理service(前提)
2、spring要管理dao(前提)
总结前提:依赖方(service)、被依赖方(dao)都需要被spring管理
3、根据依赖关系,service依赖dao,将dao实例注入至service的属性中。
底层原理:spring根据配置文件中配置依赖关系,首先获取被依赖的对象dao实例,调用service对象的构造函数或者set方法将dao实例设置(注入)到service属性。
5.2. DI测试
目标:
让spring将service依赖的dao注入。
1、在spring的容器中配置dao和service

2、配置依赖关系,service依赖dao

5.3. 小结Ioc和Di的区别
ioc:控制反转,将对象的创建权反转到ioc容器。
DI:依赖注入,将对象所依赖的对象注入到对象的属性中。 就是IOC的具体实现方法。
1、IOC就是一个容器
2、IOC容器中包括spring管理的所有bean。
3、IOC容器负责对bean进行实例化
4、IOC容器对bean进行实例化时候,检查有哪些依赖的属性,将依赖的属性注入到实例化的bean的属性中。
要实现依赖注入,需要spring管理依赖方和被依赖方(spring要对依赖方和被依赖方实例化)。
5.4. 依赖注入方法
5.4.1. 通过有参构造器注入属性值


5.4.2. 通过 set方法注入(常用!!!)

5.4.3. 测试set方法注入支持属性类型:

<!-- 测试set方法依赖注入的属性类型 -->
    <bean id="queryVo" class="com.dohit.spring.pojo.QueryVo">
        <!-- 基本类型 -->
        <property name="page" value="1"></property>
        <property name="username" value="大牛"></property>
        <!-- pojo属性 -->
        <property name="customer" ref="customer1"></property>
        <!-- list List<String> -->
        <property name="listString">
            <list>
                <value>小牛1</value>
                <value>小牛2</value>
            </list>
        </property>
        <!-- list List<CstCustomer> -->
        <property name="customerList">
            <list>
                <ref bean="customer3"/>
                <ref bean="customer3"/>
            </list>
        </property>
        <!-- map -->
        <property name="map">
            <map>
                <entry key="101" value="小牛"></entry>
                <entry key="102" value="大牛"></entry>
            </map>
        </property>
        <!-- properties -->
        <property name="properties">
            <props>
                <prop key="101" >小牛</prop>
                <prop key="102" >大牛</prop>
            </props>
        </property>
    </bean>
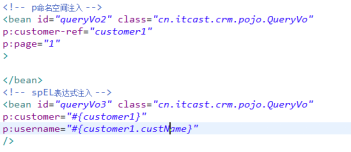
5.4.4. p命名空间和spEL表达式注入方式(了解)
6. 基于注解方式进行IOC开发
使用注解,spring通过注解方式完成bean的管理。
bean的管理包括两部分:
1、对 bean实例化
2、对bean依赖注入
6.1. 准备环境
将applicationContext.xml文件置空
加入spring-aop-4.2.4.RELEASE.jar
6.2. 实例化的注解
@Repository:标识此bean为一个dao


在spring中提供了@component标识就是一个bean。
@Component可以用在任何的bean上。
6.3. 配置context:component-scan组件扫描
引入context命名空间
<beans xmlns="http://www.springframework.org/schema/beans"
     xmlns:xsi="http://www.w3.org/2001/XMLSchema-instance"
     xmlns:context="http://www.springframework.org/schema/context"
     xsi:schemaLocation="http://www.springframework.org/schema/beans
         http://www.springframework.org/schema/beans/spring-beans.xsd
         http://www.springframework.org/schema/context
         http://www.springframework.org/schema/context/spring-context.xsd">

<!-- 配置组件扫描
component-scan可以扫描注解:@controller、@Service、@Repository、@Component
指定扫描的包com.dohit.spring,可以扫描子包下的类
 -->
<context:component-scan base-package="com.dohit.spring"></context:component-scan>

</beans>
原理:
在加载spring容器时,根据上边配置的包路径,扫描包下的及子包下的类,如果标识了:@controller、@Service、@Repository、@Component进行实例化。
了解,进行过虑配置:
<context:component-scan base-package="com.dohit.spring">
            <!-- 扫描 org.springframework.stereotype.Service-->
            <context:include-filter type="annotation" expression="org.springframework.stereotype.Service"/>
            <!-- 扫描org.springframework.stereotype.Repository-->
            <context:include-filter type="annotation" expression="org.springframework.stereotype.Repository"/>
            <!-- 不扫描org.springframework.stereotype.Controller -->
            <context:exclude-filter type="annotation" expression="org.springframework.stereotype.Controller"/>
        </context:component-scan>
6.4. 依赖注入的注解
@Autowired:
按类型注入
1、可以标识在属性上,根据属性类型去spring容器中找同类型的bean,找到则将bean注入到属性中。
@Autowired//按类型注入
private CustomerDao customerDao;
注意:如果容器中同一个类型的bean如果有多个,使用Autowried报错,找到多个同类型的bean,使用@Qualifier和Autowired组合配置,Qualifier指定将哪个bean注入进来。

2、可以用在set方法上。
找set方法中参数类型,根据参数类型从容器中找bean,注入。

3、使用jdk的注解@Resource:
按名称注入

和autoWired区别:Resource注解是jdk下的,而autoWired是spring提供。
7. spring整合springmvc
7.1. applicationContext-service.xml
<?xml version="1.0" encoding="UTF-8"?>
<beans xmlns="http://www.springframework.org/schema/beans"
    xmlns:context="http://www.springframework.org/schema/context" xmlns:p="http://www.springframework.org/schema/p"
    xmlns:aop="http://www.springframework.org/schema/aop" xmlns:tx="http://www.springframework.org/schema/tx"
    xmlns:xsi="http://www.w3.org/2001/XMLSchema-instance"
    xsi:schemaLocation="http://www.springframework.org/schema/beans http://www.springframework.org/schema/beans/spring-beans-4.0.xsd
    http://www.springframework.org/schema/context http://www.springframework.org/schema/context/spring-context-4.0.xsd
    http://www.springframework.org/schema/aop http://www.springframework.org/schema/aop/spring-aop-4.0.xsd http://www.springframework.org/schema/tx http://www.springframework.org/schema/tx/spring-tx-4.0.xsd
    http://www.springframework.org/schema/util http://www.springframework.org/schema/util/spring-util-4.0.xsd">
    <context:component-scan base-package="com.dohit.springmvc.service"/>

</beans>
7.2. applicationContext-transaction.xml
<?xml version="1.0" encoding="UTF-8"?>
<beans xmlns="http://www.springframework.org/schema/beans"
    xmlns:context="http://www.springframework.org/schema/context" xmlns:p="http://www.springframework.org/schema/p"
    xmlns:aop="http://www.springframework.org/schema/aop" xmlns:tx="http://www.springframework.org/schema/tx"
    xmlns:xsi="http://www.w3.org/2001/XMLSchema-instance"
    xsi:schemaLocation="http://www.springframework.org/schema/beans http://www.springframework.org/schema/beans/spring-beans-4.0.xsd
    http://www.springframework.org/schema/context http://www.springframework.org/schema/context/spring-context-4.0.xsd
    http://www.springframework.org/schema/aop http://www.springframework.org/schema/aop/spring-aop-4.0.xsd http://www.springframework.org/schema/tx http://www.springframework.org/schema/tx/spring-tx-4.0.xsd
    http://www.springframework.org/schema/util http://www.springframework.org/schema/util/spring-util-4.0.xsd">
    <!-- 事务管理器 -->
    <bean id="transactionManager"
        class="org.springframework.jdbc.datasource.DataSourceTransactionManager">
        <!-- 数据源 -->
        <property name="dataSource" ref="dataSource" />
    </bean>
    <!-- 通知 -->
    <tx:advice id="txAdvice" transaction-manager="transactionManager">
        <tx:attributes>
            <!-- 传播行为 -->
            <tx:method name="save*" propagation="REQUIRED" />
            <tx:method name="insert*" propagation="REQUIRED" />
            <tx:method name="delete*" propagation="REQUIRED" />
            <tx:method name="update*" propagation="REQUIRED" />
            <tx:method name="find*" propagation="SUPPORTS" read-only="true" />
            <tx:method name="get*" propagation="SUPPORTS" read-only="true" />
        </tx:attributes>
    </tx:advice>
    <!-- 切面 -->
    <aop:config>
        <aop:advisor advice-ref="txAdvice"
            pointcut="execution(* cn.itcast.springmvc.service.*.*(..))" />
    </aop:config>
</beans>
7.3. springmvc.xml
<?xml version="1.0" encoding="UTF-8"?>
<beans xmlns="http://www.springframework.org/schema/beans"
    xmlns:xsi="http://www.w3.org/2001/XMLSchema-instance" xmlns:p="http://www.springframework.org/schema/p"
    xmlns:context="http://www.springframework.org/schema/context"
    xmlns:dubbo="http://code.alibabatech.com/schema/dubbo" xmlns:mvc="http://www.springframework.org/schema/mvc"
    xsi:schemaLocation="http://www.springframework.org/schema/beans http://www.springframework.org/schema/beans/spring-beans-4.0.xsd
        http://www.springframework.org/schema/mvc http://www.springframework.org/schema/mvc/spring-mvc-4.0.xsd
        http://code.alibabatech.com/schema/dubbo http://code.alibabatech.com/schema/dubbo/dubbo.xsd
        http://www.springframework.org/schema/context http://www.springframework.org/schema/context/spring-context-4.0.xsd">

    <!-- 扫描带Controller注解的类 -->
    <context:component-scan base-package="com.dohit.springmvc.controller" />
    <!-- 加载注解驱动 -->
    <mvc:annotation-driven/>
    <!-- 视图解析器 -->
    <bean class="org.springframework.web.servlet.view.InternalResourceViewResolver">
        <property name="viewClass"
            value="org.springframework.web.servlet.view.JstlView" />
        <!-- jsp前缀 -->
        <property name="prefix" value="/WEB-INF/jsp/" />
        <!-- jsp后缀 -->
        <property name="suffix" value=".jsp" />
    </bean>
</beans>
7.4. web.xml
<?xml version="1.0" encoding="UTF-8"?>
<web-app xmlns:xsi="http://www.w3.org/2001/XMLSchema-instance"
    xmlns="http://java.sun.com/xml/ns/javaee"
    xsi:schemaLocation="http://java.sun.com/xml/ns/javaee http://java.sun.com/xml/ns/javaee/web-app_2_5.xsd"
    id="WebApp_ID" version="2.5">
    <display-name>springmvc-web</display-name>
    <welcome-file-list>
        <welcome-file>index.html</welcome-file>
    </welcome-file-list>
    <!-- 加载spring容器 -->
    <context-param>
        <param-name>contextConfigLocation</param-name>
        <param-value>classpath:spring/applicationContext-*.xml</param-value>
    </context-param>
    <listener>
        <listener-class>org.springframework.web.context.ContextLoaderListener</listener-class>
    </listener>

    <servlet>
        <servlet-name>springmvc</servlet-name>
        <servlet-class>org.springframework.web.servlet.DispatcherServlet</servlet-class>
        <init-param>
            <param-name>contextConfigLocation</param-name>
            <param-value>classpath:spring/springmvc.xml</param-value>
        </init-param>
    </servlet>
    <servlet-mapping>
        <servlet-name>springmvc</servlet-name>
        <url-pattern>*.action</url-pattern>
    </servlet-mapping>
</web-app>