prop、event、ref
通过 Prop 向子组件传递数据
Prop 是你可以在组件上注册的一些自定义特性。当一个值传递给一个 prop 特性的时候,它就变成了那个组件实例的一个属性。为了给博文组件传递一个标题,我们可以用一个 props 选项将其包含在该组件可接受的 prop 列表中:
Vue.component('blog-post', {
  props: ['title'],
  template: '<h3>{{ title }}</h3>'
})
一个组件默认可以拥有任意数量的 prop,任何值都可以传递给任何 prop。在上述模板中,你会发现我们能够在组件实例中访问这个值,就像访问 data 中的值一样。
可以使用 v-bind 来动态传递 prop。
<blog-post
  v-for="post in posts"
  v-bind:key="post.id"
  v-bind:title="post.title"
></blog-post>
参考:
通过事件向父级组件发送消息
Vue 实例提供了一个自定义事件的系统来解决这个问题。我们可以调用内建的 $emit 方法并传入事件的名字,来向父级组件触发一个事件:
<button v-on:click="$emit('enlarge-text', 0.1)">
  Enlarge text
</button>
参考:
访问元素 & 组件
ref 被用来给元素或子组件注册引用信息。引用信息将会注册在父组件的 $refs 对象上。如果在普通的 DOM 元素上使用,引用指向的就是 DOM 元素;如果用在子组件上,引用就指向组件实例:
<!-- `vm.$refs.p` will be the DOM node -->
<p ref="p">hello</p>

<!-- `vm.$refs.child` will be the child component instance -->
<child-component ref="child"></child-component>
$parent 属性可以用来从一个子组件访问父组件的实例。
$children 用来访问当前实例的直接子组件。

provide、inject
provide / inject 是 vue 2.2.0 新增的 API。
这对选项需要一起使用,以允许一个祖先组件向其所有子孙后代注入一个依赖,不论组件层次有多深,并在起上下游关系成立的时间里始终生效。如果你熟悉 React,这与 React 的上下文特性很相似。
// 父级组件提供 'foo'
var Provider = {
  provide: {
    foo: 'bar'
  },
  // ...
}

// 子组件注入 'foo'
var Child = {
  inject: ['foo'],
  created () {
    console.log(this.foo) // => "bar"
  }
  // ...
}
参考:
dispatch、broadcast
$dispatch 和 $broadcast 是 Vue.js 1.x 中提供的方法。
$dispatch 用于向上级派发事件,只要是它的父级(一级或多级以上),都可以在组件内通过 $on (或 events,2.x 已废弃)监听到。
$broadcast 是由上级向下级广播事件的。
参考 $dispatch 和 $broadcast 替换,在 vue2 中已经废弃了这两个 API,不过我们可以参考 vue1 的源码在 vue2 中实现这两个 API。
function broadcast(componentName, eventName, params) {
  this.$children.forEach(child => {
    var name = child.$options.componentName;

    if (name === componentName) {
      child.$emit.apply(child, [eventName].concat(params));
    } else {
      broadcast.apply(child, [componentName, eventName].concat([params]));
    }
  });
}
export default {
  methods: {
    dispatch(componentName, eventName, params) {
      var parent = this.$parent || this.$root;
      var name = parent.$options.componentName;

      while (parent && (!name || name !== componentName)) {
        parent = parent.$parent;

        if (parent) {
          name = parent.$options.componentName;
        }
      }
      if (parent) {
        parent.$emit.apply(parent, [eventName].concat(params));
      }
    },
    broadcast(componentName, eventName, params) {
      broadcast.call(this, componentName, eventName, params);
    }
  }
};
这里给出几个组件库的实现,可以参考:
findComponents
findComponents 系列方法并不是 vue 的 API,而是自行实现的通过递归、遍历,找到指定组件的 name 选项匹配的组件实例的方法。
有以下场景:
- 由一个组件,向上找到最近的指定组件;
- 由一个组件,向上找到所有的指定组件;
- 由一个组件,向下找到最近的指定组件;
- 由一个组件,向下找到所有指定的组件;
- 由一个组件,找到指定组件的兄弟组件。
// 由一个组件,向上找到最近的指定组件
function findComponentUpward (context, componentName) {
    let parent = context.$parent;
    let name = parent.$options.name;

    while (parent && (!name || [componentName].indexOf(name) < 0)) {
        parent = parent.$parent;
        if (parent) name = parent.$options.name;
    }
    return parent;
}

// 由一个组件,向上找到所有的指定组件
function findComponentsUpward (context, componentName) {
    let parents = [];
    const parent = context.$parent;

    if (parent) {
        if (parent.$options.name === componentName) parents.push(parent);
        return parents.concat(findComponentsUpward(parent, componentName));
    } else {
        return [];
    }
}

// 由一个组件,向下找到最近的指定组件
function findComponentDownward (context, componentName) {
    const childrens = context.$children;
    let children = null;

    if (childrens.length) {
        for (const child of childrens) {
            const name = child.$options.name;

            if (name === componentName) {
                children = child;
                break;
            } else {
                children = findComponentDownward(child, componentName);
                if (children) break;
            }
        }
    }
    return children;
}

// 由一个组件,向下找到所有指定的组件
function findComponentsDownward (context, componentName) {
    return context.$children.reduce((components, child) => {
        if (child.$options.name === componentName) components.push(child);
        const foundChilds = findComponentsDownward(child, componentName);
        return components.concat(foundChilds);
    }, []);
}

// 由一个组件,找到指定组件的兄弟组件
function findBrothersComponents (context, componentName, exceptMe = true) {
    let res = context.$parent.$children.filter(item => {
        return item.$options.name === componentName;
    });
    let index = res.findIndex(item => item._uid === context._uid);
    if (exceptMe) res.splice(index, 1);
    return res;
}
eventbus、vuex
EventBus
EventBus 是一种发布订阅设计模式(观察者设计模式)。

- 有一个全局EventBus
- 所有事件都订阅它
- 所有组件也发布到它,订阅组件获得更新
- 所有组件都能够将事件发布到总线,然后总线由另一个组件订阅,然后订阅它的组件将得到更新
var EventBus = new Vue();
Object.defineProperties(Vue.prototype, {
    $bus: { get: function () {
            return EventBus
        }
    }
})
这个特定的总线使用两个方法 $on 和 $emit 。$emit 用于创建发出的事件;$on 用于订阅。
var EventBus = new Vue();
this.$bus.$emit('nameOfEvent',{
    // code
});
this.$bus.$on('nameOfEvent',($event) => {
    // code
})
Vuex
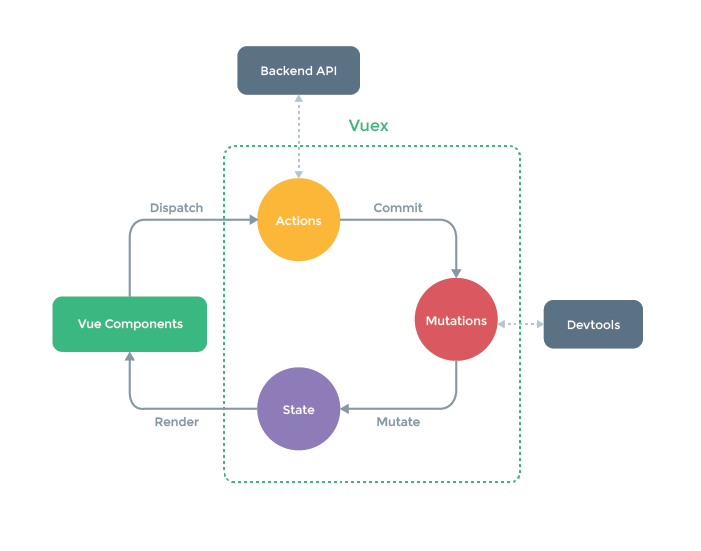
Vuex 是一个专为 Vue.js 应用程序开发的状态管理模式。它采用集中式存储管理应用的所有组件的状态,并以相应的规则保证状态以一种可预测的方式发生变化。
参考: