定义常量
import tensorflow as tf
# 定义常量
m1 = tf.constant([[3, 3]])
m2 = tf.constant([[2], [3]])
# 定义乘法
product = tf.matmul(m1, m2)
# 这里不会直接输出结果,会打印出一个tensor
# 想要输出结果要在sess中进行
print(product)
# 第一种方式定义session
sess =  tf.Session()
result = sess.run(product)
print(result)
sess.close()
# 第二种方式定义session
with tf.Session() as sess:
    print(sess.run(product))
    sess.close()
结果:[[15]]
定义变量
import tensorflow as tf
# 定义变量
x = tf.Variable([1, 2])
y = tf.Variable([3, 3])
sub = tf.subtract(x, y)
add = tf.add(x, y)

# 初始化所有变量 对于变量要进行初始化
init = tf.global_variables_initializer()
# 在回话中进行结果
with tf.Session() as sess:
    sess.run(init)
    print(sess.run(sub))
    print(sess.run(add))
结构:
[-2 -1]
[4 5]
占位符
import tensorflow as tf
# Feed:先定义占位符,等需要的时候再传入数据
x1 = tf.placeholder(tf.float32)
x2 = tf.placeholder(tf.float32)
# 乘法操作
y = tf.multiply(x1, x2)

# 使用的占位符元素在计算时要进行赋值运算
with tf.Session() as sess:
    print(sess.run(y, feed_dict={x1: 3, x2: 4}))
使用tensor进行线性回归
import tensorflow as tf
import numpy as np
import matplotlib.pyplot as plt

# 随机初始化一批数据
x_data = np.random.rand(100)
noise = np.random.normal(0, 0.01, x_data.shape)
y_data = x_data * 0.1 + 0.2 + noise

# 构建一个线性模型
d = tf.Variable(np.random.rand(1))
k = tf.Variable(np.random.rand(1))
y_pre = k*x_data + d

# 定义loss值
loss = tf.losses.mean_squared_error(y_data, y_pre)
# 定义优化器  使用优化器来优化loss
optimezer = tf.train.GradientDescentOptimizer(0.3)
train = optimezer.minimize(loss)

# 初始化变量
init = tf.global_variables_initializer()

with tf.Session() as sess:
    sess.run(init)
    for i in range(301):
        sess.run(train)
        if i % 30 == 0:
            print(i, sess.run([k, d]))
    y_pred = sess.run(y_pre)
    # 画出y_data和y_pred
    plt.scatter(x_data, y_data)
    plt.scatter(x_data, y_pred)
    plt.show()
结果:

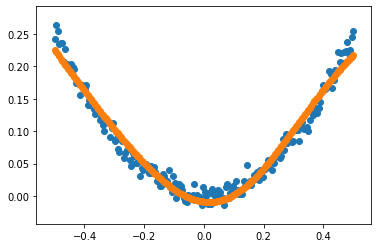
非线性回归
import tensorflow as tf
import numpy as np
import matplotlib.pyplot as plt

# 随机一批数据
x_data = np.linspace(-0.5, 0.5, 200)[:, np.newaxis]
noise = np.random.normal(0, 0.01, x_data.shape)
y_data = np.square(x_data) + noise

# 构建非线性模型
# 定义两个占位符,用来添加x_data和y_data
x = tf.placeholder(tf.float32, [None, 1])
y = tf.placeholder(tf.float32, [None, 1])

# 定义网络结构:定义只有一个隐藏层的权值矩阵
w1 = tf.Variable(tf.random_normal([1, 20]))
b1 = tf.Variable(tf.zeros([20]))
hider = tf.nn.tanh(tf.matmul(x, w1) + b1)
w2 = tf.Variable(tf.random_normal([20, 1]))
b2 = tf.Variable(tf.zeros([1]))
out = tf.nn.tanh(tf.matmul(hider, w2)+b2)

# 计算loss和定义优化器
loss = tf.losses.mean_squared_error(y, out)
optimizer = tf.train.GradientDescentOptimizer(0.1)
train = optimizer.minimize(loss)

with tf.Session() as sess:
    init = tf.global_variables_initializer()
    sess.run(init)
    for i in range(8001):
        sess.run(train, feed_dict={x: x_data, y: y_data})

    #  预测数据以及画出预测结构
    y_pred = sess.run(out, feed_dict={x: x_data, y: y_data})
    plt.scatter(x_data, y_data)
    plt.scatter(x_data, y_pred)
    plt.show()
结果:

使用BP神经网络训练mnist数据集
import tensorflow as tf
from tensorflow.examples.tutorials.mnist import input_dataut_data

# 载入mnist数据集
mnist = input_data.read_data_sets("mnist_data", one_hot=True)

# 设置banch值
batch_size = 128
# 计算执行轮数
n_batch = mnist.train.num_examples // batch_size

# 定义两个placeholder来存放数据
x = tf.placeholder(tf.float32, [None, 784])
y = tf.placeholder(tf.float32, [None, 10])

# 创建神经网络 784→10
W = tf.Variable(tf.random_normal([784, 10]))
b = tf.Variable(tf.zeros(10))
prediction = tf.nn.softmax(tf.matmul(x, W) + b)

# 定义损失函数和优化器
loss = tf.losses.mean_squared_error(y, prediction)
train = tf.train.GradientDescentOptimizer(0.1).minimize(loss)

# 计算准确率
correct_prediction = tf.equal(tf.argmax(y, 1), tf.argmax(prediction, 1))
accaracy = tf.reduce_mean(tf.cast(correct_prediction, tf.float32))

with tf.Session() as sess:
    sess.run(tf.global_variables_initializer())
    for epch in range(51):
        for batch in range(n_batch):
            # 获取一个batch的数据
            batch_xs, batch_ys = mnist.train.next_batch(batch_size)
            sess.run(train, feed_dict={x: batch_xs, y: batch_ys})
        print("Iter: ", sess.run(accaracy, feed_dict={x: mnist.test.images, y: mnist.test.labels}))
结果:由于只有一层神经元,最终acc稳定在0.67附近
提升acc的方法:
1:建议把损失函数换成交叉熵;
2:建议加深网络,2-3层即可;
3:尝试改变优化器