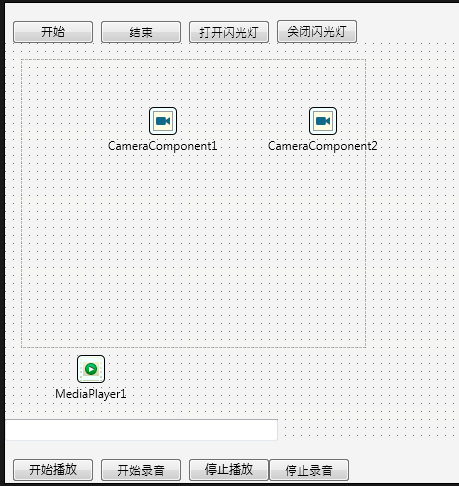
一、打开RAD Studio XE8,新建工程,加入组件MediaPlayer、CameraComponent和一些按钮,从上到下一次为Button1、2、3、4、5、6、7、8;

二、在头文件.h中加入:#include <FMX.Media.hpp>,以及
__published: void __fastcall GetImage();
private:
TAudioCaptureDevice *Microphone; //声明麦克风
String FileName;
三、在各个按钮中写入代码:
注意在.cpp文件中有 #include <System.IOUtils.hpp>,其余代码为:
__fastcall TForm1::TForm1(TComponent* Owner) : TForm(Owner)
{ //开启麦克风设备、找到存储路径
Microphone=TCaptureDeviceManager::Current->DefaultAudioCaptureDevice;
FileName=IncludeTrailingPathDelimiter(System::Ioutils::TPath::GetTempPath())+"my.caf";
}
void __fastcall TForm1::GetImage(){ //识别摄像头录制的图像
CameraComponent1->SampleBufferToBitmap(this->Image1->Bitmap,true);
}
void __fastcall TForm1::CameraComponent1SampleBufferReady(TObject *Sender, const TMediaTime ATime)
{
TThread::Synchronize(TThread::CurrentThread,GetImage); //调用GetImage方法
}
void __fastcall TForm1::Button1Click(TObject *Sender) //开始录制
{
this->CameraComponent1->Active=true;
}
void __fastcall TForm1::Button2Click(TObject *Sender) //停止录制
{
this->CameraComponent1->Active=false;
}
void __fastcall TForm1::Button3Click(TObject *Sender) //开启闪光灯
{
this->CameraComponent1->TorchMode=TTorchMode::ModeOn;
}
void __fastcall TForm1::Button4Click(TObject *Sender) //关闭闪光灯
{
this->CameraComponent1->TorchMode=TTorchMode::ModeOff;
}
void __fastcall TForm1::Button5Click(TObject *Sender) //开始播放
{
this->MediaPlayer1->FileName=FileName;
this->MediaPlayer1->Play();
}
void __fastcall TForm1::Button6Click(TObject *Sender) //开始录音
{
this->Microphone->FileName=FileName; //获取录音的存储目录
this->Edit1->Text=FileName;
this->Microphone->StartCapture();
}
void __fastcall TForm1::Button7Click(TObject *Sender) // 停止播放
{
this->MediaPlayer1->Stop();
}
void __fastcall TForm1::Button8Click(TObject *Sender) //停止录音
{
this->Microphone->StopCapture();
}
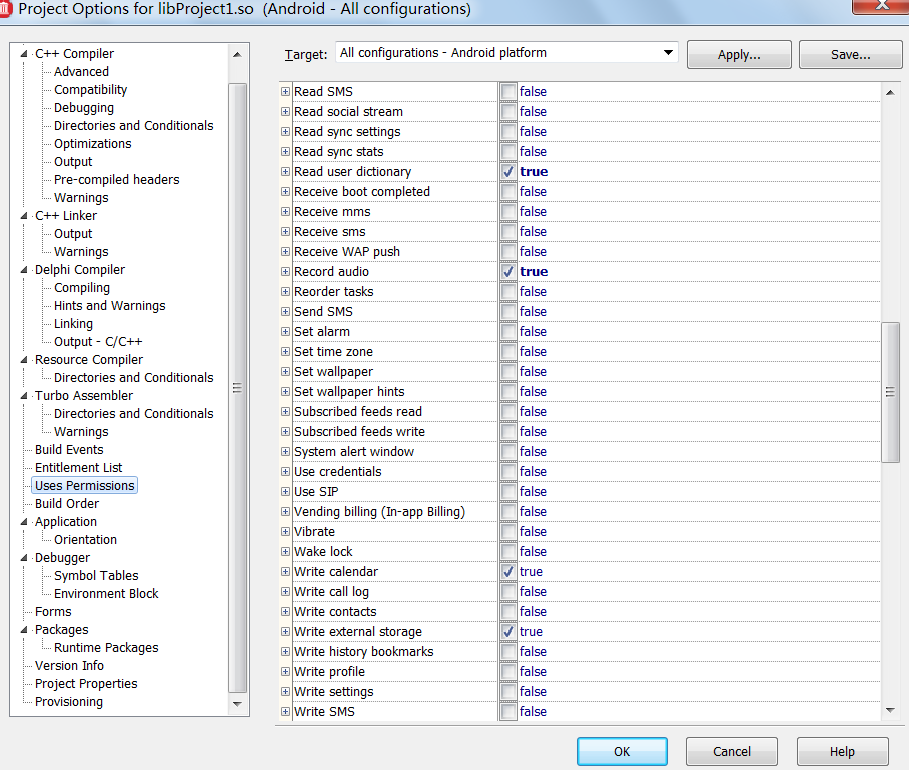
三、点击该project.exe,右键点击option,勾选下图中几个选项,使得在Android平台上支持媒体播放和录音、读写用户目录功能:

四、将实现平台换为Android,点击运行,在手机上安装后打开,点击开始录音,即可看到edit框中显示了目录,停止录音后开始播放(声音可能较小,记得调大音量),录像时可以开关闪光灯。