今天要说的是RelativeLayout。RelativeLayout相对于LinearLayout的主要不同点在于它需要一个参照物。
我们先来看一下官方对这个布局的解释:
RelativeLayout is a view group that displays child views in relative positions. The position of each view can be specified as relative to sibling elements (such as to the left-of or below another view) or in positions relative to the parent RelativeLayout area (such as aligned to the bottom, left of center).
红色高亮句子中的意思是说,元素之间总是相对于它们的同级元素或父元素进行排列布局。
而RelativeLayout相对于LinearLayout来说,它有什么好处。看下面这段话:
A RelativeLayout is a very powerful utility for designing a user interface because it can eliminate nested view groups and keep your layout hierarchy flat, which improves performance. If you find yourself using several nested LinearLayout groups, you may be able to replace them with a single RelativeLayout.
红色高亮部分意思:相对于比较复杂的布局,RelativeLayout可以使元素层级关系更加扁平化,避免像LinearLayout布局中复杂的嵌套关系,从而提高程序的性能。
相比起LinearLayout,官方更加建议我们使用RelativeLayout。
在使用RelativeLayout进行界面编写的时候,我们需要注意的是android:id属性。我们都是通过这个ID对元素进行引用
拿前面的例子进行说明
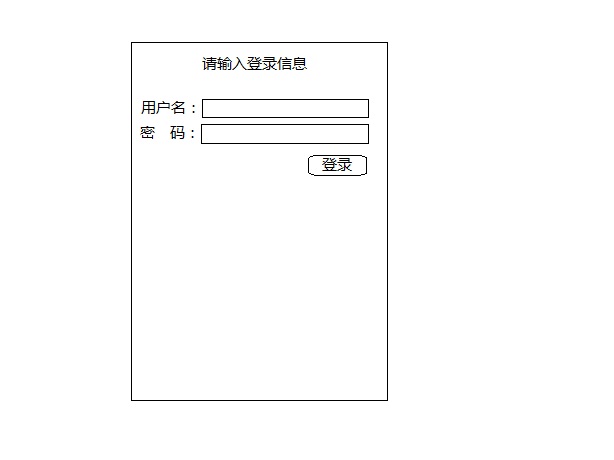
用于这个布局的LinearLayout代码:


 1 <LinearLayout
 2     android:layout_width="fill_parent"
 3     android:layout_height="fill_parent"
 4     android:orientation="vertical"
 5     xmlns:android="http://schemas.android.com/apk/res/android">
 6
 7     <TextView
 8         android:id="@+id/txtView"
 9         android:layout_width="wrap_content"
10         android:layout_height="wrap_content"
11         android:layout_gravity="center_horizontal"
12         android:textSize="18sp"
13         android:text="请输入登录信息"/>
14     <LinearLayout
15         android:layout_width="fill_parent"
16         android:layout_height="wrap_content"
17         android:orientation="horizontal">
18         <TextView
19             android:layout_width="wrap_content"
20             android:layout_height="wrap_content"
21             android:text="用户名:"
22             android:textSize="16sp"/>
23         <EditText
24             android:layout_width="0dp"
25             android:layout_height="wrap_content"
26             android:layout_weight="1"/>
27     </LinearLayout>
28     <LinearLayout
29         android:layout_width="fill_parent"
30         android:layout_height="wrap_content"
31         android:orientation="horizontal">
32         <TextView
33             android:layout_width="wrap_content"
34             android:layout_height="wrap_content"
35             android:text="密 码:"
36             android:textSize="16sp"/>
37         <EditText
38             android:layout_width="0dp"
39             android:layout_height="wrap_content"
40             android:password="true"
41             android:layout_weight="1"/>
42     </LinearLayout>
43     <Button
44         android:layout_width="wrap_content"
45         android:layout_height="wrap_content"
46         android:text="登录"
47         android:layout_gravity="right" />
48 </LinearLayout>
运行效果:
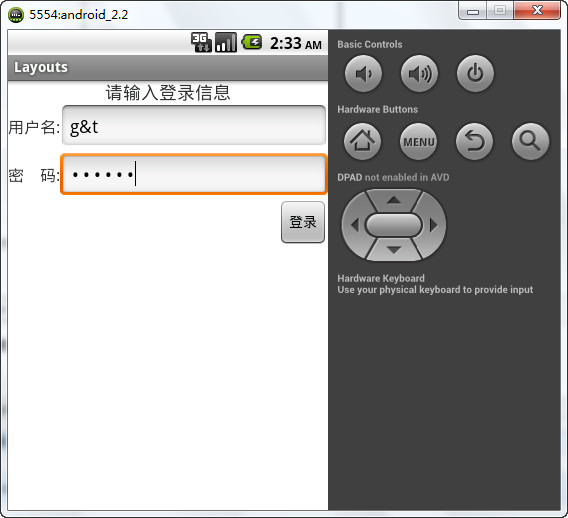
同样布局的RelativeLayout代码:
 1 <RelativeLayout
 2     android:layout_width="fill_parent"
 3     android:layout_height="fill_parent"
 4     xmlns:android="http://schemas.android.com/apk/res/android">
 5
 6     <TextView
 7         android:id="@+id/info"
 8         android:layout_width="wrap_content"
 9         android:layout_height="wrap_content"
10         android:layout_centerHorizontal="true"
11         android:text="请输入登录信息"
12         android:textSize="18sp"/>
13     <TextView
14         android:id="@+id/userName"
15         android:layout_width="wrap_content"
16         android:layout_height="wrap_content"
17         android:layout_below="@id/info"
18         android:layout_alignParentLeft="true"
19         android:text="用户名:"
20         android:textSize="16sp"
21         android:paddingTop="10sp"/>
22     <EditText
23         android:id="@+id/inputName"
24         android:layout_width="0dp"
25         android:layout_height="wrap_content"
26         android:layout_below="@id/info"
27         android:layout_toRightOf="@id/userName"
28         android:layout_alignParentRight="true"/>
29     <TextView
30         android:id="@+id/password"
31         android:layout_width="wrap_content"
32         android:layout_height="wrap_content"
33         android:layout_below="@id/inputName"
34         android:layout_alignParentLeft="true"
35         android:text="密 码:"
36         android:textSize="16sp"
37         android:paddingTop="10sp"/>
38     <EditText
39         android:id="@+id/inputPassword"
40         android:password="true"
41         android:layout_width="0dp"
42         android:layout_height="wrap_content"
43         android:layout_below="@id/inputName"
44         android:layout_toRightOf="@id/password"
45         android:layout_alignParentRight="true"/>
46
47     <Button
48         android:id="@+id/btn"
49         android:layout_width="wrap_content"
50         android:layout_height="wrap_content"
51         android:layout_below="@id/inputPassword"
52         android:layout_alignParentRight="true"
53         android:text="登录" />
54 </RelativeLayout>
运行效果:
第一眼看下去,代码比使用LinearLayout多了。
但是,我们可以看到,它们之间只有一个层级关系,它们都只有一个父类RelativeLayout。
然而,在实际项目中,RelativeLayout比LinearLayout更难把握,更容易出现问题,这就考验我们对RelativeLayout的掌握熟练程度。
我们说说一些常用的属性的作用,其他的属性大家可以对号入座
android:layout_toLeftOf="@id/idName" 元素处于指定ID元素的左边
android:layout_alignParentRight="true" 元素的右边界向父元素的右边界对齐
android:layout_below="@id/idName" 元素处于指定ID元素的下面
android:layout_marginTop="20dp" 设置外边距的值
android:layout_paddingLeft="10dp" 设置内边距的值
android:layout_centerHorizontal="true" 设置元素水平居中
android:layout_alignBaseLine="@id/idName" 与指定ID的元素基准线对齐
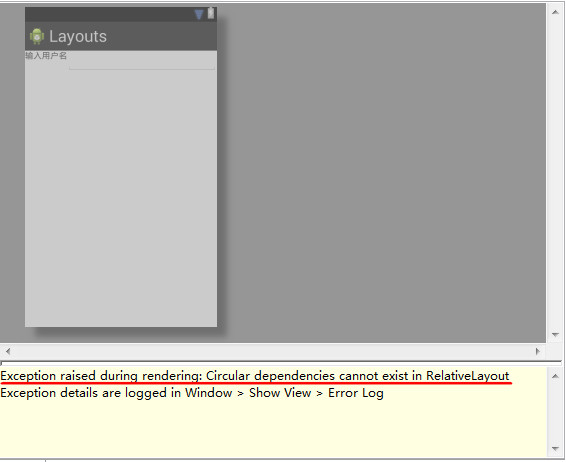
一些细节上的东西我们需要注意一下,先看下面的代码
 1 <RelativeLayout
 2     android:layout_width="fill_parent"
 3     android:layout_height="fill_parent"
 4     xmlns:android="http://schemas.android.com/apk/res/android">
 5
 6     <TextView
 7         android:id="@+id/txtView"
 8         android:layout_width="wrap_content"
 9         android:layout_height="wrap_content"
10         android:text="输入用户名"
11         android:layout_toLeftOf="@android:id/empty"/>
12
13     <EditText
14         android:id="@android:id/empty"
15         android:layout_width="fill_parent"
16         android:layout_height="wrap_content"
17         android:layout_alignParentRight="true"
18         android:layout_toRightOf="@id/txtView"/>
19
20 </RelativeLayout>
我们定义了两个互相指向的元素,这样做就会导致异常的抛出
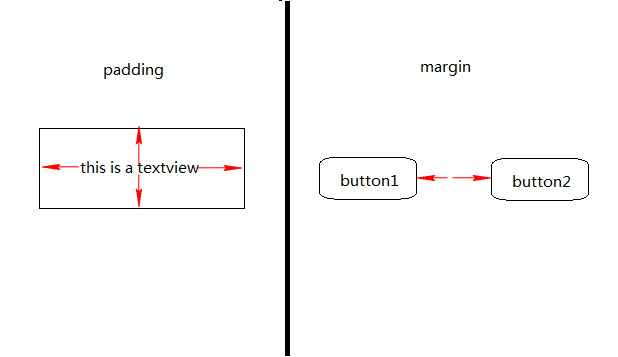
Margin和Padding的区别,我们看下图就知道了
什么是baseLine(基准线)
我们先来看一下代码和图片
下面的代码并没有使用alignBaseLine
 1 <RelativeLayout
 2     android:layout_width="fill_parent"
 3     android:layout_height="fill_parent"
 4     xmlns:android="http://schemas.android.com/apk/res/android">
 5
 6     <TextView
 7         android:id="@+id/txtView"
 8         android:layout_width="wrap_content"
 9         android:layout_height="wrap_content"
10         android:text="输入用户名:"/>
11
12     <EditText
13         android:id="@android:id/empty"
14         android:layout_width="fill_parent"
15         android:layout_height="wrap_content"
16         android:layout_alignParentRight="true"
17         android:layout_toRightOf="@id/txtView"/>
18
19 </RelativeLayout>
运行效果是这样的

输入用户名这个TextView元素向上提了。没有和右边的元素对齐,影响美观。
现在我们使它们的基准线对齐
 1 <RelativeLayout
 2     android:layout_width="fill_parent"
 3     android:layout_height="fill_parent"
 4     xmlns:android="http://schemas.android.com/apk/res/android">
 5
 6     <TextView
 7         android:id="@+id/txtView"
 8         android:layout_width="wrap_content"
 9         android:layout_height="wrap_content"
10         android:text="输入用户名:"
11         android:layout_alignBaseline="@android:id/empty"/>
12
13     <EditText
14         android:id="@android:id/empty"
15         android:layout_width="fill_parent"
16         android:layout_height="wrap_content"
17         android:layout_alignParentRight="true"
18         android:layout_toRightOf="@id/txtView"/>
19
20 </RelativeLayout>
现在它们对齐了,基准先就像我们所说的地平线,常用来对齐文本元素
红线就是baseline了,是不是有点像我们小学作业本上的线 ^-^
值得注意的是,上面的代码中我们使用了android系统内置的id,如果我们使用自定义的ID,情况又会怎样?
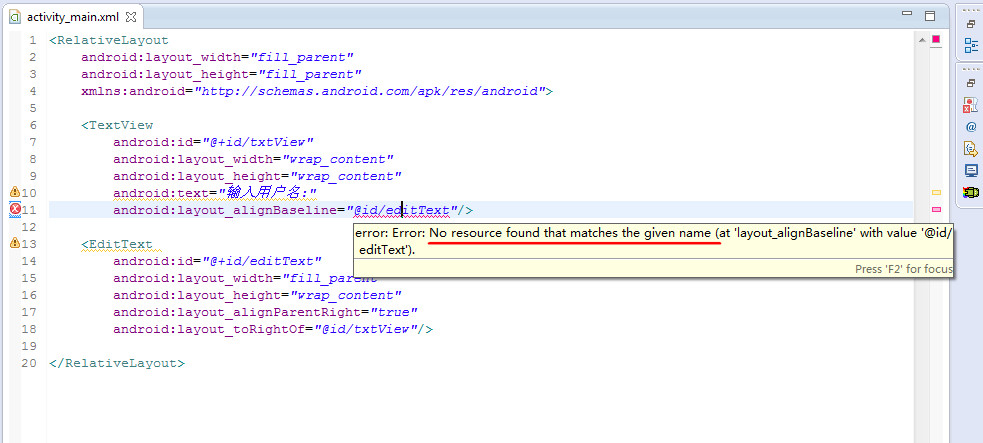
明明我们就定义了一个ID叫editText的元素,怎么会找不到呢
这里其实是顺序问题,在使用id引用资源的时候,我们必须先定义,后引用。否则编译时就会出错。
小问题,注意下就可以了。
布局就学到这里了,还有其他的布局,等以后遇到的时候再说。。
支持原创,转载请注明出处。http://www.cnblogs.com/ai-developers/p/android_relativelayout.html