Notification在手机的运用中是很常见的,比如我们收到一个短信,在我们的通知栏就会显示一个消息的图标用来提示我们,这种我们就可以用Notification来实现。他有很多的用法,比如类似消息的一个提示,进度条式的提示,折叠式啊,或者悬挂式等。下面我们可以看一个简单的也是最基本的Notification:
第一种:基本的Notification
1.API 11 以下的,现在被弃用了,它的简单用法是这样的
1.1这里需要使用PendingIntent,跟Intent相似,Intent 是及时启动,intent 随所在的activity 消失而消失,而PendingIntent它不是马上被调用,它主要用于即将发生的事情,在Notification中,它在下拉状态条点击时候才会发生activity的跳转
PendingIntent pendingIntent = PendingIntent.getActivity(this, 0, new Intent(this, MainActivity.class), 0);
1.2然后我们在来看Notification 的使用方法
 Notification notify = new Notification();
    notify.icon = R.drawable.ic_launcher;
    notify.tickerText = "有新短消息了!";
    notify.when = System.currentTimeMillis();
    notify.setLatestEventInfo(this, "通知的消息title",     在后来的版本中基本上会提示找不到,或者提示不建议使用
       "消息内容", pendingIntent);
     notify.number = 1;  //消息的数量
     notify.flags |= Notification.FLAG_AUTO_CANCEL; // FLAG_AUTO_CANCEL表明当通知被用户点击时,通知将被清除。
简单提一下2.x版本的处理方式:
Notification notify1 = new Notification(R.drawable.message, "有新短消息了", System.currentTimeMillis());
1.3然后我们需要使用系统的通知管理器来发起通知
 NotificationManager manager = (NotificationManager) getSystemService(Context.NOTIFICATION_SERVICE);
    manager.notify(NOTIFICATION_FLAG, notify);  //发起通知
我们看一下效果图:是不是很熟悉的感觉啊

2.API11以后 主要是通过Notification.Builder来创建通知,我们看一下代码实现
PendingIntent pendingIntent = PendingIntent.getActivity(this, 0,  new Intent(this, MainActivity.class), 0);

Notification notify= new Notification.Builder(this)
         .setSmallIcon(R.mipmap.ic_launcher) // 设置状态栏中的小图片,尺寸一般建议在24×24, 这里也可以设置大图标
         .setTicker(有新短消息了!")// 设置显示的提示文字
         .setContentTitle("Title")// 设置显示的标题
         .setContentText("This is message content")// 消息的详细内容
         .setContentIntent(pendingIntent) // 关联PendingIntent
         .setNumber(1) // 在TextView的右方显示的数字,可以在外部定义一个变量,点击累加setNumber(count),这时显示的和
          .getNotification(); // 需要注意build()是在API level16及之后增加的,在API11中可以使用getNotificatin()来代替
          notify.flags |= Notification.FLAG_AUTO_CANCEL;
NotificationManager manager =(NotificationManager) getSystemService(Context.NOTIFICATION_SERVICE);
          manager.notify(NOTIFICATION_FLAG, notify);
总体上来是没有什么变化,同时我们还可以设置下面的一些属性:
 //设置优先级
   notify.setPriority(Notification.PRIORITY_DEFAULT);
    //设置通知类别
   notify.setCategory(Notification.CATEGORY_MESSAGE);
3.我们也可以使用自定义的Notification:主要使用RemoteViews,
第一步:写好你想要  Notification样式的xml 文件
第二步:在上面的列子中加入下面的代码:
RemoteViews remote = new RemoteViews(getPackageName(),
                    R.layout.my_notification);
            rv.setTextViewText(R.id.content, "hello!");
            myNotify.contentView = rv;
可以使用它做折叠视图,简单说一下,它主要是用来显示长文本,它拥有2个视图,一个是普通状态下的,一个是展开状态下的,
Intent intent = new Intent(Intent.ACTION_MAIN);
               PendingIntent contentIntent = PendingIntent.getActivity(this, 1,
                       intent, 0);
               Notification.Builder buider = new Notification.Builder(this)
                       .setSmallIcon(R.mipmap.ic_launcher)
                       .setTicker("您有新短消息")
                       .setContentTitle("Notification Title")
                       .setContentText("This is message")
                       .setContentIntent(contentIntent)
                       .setAutoCancel(true)
                       .setLargeIcon(BitmapFactory.decodeResource(getResources(), R.mipmap.ic_launcher));

               RemoteViews contentView = new RemoteViews(getPackageName(),
                       R.layout.my_notification);
               contentView.setTextViewText(R.id.text_content, "show!");
               Notification notification1=buider.build();
               //指定视图Notification 正常状态下的视图
               notification1.contentView=contentView;
               RemoteViews expandView = new RemoteViews(getPackageName(),
                       R.layout.my_notification_expand);
               //展开时的视图
               notification1.bigContentView = expandView;

               manager.notify(NOTIFICATION_FLAG, notification1);
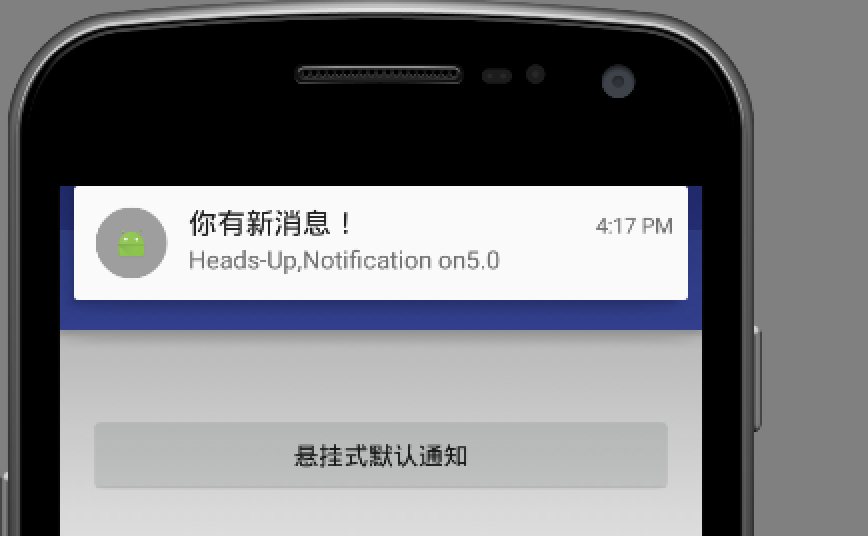
4.悬挂式Notification,他是5.0中新增的,也就是API中的Headsup的Notification,可以子啊不打断用户操作的时候,给用户通知
它跟其他的不同,主要在下面这句代码:
 //设置为悬挂,主要设置 setFullScreenIntent
   notify.setContentText("Heads-Up,Notification on5.0").setFullScreenIntent(pendingIntent, true);
如下图:
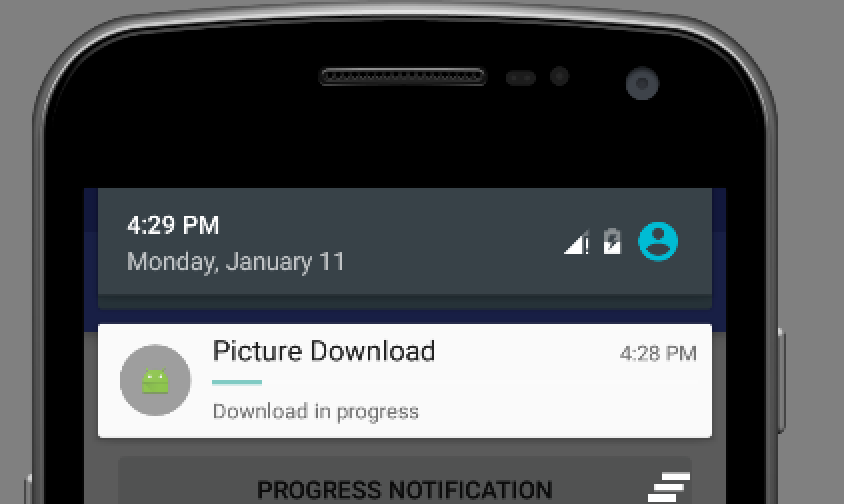
5.进度条的Notification,我们一般常见的是下载软件的时候,显示的会有一个下载进度的通知,其实这个也是很好实现的‘
在Api中是这样介绍的:
To use a progress indicator on platforms starting with Android 4.0, call setProgress(). For previous versions, you must create your own custom notification layout that includes a ProgressBar view.
它的意思是在android4.0以上平台,我们可以直接setProgress()的方法,但是对于之前的我们只能自定义布局。
我们来简单看一下:这个是api给的一个demo。下面我们重点看一下着色的部分
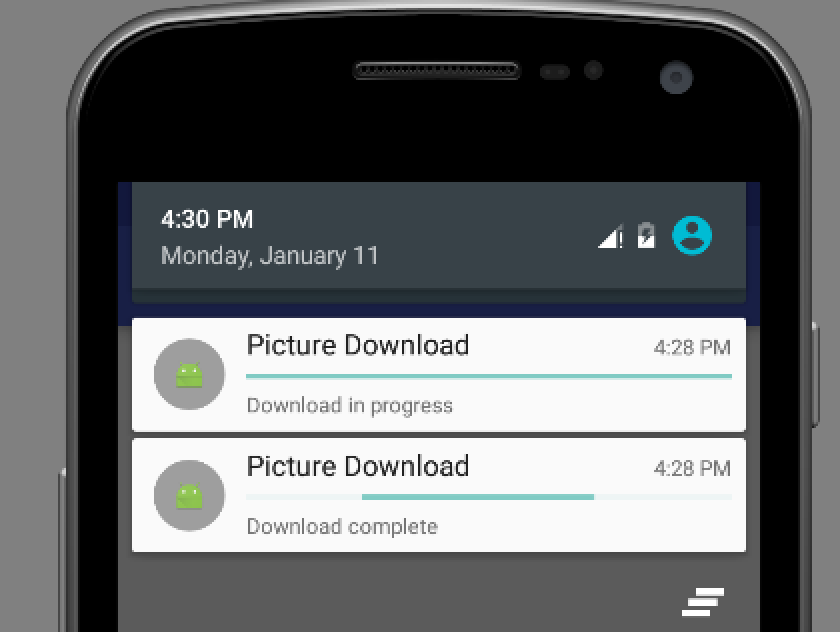
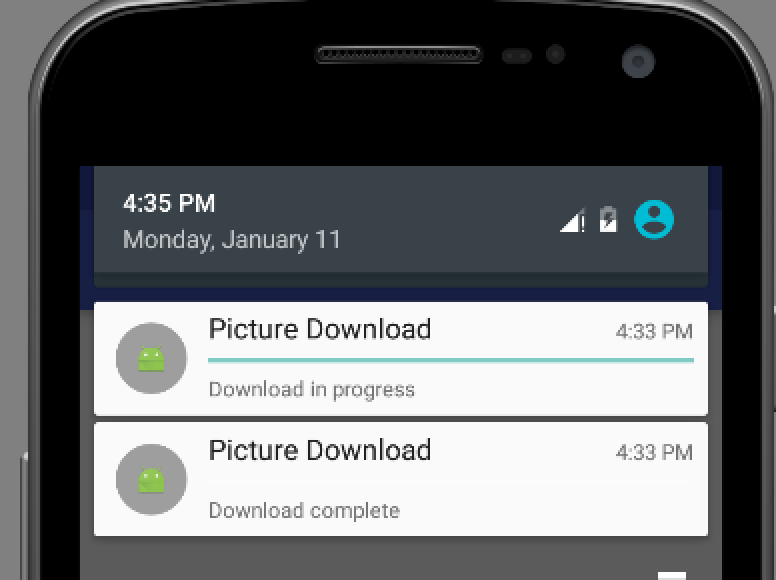
mNotificationManager =
                        (NotificationManager) getSystemService(Context.NOTIFICATION_SERVICE);
                builder = new NotificationCompat.Builder(this);
                builder.setContentTitle("Picture Download")
                        .setContentText("Download in progress")
                        .setSmallIcon(R.mipmap.ic_launcher);
                new Thread(
                        new Runnable() {
                            @Override
                            public void run() {
                                int incr;
                                // Do the "lengthy" operation 20 times
                                for (incr = 0; incr <= 100; incr+=5) {
                                    // Sets the progress indicator to a max value, the
                                    // current completion percentage, and "determinate"
                                    // state
                                    builder.setProgress(100, incr, false);
                                    // Displays the progress bar for the first time.
                                    mNotificationManager.notify(0, builder.build());
                                    // Sleeps the thread, simulating an operation
                                    // that takes time
                                    try {
                                        // Sleep for 5 seconds
                                        Thread.sleep(5*1000);
                                    } catch (InterruptedException e) {
                                        Log.d(TAG, "sleep failure");
                                    }
                                }
                                // When the loop is finished, updates the notification
                                builder.setContentText("Download complete")
                                        // Removes the progress bar
                                        .setProgress(0,0,true);
                                mNotificationManager.notify(NOTIFICATION_FLAG, builder.build());
                            }
                        }
// Starts the thread by calling the run() method in its Runnable
                ).start();
mBuilder.setProgress(100, incr, false);和 mBuilder.setProgress(0, 0, true);的区别,如果把蓝色的部分替换为前者,在运行的时候,我们会看见是它下载完成后会给我们一个通知说下载完成,但是后者会给我们提示下载完成的同时,进度条是在运行的,不断的和滚动,也就是效果是有所不同
如下图:第一个图是下载在进行的时候,第二个是我使用后 mBuilder.setProgress(0, 0, true),下载完成的时候,我们可以发现他还存在进度条,但是一直在滚动,我这里是静态图片,大家可以运行一下看看效果,第三个图,mBuilder.setProgress(100,incr,false) ,下载完成时显示的通知
还有一些其他的,辟比如锁屏下的,显示等级的Notification,在这里我就不写了,大家可以没事看看api。介绍的很详细。