
但如果将本地的Service转换成一个远程的Service,就不会出现这样的问题了.
转换成远程Service非常简单,只需要在注册Service的时候将他的android:process的属性制定成 :remote就可以了.

重新运行项目,你会发现,不会出现ANR了.
为什么将MyService转换成远程Service后就不会导致程序ANR了呢?这是由于,使用了远程Service后,MyService已经在另外一个进程当中运行了,所以只会阻塞该进程中的主线程,并不会影响到当前的应用程序。
为了证实一下MyService现在确实已经运行在另外一个进程当中了,我们分别在MainActivity的onCreate()方法和MyService的onCreate()方法里加入一行日志,打印出各自所在的进程id,如下所示:
Log.e("info", "process id is " + Process.myPid());
运行:

可以看到,不仅仅是进程id不同了,就连应用程序包名也不一样了,MyService中打印的那条日志,包名后面还跟上了:remote标识。
那既然远程Service这么好用,干脆以后我们把所有的Service都转换成远程Service吧,还省得再开启线程了。其实不然,远程Service非但不好用,甚至可以称得上是较为难用。一般情况下如果可以不使用远程Service,就尽量不要使用它。
下面就来看一下它的弊端吧,首先将MyService的onCreate()方法中让线程睡眠的代码去除掉,然后重新运行程序,并点击一下Bind Service按钮,你会发现程序崩溃了!为什么点击Start Service按钮程序就不会崩溃,而点击Bind Service按钮就会崩溃呢?这是由于在Bind Service按钮的点击事件里面我们会让MainActivity和MyService建立关联,但是目前MyService已经是一个远程Service了,Activity和Service运行在两个不同的进程当中,这时就不能再使用传统的建立关联的方式,程序也就崩溃了。
那么如何才能让Activity与一个远程Service建立关联呢?这就要使用AIDL来进行跨进程通信了(IPC)。
AIDL(Android Interface Definition Language)是Android接口定义语言的意思,它可以用于让某个Service与多个应用程序组件之间进行跨进程通信,从而可以实现多个应用程序共享同一个Service的功能。
下面我们就来一步步地看一下AIDL的用法到底是怎样的。首先需要新建一个AIDL文件,在这个文件中定义好Activity需要与Service进行通信的方法。新建MyAIDLService.aidl文件,代码如下所示:
package com.example.servicetest.MyAIDLService;interface MyAIDLService {int plus(int a, int b);String toUpperCase(String str);}
点击保存后,会在gen目录下生成一个对应的Java文件.
然后修改MyService中的代码,在里面实现刚刚定义好的MyAIDLService接口
MyAIDLService.Stub mBinder=new Stub() { //做相应的处理
@Override
public String toUpperCase(String str) throws RemoteException {
if(str!=null){
return str.toUpperCase();
}
return null;
}
@Override
public int plus(int a, int b) throws RemoteException {
return a+b;
}
};
public IBinder onBind(Intent intent) {
return mBinder;
} 这里先是对MyAIDLService.Stub进行了实现,重写里了toUpperCase()和plus()这两个方法。这两个方法的作用分别是将一个字符串全部转换成大写格式,以及将两个传入的整数进行相加。然后在onBind()方法中将MyAIDLService.Stub的实现返回。这里为什么可以这样写呢?因为Stub其实就是Binder的子类,所以在onBind()方法中可以直接返回Stub的实现。
接下来修改MainActivity中的代码,如下所示:
public class MainActivity extends Activity implements OnClickListener {Button btn_start,btn_stop,btn_bind,btn_unbind;MyAIDLService mAIDLService;ServiceConnection connection=new ServiceConnection() {@Overridepublic void onServiceDisconnected(ComponentName name) {}@Overridepublic void onServiceConnected(ComponentName name, IBinder service) {mAIDLService=MyAIDLService.Stub.asInterface(service);try {int result=mAIDLService.plus(8, 7);String upperStr = mAIDLService.toUpperCase("hello world");Log.d("info", "--result---" + result);Log.d("info", "--upperStr---" + upperStr);} catch (RemoteException e) {e.printStackTrace();}}};@Overrideprotected void onCreate(Bundle savedInstanceState) {super.onCreate(savedInstanceState);setContentView(R.layout.activity_main);btn_start=(Button) findViewById(R.id.btn_start);btn_stop=(Button) findViewById(R.id.btn_stop);btn_bind=(Button) findViewById(R.id.btn_bind);btn_unbind=(Button) findViewById(R.id.btn_unBind);btn_start.setOnClickListener(this);btn_stop.setOnClickListener(this);btn_bind.setOnClickListener(this);btn_unbind.setOnClickListener(this);Log.e("info", "process id is " + Process.myPid());}@Overridepublic void onClick(View v) {if(v.getId()==R.id.btn_start){Intent intent=new Intent(this,MyService.class);startService(intent);}else if(v.getId()==R.id.btn_stop){Intent intent=new Intent(this, MyService.class);stopService(intent);}else if(v.getId()==R.id.btn_bind){Intent intent=new Intent(this, MyService.class);bindService(intent, connection,BIND_AUTO_CREATE);}else if(v.getId()==R.id.btn_unBind){unbindService(connection);}}}
我们只是修改了ServiceConnection中的代码。可以看到,这里首先使用了MyAIDLService.Stub.asInterface()方法将传入的IBinder对象传换成了MyAIDLService对象,接下来就可以调用在MyAIDLService.aidl文件中定义的所有接口了。这里我们先是调用了plus()方法,并传入了3和5作为参数,然后又调用了toUpperCase()方法,并传入hello world字符串作为参数,最后将调用方法的返回结果打印出来。
点击Bind Service按钮

由此可见,我们确实已经成功实现跨进程通信了,在一个进程中访问到了另外一个进程中的方法。
不过你也可以看出,目前的跨进程通信其实并没有什么实质上的作用,因为这只是在一个Activity里调用了同一个应用程序的Service里的方法。而跨进程通信的真正意义是为了让一个应用程序去访问另一个应用程序中的Service,以实现共享Service的功能。那么下面我们自然要学习一下,如何才能在其它的应用程序中调用到MyService里的方法。
第一步:修改AndroidManifest.xml中的代码,给MyService加上一个action,如下所示:
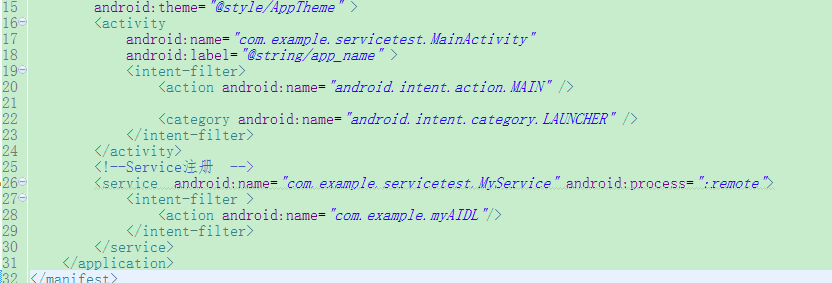
这就说明,MyService可以响应带有com.example.servicetest.MyAIDLService这个action的Intent.
第二步:新建一个android项目,在这个项目中远程调用当前MyService中的方法.
新项目中的Activity如果想要和MyService建立关联其实也不难,首先需要将MyAIDLService.aidl文件从ServiceTest项目中拷贝过来,注意要将原有的包路径一起拷贝过来,完成后项目的结构如下图所示:

第三步:打开新项目的activity_main.xml.在布局文件中加入一个Button
<RelativeLayout xmlns:android="http://schemas.android.com/apk/res/android"xmlns:tools="http://schemas.android.com/tools"android:layout_width="match_parent"android:layout_height="match_parent"android:paddingBottom="@dimen/activity_vertical_margin"android:paddingLeft="@dimen/activity_horizontal_margin"android:paddingRight="@dimen/activity_horizontal_margin"android:paddingTop="@dimen/activity_vertical_margin"tools:context=".MainActivity" ><Buttonandroid:layout_width="wrap_content"android:layout_height="wrap_content"android:id="@+id/btn"android:text="Bind Service"/></RelativeLayout>
第四步:打开MainActivity.java
public class MainActivity extends Activity {private MyAIDLService mAIDLService;private ServiceConnection connection=new ServiceConnection() {@Overridepublic void onServiceDisconnected(ComponentName arg0) {}@Overridepublic void onServiceConnected(ComponentName name, IBinder service) {mAIDLService=MyAIDLService.Stub.asInterface(service);try {int result=mAIDLService.plus(50, 48);String upperStr=mAIDLService.toUpperCase("hello world");Log.e("info","---result---"+result);Log.e("info","upperStr--"+upperStr);} catch (RemoteException e) {e.printStackTrace();}}};Button btn;@Overrideprotected void onCreate(Bundle savedInstanceState) {super.onCreate(savedInstanceState);setContentView(R.layout.activity_main);btn=(Button) findViewById(R.id.btn);btn.setOnClickListener(new OnClickListener() {@Overridepublic void onClick(View v) {Intent intent=new Intent("com.example.myAIDL");bindService(intent, connection, BIND_AUTO_CREATE);}});}}
这部分代码大家一定会非常眼熟吧?没错,这和在ServiceTest的MainActivity中的代码几乎是完全相同的,只是在让Activity和Service建立关联的时候我们使用了隐式Intent,将Intent的action指定成了com.example.servicetest.MyAIDLService。
在当前Activity和MyService建立关联之后,我们仍然是调用了plus()和toUpperCase()这两个方法,远程的MyService会对传入的参数进行处理并返回结果,然后将结果打印出来。
这样的话,ClientTest中的代码也就全部完成了,现在运行一下这个项目,然后点击Bind Service按钮,此时就会去和远程的MyService建立关联,观察LogCat中的打印信息如下所示:

不用我说,大家都已经看出,我们的跨进程通信功能已经完美实现了。
不过还有一点需要说明的是,由于这是在不同的进程之间传递数据,Android对这类数据的格式支持是非常有限的,基本上只能传递Java的基本数据类型、字符串、List或Map等。那么如果我想传递一个自定义的类该怎么办呢?这就必须要让这个类去实现Parcelable接口,并且要给这个类也定义一个同名的AIDL文件。