一、概述
Apache出品,最流行的,能力强劲的开源消息总线。

1.JMS规范
Java消息服务(Java Message Service,即JMS)应用程序接口是一个Java平台中关于面向消息中间件(MOM)的API,用于应用程序之间,或分布式系统中发送消息,进行异步通信。Java消息服务是一个与具体平台无关的API。
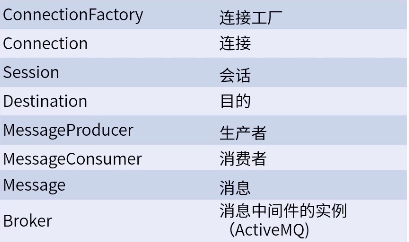
JMS的对象模型
JMS的消息模型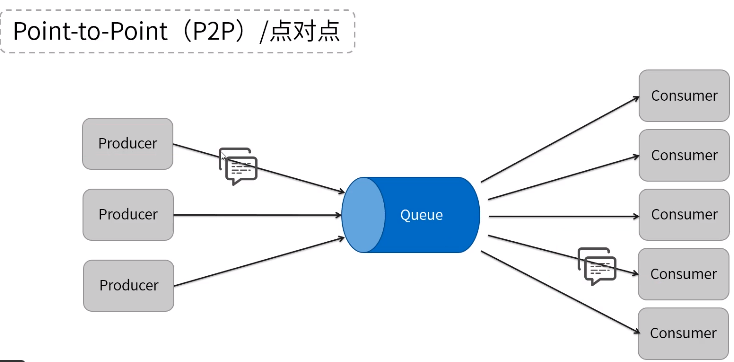
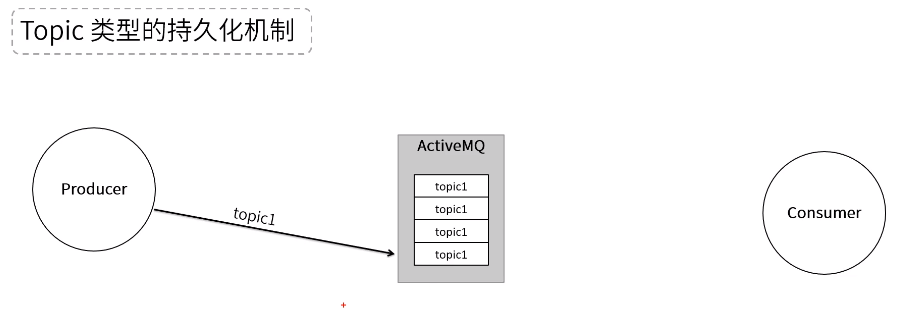
指定的数据给指定的消费者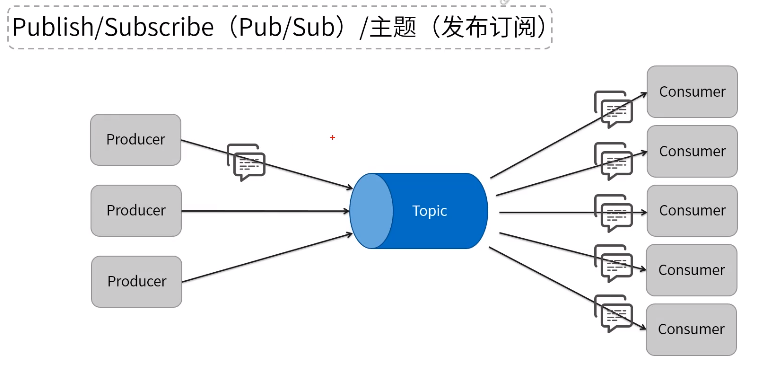
生产者发布消息,消息会传送给所有同一主题的消费者
JMS消息结构
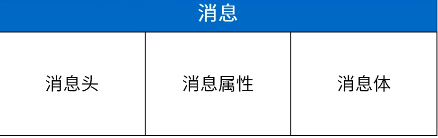
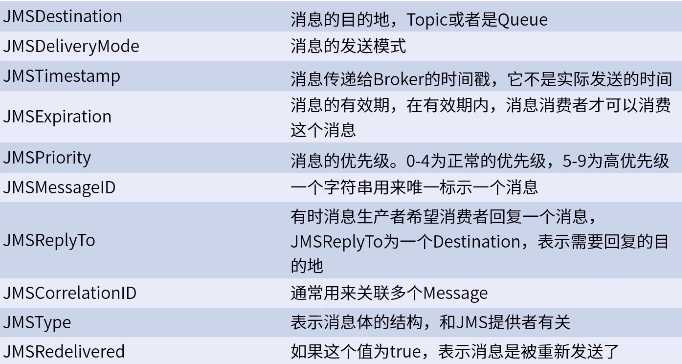
消息头,关于一些消息的描述信息
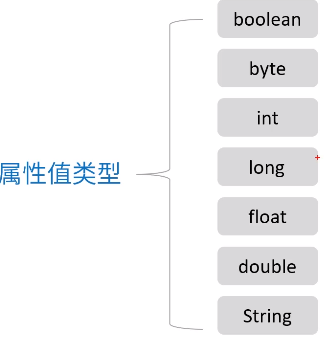
消息属性可以理解为消息的附加消息头,属性名可以自定义
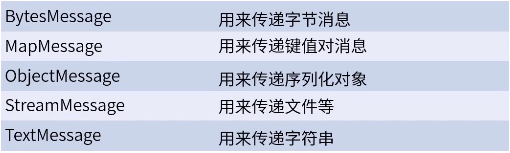
消息体类型
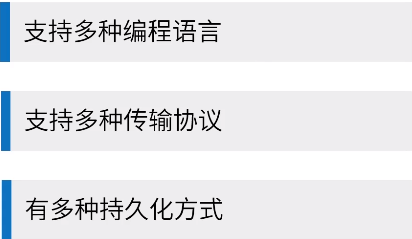
2.ActiveMQ的特性
3.安装和启动
centos7
下载 解压 文件夹改名activemq
放在了/var下面
启动
作为后台进程启动
[root@node01 activemq]# ./bin/activemq start
INFO: Loading '/bigdata/activemq//bin/env'
INFO: Using java '/usr/local/jdk/bin/java'
INFO: Starting - inspect logfiles specified in logging.properties and log4j.properties to get details
INFO: pidfile created : '/bigdata/activemq//data/activemq.pid' (pid '4203')
停止 则用stop
最好的方式是将ActiveMQ作为服务启动,使用system服务将可以确保ActiveMQ能在系统启动时自动启动。
使用vim创建已给systemd服务文件
vi /usr/lib/systemd/system/activemq.service
填写内容
   1 [Unit]
      2 Description=ActiveMQ service
      3 After=network.target
      4
      5 [Service]
      6 Type=forking
      7 ExecStart=/var/activemq/bin/activemq start
      8 ExecStop=/var/activemq/bin/activemq stop
      9 User=root
     10 Group=root
     11 Restart=always
     12 RestartSec=9
     13 StandardOutput=syslog
     14 StandardError=syslog
     15 SyslogIdentifier=activemq
     16
     17 [Install]
     18 WantedBy=multi-user.target
3.修改/var/activemq/bin/env配置,最下面;将JAVA_HOME的注释取消,填入jdk安装路径
# Location of the java installation
# Specify the location of your java installation using JAVA_HOME, or specify the
# path to the "java" binary using JAVACMD
# (set JAVACMD to "auto" for automatic detection)
JAVA_HOME="/bigdata/jdk1.8.0_151"
JAVACMD="auto"
启动ActiveMQ服务
systemtcl start activemq
查看服务状态
systemctl status activemq
设置开机启动
ln -s /usr/lib/systemd/system/activemq.service/etc/systemd/system/multi-user.target.wants/activemq.service systemctl enable activemq
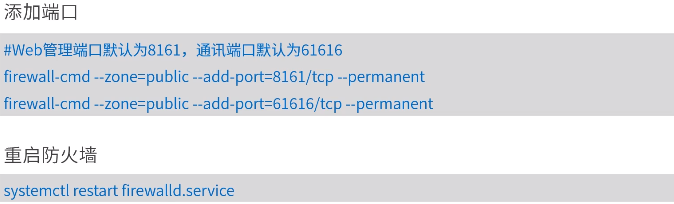
防火墙添加ActiveMQ的端口
ActiveMQ启动后,外部还无法访问,还需要在防火墙配置中增加ActiveMQ的Web管理端口和通讯端口。
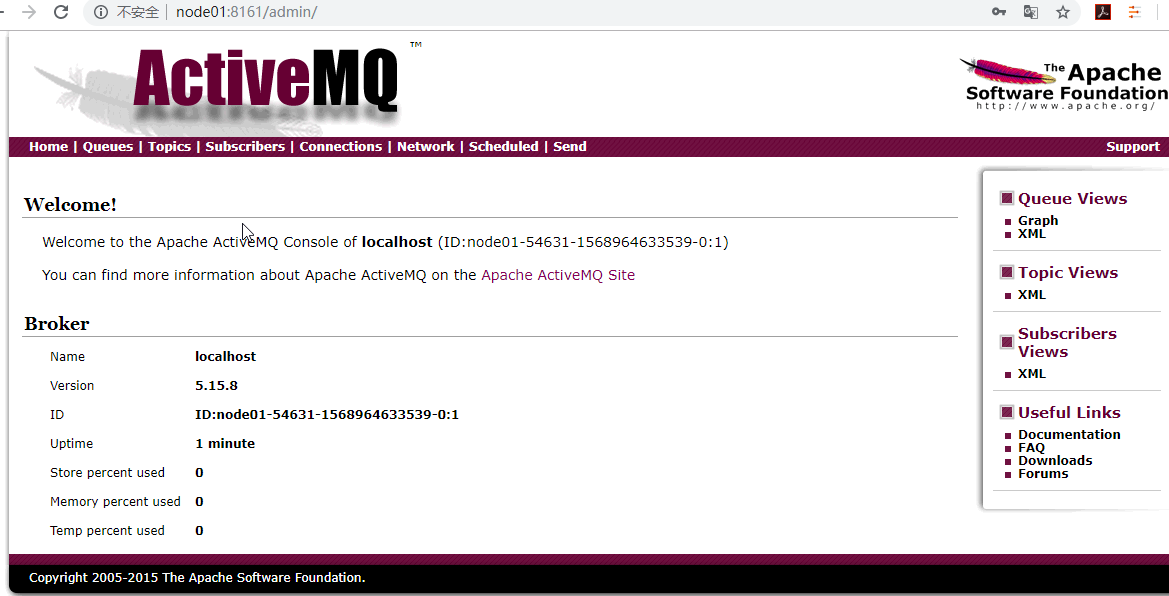
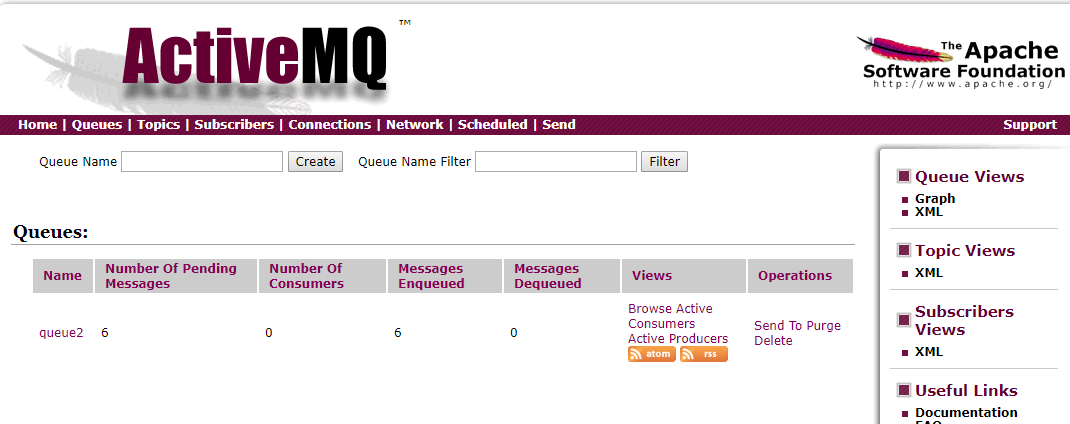
使用ActiveMQ的Web管理平台
ActiveMQ自带有管理平台,在浏览器访问http://服务IP:8161/admin即可进入
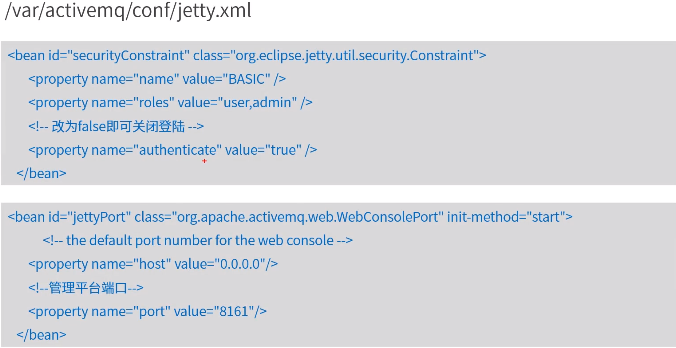
默认开启了身份校验
账户:admin
密码:admin
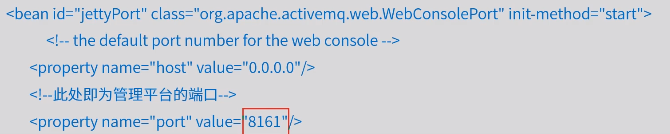
ActiveMQ的Web管理平台是基于jetty运行,因此在/var/activemq/conf目录可以看到jetty的配置文件
修改web管理平台的默认端口,在/var/activemq/conf/jetty.xml中
密码等

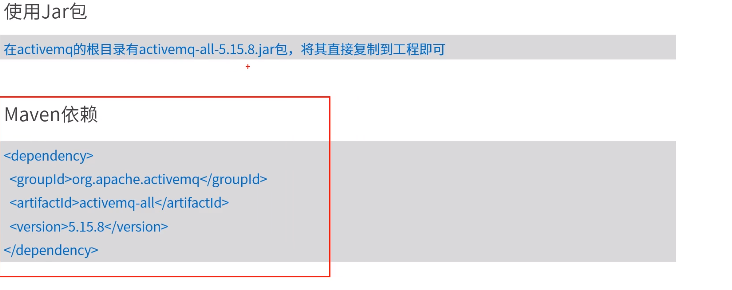
在Java中使用
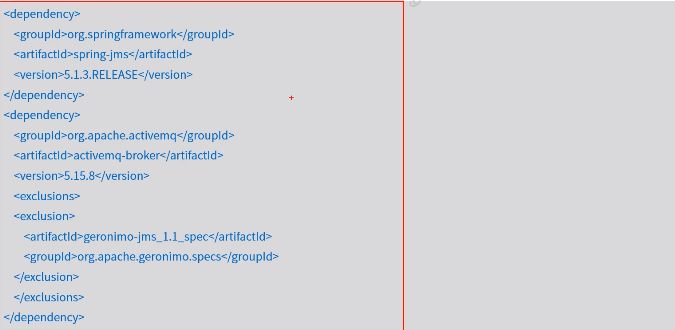
在Spring中使用
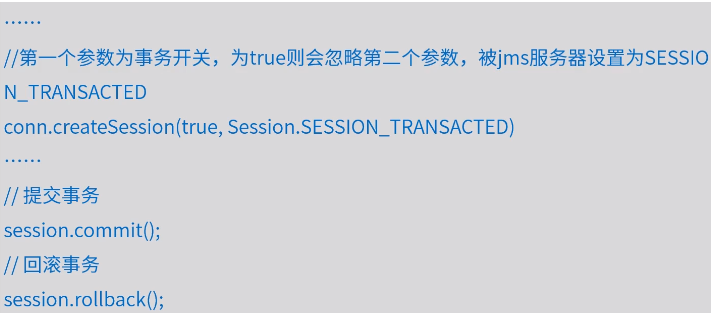
/**
 * 生产者事务
 *
 * 生产者开启事务后,消息发送后,提交事务后,broker上的消息才能发到消费者
 */
public class Producer {
    public static void main(String[] args) {
        ActiveMQConnectionFactory connectionFactory;
        Connection conn = null;
        Session session = null;

        try {
            // 1、创建连接工厂
//            connectionFactory = new ActiveMQConnectionFactory("admin", "admin", "udp://vm1.tony.com:61616");
            connectionFactory = new ActiveMQConnectionFactory("admin", "admin", "tcp://192.168.99.151:61616");
            // 2、创建连接对象
            conn = connectionFactory.createConnection();
            conn.start();

            // 3、创建会话
            // 第一个参数:是否支持事务,如果为true,则会忽略第二个参数,被jms服务器设置为SESSION_TRANSACTED
            // 第一个参数为false时,第二个参数的值可为Session.AUTO_ACKNOWLEDGE,Session.CLIENT_ACKNOWLEDGE,DUPS_OK_ACKNOWLEDGE其中一个。
            // Session.AUTO_ACKNOWLEDGE为自动确认,客户端发送和接收消息不需要做额外的工作。哪怕是接收端发生异常,也会被当作正常发送成功。
            // Session.CLIENT_ACKNOWLEDGE为客户端确认。客户端接收到消息后,必须调用javax.jms.Message的acknowledge方法。jms服务器才会当作发送成功,并删除消息。
            // DUPS_OK_ACKNOWLEDGE允许副本的确认模式。一旦接收方应用程序的方法调用从处理消息处返回,会话对象就会确认消息的接收;而且允许重复确认。
            session = conn.createSession(true, Session.AUTO_ACKNOWLEDGE);

            // 4、创建点对点发送的目标
            Destination destination = session.createQueue("queue2");
            // 创建发布的目标
//            Destination b4_destination = session.createTopic("topic1");

            // 5、创建生产者消息
            MessageProducer producer = session.createProducer(destination);
            // 设置生产者的模式,有两种可选
            // DeliveryMode.PERSISTENT 当activemq关闭的时候,队列数据将会被保存
            // DeliveryMode.NON_PERSISTENT 当activemq关闭的时候,队列里面的数据将会被清空
            producer.setDeliveryMode(DeliveryMode.NON_PERSISTENT);

            for (int i = 0; i < 10; i++) {
                // 6、创建一条消息
                // 有6中消息类型:
                // BytesMessage  用来传递字节
                // MapMessage    用来传递字节
                // ObjectMessage 用来传递序列化对象
                // StreamMessage 用来传递文件等
                // TextMessage   用来传递字符串
                String text = "Hello world! " + i;
                TextMessage message = session.createTextMessage(text);

                // 7、发送消息
                producer.send(message);

                if (i % 3 == 0) { // 3的倍数,发送,但回滚
                    session.rollback();
                } else {
                    // 在开启持久化模式时,commit后,会同步到磁盘
                    // 所以当一个原子步骤中发送大批量消息,不建议每条消息发送后提交,而是批量发送完后一次性提交,以最大限度地减少磁盘同步产生的延迟.
                    session.commit();
                }
            }
        } catch (JMSException e) {
            e.printStackTrace();
        } finally {
            if (conn != null) {
                try {
                    conn.close();
                } catch (JMSException e1) {
                    e1.printStackTrace();
                }
            }

            if (session != null) {
                try {
                    session.close();
                } catch (JMSException e1) {
                    e1.printStackTrace();
                }
            }
        }
    }
}
启动
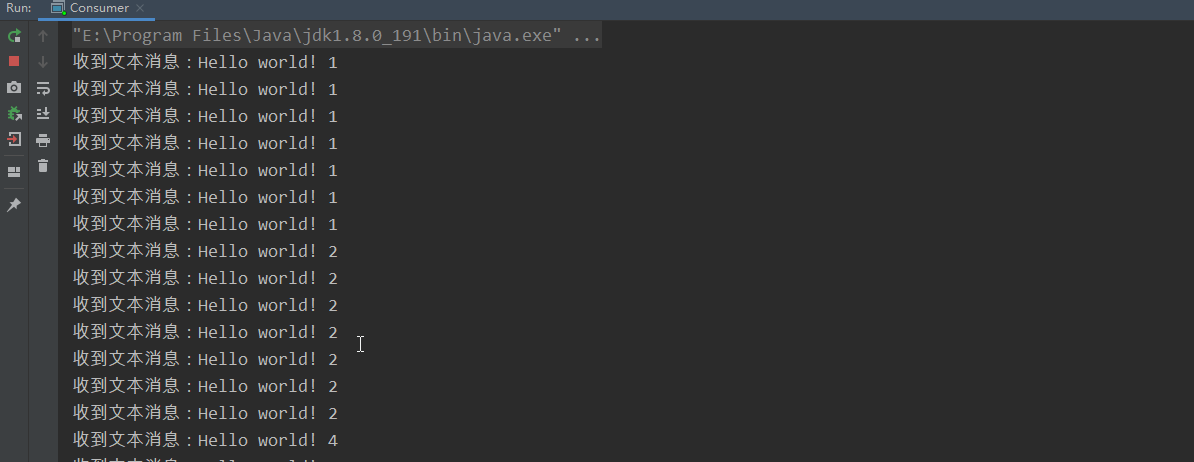
消费者
/**
 * 消费者事务
 *
 * 消费者开启事务后,接收到消息后,需要手动提交事务,否则broker上的消息不会真正被消费
 */
// http://activemq.apache.org/destination-options.html
public class Consumer {
    public static void main(String[] args) {
        ActiveMQConnectionFactory connectionFactory = null;
        Connection conn = null;
        Session session = null;
        MessageConsumer consumer = null;

        try {
            // brokerURL http://activemq.apache.org/connection-configuration-uri.html
            // 1、创建连接工厂
            connectionFactory = new ActiveMQConnectionFactory("tcp://192.168.99.151:61616");
            // 2、创建连接对象
            conn = connectionFactory.createConnection("admin", "admin");
            conn.start();

            // 3、创建会话
            // 第一个参数:是否支持事务,如果为true,则会忽略第二个参数,被jms服务器设置为SESSION_TRANSACTED
            // 第一个参数为false时,第二个参数的值可为Session.AUTO_ACKNOWLEDGE,Session.CLIENT_ACKNOWLEDGE,DUPS_OK_ACKNOWLEDGE其中一个。
            // Session.AUTO_ACKNOWLEDGE为自动确认,客户端发送和接收消息不需要做额外的工作。哪怕是接收端发生异常,也会被当作正常发送成功。
            // Session.CLIENT_ACKNOWLEDGE为客户端确认。客户端接收到消息后,必须调用javax.jms.Message的acknowledge方法。jms服务器才会当作发送成功,并删除消息。
            // DUPS_OK_ACKNOWLEDGE允许副本的确认模式。一旦接收方应用程序的方法调用从处理消息处返回,会话对象就会确认消息的接收;而且允许重复确认。
            session = conn.createSession(true, Session.AUTO_ACKNOWLEDGE);

            // 4、创建点对点接收的目标
            Destination destination = session.createQueue("queue2");
            // 创建订阅的目标
//            Destination b4_destination = session.createTopic("topic1");

            // 5、创建消费者消息 http://activemq.apache.org/destination-options.html
            consumer = session.createConsumer(destination);

            // 6、接收消息
            Session finalSession = session;
            consumer.setMessageListener(new MessageListener() {
                @Override
                public void onMessage(Message message) {
                    if (message instanceof TextMessage) {
                        try {
                            System.out.println("收到文本消息:" + ((TextMessage) message).getText());
                        } catch (JMSException e) {
                            e.printStackTrace();
                        }
                    } else {
                        System.out.println(message);
                    }
                    try {
                        finalSession.rollback();
                    } catch (JMSException e) {
                        e.printStackTrace();
                    }
                }
            });

            System.in.read();
        } catch (JMSException e) {
            e.printStackTrace();
        } catch (IOException e) {
            e.printStackTrace();
        } finally {
            if (consumer != null) {
                try {
                    consumer.close();
                } catch (JMSException e) {
                    e.printStackTrace();
                }
            }

            if (session != null) {
                try {
                    session.close();
                } catch (JMSException e1) {
                    e1.printStackTrace();
                }
            }

            if (conn != null) {
                try {
                    conn.close();
                } catch (JMSException e1) {
                    e1.printStackTrace();
                }
            }
        }
    }
}
使用spring
pom
<?xml version="1.0" encoding="UTF-8"?>
<project xmlns="http://maven.apache.org/POM/4.0.0"
         xmlns:xsi="http://www.w3.org/2001/XMLSchema-instance"
         xsi:schemaLocation="http://maven.apache.org/POM/4.0.0 http://maven.apache.org/xsd/maven-4.0.0.xsd">
    <modelVersion>4.0.0</modelVersion>

    <groupId>com.study.mq</groupId>
    <artifactId>activemq-spring</artifactId>
    <version>1.0.0</version>

    <parent>
        <groupId>org.springframework.boot</groupId>
        <artifactId>spring-boot-starter-parent</artifactId>
        <version>2.1.1.RELEASE</version>
    </parent>

    <properties>
        <java.version>1.8</java.version>
    </properties>
    <dependencies>
        <!--直接使用spring-boot-starter-activemq-->
        <dependency>
            <groupId>org.springframework.boot</groupId>
            <artifactId>spring-boot-starter-activemq</artifactId>
        </dependency>
        <!-- MQTT -->
        <dependency>
            <groupId>org.springframework.integration</groupId>
            <artifactId>spring-integration-mqtt</artifactId>
        </dependency>
    </dependencies>

    <build>
        <plugins>
            <plugin>
                <groupId>org.springframework.boot</groupId>
                <artifactId>spring-boot-maven-plugin</artifactId>
            </plugin>
        </plugins>
    </build>


</project>
resources文件夹下创建application.properties
spring.activemq.broker-url=tcp://192.168.99.151:61616
spring.activemq.user=admin
spring.activemq.password=admin
package hello;

import org.springframework.beans.factory.annotation.Autowired;
import org.springframework.boot.SpringApplication;
import org.springframework.boot.autoconfigure.SpringBootApplication;
import org.springframework.jms.core.JmsTemplate;

import javax.annotation.PostConstruct;

@SpringBootApplication
public class Producer {

    @Autowired
    private JmsTemplate jmsTemplate;

    @PostConstruct
    public void init() {
        jmsTemplate.convertAndSend("queue1", "Hello Spring 4");
    }

    public static void main(String[] args) {
        SpringApplication.run(Producer.class, args);
    }
}
package hello;

import org.springframework.boot.SpringApplication;
import org.springframework.boot.autoconfigure.SpringBootApplication;
import org.springframework.jms.annotation.EnableJms;
import org.springframework.jms.annotation.JmsListener;

@SpringBootApplication
@EnableJms
public class Consumer {

    @JmsListener(destination = "queue1")
    public void receive(String message) {
        System.out.println("收到消息:" + message);
    }

    public static void main(String[] args) {
        SpringApplication.run(Consumer.class, args);
    }
}
手工的配置
@Configuration
@EnableJms
public class JmsConfiguration {

    /**
     * 连接工厂
     *
     * @param brokerUrl
     * @param userName
     * @param password
     * @return
     */
    @Bean
    public ConnectionFactory connectionFactory(@Value("${spring.activemq.broker-url}") String brokerUrl, @Value("${spring.activemq.user}") String userName, @Value("${spring.activemq.password}") String password) {
        return new ActiveMQConnectionFactory(userName, password, brokerUrl);
    }

    /**
     * 队列模式的监听容器
     *
     * @param connectionFactory
     * @return
     */
    @Bean
    public JmsListenerContainerFactory<?> jmsListenerContainerFactoryQueue(ConnectionFactory connectionFactory) {
        DefaultJmsListenerContainerFactory bean = new DefaultJmsListenerContainerFactory();
        bean.setConnectionFactory(connectionFactory);
        return bean;
    }

    /**
     * topic 监听
     * @param connectionFactory
     * @return
     */
    @Bean
    public JmsListenerContainerFactory<?> jmsListenerContainerFactoryTopic(ConnectionFactory connectionFactory) {
        DefaultJmsListenerContainerFactory bean = new DefaultJmsListenerContainerFactory();
        bean.setConnectionFactory(connectionFactory);
        bean.setPubSubDomain(true);
        return bean;
    }

    /**
     * 队列模板
     *
     * @param connectionFactory
     * @return
     */
    @Bean
    public JmsTemplate jmsTemplateQueue(ConnectionFactory connectionFactory) {
        return new JmsTemplate(connectionFactory);
    }

    /**
     * 发布订阅模板
     *
     * @param connectionFactory
     * @return
     */
    @Bean
    public JmsTemplate jmsTemplatePublish(ConnectionFactory connectionFactory) {
        JmsTemplate jmsTemplate = new JmsTemplate(connectionFactory);
        jmsTemplate.setPubSubDomain(true);
        return jmsTemplate;
    }

}
二、支持的协议
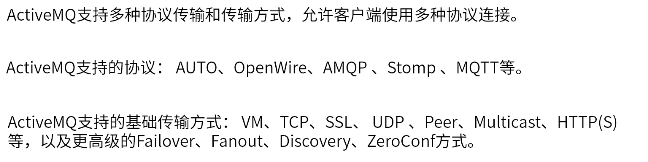
ActiveMQ的协议连接配置
在${ACTIVE_HOME}/conf/activemq.xml中,通过配置<transportConnectors>就可以使用多种传输方式

2.传输方式配置
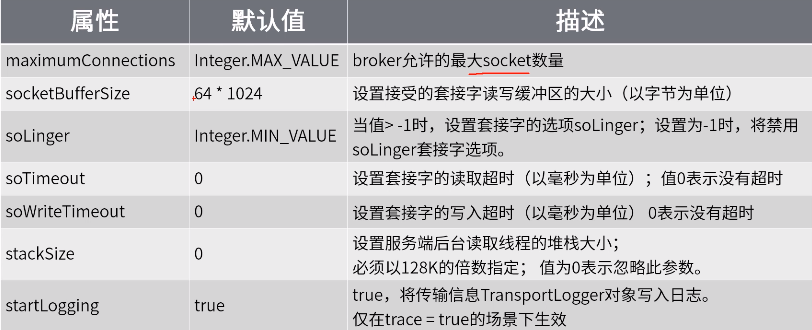
TCP
由于TCP具有可靠传输的特性,它在ActiveMQ中也是最常用的一种协议。在默认的配置中,TCP连接的端口为61616
TCP配置格式
tcp://hostname:port?key=value
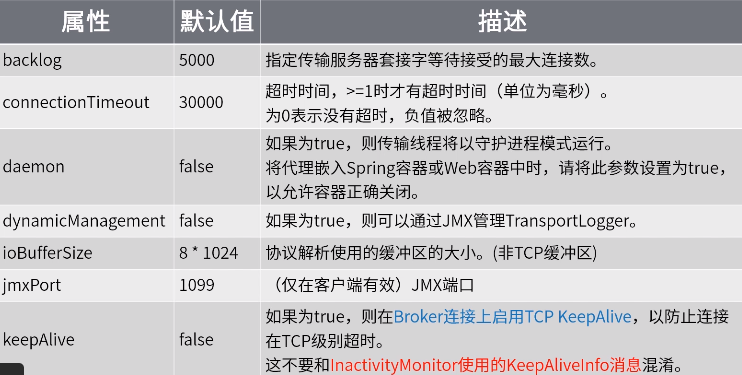
TCP参数配置
在服务端配置时,参数要以"transfport."开头
在客户端连接时,参数省略“transport.”前缀
服务器端配置示例:

客户端配置示例:

TCP配置参数说明
SSL
对外开放
需要一个安全连接的时候可以考虑使用SSL,适用于client和broke在公网的情况,如使用aws云平台等
http://activemq.apache.org/ssl-transport-reference.html
SSL配置格式,可配置参数和TCP相同
ssl://localhost:61616
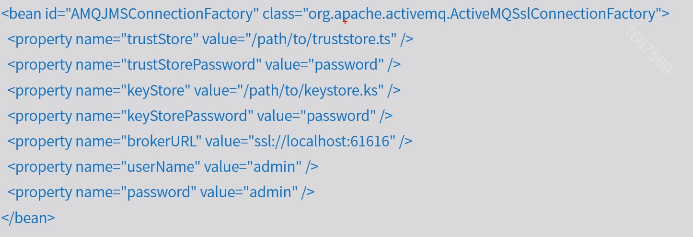
SSL客户端配置
JMS客户端需要使用ActiveMQSslConnectionFactory类创建连接,brokeUrl以ssl://开头,以下是Spring配置示例
NIO
使用Java的NIO方式对连接进行改进,因为NIO使用线程池,可以复用线程,所以可以用更少的线程维持更多的连接。如果有大量的客户端,或者性能瓶颈在网络传输上,可以考虑使用NIO的连接方式。
NIO配置格式,可配置参数和TCP相同
nio://hostname:port?key=value
Nio是OpenWrite协议的传输方式,其他协议,像AMQP、MQTT、Stomp,也有NIO的实现,通常在协议前缀中加“+nio”来区分。示例:

NIO传输线程使用情况配置
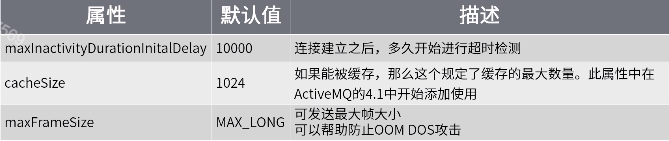
从5.15.0开始,ActiveMQ支持调整NIO的传输线程,可以设置以下属性
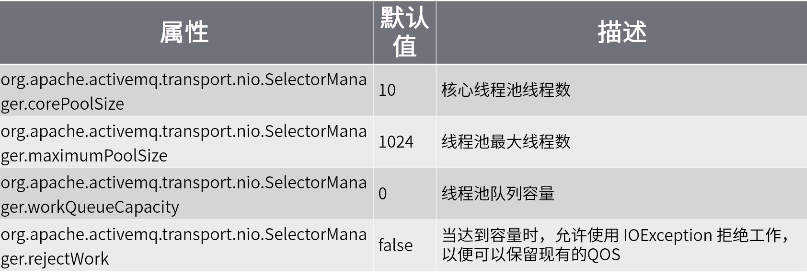
NIO传输线程使用情况配置
属性可以在${ACTIVEMQ_HOME}/bin/env中配置,示例:

NIO SSL
从5.6版开始,NIO可以支持和SSL搭配使用的传输连接。
NIO+SSL配置格式,可配置参数和TCP相同

UDP
与面向连接,可靠的字节流服务的TCP不同,UDP是一个面向数据的简单传输连接,没有TCP的三次握手,所以性能大大强于TCP,但是是以牺牲可靠性为前提。适用于丢失也无所谓的消息。
UDP配置格式

UDP配置参数说明

HTTP(S)
需要穿越防火墙,可以考虑使用HTTP(S),但由于HTTP(S)是短连接,每次创建连接的成本较高,所以性能最差。通过XML传输数据。
HTTP配置格式

HTTPS配置格式

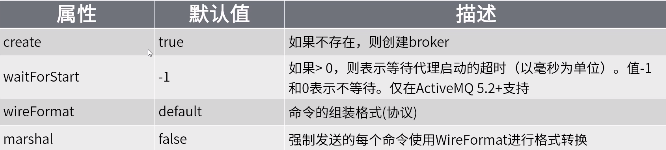
VM
虚拟机协议(方法直调),使用场景是client和broker在同一个Java虚拟机内嵌的情况,无需网络通信的开销。
VM配置格式

VM配置参数说明
3.OpenWire协议
OpenWire是Apache的一种跨语言的协议,允许从不同的语言和平台访问ActiveMQ,是ActiveMQ 4.x以后的版本默认的传输协议。

OpenWire支持TCP、SSL、NIO、UDP、VM等传输方式,直接配置这些连接,就是使用的OpenWire协议,OpenWire有自己的配置参数,客户端和服务器端配置的参数名都通过前缀“wireFormat.”表示。

示例:

配置参数

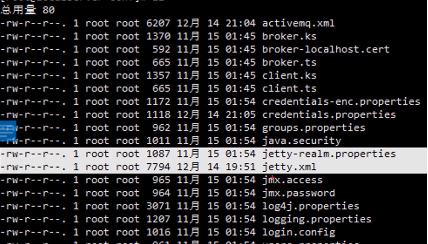
配置activemq
[root@node01 activemq]# cd /var/activemq/conf
[root@node01 conf]# ls
activemq.xml           client.ts                   jetty-realm.properties  logging.properties
broker.ks              credentials-enc.properties  jetty.xml               login.config
broker-localhost.cert  credentials.properties      jmx.access              users.properties
broker.ts              groups.properties           jmx.password
client.ks              java.security               log4j.properties
[root@node01 conf]# vi activemq.xml
比如,加个日志输出
<transportConnectors>
112 <!-- DOS protection, limit concurrent connections to 1000 and frame size to 100MB -->
113 <transportConnector name="openwire" uri="tcp://0.0.0.0:61616?maximumConnections=1000&wireFormat.maxFrameSi ze=104857600"/>
114 <transportConnector name="amqp" uri="amqp://0.0.0.0:5672?maximumConnections=1000&wireFormat.maxFrameSize=1 04857600"/>
115 <transportConnector name="stomp" uri="stomp://0.0.0.0:61613?maximumConnections=1000&wireFormat.maxFrameSiz e=104857600"/>
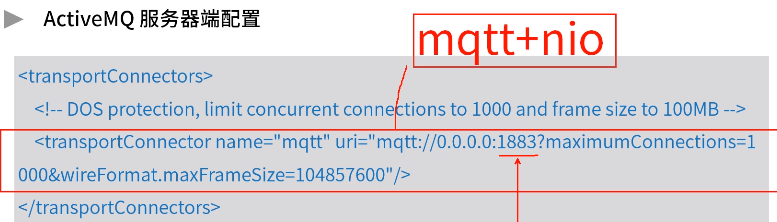
116 <transportConnector name="mqtt" uri="mqtt://0.0.0.0:1883?maximumConnections=1000&wireFormat.maxFrameSize=1 04857600"/>
117 <transportConnector name="ws" uri="ws://0.0.0.0:61614?maximumConnections=1000&wireFormat.maxFrameSize=1048 57600"/>
118 </transportConnectors>
默认启动的端口,支持不同的协议,需要什么就开什么
在tcp加参数
<transportConnector name="openwire" uri="tcp://0.0.0.0:61616?transport.trace=true&maximumConnections=1000&wireFormat.maxFrameSi ze=104857600"/>
修改日志文件的格式
vi log4j.properties
加一行日志输出的日志级别
35 # Or for more fine grained debug logging uncomment one of these
     36 #log4j.logger.org.apache.activemq=DEBUG
     37 #log4j.logger.org.apache.camel=DEBUG
     38 log4j.logger.org.apache.activemq.transport.TransportLogger=DEBUG
启动activemq
日志在data目录,进入该目录,查看日志文件内容
tail -f activemq.log
运行producer
UDP
// UDP示例 http://activemq.apache.org/udp-transport-reference.html
public class ConsumerAndProducerUDP {
    public static void main(String[] args) {
        ActiveMQConnectionFactory connectionFactory = null;
        Connection conn = null;
        Session session = null;
        MessageConsumer consumer = null;

        try {
            // 1、创建连接工厂
            connectionFactory = new ActiveMQConnectionFactory("udp://activemq.tony.com:61616");
            // 2、创建连接对象
            conn = connectionFactory.createConnection("admin", "admin");
            conn.start();

            session = conn.createSession(false, Session.AUTO_ACKNOWLEDGE);

            // 4、创建点对点接收的目标
            Destination destination = session.createQueue("queue1");

            // 5、创建生产者消息
            MessageProducer producer = session.createProducer(destination);
            // 设置生产者的模式,有两种可选
            // DeliveryMode.PERSISTENT 当activemq关闭的时候,队列数据将会被保存
            // DeliveryMode.NON_PERSISTENT 当activemq关闭的时候,队列里面的数据将会被清空
            producer.setDeliveryMode(DeliveryMode.NON_PERSISTENT);

            // 6、创建一条消息
            String text = "Hello world!";
            TextMessage message = session.createTextMessage(text);
            // 7、发送消息
            producer.send(message);

            // 8、创建消费者消息
            consumer = session.createConsumer(destination);

            // 9、接收消息
            Message consumerMessage = consumer.receive();
            if (consumerMessage instanceof TextMessage) {
                System.out.println("收到文本消息:" + ((TextMessage) consumerMessage).getText());
            } else {
                System.out.println(consumerMessage);
            }
        } catch (JMSException e) {
            e.printStackTrace();
        } finally {
            if (consumer != null) {
                try {
                    consumer.close();
                } catch (JMSException e) {
                    e.printStackTrace();
                }
            }

            if (session != null) {
                try {
                    session.close();
                } catch (JMSException e1) {
                    e1.printStackTrace();
                }
            }

            if (conn != null) {
                try {
                    conn.close();
                } catch (JMSException e1) {
                    e1.printStackTrace();
                }
            }
        }
    }
}
SSL
// ssl客户端: http://activemq.apache.org/ssl-transport-reference.html
// http://activemq.apache.org/how-do-i-use-ssl.html
public class ConsumerAndProducerSSL {
    public static void main(String[] args) {
        //  ssl
        ActiveMQSslConnectionFactory connectionFactory = null;
        Connection conn = null;
        Session session = null;
        MessageConsumer consumer = null;

        try {
            // 1、创建连接工厂
            connectionFactory = new ActiveMQSslConnectionFactory("ssl://activemq.tony.com:61617?socket.verifyHostName=false");
            connectionFactory.setTrustStore("activemq-client.ts");
            connectionFactory.setTrustStorePassword("netease");
            // 2、创建连接对象
            conn = connectionFactory.createConnection();
            conn.start();
            // 3、 创建session
            session = conn.createSession(false, Session.AUTO_ACKNOWLEDGE);
            // 4、创建点对点接收的目标
            Destination destination = session.createQueue("queue1");
            // 5、创建生产者消息
            MessageProducer producer = session.createProducer(destination);
            // 设置生产者的模式,有两种可选
            producer.setDeliveryMode(DeliveryMode.NON_PERSISTENT);
            // 6、创建一条消息
            String text = "Hello world!";
            TextMessage message = session.createTextMessage(text);
            // 7、发送消息
            producer.send(message);
            // 8、创建消费者消息
            consumer = session.createConsumer(destination);
            // 9、接收消息
            Message consumerMessage = consumer.receive();
            if (consumerMessage instanceof TextMessage) {
                System.out.println("收到文本消息:" + ((TextMessage) consumerMessage).getText());
            } else {
                System.out.println(consumerMessage);
            }

            consumer.close();
            session.close();
            conn.close();
        } catch (Exception e) {
            e.printStackTrace();
        }
    }
}
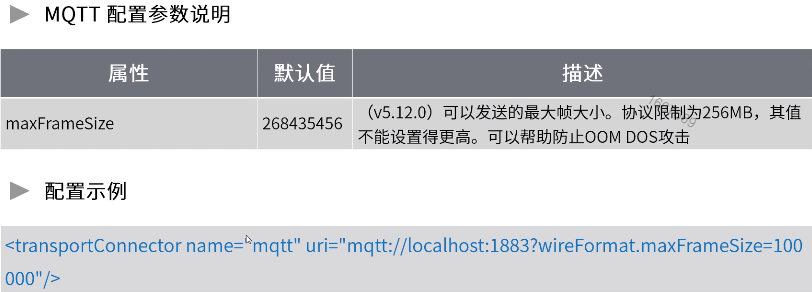
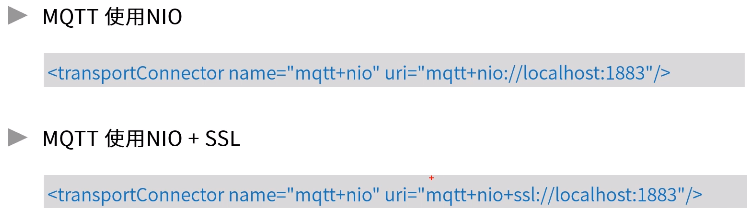
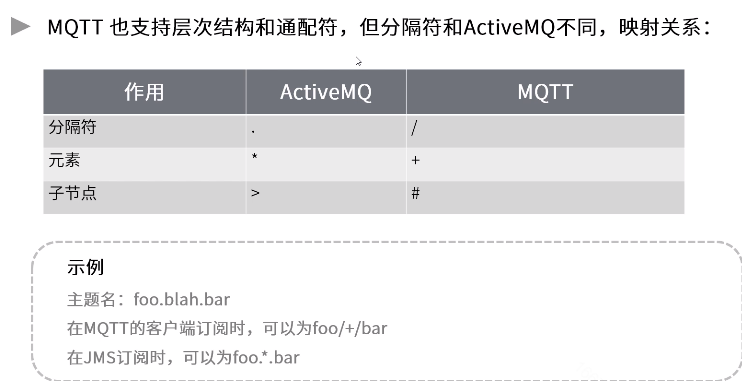
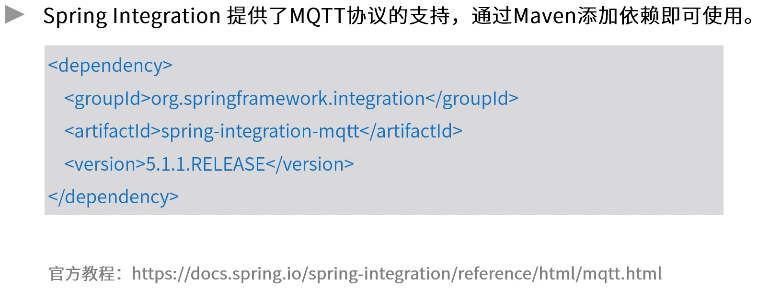
4.MQTT协议


发布订阅模型
服务质量
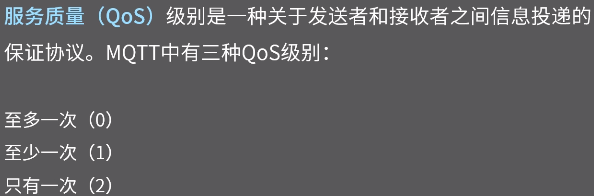

怎样工作--QoS level 0

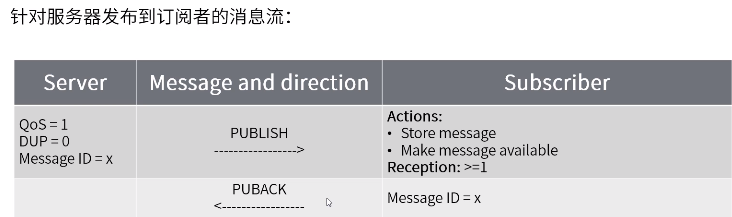
QoS level 1
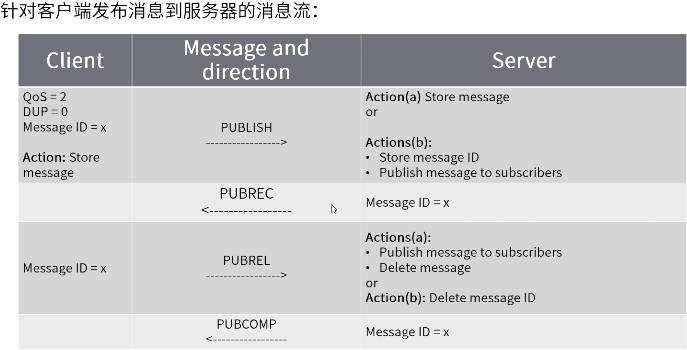
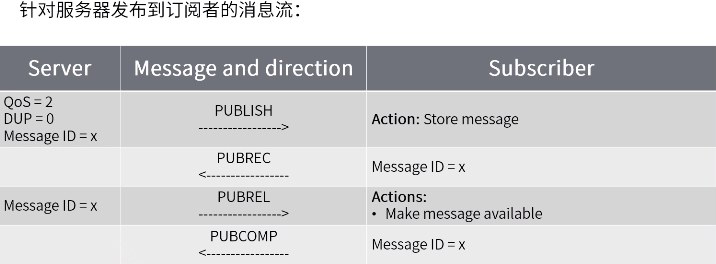
QoS level 2
ActiveMQ中使用MQTT协议
Spring使用MQTT
public class MqttConsumer {
    private static int qos = 2;
    private static String broker = "tcp://192.168.99.151:1883";
    private static String userName = "admin";
    private static String passWord = "admin";

    private static MqttClient connect(String clientId) throws MqttException {
        MemoryPersistence persistence = new MemoryPersistence();
        MqttConnectOptions connOpts = new MqttConnectOptions();
        connOpts.setCleanSession(false);
        connOpts.setUserName(userName);
        connOpts.setPassword(passWord.toCharArray());
        connOpts.setConnectionTimeout(10);
        connOpts.setKeepAliveInterval(20);
        MqttClient mqttClient = new MqttClient(broker, clientId, persistence);
        mqttClient.connect(connOpts);
        return mqttClient;

    }

    public static void sub(MqttClient mqttClient, String topic) throws MqttException {
        int[] Qos = {qos};
        String[] topics = {topic};
        mqttClient.subscribe(topics, Qos, new IMqttMessageListener[]{(s, mqttMessage) -> {
            System.out.println("收到新消息" + s + " > " + mqttMessage.toString());
        }});
    }

    private static void runsub(String clientId, String topic) throws MqttException {
        MqttClient mqttClient = connect(clientId);
        if (mqttClient != null) {
            sub(mqttClient, topic);
        }
    }

    public static void main(String[] args) throws MqttException {
        runsub("consumer-client-id-1", "x/y/z");
    }

}
public class MqttProducer {
    private static int qos = 1;
    private static String broker = "tcp://192.168.99.151:1883";
    private static String userName = "admin";
    private static String passWord = "admin";

    private static MqttClient connect(String clientId, String userName,
                                      String password) throws MqttException {
        MemoryPersistence persistence = new MemoryPersistence();
        MqttConnectOptions connOpts = new MqttConnectOptions();
        connOpts.setCleanSession(true);
        connOpts.setUserName(userName);
        connOpts.setPassword(password.toCharArray());
        connOpts.setConnectionTimeout(10);
        connOpts.setKeepAliveInterval(20);
        // String[] uris = {"tcp://10.100.124.206:1883","tcp://10.100.124.207:1883"};
        // connOpts.setServerURIs(uris);  //这个是mqtt客户端实现的负载均衡和容错
        MqttClient mqttClient = new MqttClient(broker, clientId, persistence);
        mqttClient.setCallback(new PushCallback("test"));
        mqttClient.connect(connOpts);
        return mqttClient;
    }


    private static void pub(MqttClient sampleClient, String msg, String topic)
            throws Exception {
        MqttMessage message = new MqttMessage(msg.getBytes());
        message.setQos(qos);
        message.setRetained(false);
        sampleClient.publish(topic, message);
    }

    private static void publish(String str, String clientId, String topic) throws Exception {
        MqttClient mqttClient = connect(clientId, userName, passWord);
        if (mqttClient != null) {
            pub(mqttClient, str, topic);
            System.out.println("pub-->" + str);
        }
        if (mqttClient != null) {
            mqttClient.disconnect();
        }
    }

    public static void main(String[] args) throws Exception {
        publish("message content", "producer-client-id-0", "x/y/z");
    }
}

class PushCallback implements MqttCallback {
    private String threadId;

    public PushCallback(String threadId) {
        this.threadId = threadId;
    }

    public void connectionLost(Throwable cause) {
        cause.printStackTrace();
    }

    public void deliveryComplete(IMqttDeliveryToken token) {
        System.out.println("服务器是否正确接收---------" + token.isComplete());
    }

    public void messageArrived(String topic, MqttMessage message) throws Exception {
        String msg = new String(message.getPayload());
        System.out.println(threadId + " " + msg);
    }
}
spring
@SpringBootApplication
public class MqttApplication {
    private static final Log LOGGER = LogFactory.getLog(MqttApplication.class);

    public static void main(final String... args) {
        // https://spring.io/projects/spring-integration
        // https://github.com/spring-projects/spring-integration-samples/
        SpringApplication.run(MqttApplication.class, args);
    }

    @Bean
    public MqttPahoClientFactory mqttClientFactory() {
        DefaultMqttPahoClientFactory factory = new DefaultMqttPahoClientFactory();
        MqttConnectOptions options = new MqttConnectOptions();
        options.setServerURIs(new String[]{"tcp://192.168.99.151:1883"});
        options.setUserName("admin");
        options.setPassword("admin".toCharArray());
        factory.setConnectionOptions(options);
        return factory;
    }

    // publisher
    @Bean
    public IntegrationFlow mqttOutFlow() {
        // IntegrationFlows.from 数据来源,可以设定为每秒去取数据
        return IntegrationFlows.from(() -> "hello mqtt", new Consumer<SourcePollingChannelAdapterSpec>() {
            @Override
            public void accept(SourcePollingChannelAdapterSpec sourcePollingChannelAdapterSpec) {
                sourcePollingChannelAdapterSpec.poller(Pollers.fixedDelay(1000));
            }
        })
                .transform(p -> p + " sent to MQTT")
                .handle(mqttOutbound())
                .get();
    }

    @Bean
    public MessageHandler mqttOutbound() {
        // 创建handller
        MqttPahoMessageHandler messageHandler = new MqttPahoMessageHandler("client-si-producer-0", mqttClientFactory());
        messageHandler.setAsync(true);
        messageHandler.setDefaultTopic("x/y/z");
        return messageHandler;
    }

    // consumer
    @Bean
    public IntegrationFlow mqttInFlow() {
        return IntegrationFlows.from(mqttInbound())
                .transform(p -> p + ", received from MQTT")
                .handle(printHandler())
                .get();
    }

    private MessageHandler printHandler() {
        return new MessageHandler() {
            @Override
            public void handleMessage(Message<?> message) throws MessagingException {
                System.out.println(message.getPayload().toString());
            }
        };
    }

    @Bean
    public MessageProducerSupport mqttInbound() {
        MqttPahoMessageDrivenChannelAdapter adapter = new MqttPahoMessageDrivenChannelAdapter("client-si-consumer-1",
                mqttClientFactory(), "x/y/z");
        adapter.setCompletionTimeout(5000);
        adapter.setConverter(new DefaultPahoMessageConverter());
        adapter.setQos(1);
        return adapter;
    }
}
TCP等是数据传输的方式,基于这种连接方式可以传递什么数据内容,消息协议
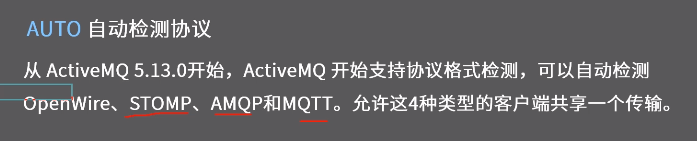
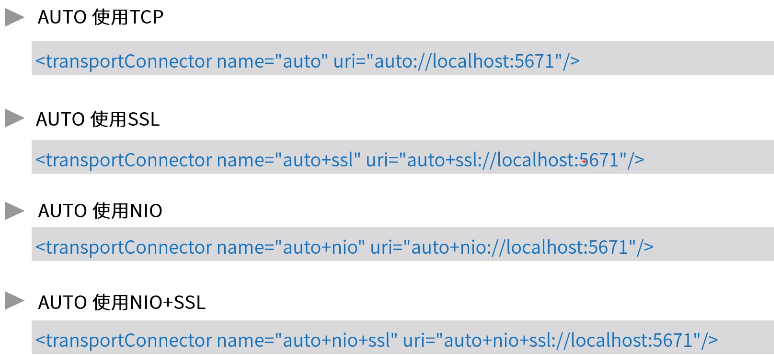
5.AUTO协议
三、高可用集群方案

需求:延时调用
配置
     37     <!--
     38         The <broker> element is used to configure the ActiveMQ broker.
     39     -->
     40     <broker xmlns="http://activemq.apache.org/schema/core" brokerName="localhost" dataDirectory="${activemq.data}" schedul        erSupport="true">
// 延时、调度消息 http://activemq.apache.org/delay-and-schedule-message-delivery.html
// 定时发送邮件通知,或者触发代码执行
public class DelayScheduleMessageDemo {
    public static void main(String[] args) {
        new ProducerThread("tcp://192.168.99.151:61616", "queue1").start();
    }

    static class ProducerThread extends Thread {
        String brokerUrl;
        String destinationUrl;

        public ProducerThread(String brokerUrl, String destinationUrl) {
            this.brokerUrl = brokerUrl;
            this.destinationUrl = destinationUrl;
        }

        @Override
        public void run() {
            ActiveMQConnectionFactory connectionFactory;
            Connection conn;
            Session session;

            try {
                // 1、创建连接工厂
                connectionFactory = new ActiveMQConnectionFactory(brokerUrl);
                // 2、创建连接对象md
                conn = connectionFactory.createConnection();
                conn.start();
                // 3、创建会话
                session = conn.createSession(false, Session.AUTO_ACKNOWLEDGE);
                // 4、创建点对点发送的目标
                Destination destination = session.createQueue(destinationUrl);
                // 5、创建生产者消息
                MessageProducer producer = session.createProducer(destination);
                // 设置生产者的模式,有两种可选 持久化 / 不持久化
                producer.setDeliveryMode(DeliveryMode.PERSISTENT);
                // 6、示例消息
                //  延时 5秒
                TextMessage message = session.createTextMessage("Hello world - 1!");
                message.setLongProperty(ScheduledMessage.AMQ_SCHEDULED_DELAY, 5 * 1000L);

                //  延时 5秒,投递3次,间隔10秒 (投递次数=重复次数+默认的一次)
                TextMessage message2 = session.createTextMessage("Hello world - 2!");
                message2.setLongProperty(ScheduledMessage.AMQ_SCHEDULED_DELAY, 5 * 1000L); // 延时
                message2.setLongProperty(ScheduledMessage.AMQ_SCHEDULED_PERIOD, 2 * 1000L); // 投递间隔
                message2.setIntProperty(ScheduledMessage.AMQ_SCHEDULED_REPEAT, 2); // 重复次数

                //  CRON 表达式的方式 以及 和上面参数的组合
                TextMessage message3 = session.createTextMessage("Hello world - 3!");
                message3.setStringProperty(ScheduledMessage.AMQ_SCHEDULED_CRON, "0 * * * *");

                // 7、发送消息
                producer.send(message);
                producer.send(message2);
                producer.send(message3);


                // 8、 关闭连接
                session.close();
                conn.close();
            } catch (JMSException e) {
                e.printStackTrace();
            }
        }
    }
}
延时调用需要高可用,否则崩了,就无法接收到消息
1.方案介绍

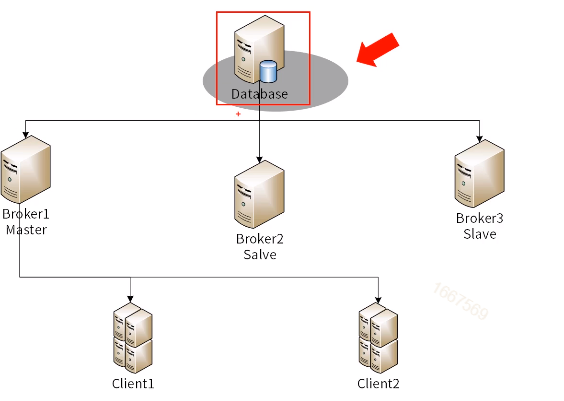
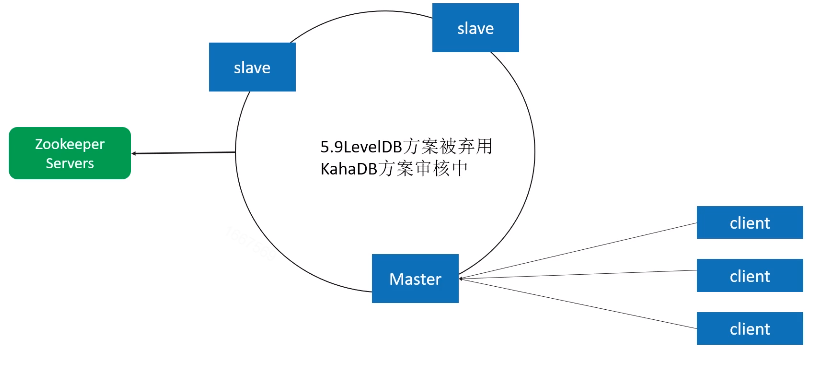
2.Master-Slave部属方式
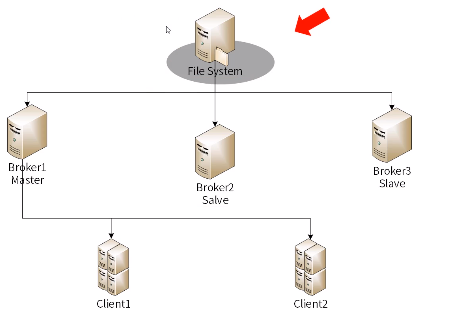
shared database Master-Slave方式
默认不支持数据库,需要在lib/extra目录下放驱动包
修改配置conf/activemq.xml
 37     <!--
 38         The <broker> element is used to configure the ActiveMQ broker.
 39     -->
 40     <broker xmlns="http://activemq.apache.org/schema/core" brokerName="localhost" persistent="true" dataDirectory="${activemq.data}" sched    ulerSupport="true">
74         <!--
 75             Configure message persistence for the broker. The default persistence
 76             mechanism is the KahaDB store (identified by the kahaDB tag).
 77             For more information, see:
 78
 79             http://activemq.apache.org/persistence.html
 80         -->
 81         <persistenceAdapter>
 82             <kahaDB directory="${activemq.data}/kahadb"/>
 83         </persistenceAdapter>
 84         <persistenceAdapter>
 85              <jdbcPersistenceAdapter dataSource="#mysql-ds" useDatabaseLock="false" transactionIsolation="4"/>
 86         </persistenceAdapter>
数据源
<!-- MySql DataSource Sample Setup -->
<bean id="mysql-ds" class="org.apache.commons.dbcp2.BasicDataSource" destroy-method="close">
    <property name="driverClassName" value="com.mysql.jdbc.Driver"/>
    <property name="url" value="jdbc:mysql://node03:3306/test_activemq?relaxAutoCommit=true"/>
    <property name="username" value="root"/>
    <property name="password" value="mysql_abc123"/>
    <property name="poolPreparedStatements" value="true"/>
</bean>
node03上的mysql要创建text_activemq数据库
重启activemq
集群中的服务器共用mysql服务器,使用同一个mysql实例
只有一个broker抢到
mysql实例中有Lock表
集群配置
只要把activemq目录复制到其他节点,并启动即可
[root@node01 var]# scp -r activemq/ root@node02:/var
启动activemq
Java代码 支持故障切换
// http://activemq.apache.org/failover-transport-reference.html
public class ConsumerFailover {
    public static void main(String[] args) throws InterruptedException {
        // 非failover的公共参数配置通过nested.*,例如 failover:(...)?nested.wireFormat.maxInactivityDuration=1000
        // ?randomize=false 随机选择,默认是顺序
        // 指定优先切换 failover:(tcp://host1:61616,tcp://host2:61616,tcp://host3:61616)?priorityBackup=true&priorityURIs=tcp://local1:61616,tcp://local2:61616
        // maxReconnectDelay重连的最大间隔时间(毫秒)
        String brokerUrl = "failover:(tcp://node01:61616,tcp://node02:61616)?initialReconnectDelay=100";
        ConsumerThread queue1 = new ConsumerThread(brokerUrl, "queue1");
        queue1.start();
        queue1.join();
    }
}

class ConsumerThread extends Thread {

    String brokerUrl;
    String destinationUrl;

    public ConsumerThread(String brokerUrl, String destinationUrl) {
        this.brokerUrl = brokerUrl;
        this.destinationUrl = destinationUrl;
    }

    @Override
    public void run() {
        ActiveMQConnectionFactory connectionFactory;
        Connection conn;
        Session session;
        MessageConsumer consumer;

        try {
            // brokerURL http://activemq.apache.org/connection-configuration-uri.html
            // 1、创建连接工厂
            connectionFactory = new ActiveMQConnectionFactory(this.brokerUrl);
            // 2、创建连接对象
            conn = connectionFactory.createConnection();
            conn.start(); // 一定要启动
            // 3、创建会话(可以创建一个或者多个session)
            session = conn.createSession(false, Session.AUTO_ACKNOWLEDGE);
            // 4、创建点对点接收的目标,queue - 点对点
            Destination destination = session.createQueue(destinationUrl);

            // 5、创建消费者消息 http://activemq.apache.org/destination-options.html
            consumer = session.createConsumer(destination);

            // 6、接收消息
            consumer.setMessageListener(message -> {
                try {
                    if (message instanceof TextMessage) {
                        System.out.println("收到文本消息:" + ((TextMessage) message).getText());
                    } else {
                        System.out.println(message);
                    }
                } catch (JMSException e) {
                    e.printStackTrace();
                }
            });
        } catch (JMSException e) {
            e.printStackTrace();
        }
    }
}
/**
 * 简单生产者
 */
public class Producer {
    public static void main(String[] args) {
        String brokerUrl = "failover:(tcp://node01:61616,tcp://node02:61616)?initialReconnectDelay=100";
        new ProducerThread(brokerUrl, "queue1").start();
    }

    static class ProducerThread extends Thread {
        String brokerUrl;
        String destinationUrl;

        public ProducerThread(String brokerUrl, String destinationUrl) {
            this.brokerUrl = brokerUrl;
            this.destinationUrl = destinationUrl;
        }

        @Override
        public void run() {
            ActiveMQConnectionFactory connectionFactory;
            Connection conn;
            Session session;

            try {
                // 1、创建连接工厂
                connectionFactory = new ActiveMQConnectionFactory(brokerUrl);
                // 2、创建连接对象md
                conn = connectionFactory.createConnection();
                conn.start();
                // 3、创建会话
                session = conn.createSession(false, Session.AUTO_ACKNOWLEDGE);
                // 4、创建点对点发送的目标
                 Destination destination = session.createQueue(destinationUrl);
                // 5、创建生产者消息
                MessageProducer producer = session.createProducer(destination);
                // 设置生产者的模式,有两种可选 持久化 / 不持久化
                producer.setDeliveryMode(DeliveryMode.PERSISTENT);
                // 6、创建一条文本消息
                String text = "Hello world!";
                TextMessage message = session.createTextMessage(text);
                for (int i = 0; i < 1; i++) {
                    // 7、发送消息
                    producer.send(message);
                }
                // 8、 关闭连接
                session.close();
                conn.close();
            } catch (JMSException e) {
                e.printStackTrace();
            }
        }
    }
}
关闭master主机node01
自动重连了node02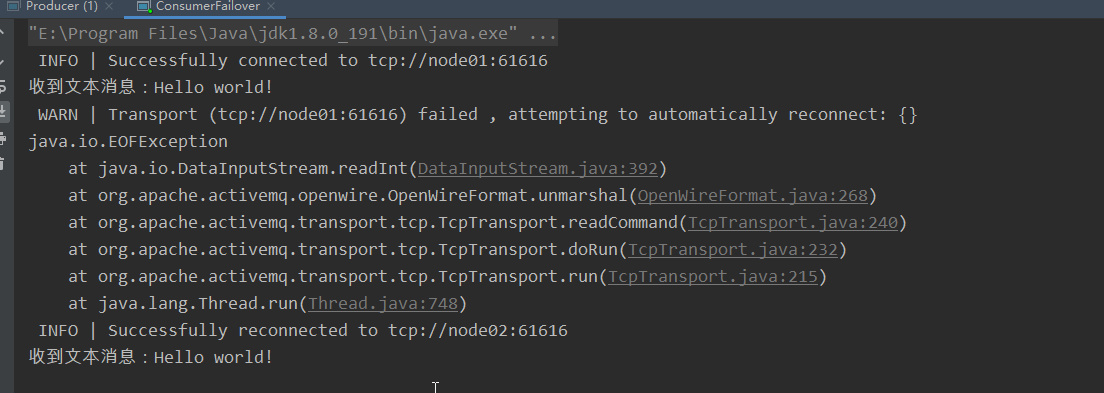
进化版不成功
Replicated LevelDB Store方式 弃用
3.Broker-Cluster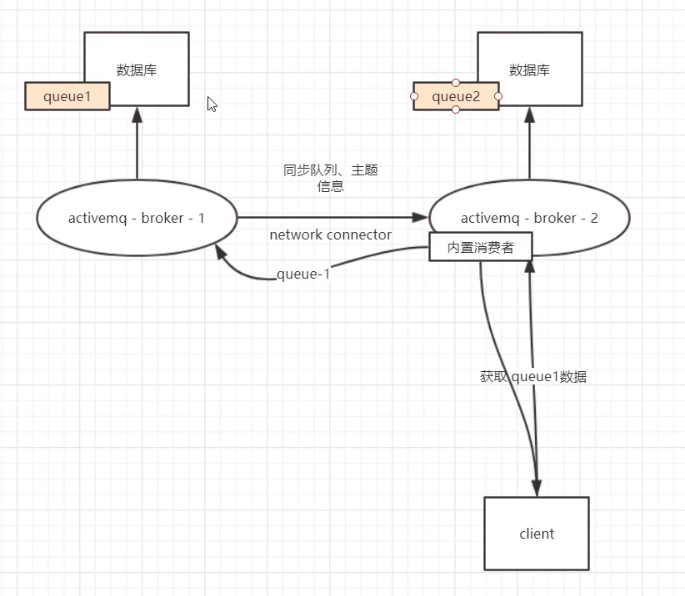
高性能的一种方式,客户端连接任何一台服务器都可以接收信息
比如连broker2,想消费订阅queue1,broker1和borker2之间有network connector,通过内置消费者去borker1里找queue1的数据
内置消费者专门负责消费其他系统的消息,再转发给客户端
还可以加负载均衡机制

去activemq.xml里配置networkConnectors
在node01里
109         <networkConnectors>
110             <networkConnector uri="static:(tcp://node02:61616)"/>
111         </networkConnectors>
在node02里
109         <networkConnectors>
110             <networkConnector uri="static:(tcp://node01:61616)"/>
111         </networkConnectors>
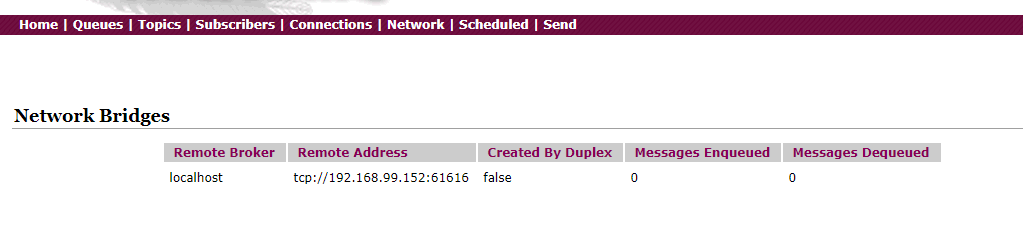
查看web控制台
node01连通node02
还有动态的方式
Broker-Cluster部属方式

Static Broker-Cluster部属配置

Dynamic Broker-Cluster部属配置

4.Master-Slave与Broker-Cluster相结合的部属方式
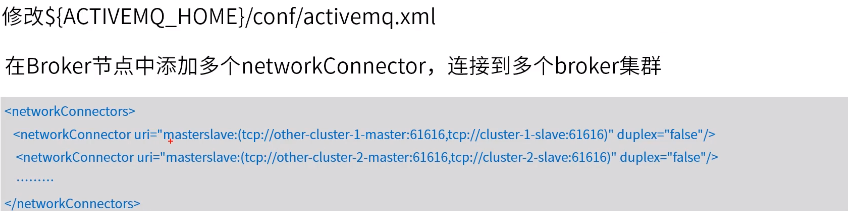
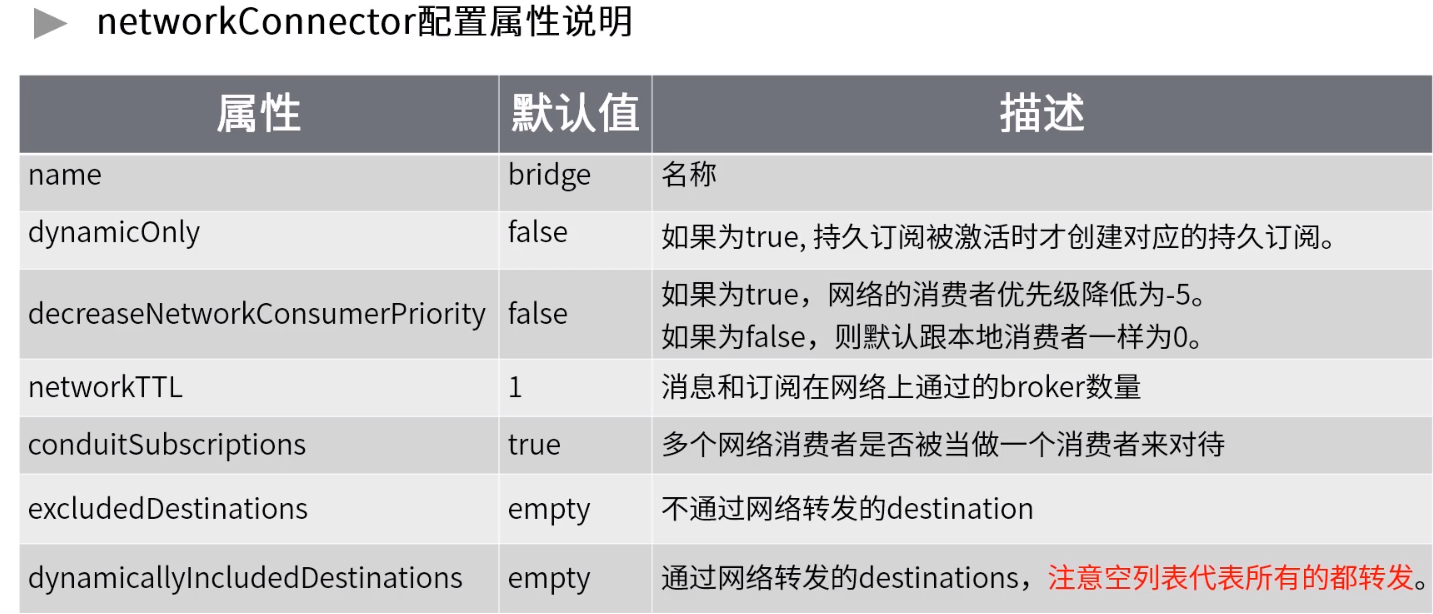
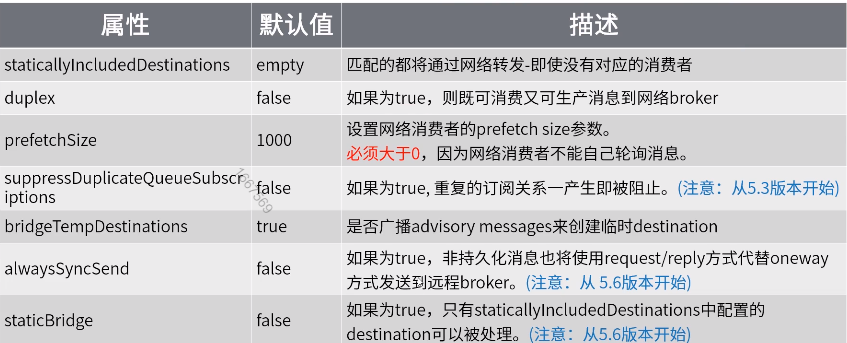
5.网络连接器配置说明
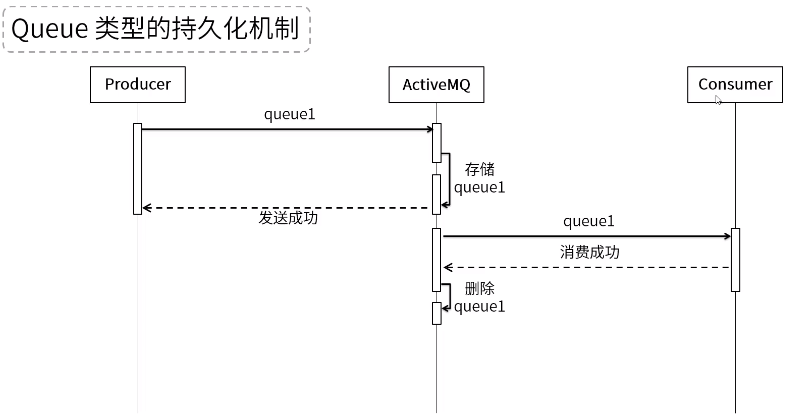
四、持久化原理及事务机制
1.持久化方案

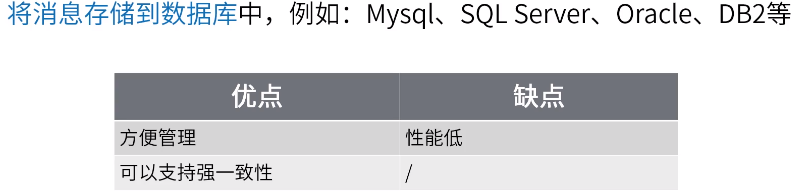
2.JDBC方式
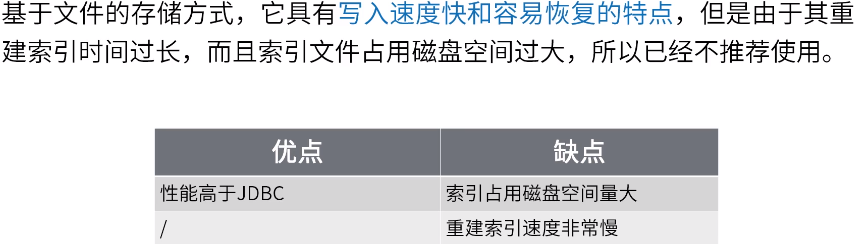
3.AMQ方式
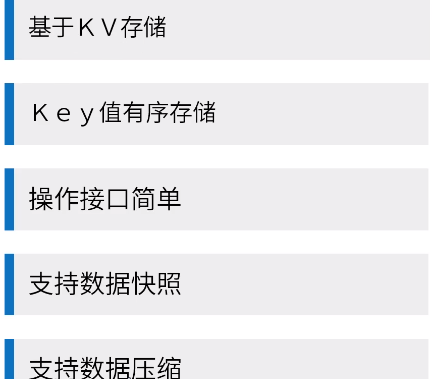
4.KahaDB方式

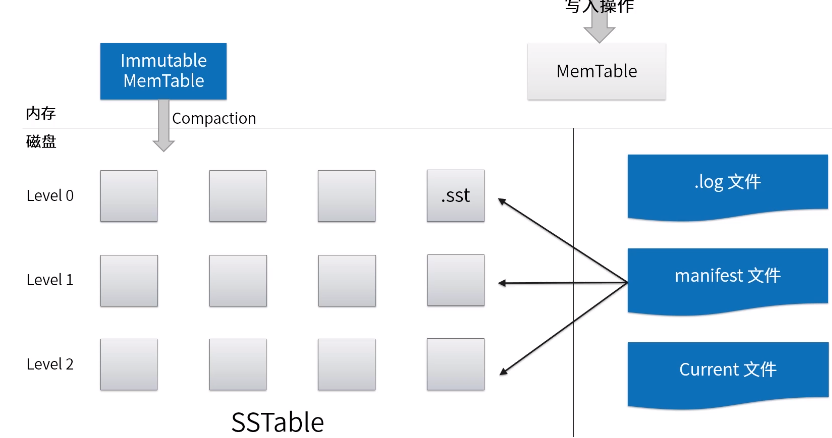
5.LevelDB

结构
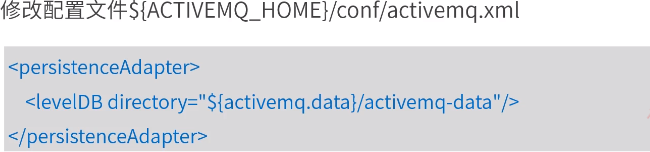
配置
4.事务机制
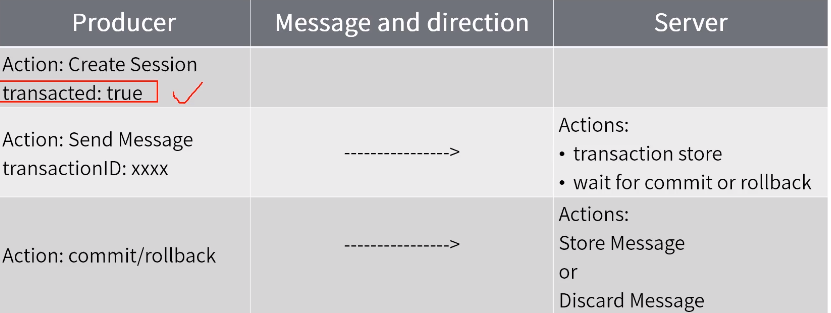
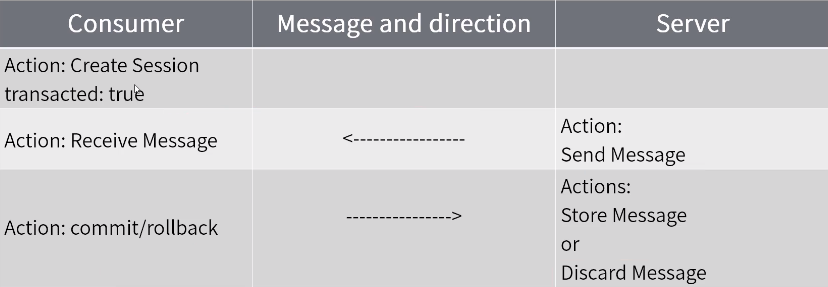
开启事务