一丶简介
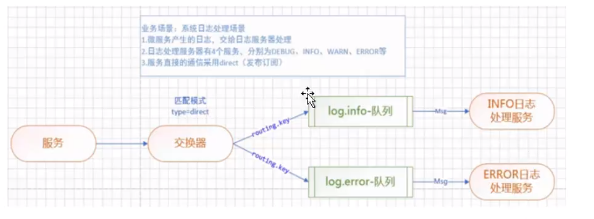
Direct Exchange
处理路由键。需要将一个队列绑定到交换器上,要求该消息与一个特定的路由键完全匹配。这是一个完整的匹配。如果一个队列绑定到该交换器上要求路由键 “test”,则只有被标记为“test”的消息才被转发,不会转发test.aaa,也不会转发dog.123,只会转发test。
业务场景,系统日志处理场景:
1.微服务产生日志,交给日志服务器处理。
2.日志服务器一共有4个服务,分别问DEBUG、INFO、WARN、ERROR(这里只写两个INFO和ERROR)。
3.服务之间的通信采用Direct(发布订阅)。

二丶配置文件
我分别创建了两个项目,一个作为生产者来发送日志,一个作为消费者来接收日志。
生产者配置:

 1 server.port=8883
 2
 3 spring.application.name=hello-world
 4
 5 spring.rabbitmq.host=localhost
 6 spring.rabbitmq.port=5672
 7 spring.rabbitmq.username=guest
 8 spring.rabbitmq.password=guest
 9
10 #设置交换器名称
11 mq.config.exchange=log.direct
12 #info的路由键
13 mq.config.queue.info.routing.key=log.info.routing.key
14 #error的队列名称
15 mq.config.queue.error=log.error
16 #error的路由键
17 mq.config.queue.error.routing.key=log.error.routing.key
消费者配置:

 1 server.port=8884
 2
 3 spring.application.name=lesson1
 4
 5 spring.rabbitmq.host=localhost
 6 spring.rabbitmq.port=5672
 7 spring.rabbitmq.username=guest
 8 spring.rabbitmq.password=guest
 9
10 #设置交换器名称
11 mq.config.exchange=log.direct
12 #info队列名称
13 mq.config.queue.info=log.info
14 #info的路由键
15 mq.config.queue.info.routing.key=log.info.routing.key
16 #error队列名称
17 mq.config.queue.error=log.error
18 #error的路由键
19 mq.config.queue.error.routing.key=log.error.routing.key
三丶创建生产者

 1 package com.example.ampq;
 2
 3 import org.springframework.amqp.core.AmqpTemplate;
 4 import org.springframework.beans.factory.annotation.Autowired;
 5 import org.springframework.beans.factory.annotation.Value;
 6 import org.springframework.stereotype.Component;
 7
 8 /**
 9  * Author:aijiaxiang
10  * Date:2020/4/26
11  * Description:发送消息
12  */
13 @Component
14 public class Sender {
15
16     @Autowired
17     private AmqpTemplate amqpTemplate;
18
19     //exChange 交换器
20     @Value("${mq.config.exchange}")
21     private String exChange;
22
23     //routingkey 路由键
24     @Value("${mq.config.queue.error.routing.key}")
25     private String routingKey;
26     /**
27      * 发送消息的方法
28      * @param msg
29      */
30     public void send(String msg){
31         //向消息队列发送消息
32         //参数1:交换器名称
33         //参数2:路由键
34         //参数3:消息
35         this.amqpTemplate.convertAndSend(exChange,routingKey,msg);
36
37     }
38 }
这里是向error队列发送消息,若要向info队列发送消息可将“routingKey”上的配置改为如下:
@Value("${mq.config.queue.info.routing.key}")
private String routingKey;
四丶创建消费者
1.error消息接收类

package com.ant.amqpdirectconsumer;

import org.springframework.amqp.core.ExchangeTypes;
import org.springframework.amqp.rabbit.annotation.*;
import org.springframework.stereotype.Component;

/**
 * Author:aijiaxiang
 * Date:2020/4/26
 * Description:消息接收者
 * @RabbitListener bindings:绑定队列
 * @QueueBinding  value:绑定队列的名称
 *                  exchange:配置交换器
 * @Queue : value:配置队列名称
 *          autoDelete:是否是一个可删除的临时队列
 * @Exchange value:为交换器起个名称
 *           type:指定具体的交换器类型
 */
@Component
@RabbitListener(
        bindings = @QueueBinding(
                value = @Queue(value = "${mq.config.queue.error}",autoDelete = "true"),
                exchange = @Exchange(value = "${mq.config.exchange}", type = ExchangeTypes.DIRECT),
                key = "${mq.config.queue.error.routing.key}"
        )
)
public class ErrorReceiver {

    /**
     * 接收消息的方法,采用消息队列监听机制
     * @param msg
     */
    @RabbitHandler
    public void process(String msg){
        System.out.println("error-receiver:"+msg);
    }
}
2.info消息接收类

package com.ant.amqpdirectconsumer;

import org.springframework.amqp.core.ExchangeTypes;
import org.springframework.amqp.rabbit.annotation.*;
import org.springframework.stereotype.Component;

/**
 * Author:aijiaxiang
 * Date:2020/4/26
 * Description:消息接收者
 * @RabbitListener bindings:绑定队列
 * @QueueBinding  value:绑定队列的名称
 *                  exchange:配置交换器
 * @Queue : value:配置队列名称
 *          autoDelete:是否是一个可删除的临时队列
 * @Exchange value:为交换器起个名称
 *           type:指定具体的交换器类型
 */
@Component
@RabbitListener(
        bindings = @QueueBinding(
                value = @Queue(value = "${mq.config.queue.info}",autoDelete = "true"),
                exchange = @Exchange(value = "${mq.config.exchange}", type = ExchangeTypes.DIRECT),
                key = "${mq.config.queue.error.routing.key}"
        )
)
public class InfoReceiver {

    /**
     * 接收消息的方法,采用消息队列监听机制
     * @param msg
     */
    @RabbitHandler
    public void process(String msg){
        System.out.println("receiver:"+msg);
    }
}
五丶测试一波

package com.example.amqp;

import com.example.ampq.Sender;
import com.example.helloworld.HelloworldApplication;
import org.junit.Test;
import org.junit.runner.RunWith;
import org.springframework.beans.factory.annotation.Autowired;
import org.springframework.boot.test.context.SpringBootTest;
import org.springframework.test.context.junit4.SpringRunner;

/**
 * Author:aijiaxiang
 * Date:2020/4/26
 * Description:
 */
@RunWith(SpringRunner.class)
@SpringBootTest(classes = HelloworldApplication.class)
public class QueueTest {
    @Autowired
    private Sender sender;

    /**
     * 测试消息队列
     */
    @Test
    public void test1() throws InterruptedException {
        while (true){
            Thread.sleep(1000);
            sender.send("hello");
        }

    }


}
