概述
- OAuth2 的几种角色和4种授权模式此处不再赘述,可以查看大神的文章 http://www.ruanyifeng.com/blog/2019/04/oauth-grant-types.html
- 本例将实现最简单的ClientCerdential 客户端认证模式,该模式适合内部API使用。
- 在将来的生产环境中,关于证书和持久化数据功能将在后续案例中实现。
环境
- AspNetCore3.1
步骤
1. 新建一个AuthServer项目
使用AspNetCore 框架新建一个WebAPI项目,命名AuthServer,将此项目作为Token认证授权中心。
添加nuget包:
<PackageReference Include="IdentityServer4.AspNetIdentity" Version="4.1.1" />
为简单起见,将此服务端口绑定到5010,表明我们认证授权中心的url 地址是 http://localhost:5010
      // 修改launchsettings.json
    "AuthServer": {
      "commandName": "Project",
      "launchBrowser": true,
      "launchUrl": "weatherforecast",
      "applicationUrl": "http://localhost:5010",
      "environmentVariables": {
        "ASPNETCORE_ENVIRONMENT": "Development"
      }
1.1 创建资源
   // 一个静态类,用于提取资源和客户端相关的配置
    public class Config
    {
        public static IEnumerable<ApiResource> GetApiResources
            => new List<ApiResource> { new ApiResource("api", "api1 desc.") { Scopes = { "api" } } };

        public static IEnumerable<Client> GetClients
            => new List<Client> {
                new Client {
                    ClientId="webapi",
                    ClientSecrets=new[] {new Secret("123456".Sha256()) },
                    AllowedGrantTypes=GrantTypes.ClientCredentials,
                    ClientName="console",
                    AllowedScopes={ new ApiScope("api").Name }
            } };


        public static IEnumerable<ApiScope> GetApiScopes
            => new[] { new ApiScope("api")};
    }
需要注意的是在AspNetCore 3.1 使用IdentityService4 的4.x版本时,需要单独定义ApiScope,并且client 的allowscopes 需要和ApiScope 的name一致,否则客户端将无法找到scope。这个设计将scope 和ApiResource 进一步解耦了,关系会更加灵活。
1.2 注册IdentityServer
在DI容器中注册identityserver服务
        public static IServiceCollection AddOAuthClientCreditionPattern(this IServiceCollection services)
        {
            services.AddIdentityServer()
                .AddDeveloperSigningCredential()
                .AddInMemoryApiResources(Config.GetApiResources)
                .AddInMemoryClients(Config.GetClients)
                .AddInMemoryApiScopes(Config.GetApiScopes) // 3.1 新增的坑,不加会报invalid_scope
                ;

            return services;

        }
       // Startup 中启用
        public void ConfigureServices(IServiceCollection services)
        {
            services.AddOAuthClientCreditionPattern();
            services.AddControllers();
        }
       // 启用中间件
        public void Configure(IApplicationBuilder app, IWebHostEnvironment env)
        {
            if (env.IsDevelopment())
            {
                app.UseDeveloperExceptionPage();
            }

            app.UseRouting();

            app.UseIdentityServer();   // 启用identityserver 中间件

            app.UseEndpoints(endpoints =>
            {
                endpoints.MapControllers();
            });
        }
1.3 启用服务
至此AuthServer 创建成功
访问 endpoint: 发现如下内容;IdentityServer4 已经定义了一系列uri 用于获取token、userinfo等。
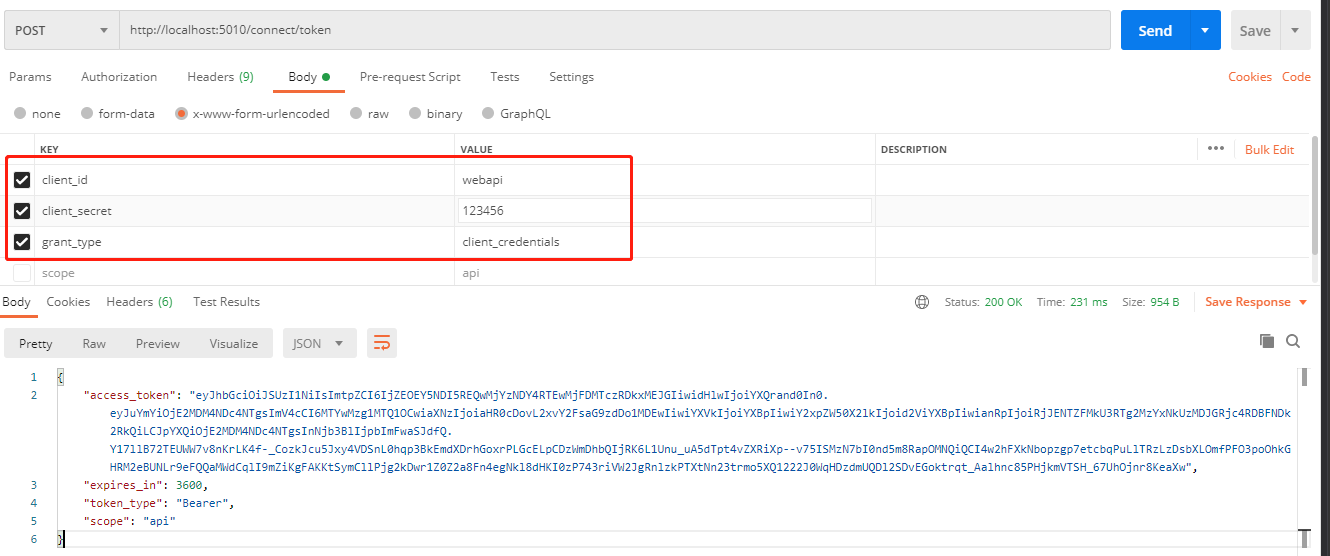
我将在后续示例中探讨其他uri,本例要用到的是获取token 的uri: http://localhost:5010/connect/token
{
	"issuer": "http://localhost:5010",
	"jwks_uri": "http://localhost:5010/.well-known/openid-configuration/jwks",
	"authorization_endpoint": "http://localhost:5010/connect/authorize",
	"token_endpoint": "http://localhost:5010/connect/token",
	"userinfo_endpoint": "http://localhost:5010/connect/userinfo",
	"end_session_endpoint": "http://localhost:5010/connect/endsession",
	"check_session_iframe": "http://localhost:5010/connect/checksession",
	"revocation_endpoint": "http://localhost:5010/connect/revocation",
	"introspection_endpoint": "http://localhost:5010/connect/introspect",
	"device_authorization_endpoint": "http://localhost:5010/connect/deviceauthorization",
	"frontchannel_logout_supported": true,
	"frontchannel_logout_session_supported": true,
	"backchannel_logout_supported": true,
	"backchannel_logout_session_supported": true,
	"scopes_supported": ["offline_access"],
	"claims_supported": [],
	"grant_types_supported": ["authorization_code", "client_credentials", "refresh_token", "implicit", "urn:ietf:params:oauth:grant-type:device_code"],
	"response_types_supported": ["code", "token", "id_token", "id_token token", "code id_token", "code token", "code id_token token"],
	"response_modes_supported": ["form_post", "query", "fragment"],
	"token_endpoint_auth_methods_supported": ["client_secret_basic", "client_secret_post"],
	"id_token_signing_alg_values_supported": ["RS256"],
	"subject_types_supported": ["public"],
	"code_challenge_methods_supported": ["plain", "S256"],
	"request_parameter_supported": true
}
至此,authserver 认证授权中心创建OK。下面创建ApiResource,并使Api启用基于的Token OAuth2认证.
1.4 获取token
2. 创建WebApi
Api 客户端使用Identityserver4 只需要nuget 引入一个 IdentityServer4.AccessTokenValidation 包即可。
<PackageReference Include="IdentityServer4.AccessTokenValidation" Version="3.0.1" />
2.1 新建一个AspNetCore WebApi 项目,将端口绑定到5020。
    "AuthTestApi": {
      "commandName": "Project",
      "launchBrowser": true,
      "launchUrl": "weatherforecast",
      "applicationUrl": "http://localhost:5020",
      "environmentVariables": {
        "ASPNETCORE_ENVIRONMENT": "Development"
      }
    }
2.2 Startup 注册
注册IdentityServer认证服务
        public void ConfigureServices(IServiceCollection services)
        {
            services.AddAuthentication("Bearer")
                .AddIdentityServerAuthentication(options =>
                {
                    options.ApiName = "api";
                    options.ApiSecret = "123456";
                    options.Authority = "http://localhost:5010";
                    options.RequireHttpsMetadata = false;

                });
            services.AddControllers();
        }

// 注册中间件
        public void Configure(IApplicationBuilder app, IWebHostEnvironment env)
        {
            if (env.IsDevelopment())
            {
                app.UseDeveloperExceptionPage();
            }

            app.UseAuthentication();

            app.UseRouting();

            app.UseAuthorization();

            app.UseEndpoints(endpoints =>
            {
                endpoints.MapControllers();
            });
        }
注意的是: 中间件必须按先后顺序启用 app.UseAuthentication()、app.UseRouting()、app.UseAuthorization();
2.3 访问api 资源
-
api 没有添加过滤器时,可以正常访问
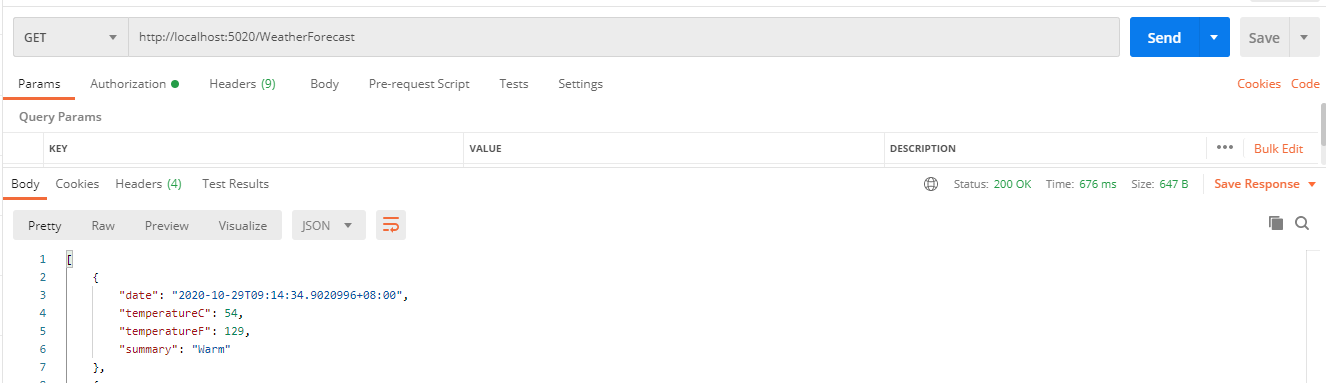
-
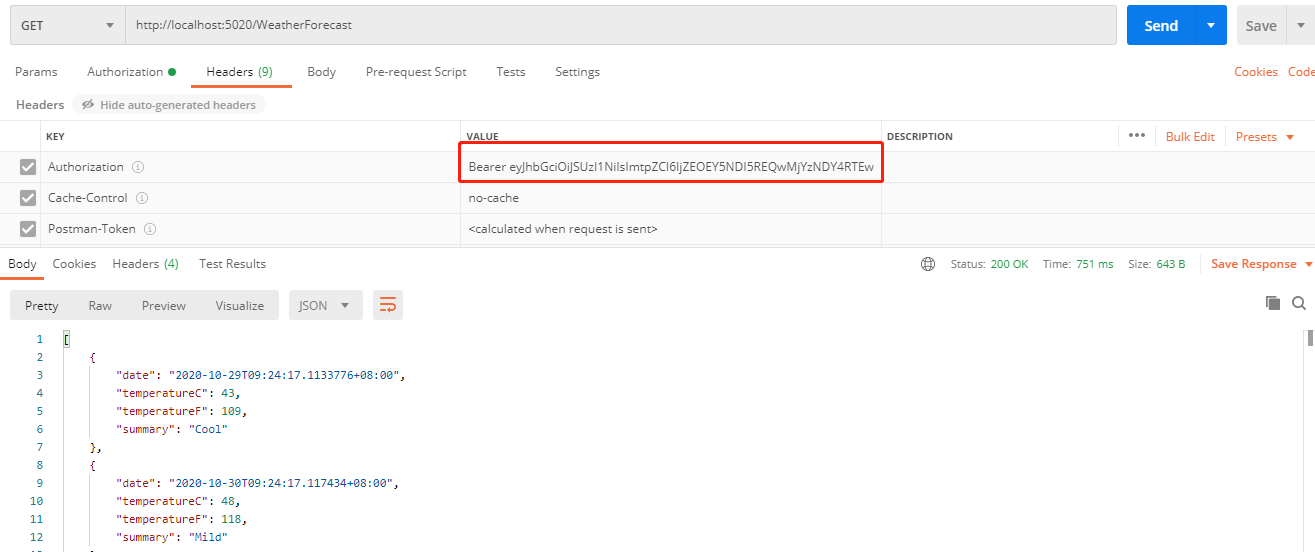
为 接口添加上 Authorize 过滤器
 [Authorize]
    [ApiController]
    [Route("[controller]")]
    public class WeatherForecastController : ControllerBase
此时再访问没有token时,拒绝访问,报401。

添加上文中拿到的token后访问,成功!