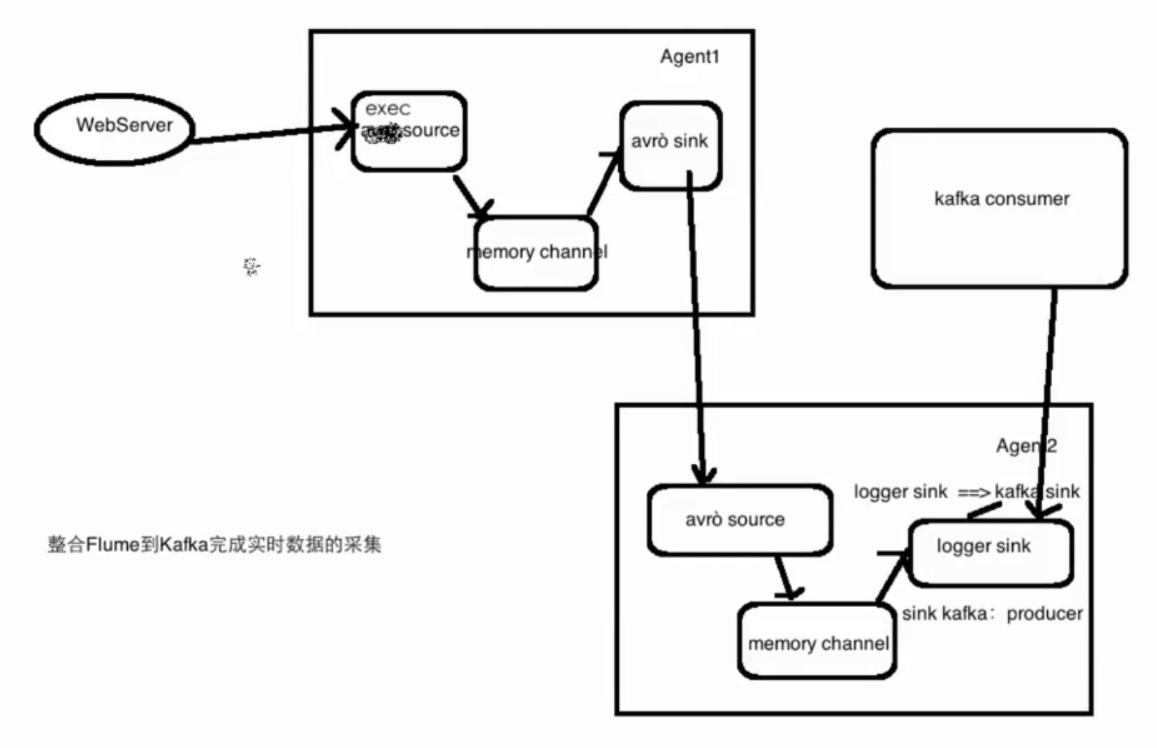
agent选择
agent1 exec source + memory channel + avro sink
agent2 avro source + memory channel
模拟实际工作中的场景,agent1 为A机器,agent2 为B机器。avro source: 监听avro端口,并且接收来自外部avro信息,
avro sink:一般用于跨节点传输,主要绑定数据移动目的地的ip和port
在创建agent2配置文件
cd /app/flume/flume/conf
vi test-avro-memory-kafka.conf
avro-memory-kafka.sources = avro-source
avro-memory-kafka.sinks = kafka-sink
avro-memory-kafka.channels = memory-channel

avro-memory-kafka.sources.avro-source.type = avro
avro-memory-kafka.sources.avro-source.bind= dblab-VirtualBox
avro-memory-kafka.sources.avro-source.port=44444

avro-memory-kafka.sinks.kafka-sink.type = org.apache.flume.sink.kafka.KafkaSink
avro-memory-kafka.sinks.kafka-sink.kafka.bootstrap.servers = dblab-VirtualBox:9092
avro-memory-kafka.sinks.kafka-sink.kafka.topic = hello_topic
avro-memory-kafka.sinks.kafka-sink.batchSize = 5
avro-memory-kafka.sinks.kafka-sink.requiredAcks = 1

avro-memory-kafka.channels.memory-channel.type = memory

avro-memory-kafka.sources.avro-source.channels = memory-channel
avro-memory-kafka.sinks.kafka-sink.channel = memory-channel
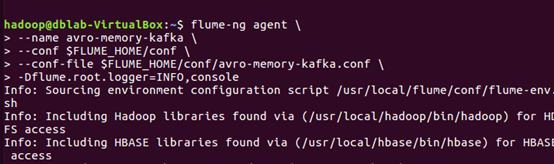
启动agent2
flume-ng agent --name avro-memory-kafka -c conf -f conf/test-avro-memory-kafka.conf -Dflume.root.logger=INFO,console
这里一定要等agent2的avro-source启动成功,已经监听了自己的44444端口,才能去启动agent1,不然agent1启动会被拒绝连接
创建agent1配置文件
cd /app/flume/flume/conf
vi test-exec-memory-avro.conf
exec-memory-avro.sources = exec-source
exec-memory-avro.sinks = avro-sink
exec-memory-avro.channels = memory-channel

exec-memory-avro.sources.exec-source.type = exec
exec-memory-avro.sources.exec-source.command = tail -F /home/hadoop/data/data.log
exec-memory-avro.sources.exec-source.shell = /bin/sh -c

exec-memory-avro.sinks.avro-sink.type = avro
exec-memory-avro.sinks.avro-sink.hostname = dblab-VirtualBox
exec-memory-avro.sinks.avro-sink.port = 44444

exec-memory-avro.channels.memory-channel.type = memory

exec-memory-avro.sources.exec-source.channels = memory-channel
exec-memory-avro.sinks.avro-sink.channel = memory-channel
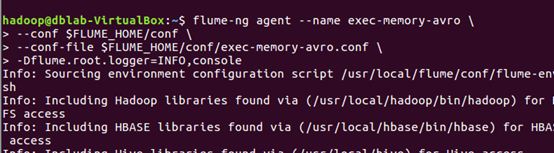
启动agent2
flume-ng agent --name exec-memory-avro -c conf -f conf/test-exec-memory-avro.conf -Dflume.root.logger=INFO,console
接下来对Kafka进行配置
先启动Kafka
$ kafka-server-start.sh $KAFKA_HOME/config/server.properties

创建hello_topic
$ kafka-topics.sh --create --zookeeper localhost:2181 --replication-factor 1 --partitions 1 --topic test
启动生产者
kafka-console-producer.sh --broker-list localhost:9092 --topic hello_topic

启动一个Kafka的客户端来消费,测试是否启动成功
kafka-console-consumer.sh --zookeeper localhost:2181 --topic hello_topic

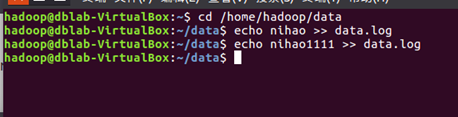
向agent1的exec-source监听的文件中写数据
查看Kafka的客户端是否通过flume消费到数据

至此完成Flume整合Kafka完成实时数据采集