中国版Azure 文件服务预览版在2015年1月13日已经上线,文件存储使用标准SMB 2.1协议为应用程序提供共享存储。
当我们的虚拟机连接到文件共享后就可以像使用本地共享文件夹一样来读取和写入文件。在使用Azure 文件服务之前我们需要两步准备工作
第一步:创建新存储账户
Note: 只有在Azure 文件服务上线后所创建的存储账户才会有Azure 文件服务功能
1) 打开Azure门户网站:https://manage.windowsazure.cn/
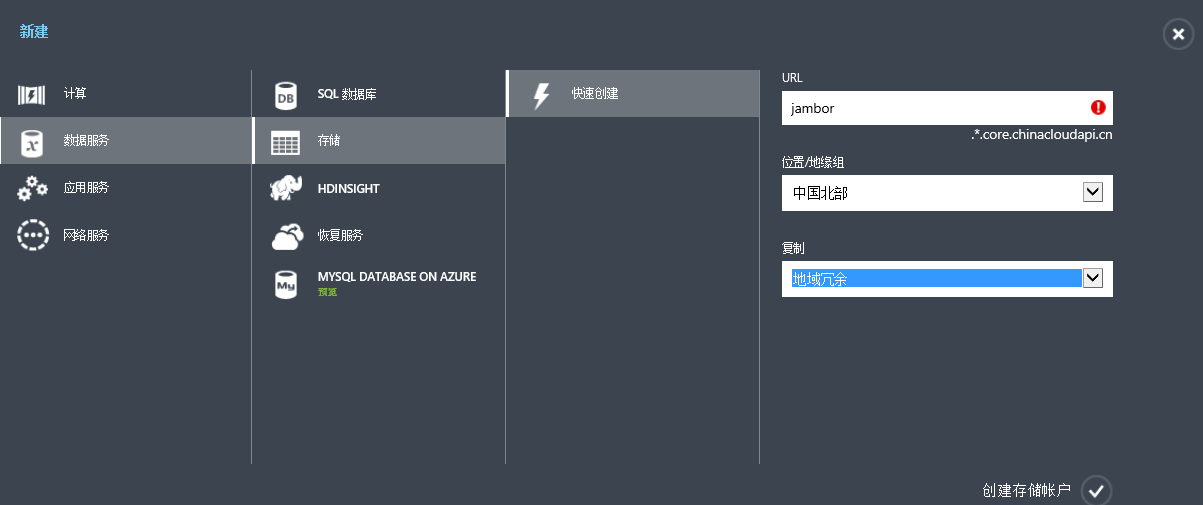
2) 按下图点击 数据服务 -> 存储 -> 快速创建
3) 打开我们创建的存储的仪表盘,我们将看到我们文件服务的终结点

第二步:下载和安装Azure PowerShell cmdlets,关于如何安装和配置 Windows Azure PowerShell请阅读:http://www.windowsazure.cn/zh-cn/documentation/articles/install-configure-powershell/
Note: Azure PowerShell 0.8.5 及更高版本才支持Azure 文件服务
所有准备工作完成后我们就可以开始了,目前Azure门户网站不支持创建存储共享,我们还是需要以PowerShell的方式来创建。
1) 启动安装好的Windows Azure PowerShell,使用下面的命令来登录你的中国版Azure账户
Add-AzureAccount -Environment AzureChinaCloud
2) 创建上下文
$ctx=New-AzureStorageContext <帐户名称> <帐户密钥> -Environment AzureChinaCloud
Note: 我们使用的是中国版的Azure,所以需要添加Environment这个参数否则会出现下面的错误,从错误中可以很明显的看到终结点并非我们中国版Azure的后缀core.chinacloudapi.cn
New-AzureStorageShare: The remote name could not be resolved: '<account name>.file.core.windows.net'
3) 使用上下文创建文件共享
$s = New-AzureStorageShare <共享名称> -Context $ctx
4) 下面我们在虚拟机中配置共享目录
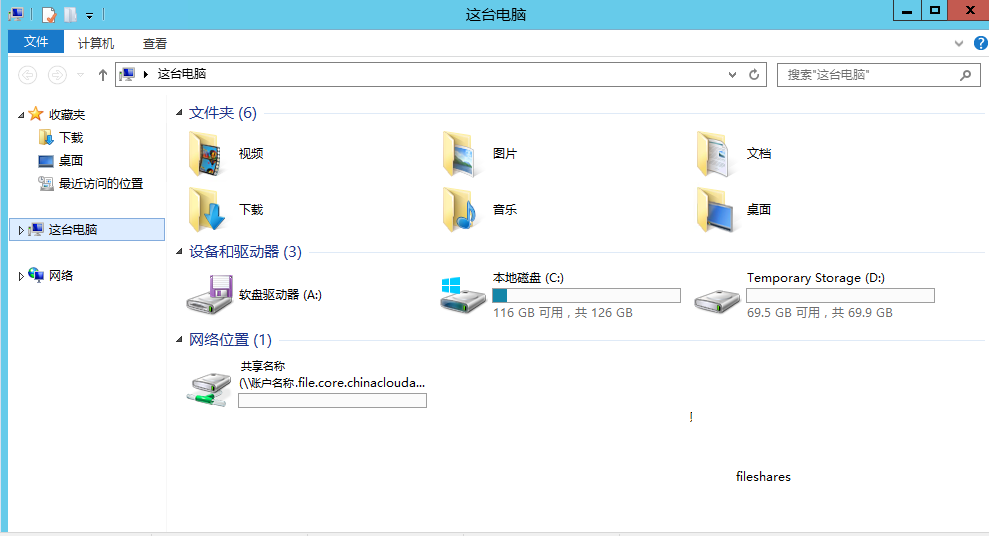
右击这台电脑 -> 点击映射网络驱动器

在文件夹输入框内输入 “\<帐户名称>.file.core.chinacloudapi.cn<共享名称>“,其中需要勾选“使用其他凭据连接“,因为我们使用的是存储账号和存储密钥的方式进行登陆。

然后在登录界面使用Azure存储的账号和密钥,之后我们就会在网络位置中看到我们的共享文件。
5) 如果文件共享不再需要了我们可以选择删除以避免不必要的费用,关于Azure 文件服务的收费请查看官网:http://www.windowsazure.cn/home/features/storage/#price ,我们可以通过下面的指令来执行删除操作:
a) 检索我们的Azure 文件服务下的所有共享文件
Get-AzureStorageShare -Context $ctx
b) 找到我们需要删除的共享文件名,执行删除操作
Remove-AzureStorageShare -Name <共享名称> -Context $ctx
至此我们就可以在Azure 虚拟机或者云服务中使用Azure 文件服务,但是需要注意的是映射网络驱动这种方式并不适用于本地环境,如果需要在本地环境中使用Azure 文件服务的话,我们就需要借助于File Storage API,下面的内容是演示如何使用.NET来实现企业内部环境使用Azure 文件服务,如果你使用其他语言你也可以尝试通过http请求的方式来实现,Rest API地址是: https://msdn.microsoft.com/zh-cn/library/azure/dn167006.aspx
1) 创建项目,安装Azure 存储NuGet包
a) 打开Visual Studio –> 选择File -> New Project –> Templates -> Visual C# -> 选择Console Application
b) 定义项目名为AzureFilesDemo
c) 右击项目选择” Manage NuGet Packages“,在搜索框内输入Azure Storage,然后安装Azure存储NuGet包。
2) 代码编写
a) 修改App.config


<?xml version="1.0" encoding="utf-8" ?>
<configuration>
  <configSections>
  </configSections>
  <startup>
    <supportedRuntime version="v4.0" sku=".NETFramework,Version=v4.5.2" />
  </startup>
  <connectionStrings>
    <add name="StorageConnectionString" connectionString="BlobEndpoint=https:// <Account Name>.blob.core.chinacloudapi.cn/;QueueEndpoint=https:// <Account Name>.queue.core.chinacloudapi.cn/;TableEndpoint=https:// <Account Name>.table.core.chinacloudapi.cn/;FileEndpoint=https:// <Account Name>.file.core.chinacloudapi.cn/;AccountName=<Account Name>;AccountKey=<Account Key>"/>                                                                                                                                                                                                  />
  </connectionStrings>
</configuration>
b) 在Program.cs中引入命名空间,并编写代码
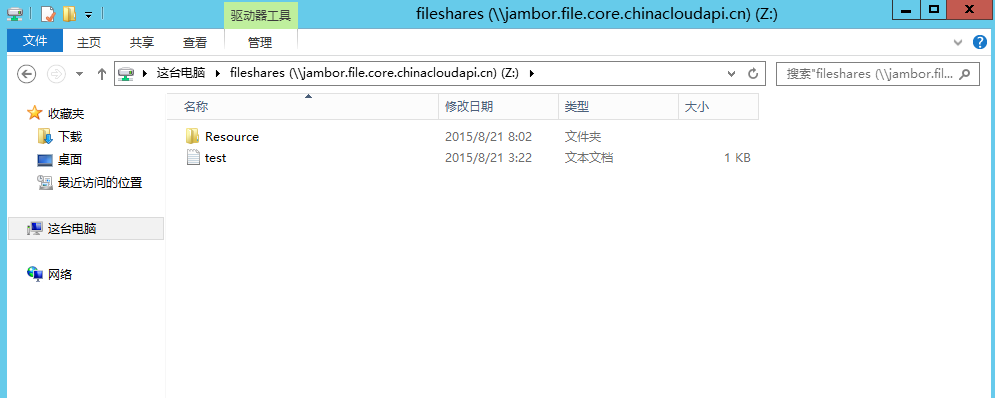
using System;
using System.Collections.Generic;
using System.Linq;
using System.Text;
using System.Threading.Tasks;
using Microsoft.WindowsAzure;
using Microsoft.WindowsAzure.Storage;
using Microsoft.WindowsAzure.Storage.Blob;
using Microsoft.WindowsAzure.Storage.File;
using System.Configuration;

namespace AzureFilesDemo
{
    class Program
    {
        static void Main(string[] args)
        {
            CloudStorageAccount storageAccount = CloudStorageAccount.Parse(ConfigurationManager.ConnectionStrings["StorageConnectionString"].ConnectionString);

            CloudFileClient fileClient = storageAccount.CreateCloudFileClient();
            CloudFileShare share = fileClient.GetShareReference("fileshares");
            if (share.Exists())
            {
                CloudFileDirectory rootDir = share.GetRootDirectoryReference();
                CloudFileDirectory sampleDir = rootDir.GetDirectoryReference("Resource");
                sampleDir.CreateIfNotExists();
            }
        }
    }
}
通过上述操作我们就可以在企业内部网络文件共享(”fileshares”)里创建一个名为”Resource”的文件夹,我在之前操作的虚拟机中也看到了这个文件夹如下图:
Note: Azure存储的连接字符串如下
DefaultEndpointsProtocol=https;AccountName={0};AccountKey={1};EndpointSuffix=core.chinacloudapi.cn;
Azure File SDK还提供了我们很多的功能,如果有兴趣,大家可以去研究下。