在WPF中Binding可以比作数据的桥梁,桥梁的两端分别是Binding的源(Source)和目标(Target)。一般情况下,Binding源是逻辑层对象,Binding目标是UI层的控件对象;这样,数据就会通过Binding送达UI层,被UI层展现。
首先我们创建一个名为Student的类,这个类的实例作为数据源在UI上显示:
    public class Student
    {
        private string name;
        public string Name
        {
            set { name = value; }
            get { return name; }
        }
    }
Binding是一种自动机制,当值变化后属性要有能力通知Binding,让Binding把变化传递给UI元素。怎样才能让一个属性具备这种通知Binding值已经变化的能力呢?方法是在属性的set语句中激发一个PropertyChanged事件。这个事件不需要我们自己声明,我们要做的是让作为数据源的类实现System.ComponentModel名称空间中的INotifyPropertyChanged接口。当为Binding设置了数据源后,Binding就会自动侦听来自这个接口的PropertyChanged事件。
    public class Student:INotifyPropertyChanged
    {
        private string name;
        public string Name
        {
            set
            {
                name = value;
                NotifyPropertyChanged("Name");
            }
            get { return name; }
        }

        public event PropertyChangedEventHandler PropertyChanged;

        private void NotifyPropertyChanged(string propertyName)
        {
            if (PropertyChanged != null)
            {
                PropertyChanged(this,new PropertyChangedEventArgs(propertyName));
            }
        }
    }
当Name属性的值发生变化时PropertyChanged事件就会被激发,Binding接收到这个事件后发现事件的消息告诉它是名为Name的属性发生了值得改变,于是就会通知Binding目标端的UI元素显示新的值。
XAML代码:
    <Grid>
        <TextBox x:Name="Box" HorizontalAlignment="Left" VerticalAlignment="Top" Margin="100,50,0,0"  Height="30" Width="200"/>
        <Button Content="按钮"  HorizontalAlignment="Left" VerticalAlignment="Top" Margin="120,150,0,0"  Height="30" Width="160" Click="Button_Click"/>
    </Grid>
C#代码:
public partial class MainWindow : Window
    {
        private Student student;
        public MainWindow()
        {
            InitializeComponent();
            student = new Student();
            Binding binding = new Binding();
            binding.Source = student;
            binding.Path = new PropertyPath("Name");
            BindingOperations.SetBinding(this.Box,TextBox.TextProperty,binding);
        }

        private void Button_Click(object sender, RoutedEventArgs e)
        {
            student.Name = DateTime.Now.ToString("yyyy-MM-dd hh:mm:ss");
        }
    }
其中:Binding binding=new Binding()声明Binding类型变量并创建实例,然后使用binding.Source=student为Binding实例指定数据源,最后使用binding.Path = new PropertyPath("Name")为Binding指定访问路径。把数据源和目标连接在一起的任务是使用BindingOperations.SetBinding(this.Box,TextBox.TextProperty,binding)方法完成的。
BindingOperations.SetBinding(this.Box,TextBox.TextProperty,binding)中的参数介绍:
第一个参数主要是指定Binding的目标。
第二个参数是用于为Binding指明将数据绑定到目标的那个属性中去,一般都为目标的依赖属性。
第三个参数是指定那个Binding将数据源与目标关联起来。
上面的代码还可以简化如下:
        private void SetBinding()
        {
            student = new Student();
            this.Box.SetBinding(TextBox.TextProperty, new Binding("Name") { Source=student});
        }
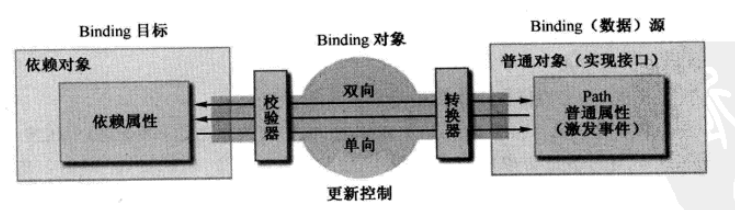
Binding模型如下: