Java 发送邮件
使用Java应用程序发送E-mail十分简单,但是首先你应该在你的机器上安装JavaMail API 和Java Activation Framework (JAF) 。
你可以在 JavaMail (Version 1.2) 下载最新的版本。
你可以再 在JAF (Version 1.1.1)下载最新的版本。
下载并解压这些文件,最上层文件夹你会发现很多的jar文件。你需要将mail.jar和activation.jar 添加到你的CLASSPATH中。
如果你使用第三方邮件服务器如QQ的SMTP服务器,可查看文章底部用户认证完整的实例。
发送一封简单的 E-mail
下面是一个发送简单E-mail的例子。假设你的localhost已经连接到网络。
// 文件名 SendEmail.java

import java.util.*;
import javax.mail.*;
import javax.mail.internet.*;
import javax.activation.*;

public class SendEmail
{
   public static void main(String [] args)
   {
      // 收件人电子邮箱
      String to = "abcd@gmail.com";

      // 发件人电子邮箱
      String from = "web@gmail.com";

      // 指定发送邮件的主机为 localhost
      String host = "localhost";

      // 获取系统属性
      Properties properties = System.getProperties();

      // 设置邮件服务器
      properties.setProperty("mail.smtp.host", host);

      // 获取默认session对象
      Session session = Session.getDefaultInstance(properties);

      try{
         // 创建默认的 MimeMessage 对象
         MimeMessage message = new MimeMessage(session);

         // Set From: 头部头字段
         message.setFrom(new InternetAddress(from));

         // Set To: 头部头字段
         message.addRecipient(Message.RecipientType.TO,
                                  new InternetAddress(to));

         // Set Subject: 头部头字段
         message.setSubject("This is the Subject Line!");

         // 设置消息体
         message.setText("This is actual message");

         // 发送消息
         Transport.send(message);
         System.out.println("Sent message successfully....");
      }catch (MessagingException mex) {
         mex.printStackTrace();
      }
   }
}
编译并运行这个程序来发送一封简单的E-mail:
$ java SendEmail
Sent message successfully....
如果你想发送一封e-mail给多个收件人,那么使用下面的方法来指定多个收件人ID:
void addRecipients(Message.RecipientType type,
                   Address[] addresses)
throws MessagingException
下面是对于参数的描述:
-
type:要被设置为TO, CC 或者BCC. 这里CC 代表抄送、BCC 代表秘密抄送y. 举例:Message.RecipientType.TO
-
addresses: 这是email ID的数组。在指定电子邮件ID时,你将需要使用InternetAddress()方法。
发送一封HTML E-mail
下面是一个发送HTML E-mail的例子。假设你的localhost已经连接到网络。
和上一个例子很相似,除了我们要使用setContent()方法来通过第二个参数为"text/html",来设置内容来指定要发送HTML内容。
// 文件名 SendHTMLEmail.java

import java.util.*;
import javax.mail.*;
import javax.mail.internet.*;
import javax.activation.*;

public class SendHTMLEmail
{
   public static void main(String [] args)
   {

      // 收件人电子邮箱
      String to = "abcd@gmail.com";

      // 发件人电子邮箱
      String from = "web@gmail.com";

      // 指定发送邮件的主机为 localhost
      String host = "localhost";

      // 获取系统属性
      Properties properties = System.getProperties();

      // 设置邮件服务器
      properties.setProperty("mail.smtp.host", host);

      // 获取默认的 Session 对象。
      Session session = Session.getDefaultInstance(properties);

      try{
         // 创建默认的 MimeMessage 对象。
         MimeMessage message = new MimeMessage(session);

         // Set From: 头部头字段
         message.setFrom(new InternetAddress(from));

         // Set To: 头部头字段
         message.addRecipient(Message.RecipientType.TO,
                                  new InternetAddress(to));

         // Set Subject: 头字段
         message.setSubject("This is the Subject Line!");

         // 发送 HTML 消息, 可以插入html标签
         message.setContent("<h1>This is actual message</h1>",
                            "text/html" );

         // 发送消息
         Transport.send(message);
         System.out.println("Sent message successfully....");
      }catch (MessagingException mex) {
         mex.printStackTrace();
      }
   }
}
编译并运行此程序来发送HTML e-mail:
$ java SendHTMLEmail
Sent message successfully....
发送带有附件的 E-mail
下面是一个发送带有附件的 E-mail的例子。假设你的localhost已经连接到网络。
// 文件名 SendFileEmail.java

import java.util.*;
import javax.mail.*;
import javax.mail.internet.*;
import javax.activation.*;

public class SendFileEmail
{
   public static void main(String [] args)
   {

      // 收件人电子邮箱
      String to = "abcd@gmail.com";

      // 发件人电子邮箱
      String from = "web@gmail.com";

      // 指定发送邮件的主机为 localhost
      String host = "localhost";

      // 获取系统属性
      Properties properties = System.getProperties();

      // 设置邮件服务器
      properties.setProperty("mail.smtp.host", host);

      // 获取默认的 Session 对象。
      Session session = Session.getDefaultInstance(properties);

      try{
         // 创建默认的 MimeMessage 对象。
         MimeMessage message = new MimeMessage(session);

         // Set From: 头部头字段
         message.setFrom(new InternetAddress(from));

         // Set To: 头部头字段
         message.addRecipient(Message.RecipientType.TO,
                                  new InternetAddress(to));

         // Set Subject: 头字段
         message.setSubject("This is the Subject Line!");

         // 创建消息部分
         BodyPart messageBodyPart = new MimeBodyPart();

         // 消息
         messageBodyPart.setText("This is message body");

         // 创建多重消息
         Multipart multipart = new MimeMultipart();

         // 设置文本消息部分
         multipart.addBodyPart(messageBodyPart);

         // 附件部分
         messageBodyPart = new MimeBodyPart();
         String filename = "file.txt";
         DataSource source = new FileDataSource(filename);
         messageBodyPart.setDataHandler(new DataHandler(source));
         messageBodyPart.setFileName(filename);
         multipart.addBodyPart(messageBodyPart);

         // 发送完整消息
         message.setContent(multipart );

         //   发送消息
         Transport.send(message);
         System.out.println("Sent message successfully....");
      }catch (MessagingException mex) {
         mex.printStackTrace();
      }
   }
}
编译并运行你的程序来发送一封带有附件的邮件。
$ java SendFileEmail
Sent message successfully....
用户认证部分
如果需要提供用户名和密码给e-mail服务器来达到用户认证的目的,你可以通过如下设置来完成:
 props.put("mail.smtp.auth", "true");
 props.setProperty("mail.user", "myuser");
 props.setProperty("mail.password", "mypwd");
e-mail其他的发送机制和上述保持一致。
需要用户名密码验证邮件发送实例:
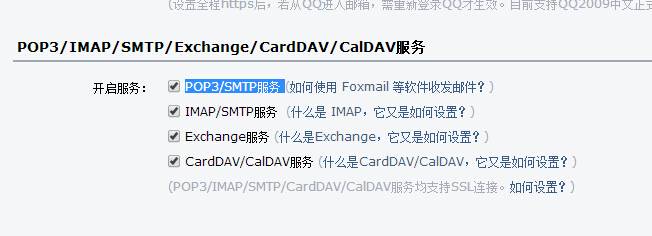
本实例以QQ邮件服务器为例,你需要在登录QQ邮箱后台在"设置"=》账号中开启POP3/SMTP服务 ,如下图所示:
Java 代码如下:
// 需要用户名密码邮件发送实例
//文件名 SendEmail2.java
//本实例以QQ邮箱为例,你需要在qq后台设置

import java.util.Properties;

import javax.mail.Authenticator;
import javax.mail.Message;
import javax.mail.MessagingException;
import javax.mail.PasswordAuthentication;
import javax.mail.Session;
import javax.mail.Transport;
import javax.mail.internet.InternetAddress;
import javax.mail.internet.MimeMessage;

public class SendEmail2
{
   public static void main(String [] args)
   {
      // 收件人电子邮箱
      String to = "xxx@qq.com";

      // 发件人电子邮箱
      String from = "xxx@qq.com";

      // 指定发送邮件的主机为 localhost
      String host = "smtp.qq.com";  //QQ 邮件服务器

      // 获取系统属性
      Properties properties = System.getProperties();

      // 设置邮件服务器
      properties.setProperty("mail.smtp.host", host);

      properties.put("mail.smtp.auth", "true");
      // 获取默认session对象
      Session session = Session.getDefaultInstance(properties,new Authenticator(){
	    public PasswordAuthentication getPasswordAuthentication()
	    {
	     return new PasswordAuthentication("xxx@qq.com", "qq邮箱密码"); //发件人邮件用户名、密码
	    }
	   });

      try{
         // 创建默认的 MimeMessage 对象
         MimeMessage message = new MimeMessage(session);

         // Set From: 头部头字段
         message.setFrom(new InternetAddress(from));

         // Set To: 头部头字段
         message.addRecipient(Message.RecipientType.TO,
                                  new InternetAddress(to));

         // Set Subject: 头部头字段
         message.setSubject("This is the Subject Line!");

         // 设置消息体
         message.setText("This is actual message");

         // 发送消息
         Transport.send(message);
         System.out.println("Sent message successfully....from w3cschool.cn");
      }catch (MessagingException mex) {
         mex.printStackTrace();
      }
   }
}