定义:实现了servlet接口的Java程序叫做servlet
1、新建maven项目,导入servlet依赖
        <dependency>
            <groupId>javax.servlet</groupId>
            <artifactId>javax.servlet-api</artifactId>
            <version>4.0.1</version>
        </dependency>
        <!-- servlet依赖的jar包start -->
        <!-- jsp依赖jar包start -->
        <dependency>
            <groupId>javax.servlet.jsp</groupId>
            <artifactId>javax.servlet.jsp-api</artifactId>
            <version>2.3.3</version>
        </dependency>
2、新建HelloServlet类,实现servlet接口,直接继承HttpServlet
//实现Servlet接口
public class HelloServlet extends HttpServlet {
    @Override
    protected void doGet(HttpServletRequest req, HttpServletResponse resp) throws ServletException, IOException {
        System.out.println("进入doget方法");
     PrintWriter writer = resp.getWriter();
        writer.print("Hello,Servlet");
    }

    @Override
    protected void doPost(HttpServletRequest req, HttpServletResponse resp) throws ServletException, IOException {
        doGet(req,resp);
    }
}
3、编写Hello.jsp,在WEB-INF目录下新建一个jsp的文件夹,新建hello.jsp
<%@ page contentType="text/html;charset=UTF-8" language="java" %>
<html>
<head>
    <title>Alan</title>
</head>
<body>
    ${msg}
</body>
</html>
4、在web.xml中注册Servlet,
<?xml version="1.0" encoding="UTF-8"?>
<web-app xmlns="http://xmlns.jcp.org/xml/ns/javaee"
         xmlns:xsi="http://www.w3.org/2001/XMLSchema-instance"
         xsi:schemaLocation="http://xmlns.jcp.org/xml/ns/javaee http://xmlns.jcp.org/xml/ns/javaee/web-app_4_0.xsd"
         version="4.0">
    <servlet>
        <servlet-name>HelloServlet</servlet-name>
        <servlet-class>com.alan.servlet.HelloServlet</servlet-class>
    </servlet>
    <servlet-mapping>
        <servlet-name>HelloServlet</servlet-name>
        <url-pattern>/user</url-pattern>
    </servlet-mapping>

</web-app>
5、配置Tomcat,并启动测试
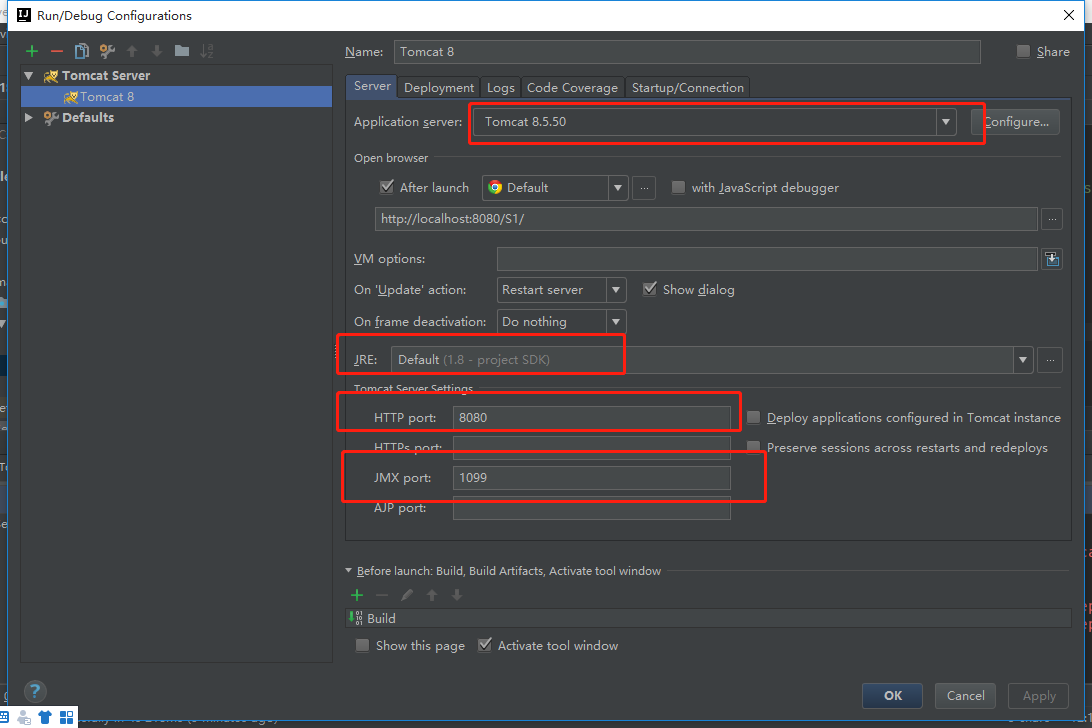
新增Artifact,选择war,右侧可自定义项目运行路径
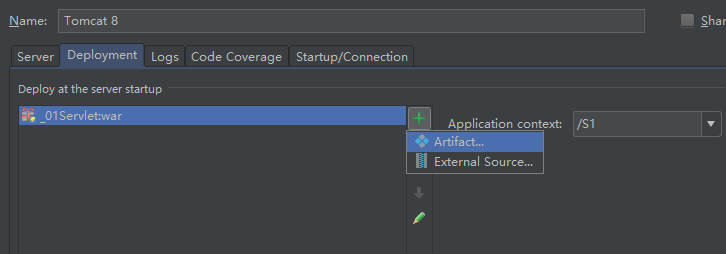
启动tomcat

小结:
servlet的映射过程,浏览器连接web服务,web服务通过已注册的信息找到对应的servlet进行访问

新增ErrorServlet类
public class ErrorServlet extends HttpServlet {
    @Override
    protected void doGet(HttpServletRequest req, HttpServletResponse resp) throws ServletException, IOException {
        resp.setContentType("text/html");
        resp.setCharacterEncoding("utf-8");

        PrintWriter writer = resp.getWriter();
        writer.print("<h1>404</h1>");
    }

    @Override
    protected void doPost(HttpServletRequest req, HttpServletResponse resp) throws ServletException, IOException {
        doGet(req,resp);
    }
}
web.xml注册ErrorServlet
  <servlet>
    <servlet-name>ErrorServlet</servlet-name>
    <servlet-class>com.alan.servlet.ErrorServlet</servlet-class>
  </servlet>
  <servlet-mapping>
    <servlet-name>ErrorServlet</servlet-name>
    <url-pattern>/*</url-pattern>
  </servlet-mapping>
启动tomcat测试


结论:指定了固有的映射路径优先级最高,如果找不到就会走默认
ServletContext
web服务启动时都会创建一个ServletContext,代表当前web应用,是Servlet池
不同的Servlet可以通过ServletContext共享数据
设置一个set和一个get,测试实现结果
ServletContext context = this.getServletContext();
context.setAttribute("username","alan");
ServletContext context = this.getServletContext();
String username = (String)context.getAttribute("username");
获取web.xml中的初始化参数
  <!-- 配置一些web应用初始化参数-->
  <context-param>
    <param-name>url</param-name>
    <param-value>jdbc:mysql://localhost:3306/mybatis</param-value>
  </context-param>
ServletContext context = this.getServletContext();
String url = context.getInitPatamter("url");
指定路径转发请求
//配置转发路径
RequestDispatcher requestDispatcher=context.getRequestDispatcher("/user");
//forward实现转发
requestDispatcher.forward(req,resp);
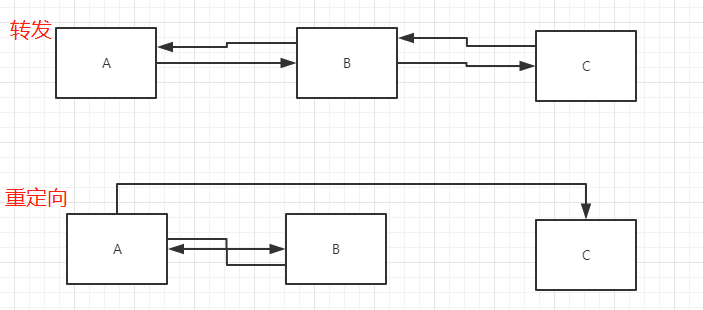
转发和重定向的概念
转发:A需要资源,只能去找B,B再去找C,再向A返回资源
重定向:A需要资源,A找到B,B告知A资源在C,A找C获得资源
异同:页面都实现跳转,请求转发URL不发生变化,重定向URL发生变化
读取资源文件
//db.properties
username=xxxx
password=xxxx
InputStream inputStream = this.getServletContext().getResourcesAsStream("/WEB-INF/classes/db.properties");
Properties prop = new Properties();
prop.load(inputStream);
String username = prop.getProperty("username");