typora-copy-images-to: img
一.接口代理方式实现Dao
1.1 代理开发方式介绍
采用 Mybatis 的代理开发方式实现 DAO 层的开发,这种方式是我们后面进入企业的主流。
Mapper 接口开发方法只需要程序员编写Mapper 接口(相当于Dao 接口),由Mybatis 框架根据接口定义创建接口的动态代理对象,代理对象的方法体同上边Dao接口实现类方法。
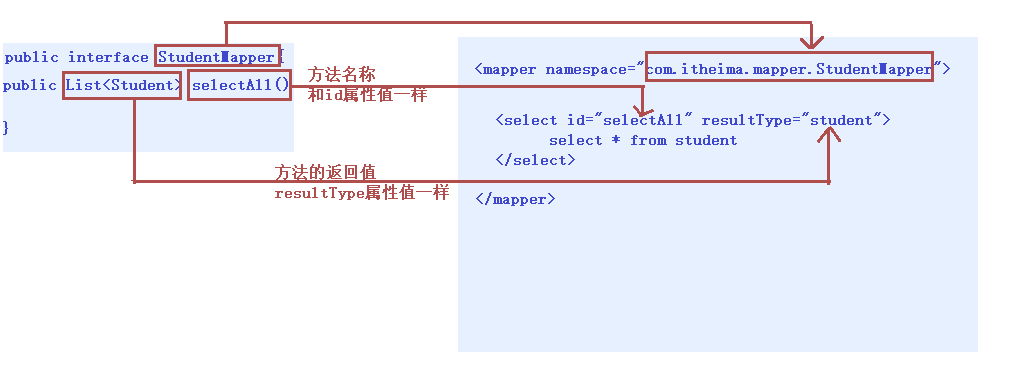
Mapper 接口开发需要遵循以下规范:
1) Mapper.xml文件中的namespace与mapper接口的全限定名相同
2) Mapper接口方法名和Mapper.xml中定义的每个statement的id相同
3) Mapper接口方法的输入参数类型和mapper.xml中定义的每个sql的parameterType的类型相同
4) Mapper接口方法的输出参数类型和mapper.xml中定义的每个sql的resultType的类型相同
总结:
接口开发的方式: 程序员只需定义接口,就可以对数据库进行操作,那么具体的对象怎么创建?
1.程序员负责定义接口
2.在操作数据库,mybatis框架根据接口,通过动态代理的方式生成代理对象,负责数据库的crud操作
1.2.编写StudentMapper接口
1.3 测试代理方式
 public Student selectById(Integer id) {
        Student stu = null;
        SqlSession sqlSession = null;
        InputStream is = null;
        try{
            //1.加载核心配置文件
            is = Resources.getResourceAsStream("MyBatisConfig.xml");

            //2.获取SqlSession工厂对象
            SqlSessionFactory sqlSessionFactory = new SqlSessionFactoryBuilder().build(is);

            //3.通过工厂对象获取SqlSession对象
            sqlSession = sqlSessionFactory.openSession(true);

            //4.获取StudentMapper接口的实现类对象
            StudentMapper mapper = sqlSession.getMapper(StudentMapper.class); // StudentMapper mapper = new StudentMapperImpl();

            //5.通过实现类对象调用方法,接收结果
            stu = mapper.selectById(id);

        } catch (Exception e) {

        } finally {
            //6.释放资源
            if(sqlSession != null) {
                sqlSession.close();
            }
            if(is != null) {
                try {
                    is.close();
                } catch (IOException e) {
                    e.printStackTrace();
                }
            }
        }

        //7.返回结果
        return stu;
    }
1.4 源码分析
-
分析动态代理对象如何生成的?
通过动态代理开发模式,我们只编写一个接口,不写实现类,我们通过 getMapper() 方法最终获取到 org.apache.ibatis.binding.MapperProxy 代理对象,然后执行功能,而这个代理对象正是 MyBatis 使用了 JDK 的动态代理技术,帮助我们生成了代理实现类对象。从而可以进行相关持久化操作。
-
分析方法是如何执行的?
动态代理实现类对象在执行方法的时候最终调用了 mapperMethod.execute() 方法,这个方法中通过 switch 语句根据操作类型来判断是新增、修改、删除、查询操作,最后一步回到了 MyBatis 最原生的 SqlSession 方式来执行增删改查。
1.5 知识小结
接口代理方式可以让我们只编写接口即可,而实现类对象由 MyBatis 生成。
实现规则 :
- 映射配置文件中的名称空间必须和 Dao 层接口的全类名相同。
- 映射配置文件中的增删改查标签的 id 属性必须和 Dao 层接口的方法名相同。
- 映射配置文件中的增删改查标签的 parameterType 属性必须和 Dao 层接口方法的参数相同。
- 映射配置文件中的增删改查标签的 resultType 属性必须和 Dao 层接口方法的返回值相同。
- 获取动态代理对象 SqlSession 功能类中的 getMapper() 方法。
二. 动态sql语句
2.1 动态sql语句概述
Mybatis 的映射文件中,前面我们的 SQL 都是比较简单的,有些时候业务逻辑复杂时,我们的 SQL是动态变化的,此时在前面的学习中我们的 SQL 就不能满足要求了。
参考的官方文档,描述如下:
2.2 动态 SQL 之<if>
我们根据实体类的不同取值,使用不同的 SQL语句来进行查询。比如在 id如果不为空时可以根据id查询,如果username 不同空时还要加入用户名作为条件。这种情况在我们的多条件组合查询中经常会碰到。
如下图:
<select id="findByCondition" parameterType="student" resultType="student">
    select * from student
    <where>
        <if test="id!=0">
            and id=#{id}
        </if>
        <if test="username!=null">
            and username=#{username}
        </if>
    </where>
</select>
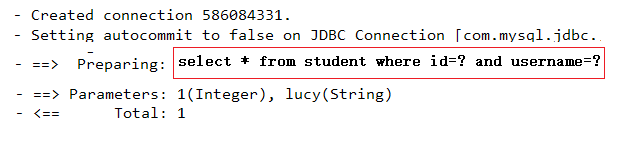
当查询条件id和username都存在时,控制台打印的sql语句如下:
     … … …
     //获得MyBatis框架生成的StudentMapper接口的实现类
    StudentMapper mapper = sqlSession.getMapper( StudentMapper.class);
    Student condition = new Student();
    condition.setId(1);
    condition.setUsername("lucy");
    Student student = mapper.findByCondition(condition);
    … … …
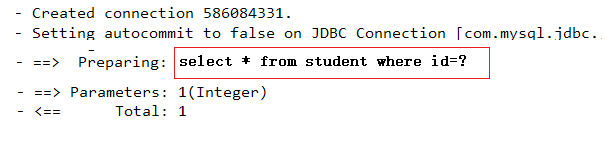
当查询条件只有id存在时,控制台打印的sql语句如下:
 … … …
 //获得MyBatis框架生成的UserMapper接口的实现类
 StudentMapper mapper = sqlSession.getMapper( StudentMapper.class);
    Student condition = new Student();
    condition.setId(1);
    Student student = mapper.findByCondition(condition);
… … …
总结语法:
<where>:条件标签。如果有动态条件,则使用该标签代替 where 关键字。
<if>:条件判断标签。
<if test=“条件判断”>
	查询条件拼接
</if>
2.3 动态 SQL 之<foreach>
循环执行sql的拼接操作,例如:SELECT * FROM student WHERE id IN (1,2,5)。
<select id="findByIds" parameterType="list" resultType="student">
   select * from student
   <where>
       <foreach collection="array" open="id in(" close=")" item="id" separator=",">
           #{id}
       </foreach>
   </where>
</select>
测试代码片段如下:
 … … …
 //获得MyBatis框架生成的UserMapper接口的实现类
StudentMapper mapper = sqlSession.getMapper(StudentMapper.class);
int[] ids = new int[]{2,5};
List<Student> sList = mapper.findByIds(ids);
System.out.println(sList);
… … …
总结语法:
<foreach>:循环遍历标签。适用于多个参数或者的关系。
    <foreach collection=“”open=“”close=“”item=“”separator=“”>
		获取参数
	</foreach>
属性
collection:参数容器类型, (list-集合, array-数组)。
open:开始的 SQL 语句。
close:结束的 SQL 语句。
item:参数变量名。
separator:分隔符。
2.4 SQL片段抽取
Sql 中可将重复的 sql 提取出来,使用时用 include 引用即可,最终达到 sql 重用的目的
<!--抽取sql片段简化编写-->
<sql id="selectStudent" select * from student</sql>
<select id="findById" parameterType="int" resultType="student">
    <include refid="selectStudent"></include> where id=#{id}
</select>
<select id="findByIds" parameterType="list" resultType="student">
    <include refid="selectStudent"></include>
    <where>
        <foreach collection="array" open="id in(" close=")" item="id" separator=",">
            #{id}
        </foreach>
    </where>
</select>
总结语法:
我们可以将一些重复性的 SQL 语句进行抽取,以达到复用的效果。
-  <sql>:抽取 SQL 语句标签。
-  <include>:引入 SQL 片段标签。
   <sql id=“片段唯一标识”>抽取的 SQL 语句</sql> <include refid=“片段唯一标识”/>
2.5 知识小结
MyBatis映射文件配置:
<select>:查询

<insert>:插入

<update>:修改

<delete>:删除

<where>:where条件

<if>:if判断

<foreach>:循环

<sql>:sql片段抽取
三. 分页插件
3.1 分页插件介绍
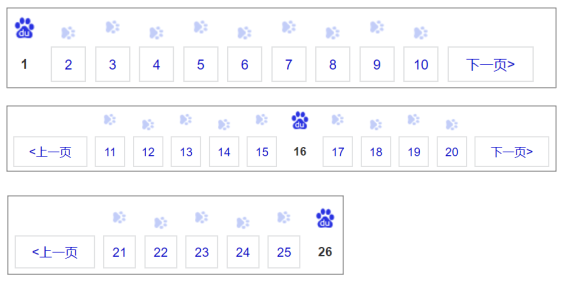
- 分页可以将很多条结果进行分页显示。
- 如果当前在第一页,则没有上一页。如果当前在最后一页,则没有下一页。
- 需要明确当前是第几页,这一页中显示多少条结果。
- MyBatis分页插件总结
- 在企业级开发中,分页也是一种常见的技术。而目前使用的 MyBatis 是不带分页功能的,如果想实现分页的 功能,需要我们手动编写 LIMIT 语句。但是不同的数据库实现分页的 SQL 语句也是不同的,所以手写分页 成本较高。这个时候就可以借助分页插件来帮助我们实现分页功能。
- PageHelper:第三方分页助手。将复杂的分页操作进行封装,从而让分页功能变得非常简单。
3.2 分页插件的使用
MyBatis可以使用第三方的插件来对功能进行扩展,分页助手PageHelper是将分页的复杂操作进行封装,使用简单的方式即可获得分页的相关数据
开发步骤:
①导入与PageHelper的jar包
②在mybatis核心配置文件中配置PageHelper插件
<!-- 注意:分页助手的插件  配置在通用mapper之前 -->
<plugin interceptor="com.github.pagehelper.PageHelper">
    <!-- 指定方言 -->
    <property name="dialect" value="mysql"/>
</plugin>
③测试分页数据获取
@Test
public void testPageHelper(){
    //设置分页参数
    PageHelper.startPage(1,2);

    List<User> select = userMapper2.select(null);
    for(User user : select){
        System.out.println(user);
    }
}
3.3 分页插件的参数获取
获得分页相关的其他参数:
//其他分页的数据
PageInfo<User> pageInfo = new PageInfo<User>(select);
System.out.println("总条数:"+pageInfo.getTotal());
System.out.println("总页数:"+pageInfo.getPages());
System.out.println("当前页:"+pageInfo.getPageNum());
System.out.println("每页显示长度:"+pageInfo.getPageSize());
System.out.println("是否第一页:"+pageInfo.isIsFirstPage());
System.out.println("是否最后一页:"+pageInfo.isIsLastPage());
3.4 分页插件知识小结
分页:可以将很多条结果进行分页显示。
-
分页插件 jar 包: pagehelper-5.1.10.jar jsqlparser-3.1.jar
-
:集成插件标签。 -
分页助手相关 API
1.PageHelper:分页助手功能类。
- startPage():设置分页参数
- PageInfo:分页相关参数功能类。
- getTotal():获取总条数
- getPages():获取总页数
- getPageNum():获取当前页
- getPageSize():获取每页显示条数
- getPrePage():获取上一页
- getNextPage():获取下一页
- isIsFirstPage():获取是否是第一页
- isIsLastPage():获取是否是最后一页
四.MyBatis的多表操作
4.1 多表模型介绍
我们之前学习的都是基于单表操作的,而实际开发中,随着业务难度的加深,肯定需要多表操作的。
- 多表模型分类 一对一:在任意一方建立外键,关联对方的主键。
- 一对多:在多的一方建立外键,关联一的一方的主键。
- 多对多:借助中间表,中间表至少两个字段,分别关联两张表的主键。
4.2 多表模型一对一操作
-
一对一模型: 人和身份证,一个人只有一个身份证
-
代码实现
-
步骤一: sql语句准备
CREATE TABLE person( id INT PRIMARY KEY AUTO_INCREMENT, NAME VARCHAR(20), age INT ); INSERT INTO person VALUES (NULL,'张三',23); INSERT INTO person VALUES (NULL,'李四',24); INSERT INTO person VALUES (NULL,'王五',25); CREATE TABLE card( id INT PRIMARY KEY AUTO_INCREMENT, number VARCHAR(30), pid INT, CONSTRAINT cp_fk FOREIGN KEY (pid) REFERENCES person(id) ); INSERT INTO card VALUES (NULL,'12345',1); INSERT INTO card VALUES (NULL,'23456',2); INSERT INTO card VALUES (NULL,'34567',3); -
步骤二:配置文件
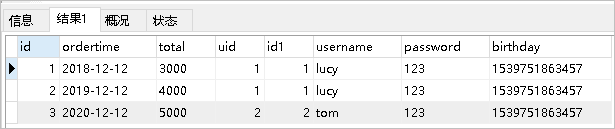
<?xml version="1.0" encoding="UTF-8" ?> <!DOCTYPE mapper PUBLIC "-//mybatis.org//DTD Mapper 3.0//EN" "http://mybatis.org/dtd/mybatis-3-mapper.dtd"> <mapper namespace="com.itheima.table01.OneToOneMapper"> <!--配置字段和实体对象属性的映射关系--> <resultMap id="oneToOne" type="card"> <id column="cid" property="id" /> <result column="number" property="number" /> <!-- association:配置被包含对象的映射关系 property:被包含对象的变量名 javaType:被包含对象的数据类型 --> <association property="p" javaType="person"> <id column="pid" property="id" /> <result column="name" property="name" /> <result column="age" property="age" /> </association> </resultMap> <select id="selectAll" resultMap="oneToOne"> SELECT c.id cid,number,pid,NAME,age FROM card c,person p WHERE c.pid=p.id </select> </mapper> -
步骤三:测试类
 @Test
    public void selectAll() throws Exception{
        //1.加载核心配置文件
        InputStream is = Resources.getResourceAsStream("MyBatisConfig.xml");

        //2.获取SqlSession工厂对象
        SqlSessionFactory sqlSessionFactory = new SqlSessionFactoryBuilder().build(is);

        //3.通过工厂对象获取SqlSession对象
        SqlSession sqlSession = sqlSessionFactory.openSession(true);

        //4.获取OneToOneMapper接口的实现类对象
        OneToOneMapper mapper = sqlSession.getMapper(OneToOneMapper.class);

        //5.调用实现类的方法,接收结果
        List<Card> list = mapper.selectAll();

        //6.处理结果
        for (Card c : list) {
            System.out.println(c);
        }

        //7.释放资源
        sqlSession.close();
        is.close();
    }
3.一对一配置总结:
<resultMap>:配置字段和对象属性的映射关系标签。 id 属性:唯一标识 type 属性:实体对象类型 <id>:配置主键映射关系标签。 <result>:配置非主键映射关系标签。 column 属性:表中字段名称 property 属性: 实体对象变量名称 <association>:配置被包含对象的映射关系标签。 property 属性:被包含对象的变量名 javaType 属性:被包含对象的数据类型 -
4.3 多表模型一对多操作
-
一对多模型: 一对多模型:班级和学生,一个班级可以有多个学生。
-
代码实现
-
步骤一: sql语句准备
CREATE TABLE classes( id INT PRIMARY KEY AUTO_INCREMENT, NAME VARCHAR(20) ); INSERT INTO classes VALUES (NULL,'黑马一班'); INSERT INTO classes VALUES (NULL,'黑马二班'); CREATE TABLE student( id INT PRIMARY KEY AUTO_INCREMENT, NAME VARCHAR(30), age INT, cid INT, CONSTRAINT cs_fk FOREIGN KEY (cid) REFERENCES classes(id) ); INSERT INTO student VALUES (NULL,'张三',23,1); INSERT INTO student VALUES (NULL,'李四',24,1); INSERT INTO student VALUES (NULL,'王五',25,2); INSERT INTO student VALUES (NULL,'赵六',26,2); -
步骤二:配置文件
<mapper namespace="com.itheima.table02.OneToManyMapper"> <resultMap id="oneToMany" type="classes"> <id column="cid" property="id"/> <result column="cname" property="name"/> <!-- collection:配置被包含的集合对象映射关系 property:被包含对象的变量名 ofType:被包含对象的实际数据类型 --> <collection property="students" ofType="student"> <id column="sid" property="id"/> <result column="sname" property="name"/> <result column="sage" property="age"/> </collection> </resultMap> <select id="selectAll" resultMap="oneToMany"> SELECT c.id cid,c.name cname,s.id sid,s.name sname,s.age sage FROM classes c,student s WHERE c.id=s.cid </select> </mapper> -
步骤三:测试类
    @Test
    public void selectAll() throws Exception{
        //1.加载核心配置文件
        InputStream is = Resources.getResourceAsStream("MyBatisConfig.xml");

        //2.获取SqlSession工厂对象
        SqlSessionFactory sqlSessionFactory = new SqlSessionFactoryBuilder().build(is);

        //3.通过工厂对象获取SqlSession对象
        SqlSession sqlSession = sqlSessionFactory.openSession(true);

        //4.获取OneToManyMapper接口的实现类对象
        OneToManyMapper mapper = sqlSession.getMapper(OneToManyMapper.class);

        //5.调用实现类的方法,接收结果
        List<Classes> classes = mapper.selectAll();

        //6.处理结果
        for (Classes cls : classes) {
            System.out.println(cls.getId() + "," + cls.getName());
            List<Student> students = cls.getStudents();
            for (Student student : students) {
                System.out.println("	" + student);
            }
        }

        //7.释放资源
        sqlSession.close();
        is.close();
    }
3.一对多配置文件总结:
<resultMap>:配置字段和对象属性的映射关系标签。 id 属性:唯一标识 type 属性:实体对象类型 <id>:配置主键映射关系标签。 <result>:配置非主键映射关系标签。 column 属性:表中字段名称 property 属性: 实体对象变量名称 <collection>:配置被包含集合对象的映射关系标签。 property 属性:被包含集合对象的变量名 ofType 属性:集合中保存的对象数据类型 -
4.4 多表模型多对多操作
-
多对多模型:学生和课程,一个学生可以选择多门课程、一个课程也可以被多个学生所选择。
-
代码实现
-
步骤一: sql语句准备
CREATE TABLE course( id INT PRIMARY KEY AUTO_INCREMENT, NAME VARCHAR(20) ); INSERT INTO course VALUES (NULL,'语文'); INSERT INTO course VALUES (NULL,'数学'); CREATE TABLE stu_cr( id INT PRIMARY KEY AUTO_INCREMENT, sid INT, cid INT, CONSTRAINT sc_fk1 FOREIGN KEY (sid) REFERENCES student(id), CONSTRAINT sc_fk2 FOREIGN KEY (cid) REFERENCES course(id) ); INSERT INTO stu_cr VALUES (NULL,1,1); INSERT INTO stu_cr VALUES (NULL,1,2); INSERT INTO stu_cr VALUES (NULL,2,1); INSERT INTO stu_cr VALUES (NULL,2,2); -
步骤二:配置文件
<?xml version="1.0" encoding="UTF-8" ?> <!DOCTYPE mapper PUBLIC "-//mybatis.org//DTD Mapper 3.0//EN" "http://mybatis.org/dtd/mybatis-3-mapper.dtd"> <mapper namespace="com.itheima.table03.ManyToManyMapper"> <resultMap id="manyToMany" type="student"> <id column="sid" property="id"/> <result column="sname" property="name"/> <result column="sage" property="age"/> <collection property="courses" ofType="course"> <id column="cid" property="id"/> <result column="cname" property="name"/> </collection> </resultMap> <select id="selectAll" resultMap="manyToMany"> SELECT sc.sid,s.name sname,s.age sage,sc.cid,c.name cname FROM student s,course c,stu_cr sc WHERE sc.sid=s.id AND sc.cid=c.id </select> </mapper> -
步骤三:测试类
 @Test
    public void selectAll() throws Exception{
        //1.加载核心配置文件
        InputStream is = Resources.getResourceAsStream("MyBatisConfig.xml");

        //2.获取SqlSession工厂对象
        SqlSessionFactory sqlSessionFactory = new SqlSessionFactoryBuilder().build(is);

        //3.通过工厂对象获取SqlSession对象
        SqlSession sqlSession = sqlSessionFactory.openSession(true);

        //4.获取ManyToManyMapper接口的实现类对象
        ManyToManyMapper mapper = sqlSession.getMapper(ManyToManyMapper.class);

        //5.调用实现类的方法,接收结果
        List<Student> students = mapper.selectAll();

        //6.处理结果
        for (Student student : students) {
            System.out.println(student.getId() + "," + student.getName() + "," + student.getAge());
            List<Course> courses = student.getCourses();
            for (Course cours : courses) {
                System.out.println("	" + cours);
            }
        }

        //7.释放资源
        sqlSession.close();
        is.close();
    }
3.多对多配置文件总结:
<resultMap>:配置字段和对象属性的映射关系标签。 id 属性:唯一标识 type 属性:实体对象类型 <id>:配置主键映射关系标签。 <result>:配置非主键映射关系标签。 column 属性:表中字段名称 property 属性: 实体对象变量名称 <collection>:配置被包含集合对象的映射关系标签。 property 属性:被包含集合对象的变量名 ofType 属性:集合中保存的对象数据类型 -
4.5 多表模型操作总结
 <resultMap>:配置字段和对象属性的映射关系标签。
    id 属性:唯一标识
    type 属性:实体对象类型
<id>:配置主键映射关系标签。
<result>:配置非主键映射关系标签。
	column 属性:表中字段名称
	property 属性: 实体对象变量名称
<association>:配置被包含对象的映射关系标签。
	property 属性:被包含对象的变量名
	javaType 属性:被包含对象的数据类型
<collection>:配置被包含集合对象的映射关系标签。
	property 属性:被包含集合对象的变量名
	ofType 属性:集合中保存的对象数据类型