转自 http://wsfdl.com/openstack/2016/01/13/Keystone%E9%9B%86%E6%88%90LDAP.html
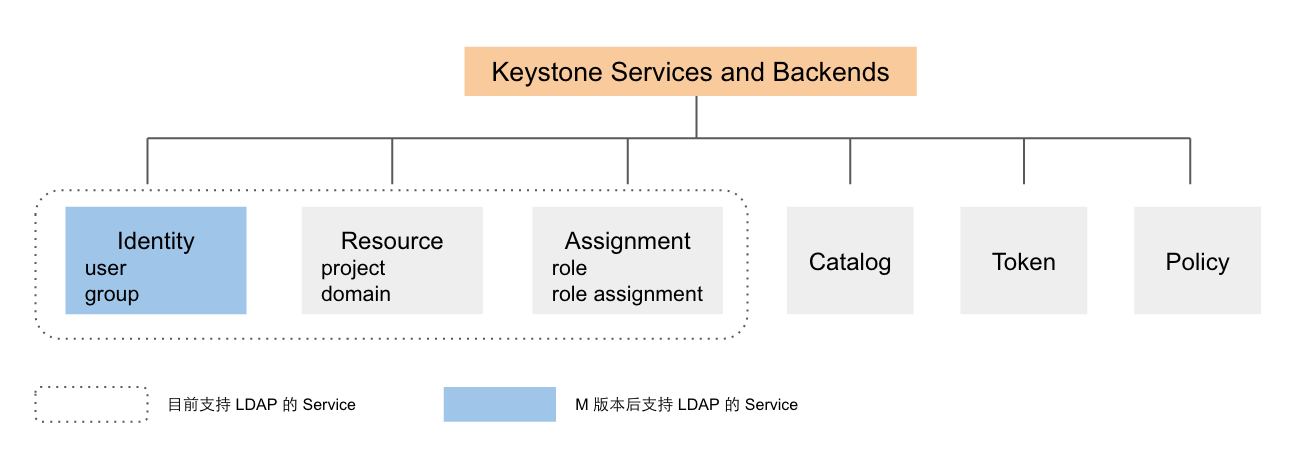
得益于 Keystone 优良的架构,它允许 Service 适配多种 Backend。Keystone 目前有 Identity, Resource, Assigment, Token, Policy, Catatlog 等 service,在 K 版本中,Identity, Resource, Assigment 都支持 LDAP 作为其 Backend,但是因为 Resource 和 Assigment 中的某些属性在 LDAP 并不能很好的支持,因此从 M 版本后,只有 Idendity 支持 LDAP 作为 Backend。本文的例子也仅将 Identity 的数据存储在 LDAP 中,其它 Services 的数据依旧存储在 SQL 里。
- Identity: User and Group
- Resource: Project and Domain
- Assigment: Role and Role Assigment
基本配置如下:
- Linux: Ubuntu 14.04 LTS
- OpenStack: Kilo
- LDAP: slapd 2.4.31
LDAP 的 DN(Distinguished Names) 默认由主机域名生成,本地的 DNS 设置如下:
root@ubuntu:~# cat /etc/hosts
10.10.1.100    keystone.com
127.0.0.1   localhost
Install LDAP
sudo apt-get install slapd ldap-utils
安装完成后可通过以下命令和步骤完成 LDAP 的基本配置:
sudo dpkg-reconfigure slapd


* Omit OpenLDAP server configuration? No

* DNS domain name?  keystone.com

* Organization name?  admin

* Administrator password? YourPassword

* Use the password you configured during installation, or choose another one
  Database backend to use? HDB

* Remove the database when slapd is purged? No

* Move old database? Yes

* Allow LDAPv2 protocol? No
Configure LDAP
由于 LDAP 的用户属性和 Keystone 默认的用户属性有所差异,所以 LDAP 需生成与 Keystone 中的 User 和 Group 相匹配的对象,可通过以下脚本(add_user_group.ldif)添加该对象,并生成 demo 和 admin 两个用户。
# Users
dn: ou=users,dc=keystone,dc=com
ou: users
objectClass: organizationalUnit

# Group
dn: ou=groups,dc=keystone,dc=com
objectClass: organizationalUnit
ou: groups

# demo user
dn: cn=demo,ou=users,dc=keystone,dc=com
cn: demo
displayName: demo
givenName: demo
mail: demo@example.com
objectClass: inetOrgPerson
objectClass: top
sn: demo
uid: demo
userPassword: 123456

# admin user
dn: cn=admin,ou=users,dc=keystone,dc=com
cn: admin
displayName: admin
givenName: admin
mail: admin@example.com
objectClass: inetOrgPerson
objectClass: top
sn: admin
uid: admin
userPassword: 123456
由以下命令把上述配置文件内容更新至 LDAP:
ldapadd -x -W -D "cn=admin,dc=example,dc=com" -f add_user_group.ldif
Keystone 的配置文件如下:
[identity]
driver = keystone.identity.backends.ldap.Identity

[assignment]
driver = keystone.assignment.backends.sql.Assignment

[ldap]
# LDAP 服务器地址,tree_dn 目录下管理员的账号和密码等
url = ldap://keystone.com
query_scope = sub
user = "cn=admin,dc=keystone,dc=com"
password = 123456
tree_dn = "dc=keystone,dc=com"

# 以下配置定义 Keystone 和 LDAP 二者的属性的 mapping 关系。
user_tree_dn = "ou=users,dc=keystone,dc=com"
user_objectclass = inetOrgPerson
user_id_attribute = cn
user_name_attribute = cn
user_mail_attribute = mail
user_pass_attribute = userPassword
user_enabled_attribute = enabled

group_tree_dn = "ou=groups,dc=keystone,dc=com"
group_objectclass = groupOfUniqueNames
group_id_attribute = cn
group_name_attribute = cn
group_member_attribute = uniquemember
group_desc_attribute = description

user_allow_create = true
user_allow_update = true
user_allow_delete = true

group_allow_create = true
group_allow_update = true
group_allow_delete = true
Test
用 admin_token 创建 project 和 role,并赋予 demo 和 admin 用户在 project 中的 role 后,即可使用该用户获得 scope token 访问 Keystone 的 API。
root@ubuntu:~# openstack user list
+--------------------+--------------------+
| ID                 | Name               |
+--------------------+--------------------+
| demo               | demo               |
| admin              | admin              |
+--------------------+--------------------+

root@ubuntu:~# openstack user show demo
+-----------+------------------+
| Field     | Value            |
+-----------+------------------+
| domain_id | default          |
| email     | demo@example.com |
| id        | demo             |
| name      | demo             |
+-----------+------------------+

root@ubuntu:~# openstack user create hello --password 123456
+-----------+----------------------------------+
| Field     | Value                            |
+-----------+----------------------------------+
| domain_id | default                          |
| enabled   | True                             |
| id        | hello                            |
| name      | hello                            |
+-----------+----------------------------------+

root@ubuntu:~# openstack project create test_project
+-------------+----------------------------------+
| Field       | Value                            |
+-------------+----------------------------------+
| description |                                  |
| domain_id   | default                          |
| enabled     | True                             |
| id          | cbdf05b17cf54587b3b58a11f49252e7 |
| name        | test_project                     |
+-------------+----------------------------------+