|
mydb1 |
Ops Manager,mongodb,agent |
|
mydb2 |
mongodb,agent |
|
mydb3 |
mongodb,agent |
NUMA Settings
sysctl -w vm.zone_reclaim_mode=0
NTP Settings
yum install -y ntp/etc/init.d/ntpd start
Turn off Atime
vim /etc/fstab/dev/mapper/VolGroup-lv_data /data ext4 defaults,noatime,nodiratime 1 1
ulimt settings
ulimit -a
修改/etc/security/limits.conf
mongod soft nproc 65535
mongod hard nproc 65535
Disable Transparent Huge Pages
通过启动脚本可以在每次启动时关闭THP
vim /etc/init.d/disable-transparent-hugepages
#以下为脚本内容
#!/bin/bash
### BEGIN INIT INFO
# Provides: disable-transparent-hugepages
# Required-Start: $local_fs
# Required-Stop:
# X-Start-Before: mongod mongodb-mms-automation-agent
# Default-Start: 2 3 4 5
# Default-Stop: 0 1 6
# Short-Description: Disable Linux transparent huge pages
# Description: Disable Linux transparent huge pages, to improve
# database performance.
### END INIT INFO
case $1 in
start)
if [ -d /sys/kernel/mm/transparent_hugepage ]; then
thp_path=/sys/kernel/mm/transparent_hugepage
elif [ -d /sys/kernel/mm/redhat_transparent_hugepage ]; then
thp_path=/sys/kernel/mm/redhat_transparent_hugepage
else
return 0
fi
echo 'never' > ${thp_path}/enabled
echo 'never' > ${thp_path}/defrag
re='^[0-1]+$'
if [[ $(cat ${thp_path}/khugepaged/defrag) =~ $re ]]
then
# RHEL 7
echo 0 > ${thp_path}/khugepaged/defrag
else
# RHEL 6
echo 'no' > ${thp_path}/khugepaged/defrag
fi
unset re
unset thp_path
;;esac
检查是否生效
cat /sys/kernel/mm/transparent_hugepage/enabledcat /sys/kernel/mm/transparent_hugepage/defrag
#有以下输出表示正确
always madvise [never]
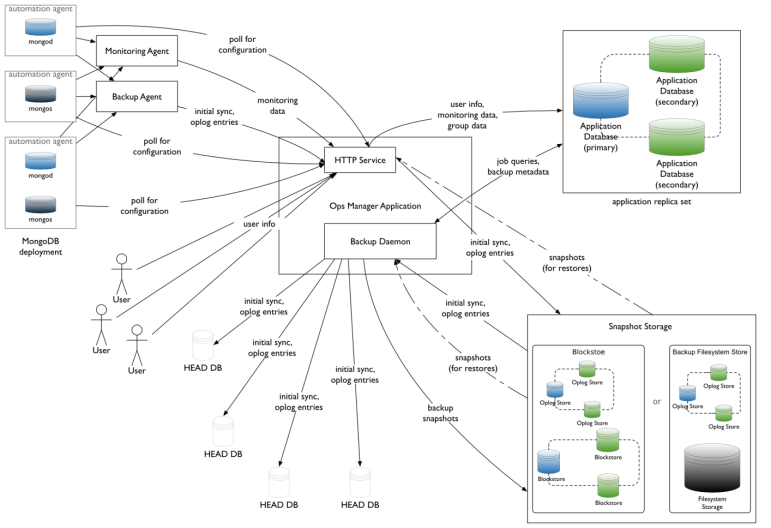
1、Install the Ops Manager Application Database
Ops Manager需要先安装mongodb,创建其数据库副本集后才能部署安装。
官方的yum源比较慢,推荐使用阿里云yum源
# 阿里云repo
cat > /etc/yum.repos.d/mongodb-org-3.4.repo << EOF
[mongodb-org-3.4]
name=MongoDB Repository
#baseurl=https://repo.mongodb.org/yum/redhat/$releasever/mongodb-org/3.4/x86_64/
baseurl=https://mirrors.aliyun.com/mongodb/yum/redhat/$releasever/mongodb-org/3.4/x86_64/
gpgcheck=0
enabled=1
gpgkey=https://www.mongodb.org/static/pgp/server-3.4.asc
EOF
安装mongod
在每台节点上执行以下步骤
yum install -y mongodb-org
修改配置
vim /etc/mongod.conf
#修改为数据分区,需创建该目录,并确保mongod用户可读写
# Where and how to store data.
storage:
dbPath: /data/mongo
journal:
enabled: true
#默认监听本地lo,注释掉
# network interfaces
net:
port: 27017
# bindIp: 127.0.0.1 # Listen to local interface only, comment to listen on all interfaces.
启动服务
mkdir -p /data/mongo
chown -R mongod:mongod /data
systemctl start mongod.service
部署Ops Manager副本集
通过修改配置文件的方式创建Ops Manager所需副本集。
注:也可以通过命令行方式指定副本集启动。修改配置文件的方式便于通过init script管理。
在所有节点上修改配置
vim mongod.conf
#添加以下内容
replication:
replSetName: rs_ops_manager
#重启生效
systemctl start mongod.service
在任一节点上执行mongo shell,添加副本集节点,此处使用node1节点
mongo --host localhost --port 27017
#Initiate the replica set
rs.initiate()
#display the replica set configuration object
rs.conf()
#Add the remaining members to the replica set
rs.add("mydb2")
rs.add("mydb3")
#Check the status of the replica set
rs.status()
2、Install Ops Manager
#下载安装wget -c https://downloads.mongodb.com/on-prem-mms/rpm/mongodb-mms-3.4.15.646-1.x86_64.rpm
rpm -ivh mongodb-mms-<version>.x86_64.rpm
Configure the Ops Manager connection to the Ops Manager Application Database
vim /opt/mongodb/mms/conf/conf-mms.properties
#设置mongo.mongoUri
mongo.mongoUri=mongodb://mydb1:27017,mydb2:27017,mydb3:27017/?replicaSet=rs_ops_manager
/etc/init.d/mongodb-mms start
Generating new Ops Manager private key...
Starting pre-flight checks
Successfully finished pre-flight checks
Migrate Ops Manager data
Running migrations...[ OK ]
Start Ops Manager server
Instance 0 starting...................[ OK ]
Starting pre-flight checks
Successfully finished pre-flight checks
Start Backup Daemon...[ OK ]
Open the Ops Manager home page and register the first user.
- http://<host>:8080
- Click the Register link and follow the prompts to register the first user and create the first group. The first user is automatically assigned the Global Owner role.
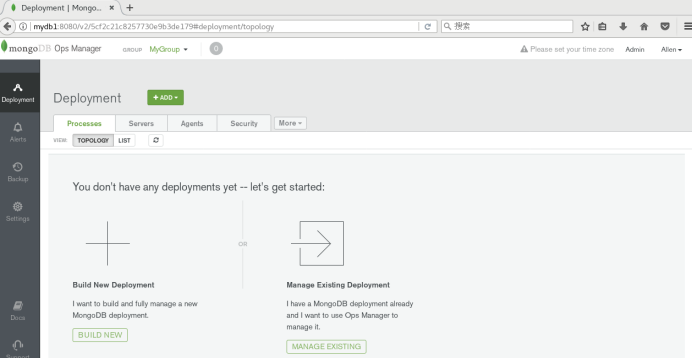
3、配置MongoDB Ops Manager
3.1 打开Ops管理界面
通过服务ops的8080端口,即可打开web管理界面,如下图所示:
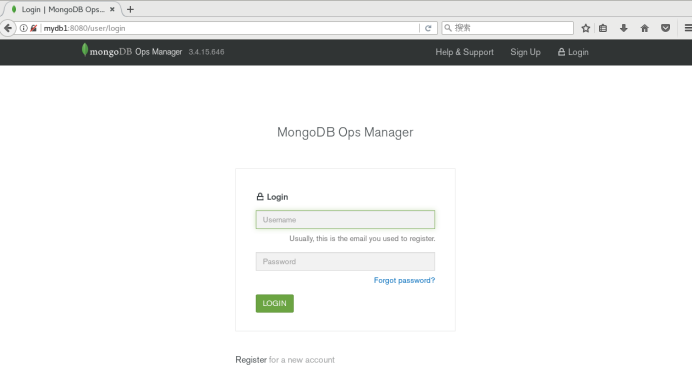
3.2 注册管理员账号

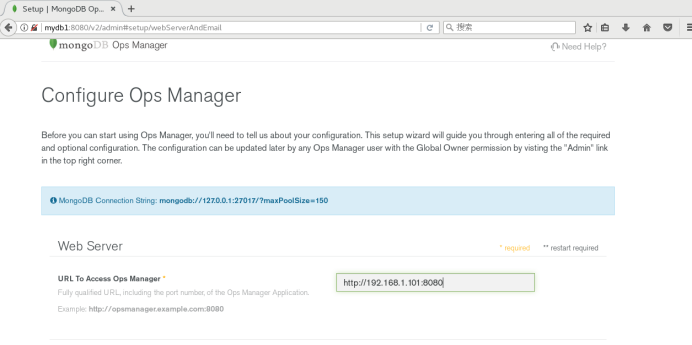
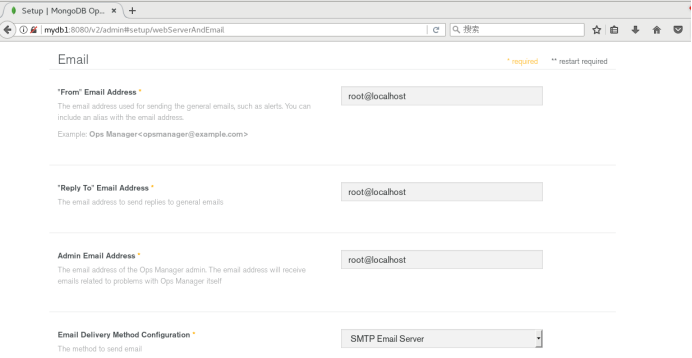
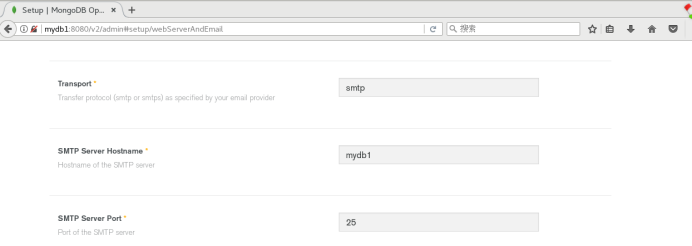
3.3 设置Web Server和Email
设置Web Server和Email,其他的默认即可,如下图所示:
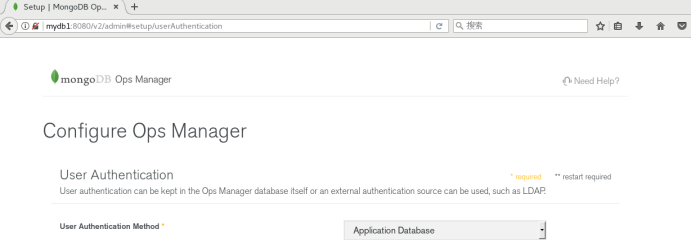
3.4 设置用户认证方式
这里使用默认的application database,如下图:
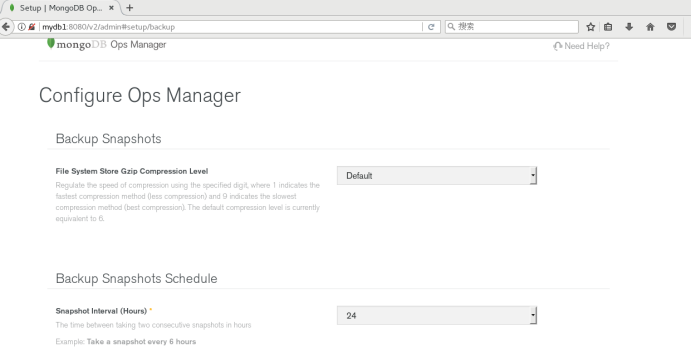
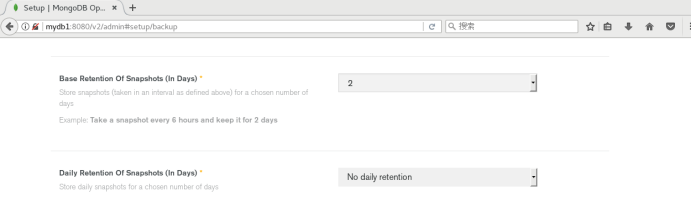
3.5 备份快照设置
使用默认的设置即可,如下图:
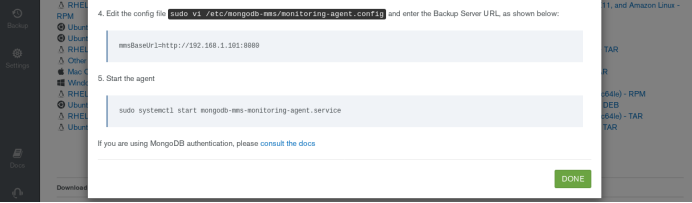
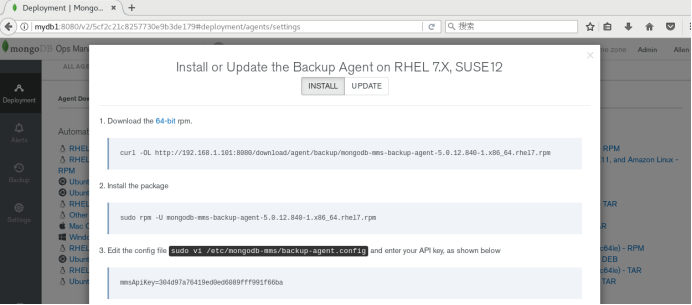
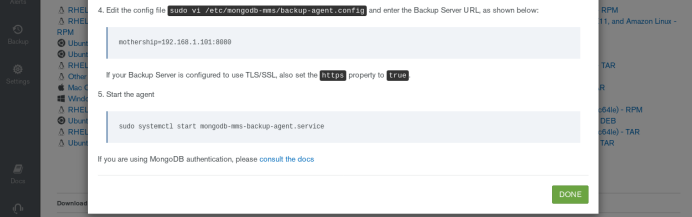
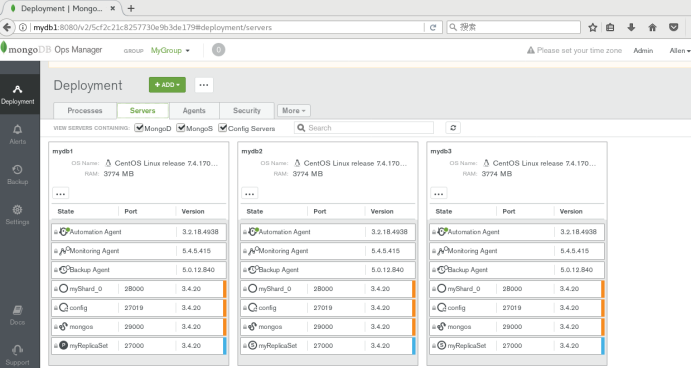
4、配置MongoDB Ops Manager Agent
依次点击Agents->Download & Settings, 会出现所有的代理信息,如图所示:
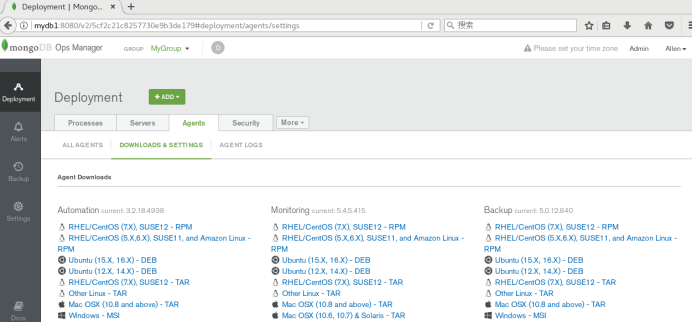
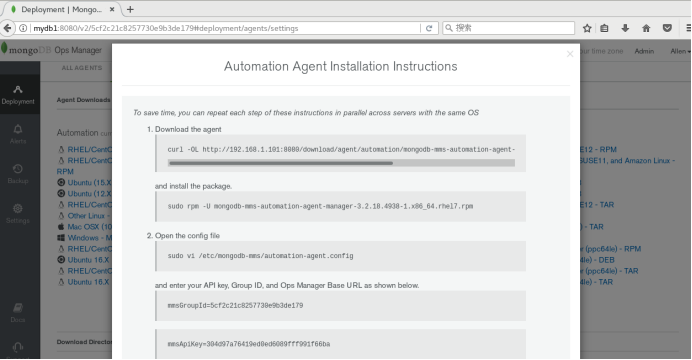
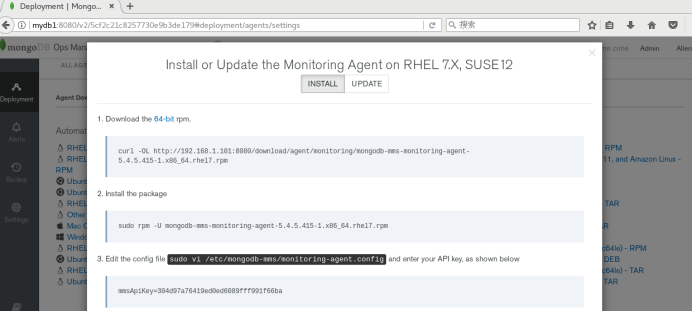
安装Automation,Monitoring,Backup。环境的操作系统是Oracle Linux 7,所以点击Centos 7对应的rpm连接,弹出安装操作步骤:

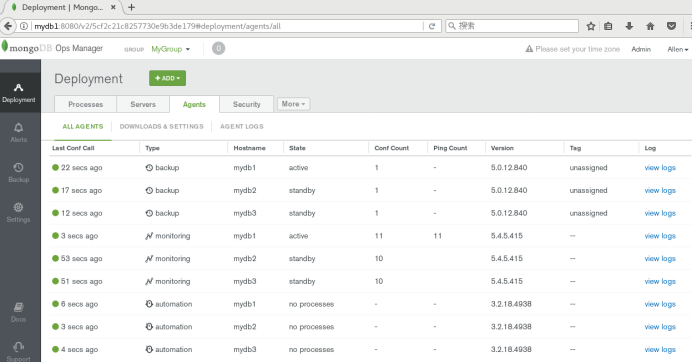
待所有的代理安装配置完成后,会在web管理界面看到,如下图所示:
5、通过Ops Manager自动化部署repl和shard集群
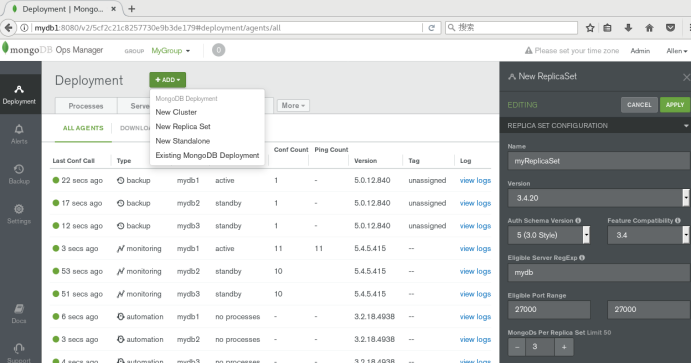

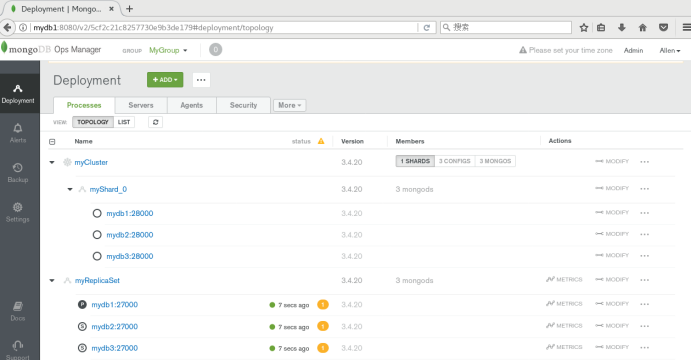
Create or Import a MongoDB Deployment
Manage Deployments
Alerts and Monitoring
Back Up and Restore Deployments
https://www.cnblogs.com/wsl222000/p/6742504.html
https://www.iyunv.com/thread-385560-1-1.html
https://blog.51cto.com/candon123/2162461
http://www.mamicode.com/info-detail-2420298.html