Introduction to Tkinter
原英文教程地址zetcode.com
In this part of the Tkinter tutorial, we introduce the Tkinter toolkit and create our first programs.
The purpose of this tutorial is to get you started with the Tkinter toolkit.
在 Tkinter 教程的这一部分,我们将介绍 Tkinter 工具集并且创建我们的第一个程序。
这个教程的目的是让你使用 Tkinter 工具集开始一段新的征程。
Tkinter
Tkinter is a Python binding to the Tk GUI toolkit. Tk is the original GUI library for the Tcl language. Tkinter is implemented as a Python wrapper around a complete Tcl interpreter embedded in the Python interpreter. There are several other popular Python GUI toolkits. Most popular are wxPython, PyQt, and PyGTK.
Tkinter 是 python 内置的 TK GUI 工具集。TK 是 Tcl 语言的原生 GUI 库。作为 python 的图形设计工具,它所使用的 Tcl 语言环境已经完全嵌入到了 python 解释器中。当然还有一些其他比较著名的 python GUI 工具。比如著名的 wxPython,PyQt 和 PyGTK。
Python
Python is a general-purpose, dynamic, object-oriented programming language. The design purpose of the Python language emphasizes programmer productivity and code readability. Python was initially developed by Guido van Rossum. It was first released in 1991. Python was inspired by ABC, Haskell, Java, Lisp, Icon, and Perl programming languages. Python is a high-level, general-purpose, multiplatform, interpreted language. Python is a minimalistic language. One of its most visible features is that it does not use semicolons nor brackets; Python uses indentation instead. There are two main branches of Python currently: Python 2.x and Python 3.x. Python 3.x breaks backward compatibility with previous releases of Python. It was created to correct some design flaws of the language and make the language more clean. This tutorial is written in Python 2.x. Most of the code is written in Python 2.x versions. It will take some time till the software base and programmers will migrate to Python 3.x. Today, Python is maintained by a large group of volunteers worldwide. Python is open source software.
Python is an ideal start for those who want to learn programming.
python 是一个通用的、动态的和面向对象的编程语言。设计 python 的时候就强调使用 python 程序员的工作效率和 python 代码的易读性。python 编程语言是由 Guido van Rossum 开发并在1991年首次发布。python 在一定程度上受到了ABC,Haskell,Java,Lisp,Icon 和 Perl 等编程语言的启发。python 是一个高级的、通用的、多平台的解释型语言,但是python也很简单。它在视觉上的最大特征就是它使用缩进而不是使用分号和圆括号来分隔语句。现在 python 有两个主要的分支,2.x版本和3.x版本,3.x版本并不向后兼容以前的版本。相比以前版本,它修正了一些设计缺陷以让语言本身更加简洁。这个教程写在2.x时期,教程里的大部分代码都是使用2.x的版本。因为程序员包括程序转向3.x的话还需要一段时间。现在,python主要由一些大型的世界性志愿组织来维护,当然,它也是开源的。
如果你想学习一门编程语言的话,学python是个很好的主意。
Python programming language supports several programming styles. It does not force a programmer to a specific paradigm. Python supports object oriented and procedural programming. There is also a limited support for functional programming.
python语言支持很多编程风格。它不局限于特定的范例。python支持面向对象和面向过程,当然,在功能上有一定的限制。
python语言的官网是python.org。
Pillow
Pillow is a Python library for for opening, manipulating, and saving many different image file formats. Some of the examples in this tutorial use Pillow.
$ sudo apt-get install python-pil.imagetk
On Debian Linux, we can install Pillow with its package manager.$ yum install python-imaging
On systems using RPM package format, we use the above command to install Pillow.$ pip install pillow
Alternatively, we can use pip to install Pillow
Pillow是python的一个库,用于打开、操作和保存不同图像格式的文件。本教程一部分例子使用的Pillow。
$ sudo apt-get install python-pil.imagetk
在Debian Linux上我们可以使用它自带的包管理器来安装Pillow
$ yum install python-imaging
在使用 RPM 包格式的系统上,我们可以使用如上命令来安装Pillow
$ pip install pillow
或者,也可以使用 pip 来安装Pillow
Tkinter simple example
In our first example, we show a basic window on the screen.
在我们第一个例子中,我们将在屏幕上显示一个最基本的窗口。
from tkinter import Tk, BOTH
from tkinter.ttk import Frame

class Example(Frame):

    def __init__(self):
        super().__init__()

        self.initUI()


    def initUI(self):

        self.master.title("Simple")
        self.pack(fill=BOTH, expand=1)


def main():

    root = Tk()
    root.geometry("250x150+300+300")
    app = Example()
    root.mainloop()


if __name__ == '__main__':
    main()
While this code is very small, the application window can do quite a lot. It can be resized, maximized, or minimized. All the complexity that comes with it has been hidden from the application programmer.
虽然这段代码很少,但这个应用窗口能做的并不少。它可以调整大小、最大化、最小化。但它所带来的复杂性已经被程序员隐藏掉了。
from tkinter import Tk, BOTH
from tkinter.ttk import Frame
Here we import Tk and Frame classes, and BOTH constant. Tk class is used to create a root window. Frame is a container for other widgets.
这里我们引入了TK和Frame类和BOTH常量。TK类用于创建根窗口。Frame是一个包含其他小控件的容器。
class Example(Frame):

    def __init__(self):
        super().__init__()
Our example class inherits from the Frame container widget. In the init() constructor method we call the constructor of our inherited class.
我们的example类继承了Frame容器控件。在__init__()构造方法中,我们调用了父类的构造方法。
self.initUI()
We delegate the creation of the user interface to the initUI() method.
我们将用户界面的创造方法交给 initUI() 来处理。
self.master.title("Simple")
We set the title of the window using the title() method. The master attribute gives access to the root window (Tk).
我们使用 title() 方法来设置这个窗口的标题。而 master 属性则是提供了访问根窗口的入口。
self.pack(fill=BOTH, expand=1)
The pack() method is one of the three geometry managers in Tkinter. It organizes widgets into horizontal and vertical boxes. Here we put the Frame widget, accessed via the self attribute to the Tk root window. It is expanded in both directions. In other words, it takes the whole client space of the root window.
这个pack()方法是三个几何管理器中的一个。它将控件组织成水平和垂直的框。这里我们放置了一个Frame小控件,由self属性提供访问根窗口的入口。它会在两个方向上进行扩展,换句话说,它可能会占据整个根窗口。
root = Tk()
The root window is created. The root window is a main application window in our programs. It has a title bar and borders. These are provided by the window manager. It must be created before any other widgets.
根窗口已经被创建。在我们的程序中,根窗口是主窗口,它有一个标题栏和边框。这些都由窗口管理器来提供。同时,他必须在所有控件之前被创建。
root.geometry("250x150+300+300")
The geometry() method sets a size for the window and positions it on the screen. The first two parameters are the width and height of the window. The last two parameters are x and y screen coordinates.
这个geometry()方法给窗口设置了一个大小并将它放在在屏幕上。前两个参数分别是宽和高。后两个参数是屏幕的 x 和 y 轴的坐标。
app = Example()
Here we create the instance of the application class.
这里我们实例化了一个应用类。
root.mainloop()
Finally, we enter the mainloop. The event handling starts from this point. The mainloop receives events from the window system and dispatches them to the application widgets. It is terminated when we click on the close button of the titlebar or call the quit() method.
最后,我们进入主循环。事件将从这个点开始处理。主循环接收来自窗口系统的事件并交给程序控件处理。当我们点击标题栏上面的关闭按钮或调用quit()方法时,它将会关闭。

Tkinter centering window
This script centers a window on the screen.
这个脚本将窗口放在屏幕中间。
from tkinter import Tk, BOTH
from tkinter.ttk import Frame

class Example(Frame):

    def __init__(self):
        super().__init__()

        self.initUI()


    def initUI(self):

        self.master.title("Centered window")
        self.pack(fill=BOTH, expand=1)
        self.centerWindow()


    def centerWindow(self):

        w = 290
        h = 150

        sw = self.master.winfo_screenwidth()
        sh = self.master.winfo_screenheight()

        x = (sw - w)/2
        y = (sh - h)/2
        self.master.geometry('%dx%d+%d+%d' % (w, h, x, y))


def main():

    root = Tk()
    ex = Example()
    root.mainloop()


if __name__ == '__main__':
    main()
We need to have the size of the window and the size of the screen to position the window in the center of the monitor screen.
我们需要知道窗口的大小和屏幕的大小以让窗口居中。
w = 290
h = 150
These are the width and height values of the application window.
上面是应用窗口的宽和高。
sw = self.master.winfo_screenwidth()
sh = self.master.winfo_screenheight()
We determine the width and height of the screen.
屏幕的大小需要我们进行判断
x = (sw - w)/2
y = (sh - h)/2
We calculate the required x and y coordinates.
我们计算出我们需要的 x 和 y 坐标。
self.master.geometry('%dx%d+%d+%d' % (w, h, x, y))
Finally, the geometry() method is used to place the window in the center of the screen.
最后,geometry() 方法经常被用于设置窗口居中。
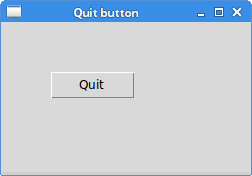
Tkinter Quit button
In the last example of this chapter, we create an application that has a quit button. When we press the button, the application terminates.
本章的最后一个例子,我们创建一个有退出按钮的窗口。当我们按下按钮,程序结束。
from tkinter import Tk, BOTH
from tkinter.ttk import Frame, Button, Style

class Example(Frame):

    def __init__(self):
        super().__init__()

        self.initUI()


    def initUI(self):

        self.style = Style()
        self.style.theme_use("default")

        self.master.title("Quit button")
        self.pack(fill=BOTH, expand=1)

        quitButton = Button(self, text="Quit",
            command=self.quit)
        quitButton.place(x=50, y=50)


def main():

    root = Tk()
    root.geometry("250x150+300+300")
    app = Example()
    root.mainloop()


if __name__ == '__main__':
    main()
We position a Button on the window. Clicking on the button will terminate the application.
我们在窗口中放了一个按钮。并且点击这个按钮会结束程序。
from tkinter.ttk import Frame, Button, Style
Tkinter supports theming of widgets. Widgets that are themed can be imported from the ttk module. At the time of this writing, not all widgets are themable. For instance, menus or listboxes are not supported so far.
Tkinter 支持控件主题,控件的主题可以由 ttk 模块导入。在写下这句话的时候,并不是所有的控件都支持主题。比如说,菜单和列表框就不支持。
self.style = Style()
self.style.theme_use("default")
We apply a theme for our widgets. Some of the supported themes are clam, default, alt, or classic.
我们为我们的控件应用应用主题。一些支持的主题比如clam、default、alt、classic。
quitButton = Button(self, text="Quit",
    command=self.quit)
We create an instance of the Button widget. The parent of this button is the Frame container. We provide a label for the button and a command. The command specifies a method that is called when we press the button. In our case the quit() method is called, which terminates the application.
我们创建一个按钮的例子。这个按钮的承载者是Frame容器。我们为按钮提供一个标签和命令。这个命令指定当我们按下按钮时所调用的方法。在我们的例子中,调用的是用于结束程序的 quit() 方法。
quitButton.place(x=50, y=50)
We use the place geometry manager to position the button in absolute coordinates—50x50 px from the top-left corner of the window.
我们使用 place 几何布局管理器将按钮放在,距离窗口左上角坐标为50x50的绝对位置上。
This section was an introduction to the Tkinter toolkit.
这一部分是关于 Tkinter 工具集的介绍。