新增页面
新增页面接口定义
1、定义响应模型
@Data
public class CmsPageResult extends ResponseResult {
    CmsPage cmsPage;
    public CmsPageResult(ResultCode resultCode,CmsPage cmsPage) {
        super(resultCode);
        this.cmsPage = cmsPage;
    }
}
2、定义添加Api
@ApiOperation("添加页面")
public CmsPageResult add(CmsPage cmsPage);
新增页面服务端开发
页面唯一索引
在cms_page集中上创建页面名称、站点Id、页面webpath为唯一索引
Dao
1、添加根据页面名称、站点Id、页面webpath查询页面方法,此方法用于校验页面是否存在
public interface CmsPageRepository extends MongoRepository<CmsPage,String> {
    //根据页面名称、站点id、页面访问路径查询
    CmsPage findByPageNameAndSiteIdAndPageWebPath(String pageName,String siteId,String
pageWebPath);
    。。。
2、使用 CmsPageRepository提供的save方法 。
Service
//添加页面
    public CmsPageResult add(CmsPage cmsPage){
//校验页面是否存在,根据页面名称、站点Id、页面webpath查询
        CmsPage cmsPage1 =
cmsPageRepository.findByPageNameAndSiteIdAndPageWebPath(cmsPage.getPageName(),
cmsPage.getSiteId(), cmsPage.getPageWebPath());
         if(cmsPage1==null){
            cmsPage.setPageId(null);//添加页面主键由spring data 自动生成
            cmsPageRepository.save(cmsPage);
            //返回结果
            CmsPageResult cmsPageResult = new CmsPageResult(CommonCode.SUCCESS,cmsPage);
            return cmsPageResult;
        }
        return new CmsPageResult(CommonCode.FAIL,null);
    }
Controller
 //添加页面
    @Override
    @PostMapping("/add")
    public CmsPageResult add(@RequestBody CmsPage cmsPage) {
        return pageService.add(cmsPage);
    }
接口测试
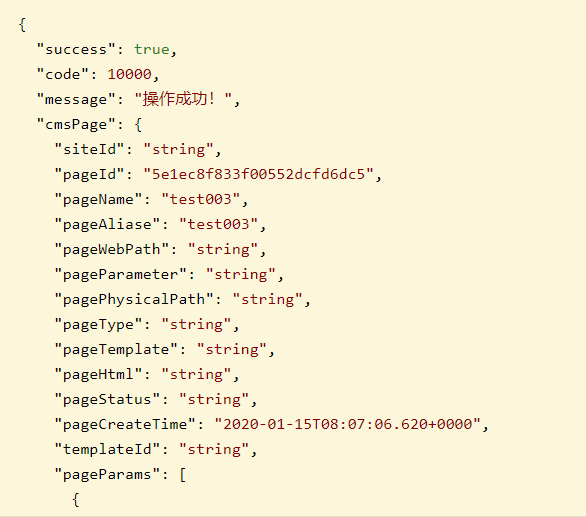
请求内容为 json数据,测试数据如下:
{
  "dataUrl": "string",
  "htmlFileId": "string",
  "pageAliase": "string",
  "pageCreateTime": "2018‐06‐11T02:01:25.667Z",
  "pageHtml": "string",
  "pageName": "测试页面",
  "pageParameter": "string",
  "pagePhysicalPath": "string",
  "pageStatus": "string",
  "pageTemplate": "string",
  "pageType": "string",
  "pageWebPath": "string",
  "siteId": "string",
  "templateId": "string"
}
成功响应结果:
前端新增页面
编写page_add.vue页面
使用Element-UI的form组件编写添加表单内容,页面效果如下:

修改页面
修改页面用户操作流程:
1、用户进入修改页面,在页面上显示了修改页面的信息
2、用户修改页面的内容,点击“提交”,提示“修改成功”或“修改失败”
修改页面接口定义
修改页面需要定义的API如下:
@ApiOperation("通过ID查询页面")
public CmsPage findById(String id);
@ApiOperation("修改页面")
public CmsPageResult edit(String id,CmsPage cmsPage);
修改页面服务端开发
Dao
使用 Spring Data提供的findById方法完成根据主键查询 。
使用 Spring Data提供的save方法完成数据保存 。
Service
//根据id查询页面
    public CmsPage getById(String id){
        Optional<CmsPage> optional = cmsPageRepository.findById(id);
        if(optional.isPresent()){
            return optional.get();
        }
        //返回空
        return null;
    }
 //更新页面信息
    public CmsPageResult update(String id,CmsPage cmsPage) {
        //根据id查询页面信息
         CmsPage one = this.getById(id);
        if (one != null) {
            //更新模板id
            one.setTemplateId(cmsPage.getTemplateId());
            //更新所属站点
            one.setSiteId(cmsPage.getSiteId());
            //更新页面别名
            one.setPageAliase(cmsPage.getPageAliase());
            //更新页面名称
            one.setPageName(cmsPage.getPageName());
            //更新访问路径
            one.setPageWebPath(cmsPage.getPageWebPath());
            //更新物理路径
            one.setPagePhysicalPath(cmsPage.getPagePhysicalPath());
            //执行更新
            CmsPage save = cmsPageRepository.save(one);
            if (save != null) {
                //返回成功
                CmsPageResult cmsPageResult = new CmsPageResult(CommonCode.SUCCESS, save);
                return cmsPageResult;
            }
        }
        //返回失败
        return new CmsPageResult(CommonCode.FAIL,null);
    }
Controller
1、根据id查询页面
@Override
    @GetMapping("/get/{id}")
    public CmsPage findById(@PathVariable("id") String id) {
        return pageService.getById(id);
    }
2、保存页面信息
@Override
    @PutMapping("/edit/{id}")//这里使用put方法,http 方法中put表示更新
    public CmsPageResult edit(@PathVariable("id") String id, @RequestBody CmsPage cmsPage) {
        return pageService.update(id,cmsPage);
    }
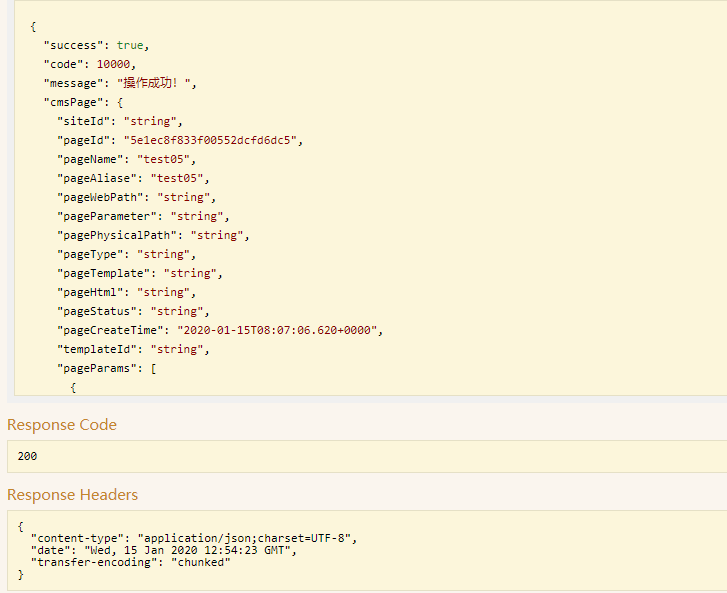
Swagger 修改测试

修改id

查询,拿到数据

输入id

test03修改成test05
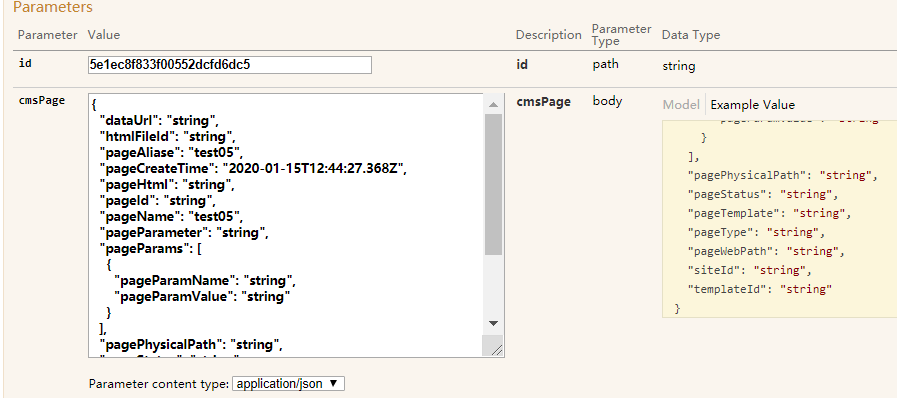
修改成功
异常处理
问题:
1、上边的代码只要操作不成功仅向用户返回“错误代码:11111,失败信息:操作失败”,无法区别具体的错误信
息。
2、service方法在执行过程出现异常在哪捕获?在service中需要都加try/catch,如果在controller也需要添加
try/catch,代码冗余严重且不易维护。
解决方案:
1、在Service方法中的编码顺序是先校验判断,有问题则抛出具体的异常信息,最后执行具体的业务操作,返回成
功信息。
2、在统一异常处理类中去捕获异常,无需controller捕获异常,向用户返回统一规范的响应信息。
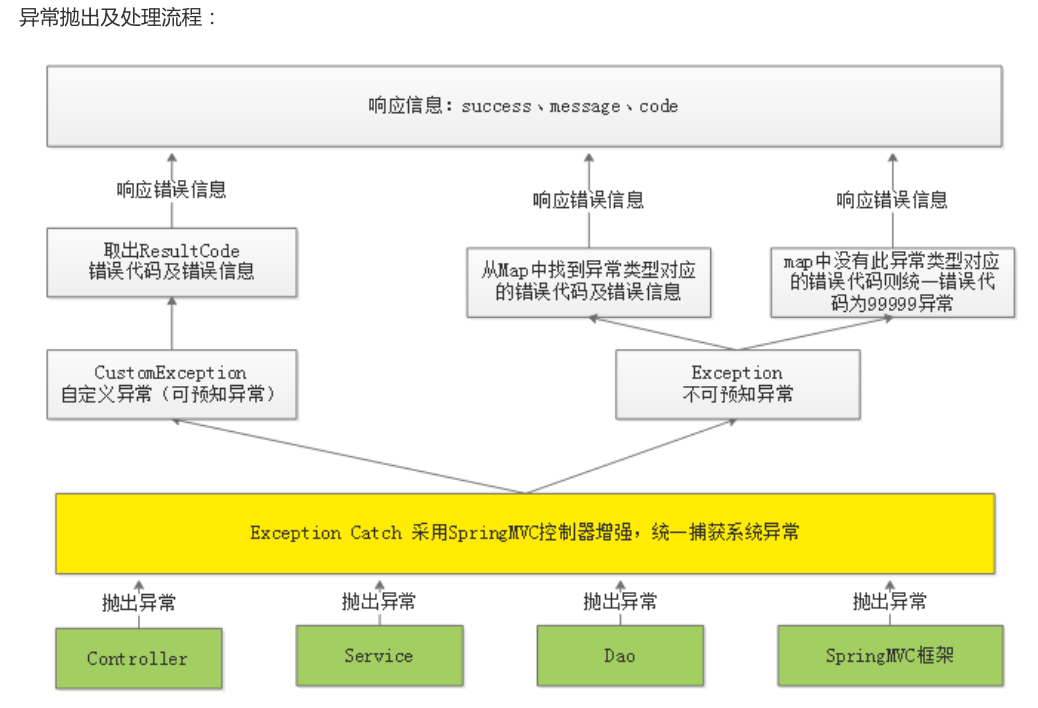
异常处理流程
系统对异常的处理使用统一的异常处理流程:
1、自定义异常类型。
2、自定义错误代码及错误信息。
3、对于可预知的异常由程序员在代码中主动抛出,由SpringMVC统一捕获。
可预知异常是程序员在代码中手动抛出本系统定义的特定异常类型,由于是程序员抛出的异常,通常异常信息比较
齐全,程序员在抛出时会指定错误代码及错误信息,获取异常信息也比较方便。
4、对于不可预知的异常(运行时异常)由SpringMVC统一捕获Exception类型的异常。
不可预知异常通常是由于系统出现bug、或一些不要抗拒的错误(比如网络中断、服务器宕机等),异常类型为
RuntimeException类型(运行时异常)。
5、可预知的异常及不可预知的运行时异常最终会采用统一的信息格式(错误代码+错误信息)来表示,最终也会随
请求响应给客户端。
在common工程定义异常类型
package com.xuecheng.framework.exception;
import com.xuecheng.framework.model.response.ResultCode;
public class CustomException extends RuntimeException {
    private ResultCode resultCode;
    public CustomException(ResultCode resultCode) {
       //异常信息为错误代码+异常信息
       super("错误代码:"+resultCode.code()+"错误信息:"+resultCode.message());
        this.resultCode = resultCode;
    }
    public ResultCode getResultCode(){
        return this.resultCode;
    }
}
异常抛出类
package com.xuecheng.framework.exception;
import com.xuecheng.framework.model.response.ResultCode;
public class ExceptionCast {
    //使用此静态方法抛出自定义异常
    public static void cast(ResultCode resultCode){
        throw new CustomException(resultCode);
    }
}
异常捕获类
package com.xuecheng.framework.exception;
import com.xuecheng.framework.model.response.ResponseResult;
import com.xuecheng.framework.model.response.ResultCode;
import org.slf4j.Logger;
import org.slf4j.LoggerFactory;
import org.springframework.web.bind.annotation.ControllerAdvice;
import org.springframework.web.bind.annotation.ExceptionHandler;
import org.springframework.web.bind.annotation.ResponseBody;
@ControllerAdvice
public class ExceptionCatch {
    private static final Logger LOGGER = LoggerFactory.getLogger(ExceptionCatch.class);
    //捕获 CustomException异常
    @ExceptionHandler(CustomException.class)
    @ResponseBody
    public ResponseResult customException(CustomException e) {
        LOGGER.error("catch exception : {}
exception: ",e.getMessage(), e);
        ResultCode resultCode = e.getResultCode();
        ResponseResult responseResult = new ResponseResult(resultCode);
        return responseResult;
    }
}
自定义异常这里要注意:


展示异常信息
