页面静态化需求
1、为什么要进行页面管理?
本项目cms系统的功能就是根据运营需要,对门户等子系统的部分页面进行管理,从而实现快速根据用户需求修改
页面内容并上线的需求。
2、如何修改页面的内容?
在开发中修改页面内容是需要人工编写html及JS文件,CMS系统是通过程序自动化的对页面内容进行修改,通过
页面静态化技术生成html页面。
3、如何对页面进行静态化?
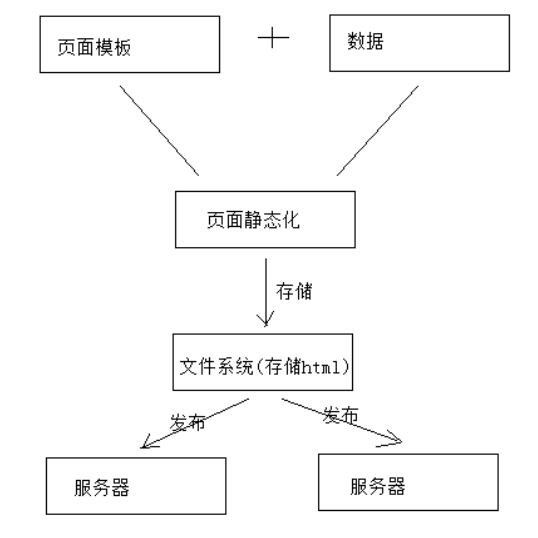
采用页面模板+数据 = 输出html页面的技术实现静态化。

4、静态化的html页面存放在哪里?
生成对的静态化的页面,由cms程序自动发布到服务器(门户服务器丶其他)中,实现页面的快速上线。
FreeMarker研究
它是一种模板引擎,基于模板+数据,输出文本(html文件、json文件、java文件)
核心指令
数据模型
Freemarker静态化依赖数据模型和模板,下边定义数据模型:
下边方法形参map即为freemarker静态化所需要的数据模型,在map中填充数据:

@RequestMapping("/test1")
    public String freemarker(Map<String, Object> map){
        //向数据模型放数据
        map.put("name","黑马程序员");
        Student stu1 = new Student();
        stu1.setName("小明");
        stu1.setAge(18);
        stu1.setMondy(1000.86f);
        stu1.setBirthday(new Date());
        Student stu2 = new Student();
        stu2.setName("小红");
        stu2.setMondy(200.1f);
        stu2.setAge(19);
//        stu2.setBirthday(new Date());
        List<Student> friends = new ArrayList<>();
        friends.add(stu1);
        stu2.setFriends(friends);
        stu2.setBestFriend(stu1);
        List<Student> stus = new ArrayList<>();
        stus.add(stu1);
        stus.add(stu2);
        //向数据模型放数据
        map.put("stus",stus);
        //准备map数据
        HashMap<String,Student> stuMap = new HashMap<>();
        stuMap.put("stu1",stu1);
        stuMap.put("stu2",stu2);
        //向数据模型放数据
        map.put("stu1",stu1);
        //向数据模型放数据
        map.put("stuMap",stuMap);
        //返回模板文件名称
        return "test1";
    }
List指令
1、注释,即<#‐‐和‐‐>,介于其之间的内容会被freemarker忽略
2、插值(Interpolation):即${..}部分,freemarker会用真实的值代替${..}
3、FTL指令:和HTML标记类似,名字前加#予以区分,Freemarker会解析标签中的表达式或逻辑。
4、文本,仅文本信息,这些不是freemarker的注释、插值、FTL指令的内容会被freemarker忽略解析,直接输出内
容。
在test1.ftl模板中使用list指令遍历数据模型中的数据:
<table>
    <tr>
     <td>序号</td>
        <td>姓名</td>
        <td>年龄</td>
        <td>钱包</td>
    </tr>
    <#list stus as stu>
        <tr>
            <td>${stu_index + 1}</td>
            <td>${stu.name}</td>
            <td>${stu.age}</td>
            <td>${stu.mondy}</td>
        </tr>
    </#list>
</table>
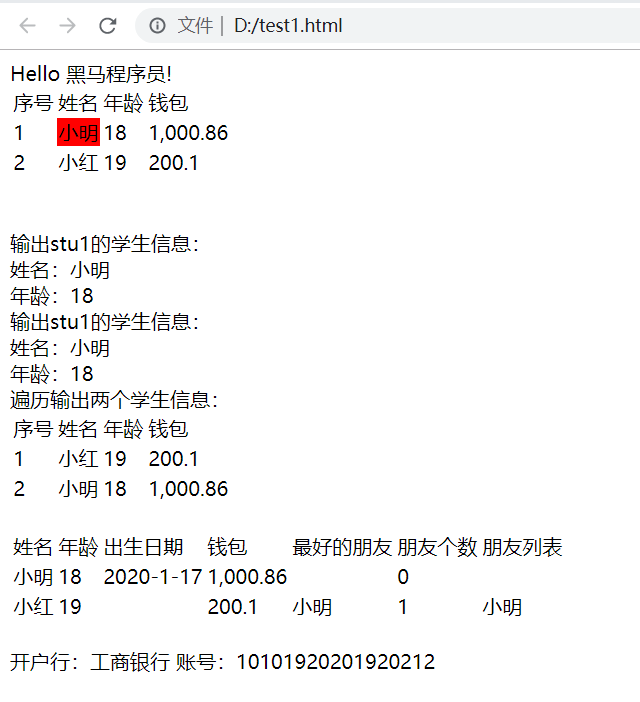
3、输出:
Hello 黑马程序员! 序号 姓名 年龄 钱包 1 小明 18 1,000.86 2 小红 19 200.1
遍历Map数据
1、数据模型
使用map指令遍历数据模型中的stuMap。
2、模板

输出stu1的学生信息:<br/>
姓名:${stuMap['stu1'].name}<br/>
年龄:${stuMap['stu1'].age}<br/>
输出stu1的学生信息:<br/>
姓名:${stuMap.stu1.name}<br/>
年龄:${stuMap.stu1.age}<br/>
遍历输出两个学生信息:<br/>
<table>
    <tr>
        <td>序号</td>
        <td>姓名</td>
        <td>年龄</td>
        <td>钱包</td>
    </tr>
<#list stuMap?keys as k>
<tr>
    <td>${k_index + 1}</td>
    <td>${stuMap[k].name}</td>
    <td>${stuMap[k].age}</td>
    <td >${stuMap[k].mondy}</td>
</tr>
</#list>
</table>
3 、输出
输出stu1的学生信息:
姓名:小明
年龄:18
输出stu1的学生信息:
姓名:小明
年龄:18
遍历输出两个学生信息:
序号 姓名 年龄 钱包
1 小红 19 200.1
2 小明 18 1,000.86
静态化测试
在cms中使用freemarker将页面生成html文件,本节测试html文件生成的方法:
1、使用模板文件静态化
定义模板文件,使用freemarker静态化程序生成html文件。
2、使用模板字符串静态化
定义模板字符串,使用freemarker静态化程序生成html文件。
使用模板文件静态化
在test下创建测试类,并且将main下的resource/templates拷贝到test下,本次测试使用之前我们在main下创建
的模板文件。

//基于模板生成静态化文件
@Test
public void testGenerateHtml() throws IOException, TemplateException {
    //创建配置类
    Configuration configuration=new Configuration(Configuration.getVersion());
    //设置模板路径
    String classpath = this.getClass().getResource("/").getPath();
    configuration.setDirectoryForTemplateLoading(new File(classpath + "/templates/"));
    //设置字符集
    configuration.setDefaultEncoding("utf‐8");
    //加载模板
    Template template = configuration.getTemplate("test1.ftl");
    //数据模型
    Map<String,Object> map = new HashMap<>();
    map.put("name","黑马程序员");
    //静态化
    String content = FreeMarkerTemplateUtils.processTemplateIntoString(template, map);
    //静态化内容
    System.out.println(content);
    InputStream inputStream = IOUtils.toInputStream(content);
    //输出文件
    FileOutputStream fileOutputStream = new FileOutputStream(new File("d:/test1.html"));
    int copy = IOUtils.copy(inputStream, fileOutputStream);
}
使用模板字符串静态化

//基于模板字符串生成静态化文件
@Test
public void testGenerateHtmlByString() throws IOException, TemplateException {
    //创建配置类
    Configuration configuration=new Configuration(Configuration.getVersion());
    //模板内容,这里测试时使用简单的字符串作为模板
    String templateString="" +
            "<html>
" +
            "    <head></head>
" +
            "    <body>
" +
            "    名称:${name}
" +
            "    </body>
" +
            "</html>";

    //模板加载器
    StringTemplateLoader stringTemplateLoader = new StringTemplateLoader();
    stringTemplateLoader.putTemplate("template",templateString);
    configuration.setTemplateLoader(stringTemplateLoader);
    //得到模板
    Template template = configuration.getTemplate("template","utf‐8");
    //数据模型
    Map<String,Object> map = new HashMap<>();
    map.put("name","黑马程序员");
    //静态化
    String content = FreeMarkerTemplateUtils.processTemplateIntoString(template, map);
    //静态化内容
    System.out.println(content);
    InputStream inputStream = IOUtils.toInputStream(content);
    //输出文件
    FileOutputStream fileOutputStream = new FileOutputStream(new File("d:/test1.html"));
    IOUtils.copy(inputStream, fileOutputStream);
}

页面静态化
通过上边对FreeMarker的研究我们得出:模板+数据模型=输出,页面静态化需要准备数据模型和模板,先知道数
据模型的结构才可以编写模板,因为在模板中要引用数据模型中的数据,本节将系统讲解CMS页面数据模型获取、
模板管理及静态化的过程。
管理员怎么知道DataUrl的内容呢?
举例说明:
此页面是轮播图页面,它的DataUrl由开发轮播图管理的程序员提供。
此页面是精品课程推荐页面,它的DataUrl由精品课程推荐的程序员提供。
此页面是课程详情页面,它的DataUrl由课程管理的程序员提供。
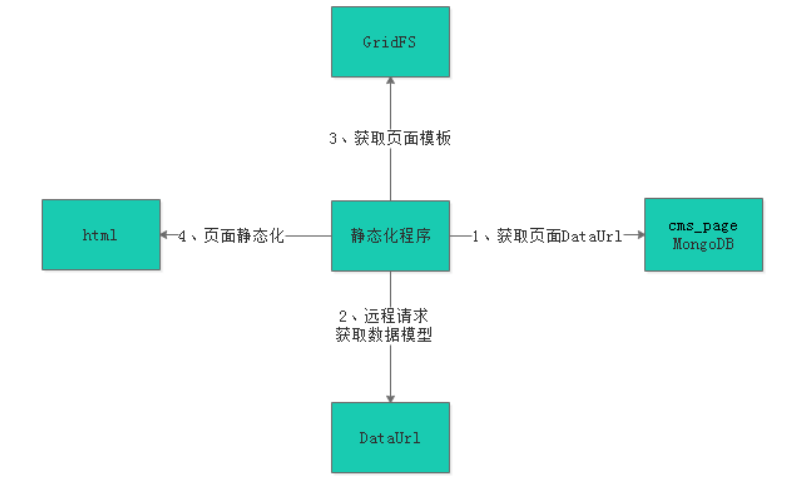
页面静态化流程如下图:
1、静态化程序首先读取页面获取DataUrl。
2、静态化程序远程请求DataUrl得到数据模型。
3、获取页面模板。
4、执行页面静态化。

轮播图DataUrl接口
CMS中有轮播图管理、精品课程推荐的功能,以轮播图管理为例说明:轮播图管理是通过可视化的操作界面由管理
员指定轮播图图片地址,最后将轮播图图片地址保存在cms_config集合中,下边是轮播图数据模型:

接口定义
cms_config有固定的数据结构,如下:
@Data
@ToString
@Document(collection = "cms_config")
public class CmsConfig {
    @Id
    private String id;//主键
    private String name;//数据模型的名称
    private List<CmsConfigModel> model;//数据模型项目
}
数据模型项目内容如下:
@Data
@ToString
public class CmsConfigModel {
    private String key;//主键
    private String name;//项目名称
    private String url;//项目url
    private Map mapValue;//项目复杂值
    private String value;//项目简单值
}
根据配置信息Id查询配置信息,定义接口如下:
@Api(value="cms配置管理接口",description = "cms配置管理接口,提供数据模型的管理、查询接口")
public interface CmsConfigControllerApi {
    @ApiOperation("根据id查询CMS配置信息")
    public CmsConfig getmodel(String id);
}
Dao
定义CmsConfig的dao接口:
public interface CmsConfigRepository extends MongoRepository<CmsConfig,String> {
}
Service
定义CmsConfigService实现根据id查询CmsConfig信息。
@Service
public class CmsConfigService {
    @Autowired
    CmsConfigRepository cmsConfigRepository;
    //根据id查询配置管理信息
    public CmsConfig getConfigById(String id){
        Optional<CmsConfig> optional = cmsConfigRepository.findById(id);
        if(optional.isPresent()){
            CmsConfig cmsConfig = optional.get();
            return cmsConfig;
        }
        return null;
    }
}
Controller
@RestController
@RequestMapping("/cms/config")
public class CmsConfigController implements CmsConfigControllerApi {
    @Autowired
    CmsConfigService cmsConfigService;
    @Override
    @GetMapping("/getmodel/{id}")
    public CmsConfig getmodel(@PathVariable("id") String id) {
        return cmsConfigService.getConfigById(id);
    }
}
测试
使用postman测试接口:
get请求:http://localhost:31001/cms/config/getmodel/5a791725dd573c3574ee333f (轮播图信息)
模板管理

1、要增加新模板首先需要制作模板,模板的内容就是Freemarker ftl模板内容。
2、通过模板管理模块功能新增模板、修改模板、删除模板。
3、模板信息存储在MongoDB数据库,其中模板信息存储在cms_template集合中,模板文件存储在GridFS文件系
统中。
模板制作
1、轮播图页面原型
在门户的静态工程目录有轮播图的静态页面,路径是:/include/index_banner.html。

  <!DOCTYPE html>
<html lang="en">
<head>
    <meta charset="UTF‐8">
    <title>Title</title>
    <link rel="stylesheet" href="http://www.xuecheng.com/plugins/normalize‐css/normalize.css" />
    <link rel="stylesheet"
href="http://www.xuecheng.com/plugins/bootstrap/dist/css/bootstrap.css" />
    <link rel="stylesheet" href="http://www.xuecheng.com/css/page‐learing‐index.css" />
    <link rel="stylesheet" href="http://www.xuecheng.com/css/page‐header.css" />
</head>
<body>
<div class="banner‐roll">
    <div class="banner‐item">
        <div class="item" style="background‐image: url(../img/widget‐bannerB.jpg);"></div>
        <div class="item" style="background‐image: url(../img/widget‐bannerA.jpg);"></div>
        <div class="item" style="background‐image: url(../img/widget‐banner3.png);"></div>
        <div class="item" style="background‐image: url(../img/widget‐bannerB.jpg);"></div>
        <div class="item" style="background‐image: url(../img/widget‐bannerA.jpg);"></div>
        <div class="item" style="background‐image: url(../img/widget‐banner3.png);"></div>
    </div>
    <div class="indicators"></div>
</div>
<script type="text/javascript" src="http://www.xuecheng.com/plugins/jquery/dist/jquery.js">
</script>
<script type="text/javascript"
src="http://www.xuecheng.com/plugins/bootstrap/dist/js/bootstrap.js"></script>
<script type="text/javascript">
    var tg = $('.banner‐item .item');
    var num = 0;
    for (i = 0; i < tg.length; i++) {
        $('.indicators').append('<span></span>');
        $('.indicators').find('span').eq(num).addClass('active');
    }
    function roll() {
        tg.eq(num).animate({
            'opacity': '1',
            'z‐index': num
        }, 1000).siblings().animate({
            'opacity': '0',
            'z‐index': 0
        }, 1000);

$('.indicators').find('span').eq(num).addClass('active').siblings().removeClass('active');
        if (num >= tg.length ‐ 1) {
            num = 0;
        } else {
            num++;
        }
    }
    $('.indicators').find('span').click(function() {
        num = $(this).index();

在freemarker测试工程中新建模板index_banner.ftl。
        roll();
    });
    var timer = setInterval(roll, 3000);
    $('.banner‐item').mouseover(function() {
        clearInterval(timer)
    });
    $('.banner‐item').mouseout(function() {
        timer = setInterval(roll, 3000)
    });
</script>
</body>
</html>
2 、数据模型为:
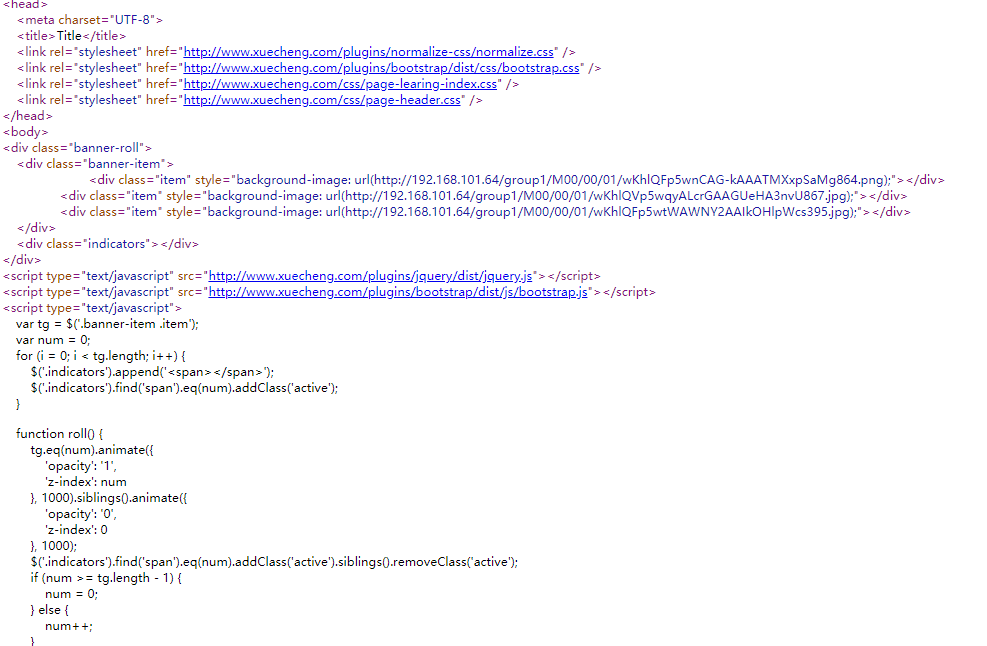
通过http 获取到数据模型如下:
下图数据模型的图片路径改成可以浏览的正确路径。
{
    "id": "5a791725dd573c3574ee333f",
    "name": "轮播图",
    "model": [
      {
        "key": "banner1",
        "name": "轮播图1地址",
        "url": null,
        "mapValue": null,
        "value": "http://www.xuecheng.com/img/widget‐bannerB.jpg"
      },
      {
        "key": "banner2",
        "name": "轮播图2地址",
        "url": null,
        "mapValue": null,
        "value": "http://www.xuecheng.com/img/widget‐bannerA.jpg"
      },
      {
        "key": "banner3",
        "name": "轮播图3地址",
        "url": null,
        "mapValue": null,
        "value": "http://www.xuecheng.com/img/widget‐banner3.jpg"
      }
    ]
}
3、编写模板
在freemarker测试工程中新建模板index_banner.ftl。

 <!DOCTYPE html>
<html lang="en">
<head>
    <meta charset="UTF‐8">
    <title>Title</title>
    <link rel="stylesheet" href="http://www.xuecheng.com/plugins/normalize‐css/normalize.css" />
    <link rel="stylesheet"
href="http://www.xuecheng.com/plugins/bootstrap/dist/css/bootstrap.css" />
    <link rel="stylesheet" href="http://www.xuecheng.com/css/page‐learing‐index.css" />
    <link rel="stylesheet" href="http://www.xuecheng.com/css/page‐header.css" />
</head>
<body>
<div class="banner‐roll">
    <div class="banner‐item">
        <#if model??>
            <#list model as item>
                <div class="item" style="background‐image: url(${item.value});"></div>
            </#list>
        </#if>
<#‐‐ <div class="item" style="background‐image: url(../img/widget‐bannerA.jpg);"></div>
        <div class="item" style="background‐image: url(../img/widget‐banner3.png);"></div>
        <div class="item" style="background‐image: url(../img/widget‐bannerB.jpg);"></div>
        <div class="item" style="background‐image: url(../img/widget‐bannerA.jpg);"></div>
        <div class="item" style="background‐image: url(../img/widget‐banner3.png);"></div>‐‐>
    </div>
    <div class="indicators"></div>
</div>
<script type="text/javascript" src="http://www.xuecheng.com/plugins/jquery/dist/jquery.js">
</script>
<script type="text/javascript"
src="http://www.xuecheng.com/plugins/bootstrap/dist/js/bootstrap.js"></script>
<script type="text/javascript">
    var tg = $('.banner‐item .item');
    var num = 0;
    for (i = 0; i < tg.length; i++) {
        $('.indicators').append('<span></span>');
        $('.indicators').find('span').eq(num).addClass('active');
    }
    function roll() {
        tg.eq(num).animate({
            'opacity': '1',
            'z‐index': num
        }, 1000).siblings().animate({
            'opacity': '0',
            'z‐index': 0
        }, 1000);

$('.indicators').find('span').eq(num).addClass('active').siblings().removeClass('active');
        if (num >= tg.length ‐ 1) {
            num = 0;
        } else {
            num++;
请求:http://localhost:8088/freemarker/banner
        }
    }
    $('.indicators').find('span').click(function() {
        num = $(this).index();
        roll();
    });
    var timer = setInterval(roll, 3000);
    $('.banner‐item').mouseover(function() {
        clearInterval(timer)
    });
    $('.banner‐item').mouseout(function() {
        timer = setInterval(roll, 3000)
    });
</script>
</body>
</html>
模板测试
在freemarker测试工程编写一个方法测试轮播图模板,代码如下:
@Autowired
RestTemplate restTemplate;
@RequestMapping("/banner")
public String index_banner(Map<String, Object> map){
    String dataUrl = "http://localhost:31001/cms/config/getmodel/5a791725dd573c3574ee333f";
    ResponseEntity<Map> forEntity = restTemplate.getForEntity(dataUrl, Map.class);
    Map body = forEntity.getBody();
    map.putAll(body);
    return "index_banner";
}
请求:http://localhost:8088/freemarker/banner


GridFS介绍
GridFS是MongoDB提供的用于持久化存储文件的模块,CMS使用MongoDB存储数据,使用GridFS可以快速集成
开发。
它的工作原理是:
在GridFS存储文件是将文件分块存储,文件会按照256KB的大小分割成多个块进行存储,GridFS使用两个集合
(collection)存储文件,一个集合是chunks, 用于存储文件的二进制数据;一个集合是files,用于存储文件的元数
据信息(文件名称、块大小、上传时间等信息)。
从GridFS中读取文件要对文件的各各块进行组装、合并。
静态化测试
测试整个页面静态化的流程,流程如下:
1、填写页面DataUrl
在编辑cms页面信息界面填写DataUrl,将此字段保存到cms_page集合中。
2、静态化程序获取页面的DataUrl
3、静态化程序远程请求DataUrl获取数据模型。
4、静态化程序获取页面的模板信息
5、执行页面静态化
填写页面DataUrl
修改页面管理模板代码,实现编辑页面DataUrl。
注意:此地址由程序员提供给系统管理员,由系统管理员录入到系统中。
下边实现页面修改界面录入DataUrl:
1、修改页面管理前端的page_edit.vue
在表单中添加 dataUrl输入框:
<el‐form‐item label="数据Url" prop="dataUrl">
  <el‐input v‐model="pageForm.dataUrl" auto‐complete="off" ></el‐input>
</el‐form‐item>
2、修改页面管理服务端PageService
在更新cmsPage数据代码中添加:
//更新dataUrl
one.setDataUrl(cmsPage.getDataUrl());
静态化程序
在PageService中定义页面静态化方法,如下:

    public String getPageHtml(String pageId){
        //获取页面模型数据
        Map model = this.getModelByPageId(pageId);
        if(model == null){
            //获取页面模型数据为空
            ExceptionCast.cast(CmsCode.CMS_GENERATEHTML_DATAISNULL);
        }
        //获取页面模板
        String templateContent = getTemplateByPageId(pageId);
        if(StringUtils.isEmpty(templateContent)){
            //页面模板为空
            ExceptionCast.cast(CmsCode.CMS_GENERATEHTML_TEMPLATEISNULL);
        }
        //执行静态化
        String html = generateHtml(templateContent, model);
        if(StringUtils.isEmpty(html)){
            ExceptionCast.cast(CmsCode.CMS_GENERATEHTML_HTMLISNULL);
        }
        return html;
    }
    //页面静态化
    public String generateHtml(String template,Map model){
        try {
        //生成配置类
        Configuration configuration = new Configuration(Configuration.getVersion());
        //模板加载器
        StringTemplateLoader stringTemplateLoader = new StringTemplateLoader();
        stringTemplateLoader.putTemplate("template",template);
        //配置模板加载器
        configuration.setTemplateLoader(stringTemplateLoader);
        //获取模板
北京市昌平区建材城西路金燕龙办公楼一层 电话:400-618-9090
        Template template1 = configuration.getTemplate("template");
        String html = FreeMarkerTemplateUtils.processTemplateIntoString(template1, model);
        return html;
        } catch (Exception e) {
            e.printStackTrace();
        }
        return null;
    }
    //获取页面模板
    public String getTemplateByPageId(String pageId){
        //查询页面信息
        CmsPage cmsPage = this.getById(pageId);
        if(cmsPage == null){
            //页面不存在
            ExceptionCast.cast(CmsCode.CMS_PAGE_NOTEXISTS);
        }
        //页面模板
        String templateId = cmsPage.getTemplateId();
        if(StringUtils.isEmpty(templateId)){
            //页面模板为空
            ExceptionCast.cast(CmsCode.CMS_GENERATEHTML_TEMPLATEISNULL);
        }
        Optional<CmsTemplate> optional = cmsTemplateRepository.findById(templateId);
        if(optional.isPresent()){
            CmsTemplate cmsTemplate = optional.get();
            //模板文件id
            String templateFileId = cmsTemplate.getTemplateFileId();
            //取出模板文件内容
            GridFSFile gridFSFile =
gridFsTemplate.findOne(Query.query(Criteria.where("_id").is(templateFileId)));
            //打开下载流对象
            GridFSDownloadStream gridFSDownloadStream =
gridFSBucket.openDownloadStream(gridFSFile.getObjectId());
            //创建GridFsResource
            GridFsResource gridFsResource = new GridFsResource(gridFSFile,gridFSDownloadStream);
            try {
                String content = IOUtils.toString(gridFsResource.getInputStream(), "utf‐8");
                return content;
            } catch (IOException e) {
                e.printStackTrace();
            }
        }
        return null;
    }
    //获取页面模型数据
    public Map getModelByPageId(String pageId){
        //查询页面信息
        CmsPage cmsPage = this.getById(pageId);
        if(cmsPage == null){
            //页面不存在
            ExceptionCast.cast(CmsCode.CMS_PAGE_NOTEXISTS);
        }
        //取出dataUrl
        String dataUrl = cmsPage.getDataUrl();
        if(StringUtils.isEmpty(dataUrl)){
            ExceptionCast.cast(CmsCode.CMS_GENERATEHTML_DATAURLISNULL);
        }
        ResponseEntity<Map> forEntity = restTemplate.getForEntity(dataUrl, Map.class);
        Map body = forEntity.getBody();
        return body;
    }
