1.初识Fragment
Fragment的中文含义是碎片,在之前安卓开发是,用户界面的切换全部使用activity的切换,这就造成了整个应用使用起来速度较慢,而且很占内存,因为activity是重量级的组件,在应用程序内部使用很不方便。于是出现了Fragment来解决这样的问题。Fragment是一种便捷的、轻量级的、基于activity的组件,所谓基于activity,就是必须有activity作为容器,Fragment才可以生存。另外,Fragment 可以动态的添加和删除。所以说Fragment是一种非常方便开发的组件 。
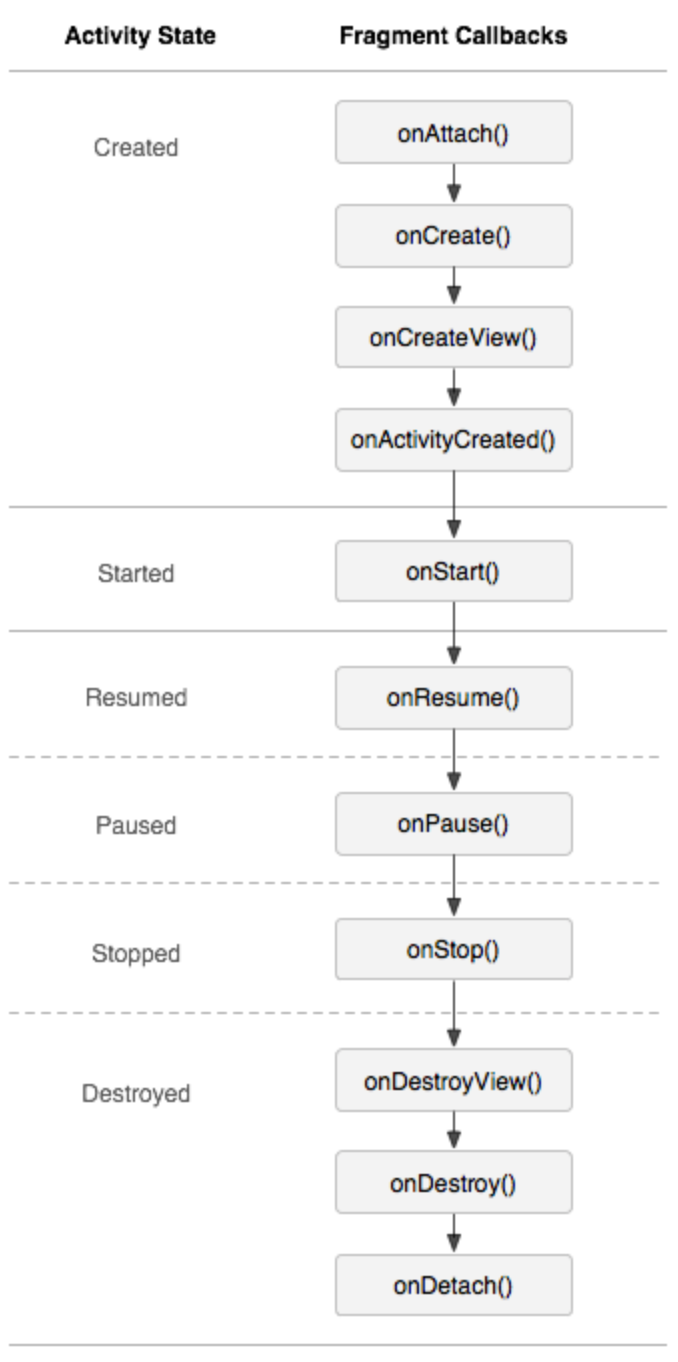
2.Fragment的生命周期
Fragment1和Fragment2
主界面默认加载1,从1跳转到2时,2执行onCreate-onCreateView,后退时执行onPause-onDesdory。1执行onPause-onDesdroyView。再点后退,1执行OnDestory。
3.创建一个Fragment
import android.os.Bundle;
import android.support.annotation.Nullable;
import android.support.v4.app.Fragment;
import android.view.LayoutInflater;
import android.view.View;
import android.view.ViewGroup;

/**
 * Created by lzc on 16/6/27.
 */
public class Frag2 extends Fragment {
    @Nullable
    @Override
    public View onCreateView(LayoutInflater inflater, @Nullable ViewGroup container, @Nullable Bundle savedInstanceState) {
        View v = inflater.inflate(R.layout.fragment2,container,false);
        v.findViewById(R.id.button2).setOnClickListener(new View.OnClickListener() {
            @Override
            public void onClick(View view) {
                getFragmentManager().popBackStack();
            }
        });
        return v;
    }
}
创建一个自定义的类,继承Fragment类,包为android.support.v4.app.Fragment。这个类里有一个默认的onCreate方法,这个方法要返回一个view类型的对象。这个对象的值为inflater对象调用inflate方法返回的值。第一个参数是此Fragment所加载的xml布局文件。也就是一个Fragment对应一个xml布局文件。创建完View对象后, 最后返回此对象,一个Fragment类便建完了。
MainActivity.java
import android.support.v7.app.AppCompatActivity;
import android.os.Bundle;

public class MainActivity extends AppCompatActivity {

    @Override
    protected void onCreate(Bundle savedInstanceState) {
        super.onCreate(savedInstanceState);
        setContentView(R.layout.activity_main);
        if(savedInstanceState == null){
            getSupportFragmentManager().beginTransaction().add(R.id.container,new Frag1()).commit();
        }
    }
}
使用FragmentManager将Fragment添加到主布局里。(如果要切换Fragment,把add方法改成replace方法)。另外,加载Fragment的主类所加载xml布局为FramLayout。R.id.container为主布局中FramLayout的id。
<FrameLayout xmlns:android="http://schemas.android.com/apk/res/android"
        android:id="@+id/container"
4.将Fragment添加到后退栈中
由于fragment是基于activity的,所以同一个activity内部的fragment切换以后,点击返回键不会回到上一个Fragment,而是回到上一个Activity,或者退回主界面。
添加到安卓手机回退键的回退栈中:
getFragmentManager().beginTransaction().addToBackStack(null).replace(R.id.container,new Frag2()).commit();
添加按钮使Fragment回退:
getFragmentManager().popBackStack();
5.实现同一个Activity内两个Fragment的跳转源码
Frag1.java
import android.os.Bundle;
import android.support.annotation.Nullable;
import android.support.v4.app.Fragment;
import android.view.LayoutInflater;
import android.view.View;
import android.view.ViewGroup;

/**
 * Created by lzc on 16/6/27.
 */
public class Frag1 extends Fragment {
    @Nullable
    @Override
    public View onCreateView(LayoutInflater inflater, @Nullable ViewGroup container, @Nullable Bundle savedInstanceState) {
        View v = inflater.inflate(R.layout.fragment1,container,false);
        v.findViewById(R.id.button).setOnClickListener(new View.OnClickListener() {
            @Override
            public void onClick(View view) {
                getFragmentManager().beginTransaction().addToBackStack(null).replace(R.id.container,new Frag2()).commit();
            }
        });
        return v;
    }
}
fragment1.xml
<?xml version="1.0" encoding="utf-8"?>
<LinearLayout xmlns:android="http://schemas.android.com/apk/res/android"
    android:layout_width="match_parent"
    android:layout_height="match_parent">

    <TextView
        android:layout_width="wrap_content"
        android:layout_height="wrap_content"
        android:text="fragment1"
        android:id="@+id/textView" />

    <Button
        android:layout_width="wrap_content"
        android:layout_height="wrap_content"
        android:text="跳转Fragment"
        android:id="@+id/button" />

</LinearLayout>
Frag2.java
import android.os.Bundle;
import android.support.annotation.Nullable;
import android.support.v4.app.Fragment;
import android.view.LayoutInflater;
import android.view.View;
import android.view.ViewGroup;

/**
 * Created by lzc on 16/6/27.
 */
public class Frag2 extends Fragment {
    @Nullable
    @Override
    public View onCreateView(LayoutInflater inflater, @Nullable ViewGroup container, @Nullable Bundle savedInstanceState) {
        View v = inflater.inflate(R.layout.fragment2,container,false);
        v.findViewById(R.id.button2).setOnClickListener(new View.OnClickListener() {
            @Override
            public void onClick(View view) {
                getFragmentManager().popBackStack();
            }
        });
        return v;
    }
}
fragment2.xml
<?xml version="1.0" encoding="utf-8"?>
<LinearLayout xmlns:android="http://schemas.android.com/apk/res/android"
    android:layout_width="match_parent"
    android:layout_height="match_parent">

    <TextView
        android:layout_width="wrap_content"
        android:layout_height="wrap_content"
        android:text="fragment2"
        android:id="@+id/textView3" />

    <Button
        android:layout_width="wrap_content"
        android:layout_height="wrap_content"
        android:text="back"
        android:id="@+id/button2" />
</LinearLayout>
MainActivity.java见上文图
activity_main.xml:
<?xml version="1.0" encoding="utf-8"?>


    <FrameLayout xmlns:android="http://schemas.android.com/apk/res/android"
        android:id="@+id/container"
        android:layout_width="match_parent"
        android:layout_height="match_parent"
        android:layout_below="@+id/textView2"
        android:layout_alignParentLeft="true"
        android:layout_alignParentStart="true"
        android:layout_marginTop="52dp">

</FrameLayout>
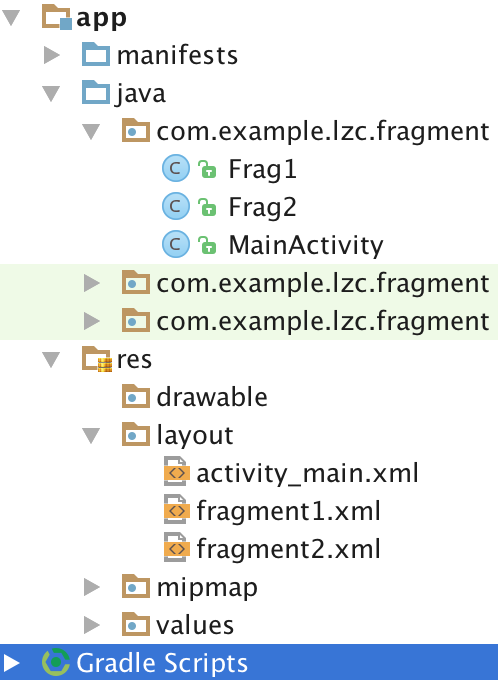
项目结构