1.资源准备
最近,在VmwareStation 10虚拟机上,基于CentOS5.4安装Oracle 11g RAC,并把过程记录下来.刚开始时,是基于CentOS 6.4安装Oracle 11g RAC, 没有成功,主要是Oracle 11g RAC安装,没有针对CentOS 6.4的内核的一些包.
本文内容详实,包括安装过程中遇到的一些问题,也单独编一章节,第四章节的FAQ.
http://blog.chinaunix.net/xmlrpc.php?r=blog/article&id=4681351&uid=29655480
1.1. 软件准备
- SecureCRT:用于客户机通过SSH连接LINUX
- VmWareStation10:
VMware-workstation-full-10.0.1-1379776.exe
5C4A7-6Q20J-6ZD58-K2C72-0AKPE (已测,可用)
1Y0W5-0W205-7Z8J0-C8C5M-9A6MF
NF2A7-AYK43-CZCT8-FCAN6-CA84
4A4QH-6Q195-XZW10-6K8N2-A3CJX
5A6ZT-20JD2-LZWZ9-H38N0-92L62
- CentOS5.4: CentOS-5.4-x86_64-bin-DVD1.iso、CentOS-5.4-x86_64-bin-DVD2.iso
- Oracle 11g: linux.x64_11gR2_database_1of2.zip、linux.x64_11gR2_database_1of2.zip、linux.x64_11gR2_grid.zip
http://public-yum.oracle.com
http://mirrors.163.com/centos/
https://www.centos.org/download/mirrors/
http://download.chinaunix.net/download.php?id=30562&ResourceID=12271
- Oracle ASMlib下载地址:
http://www.oracle.com/technetwork/server-storage/linux/downloads/rhel5-084877.html
1.2. 硬件准备
- Windows环境:
- 虚拟机环境:

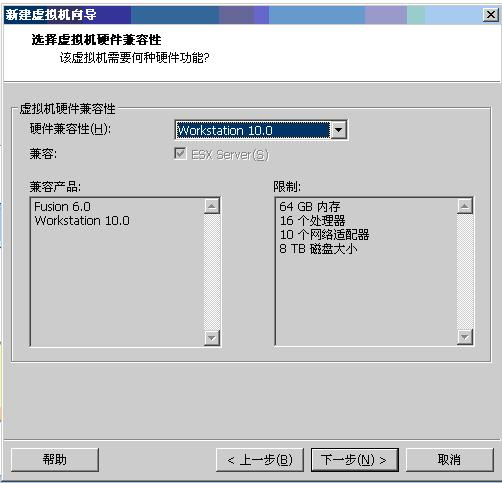
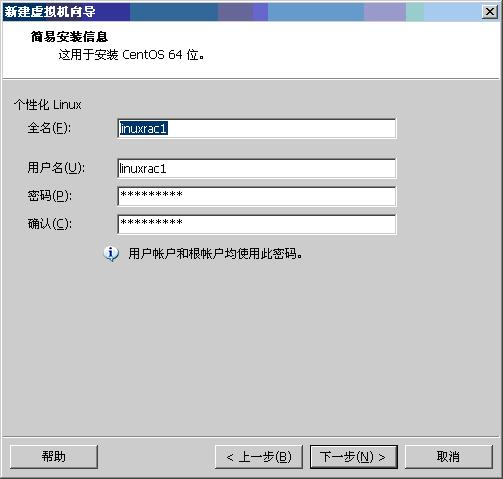
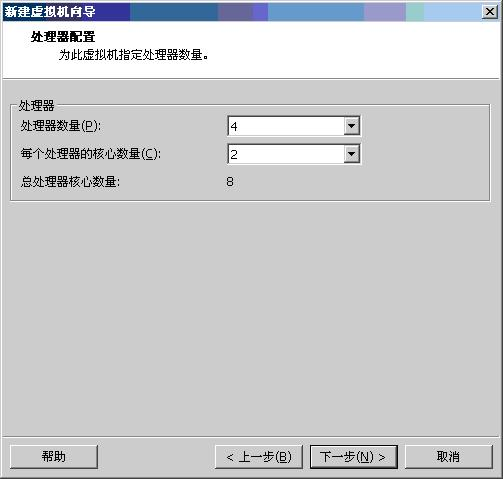
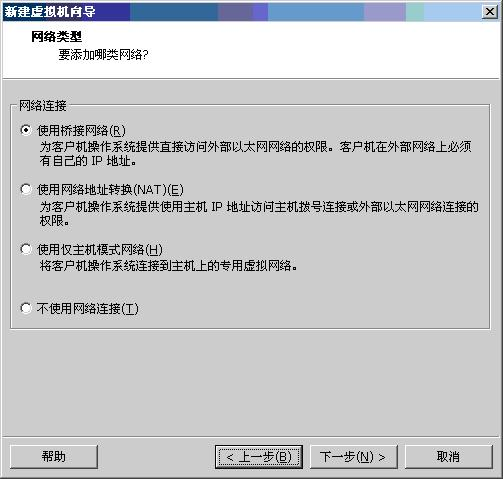
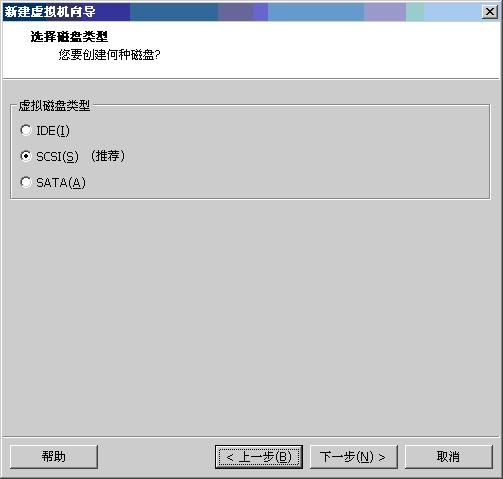
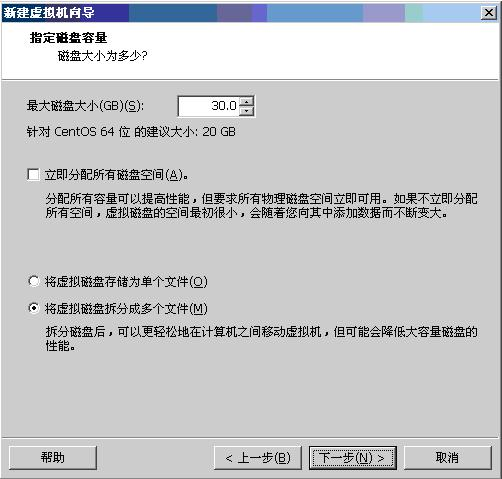
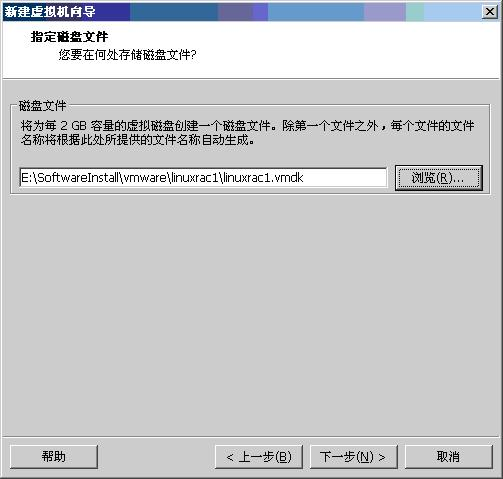
- 2.搭建环境-2.1创建虚拟机
2.1.1. 创建虚拟机节点1


2.1.2. 创建虚拟机节点2
操作如节点1.
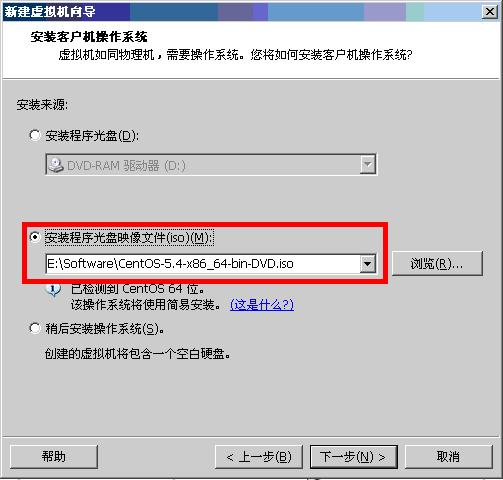
2.2. 安装操作系统CentOS5.4
两个虚拟机都安装,此步骤在创建虚拟机节点时:
2.3.配置共享磁盘
2.3.1.创建共享磁盘
在cmd中进入WMware Workstation 10.0 安装目录:
|
1.创建存储Oracle Clusterware文件 (Oracle Cluster Registry and voting disk) 的磁盘: vmware-vdiskmanager.exe -c -s 4Gb -a lsilogic -t 2 "E:SoftwareInstallvmwareSharedDiskASM"ShareDiskOCR.vmdk 2.创建存储Oracle共享数据文件的磁盘: vmware-vdiskmanager.exe -c -s 20Gb -a lsilogic -t 2 "E:SoftwareInstallvmwareSharedDiskASM"ShareDiskData01.vmdk vmware-vdiskmanager.exe -c -s 20Gb -a lsilogic -t 2 "E:SoftwareInstallvmwareSharedDiskASM"ShareDiskData02.vmdk
vmware-vdiskmanager.exe -c -s 5Gb -a lsilogic -t 2 "E:SoftwareInstallvmwareSharedDiskASM"ShareDiskFlash.vmdk |

2.3.2. 编辑虚拟机配置文件
关闭两台虚拟机,用记事本打开虚拟机名字.wmx,到虛拟机的目录比如 E:SoftwareInstallvmwarelinuxrac1,直接编辑*.vmx 文件, 加上下面语句(所有虛拟机节点):
|
scsi1:1.deviceType = "disk" scsi1:1.present = "TRUE" scsi1:1.fileName = "E:SoftwareInstallvmwareSharedDiskASMShareDiskOCR.vmdk" scsi1:1.mode = "independent-persistent" scsi1:1.redo = ""
scsi1:2.deviceType = "disk" scsi1:2.present = "TRUE" scsi1:2.fileName = "E:SoftwareInstallvmwareSharedDiskASMShareDiskData01.vmdk" scsi1:2.mode = "independent-persistent" scsi1:2.redo = ""
scsi1:3.deviceType = "disk" scsi1:3.present = "TRUE" scsi1:3.fileName = "E:SoftwareInstallvmwareSharedDiskASMShareDiskData02.vmdk" scsi1:3.mode = "independent-persistent" scsi1:3.redo = ""
scsi1:4.deviceType = "disk" scsi1:4.present = "TRUE" scsi1:4.fileName = "E:SoftwareInstallvmwareSharedDiskASMShareDiskFlash.vmdk" scsi1:4.mode = "independent-persistent" scsi1:4.redo = "" scsi1.pciSlotNumber = "37" usb:0.present = "TRUE" usb:0.deviceType = "hid" usb:0.port = "0" usb:0.parent = "-1" |
注意:这个文件中的每一行都不能重复,否则会报错, 而且不要去改变文件的编码格式
(如果提示需要存储为其他编码格式,比如unicode, 那么就是拷贝的格式有问题,需要手工写入 )。
最后开启虚拟机程序(注意,一定要重新启动vmware界面程序),查看每个节点虚拟机
Devices部分,在未开启各个虚拟机的时候就应该可以看到磁盘挂载情况 。 然后开机
再次确认 。 如果在未开启时没有看到磁盘信息, 那么就是写入vmx文件的语法有问题,
可以手工写入(而不是拷贝)。
当然也可以通过VMWare图形界面建立磁盘,注意共享磁盘选择SCSI 1而不是0才可以。我这里就是用的图形界面方式,总之不管是图形界面还是命令创建,最后添加到虚拟机里的每一个磁盘属性应当如下图所示,
注意选择磁盘时候需要选取 SCSI 1:1,SCSI 1:2,我这里有四个共享磁盘,那么就依次是SCSI 1:1,SCSI 1:2,SCSI 1:3,SCSI 1:4
2.4.安装JDK
2.4.1.准备JDK
在百度搜索:JDK下载
2.4.2.上传JDK
put E:软件安装文件jdk-8u11-linux-x64.rpm /home/linuxrac1/Downloads
put E:软件安装文件linux.x64_11gR2_database_1of2.zip /home/linuxrac1/Downloads
put E:软件安装文件linux.x64_11gR2_database_2of2.zip /home/linuxrac1/Downloads
put E:软件安装文件jdk-8u11-linux-x64.rpm /home/linuxrac1/Downloads
2.4.3.安装JDK
|
安装JDK: |
|
[linuxrac1@localhost Downloads]# su root Password: [linuxrac1@localhost Downloads]# rpm -ivh jdk-8u11-linux-x64.rpm Preparing... ###########################################[100%] 1:jdk ###########################################[100%] Unpacking JAR files... rt.jar... jsse.jar... charsets.jar... tools.jar... localedata.jar... jfxrt.jar... [root@localhost Downloads]#
total 16 lrwxrwxrwx 1 root root 16 Sep 3 18:40 default -> /usr/java/latest drwxr-xr-x 8 root root 4096 Sep 3 18:40 jdk1.8.0_11 lrwxrwxrwx 1 root root 21 Sep 3 18:40 latest -> /usr/java/jdk1.8.0_11 [root@linuxrac1 java]# cd jdk1.8.0_11 [root@linuxrac1 jdk1.8.0_11]# ls bin javafx-src.zip man THIRDPARTYLICENSEREADME-JAVAFX.txt COPYRIGHT jre README.html THIRDPARTYLICENSEREADME.txt db lib release include LICENSE src.zip [root@linuxrac1 jdk1.8.0_11]# pwd /usr/java/jdk1.8.0_11 |
2.4.4.配置JDK环境变量
|
查看安装JDK的目录:/usr/java/ |
|
[root@linuxrac1 ~]# cd /usr/java/ [root@linuxrac1 java]# ll total 16 lrwxrwxrwx 1 root root 16 Sep 3 18:40 default -> /usr/java/latest drwxr-xr-x 8 root root 4096 Sep 3 18:40 jdk1.8.0_11 lrwxrwxrwx 1 root root 21 Sep 3 18:40 latest -> /usr/java/jdk1.8.0_11 [root@linuxrac1 java]# cd jdk1.8.0_11 [root@linuxrac1 jdk1.8.0_11]# ls bin javafx-src.zip man THIRDPARTYLICENSEREADME-JAVAFX.txt COPYRIGHT jre README.html THIRDPARTYLICENSEREADME.txt db lib release include LICENSE src.zip [root@linuxrac1 jdk1.8.0_11]# pwd /usr/java/jdk1.8.0_11 |
|
编辑profile |
|
[root@linuxrac1 ~]# cd /etc [root@linuxrac1 etc]# ls profile profile [root@linuxrac1 etc]# vi profile # /etc/profile
# System wide environment and startup programs, for login setup # Functions and aliases go in /etc/bashrc pathmunge () { if ! echo $PATH | /bin/egrep -q "(^|:)$1($|:)" ; then if [ "$2" = "after" ] ; then PATH=$PATH:$1 else PATH=$1:$PATH fi fi }
# ksh workaround if [ -z "$EUID" -a -x /usr/bin/id ]; then EUID=`id -u` UID=`id -ru` fi
# Path manipulation # if [ "$EUID" = "0" ]; then pathmunge /sbin pathmunge /usr/sbin pathmunge /usr/local/sbin # fi # set environment by HondaHsu 2014 JAVA_HOME=/usr/java/jdk1.8.0_11 JRE_HOME=/usr/java/jdk1.8.0_11/jre PATH=$PATH:$JAVA_HOME/bin:$JRE_HOME/bin CLASSPATH=.:$JAVA_HOME/lib/dt.jar:$JAVA_HOME/lib/tool.jar:$JRE_HOME/lib: export JAVA_HOME JRE_HOME PATH CLASSPATH
[root@linuxrac1 etc]# java -version java version "1.8.0_11" Java(TM) SE Runtime Environment (build 1.8.0_11-b12) Java HotSpot(TM) 64-Bit Server VM (build 25.11-b03, mixed mode) |
2.5. 配置网络
2.5.1. 配置网络
Oracle Rac数据库涉及到公用网络和私有网络,因此要做网络划分和IP地址规划,下表列出了要安装的RAC数据库对应的IP地址、主机名以及网络连接类型:
|
Rac1 |
||||
|
主机名 |
IP址址 |
子网 |
网络类型 |
解析方式 |
|
Eth0 |
10.10.97.161 |
255.255.255.0 |
公用网络 |
|
|
Eth1 |
192.168.2.116 |
255.255.255.0 |
私有网络 |
|
|
10.10.97.181 |
255.255.255.0 |
虚拟网络 |
||
|
/etc/hosts |
||||
|
#eth0 public 10.10.97.161 linuxrac1 10.10.97.167 linuxrac2 #eth1 private 192.168.2.116 linuxrac1-pri 192.168.2.216 linuxrac2-priv #virtual 10.10.97.181 linuxrac1-vip 10.10.97.183 linuxrac2-vip #scan 10.10.97.193 linuxrac-scan |
||||
|
Rac2 |
||||
|
主机名 |
IP址址 |
子网 |
网络类型 |
解析方式 |
|
Eth0 |
10.10.97.167 |
255.255.255.0 |
公用网络 |
|
|
Eth1 |
192.168.2.216 |
255.255.255.0 |
私有网络 |
|
|
10.10.97.183 |
255.255.255.0 |
虚拟网络 |
||
|
/etc/hosts |
||||
|
#eth0 public 10.10.97.161 linuxrac1 10.10.97.167 linuxrac2 #eth1 private 192.168.2.116 linuxrac1-pri 192.168.2.216 linuxrac2-priv #virtual 10.10.97.181 linuxrac1-vip 10.10.97.183 linuxrac2-vip #scan 10.10.97.193 linuxrac-scan |
||||
公网与私网IP设置在网卡上,虚拟IP不用设置.
通过ifdown,ifup使配置的IP生效:
|
[root@linuxrac2 Desktop]# ifdown eth0 Device state: 3 (disconnected) [root@linuxrac2 Desktop]# ifdown eth1 Device state: 3 (disconnected) [root@linuxrac2 Desktop]# ifup eth0 Active connection state: activating Active connection path: /org/freedesktop/NetworkManager/ActiveConnection/2 state: activated Connection activated [root@linuxrac2 Desktop]# ifup eth1 Active connection state: activated Active connection path: /org/freedesktop/NetworkManager/ActiveConnection/3 |
2.6. 安装Oracle所依赖的必要包
2.6.1. 检查Oracle所依赖的必要rpm包
|
[root@localhost /]#rpm -q binutils compat-libstdc elfutils-libelf elfutils-libelf-devel expat gcc |
2.6.2. 准备Oracle所依赖的必要包
- 在Linux安装文件的CentOS-5.4-x86_64-bin-DVD1Packages文件夹查找缺少的依赖包:
- yum 使用http://mirror.centos.org的镜像更新:http://mirror.centos.org/centos/5/os/x86_64/CentOS/
另外,也可以通过修改yum.repos.d下的CenOS的镜像仓库地址,如访问163的镜像,操作如下:
1) 备份系统原来的CentOS-Base.repo文件:
|
[root@localhost /]#cd /etc/yum.repos.d/ [root@localhost /]#cp -a CentOS-Base.repo CentOS-Base.repo.bak |
2) 用vi打开CentOS-Base.repo文件:
|
[root@localhost /]#vim CentOS-Base.repo |
然后,按Insert键进入文本编辑状态
3) 修改后的CentOS-Base.repo文件,代码如下:
# CentOS-Base.repo
|
# CentOS-Base.repo [base] gpgkey=http://mirrors.163.com/centos/RPM-GPG-KEY-CentOS-6 #released updates gpgkey=http://mirrors.163.com/centos/RPM-GPG-KEY-CentOS-6 #packages used/produced in the build but not released gpgkey=http://mirrors.163.com/centos/RPM-GPG-KEY-CentOS-6 #additional packages that may be useful gpgkey=http://mirrors.163.com/centos/RPM-GPG-KEY-CentOS-6 #additional packages that extend functionality of existing packages gpgkey=http://mirrors.163.com/centos/RPM-GPG-KEY-CentOS-6 |
保存:先按Esc,然后按“:”,再:“wq”。
2.6.3. 上传到虚拟机LINUX上
|
通过SecureCRT上传:oracle 所依赖的一些包 |
|
put E: emp rpms.zip/home/linuxrac2/Downloads |
然后解压:
|
解压所上传的压缩包: |
|
put E: emp rpms.zip /home/linuxrac2/Downloads |
2.6.4.安装Oracle所依赖的必要包
例如:
|
[root@localhost rpms]# rpm -ivh pdksh-5.2.14-37.el5_8.1.x86_64.rpm [root@localhost rpms]# rpm -ivh unixODBC-2.2.14-12.el6_3.x86_64.rpm [root@localhost rpms]# rpm -ivh unixODBC-devel-2.2.14-12.el6_3.x86_64.rpm [root@localhost rpms]# rpm -ivh gcc-4.4.7-3.el6.x86_64.rpm |
- 在安装 oracle x64 时,需要安装 32 位的 compat-libstdc++,但是,直接运行安装时,会由于依赖关系,安装不能完成,如果手工输入这么多的包,就过于复杂了。更关键的是,它列出的名字与包的名字并不一一对应。
|
[root@localhost rpms]#rpm -ivh compat-libstdc++-33-3.2.3-69.el6.i686.rpm |
1) 建立光盘的挂接点
mkdir /media/cdrom
这个路径是必须的,因为,系统中设置的光盘路径就是这个。也可手工
2) 挂接光盘(注,挂载设备类型及内容请参考CentOS-Media.repo中的描述)
mount /dev/dvd /media/cdrom/
3) 下面就可以使用了。
命令格式:
yum --disablerepo=* --enablerepo=c6-media [命令]
比如:
查询组:
yum --disablerepo=* --enablerepo=c6-media grouplist
安装 X11。
yum --disablerepo=* --enablerepo=c6-media groupinstall "X11"
如果不是组,比如,安装 perl:
yum --disablerepo=* --enablerepo=c6-media install "perl"
- 于是,我们就可以用下面的命令,它会自动把依赖的包全部装上:
|
[root@localhost rpms]#yum --disablerepo=* --enablerepo=c6-media install compat-libstdc++-33-3.2.3-69.el6.i686.rpm |
1.下载repo文件:
|
[root@localhost etc]# cd yum.repos.d [root@localhost yum.repos.d]# wget http://mirrors.163.com/.help/CentOS6-Base-163.repo |
2.备份并替换系统的repo文件
|
[root@localhost yum.repos.d]# mv CentOS-Base.repo CentOS-Base.repo.bak [root@localhost yum.repos.d]# mv CentOS6-Base-163.repo CentOS-Base.repo |
3.执行yum源更新
|
[root@localhost yum.repos.d]# yum clean all [root@localhost yum.repos.d]# yum makecache [root@localhost yum.repos.d]# yum update |
2.7.配置资源与参数
2.7.1. 修改主机名称
|
[root@linuxrac1 ~]# cd /etc/sysconfig [root@linuxrac1 sysconfig]# vi network NETWORKING=yes NETWORKING_IPV6=no HOSTNAME=linuxrac1 [root@linuxrac1 sysconfig]# |
|
[root@linuxrac2 ~]# cd /etc/sysconfig [root@linuxrac2 sysconfig]# vi network NETWORKING=yes NETWORKING_IPV6=no HOSTNAME=linuxrac2 [root@linuxrac2 sysconfig]# |
2.7.2. 配置用户,组,目录和权
创建组之前要确认一下/etc/group及/etc/passwd下的组及用户,确保每个节点上的uid及gid 一致 (当然也可以建组的时候加入id号,groupadd -g 501 oinstall) .
根据规划:
Grid Infrastructure操作系统用户grid , 主组为oinstall,辅助组为asmadmin, asmdba, asmoper
Oracle RAC操作系统用户oracle , 主组为oinstall , 辅助组为dba, oper , asmdba
|
[root@localhost /]# groupadd oinstall [root@localhost /]# groupadd dba [root@localhost /]# groupadd oper [root@localhost /]# groupadd asmadmin [root@localhost /]# groupadd asmdba [root@localhost /]# groupadd asmoper [root@localhost /]# useradd -g oinstall -G dba,asmdba,asmadmin,asmoper grid [root@localhost /]# useradd -g oinstall -G dba,oper,asmdba oracle [root@localhost /]# echo -n oracle|passwd --stdin grid Changing password for user grid. passwd: all authentication tokens updated successfully. [root@localhost /]# echo -n oracle|passwd --stdin oracle Changing password for user oracle. passwd: all authentication tokens updated successfully. [root@localhost /]# mkdir -p /u01/app/11.2.0/grid [root@localhost /]# mkdir -p /u01/app/grid [root@localhost /]# mkdir -p /u01/app/oracle [root@localhost /]# chown grid:oinstall /u01/app/11.2.0/grid [root@localhost /]# chown grid:oinstall /u01/app/grid [root@localhost /]# chown -R oracle:oinstall /u01/app/oracle [root@localhost /]# chmod -R 777 /u01/ [root@localhost /]# chown -R grid:oinstall /u01 |
2.7.3.修改系统内核参数/etc/sysctl.conf
|
[root@linuxrac1 etc]# vi sysctl.conf # add parameter for oracle fs.aio-max-nr = 1048576 fs.file-max = 6815744 kernel.shmall = 2097152 kernel.shmmax = 1073741824 kernel.shmmni = 4096 kernel.sem = 250 32000 100 128 net.ipv4.ip_local_port_range = 9000 65500 net.core.rmem_default = 262144 net.core.rmem_max = 4194304 net.core.wmem_default = 262144 net.core.wmem_max = 1048586 |
2.7.4.配置/etc/security/limits.conf
|
[root@linuxrac1]# vi /etc/security/limits.conf #add parameter for oracle and grid oracle soft nproc 2047 oracle hard nproc 16384 oracle soft nofile 1024 oracle hard nofile 65536 oracle soft stack 10240 grid soft nproc 2047 grid hard nproc 16384 grid soft nofile 1024 grid hard nofile 65536 grid soft stack 10240 |
2.7.5. 配置/etc/profile
|
[root@linuxrac1 etc]# vi profile # for oracle if [ $USER = "oracle" ] || [ $USER = "grid" ];then if [ $SHELL = "/bin/ksh" ];then ulimit -p 16384 ulimit -n 65536 else ulimit -u 16384 -n 65536 fi umask 022 fi ############################# export PATH=$PATH:/u01/app/11.2.0/grid/bin #color of grep alias grep='grep --color=auto' |
2.8.配置用户环境
2.8.1. 配置节点RAC1
|
配置grid用户环境变量: |
|
cat >> /home/grid/.bash_profile <<EOF export TMP=/tmp; export TMPDIR=$TMP; export ORACLE_HOSTNAME=linuxrac1; export ORACLE_SID=+ASM1; export ORACLE_BASE=/u01/app/grid; export ORACLE_HOME=/u01/app/11.2.0/grid; export NLS_DATE_FORMAT="yy-mm-dd HH24:MI:SS"; export PATH=$ORACLE_HOME/bin:$PATH; export NLS_LANG=AMERICAN_AMERICA.ZHS16GBK; EOF |
|
配置oracle用户环境变量: |
|
cat >> /home/oracle/.bash_profile <<EOF export TMP=/tmp; export TMPDIR=$TMP; export ORACLE_HOSTNAME= linuxrac1; export ORACLE_BASE=/u01/app/oracle; export ORACLE_HOME=$ORACLE_BASE/product/11.2.0/db_1; export ORACLE_UNQNAME=prod; export ORACLE_SID=prod1; export ORACLE_TERM=xterm; export PATH=/usr/sbin:$PATH; export PATH=$ORACLE_HOME/bin:$PATH; export LD_LIBRARY_PATH=$ORACLE_HOME/lib:/lib:/usr/lib; export CLASSPATH=$ORACLE_HOME/JRE:$ORACLE_HOME/jlib:$ORACLE_HOME/rdbms/jlib; export NLS_DATE_FORMAT="yyyy-mm-dd HH24:MI:SS"; export NLS_LANG=AMERICAN_AMERICA.ZHS16GBK; EOF |
2.8.2.配置节点RAC2
|
配置grid用户环境变量: |
|
cat >> /home/grid/.bash_profile <<EOF export TMP=/tmp; export TMPDIR=$TMP; export ORACLE_HOSTNAME= linuxrac2; export ORACLE_SID=+ASM2; export ORACLE_BASE=/u01/app/grid; export ORACLE_HOME=/u01/app/11.2.0/grid; export NLS_DATE_FORMAT="yy-mm-dd HH24:MI:SS"; export PATH=$ORACLE_HOME/bin:$PATH; export NLS_LANG=AMERICAN_AMERICA.ZHS16GBK; EOF |
|
配置oracle用户环境变量: |
|
cat >> /home/oracle/.bash_profile <<EOF export TMP=/tmp; export TMPDIR=$TMP; export ORACLE_HOSTNAME=linuxrac2; export ORACLE_BASE=/u01/app/oracle; export ORACLE_HOME=$ORACLE_BASE/product/11.2.0/db_1; export ORACLE_UNQNAME=prod; export ORACLE_SID=prod2; export ORACLE_TERM=xterm; export PATH=/usr/sbin:$PATH; export PATH=$ORACLE_HOME/bin:$PATH; export LD_LIBRARY_PATH=$ORACLE_HOME/lib:/lib:/usr/lib; export CLASSPATH=$ORACLE_HOME/JRE:$ORACLE_HOME/jlib:$ORACLE_HOME/rdbms/jlib; export NLS_DATE_FORMAT="yyyy-mm-dd HH24:MI:SS"; export NLS_LANG=AMERICAN_AMERICA.ZHS16GBK; EOF |
2.9.配置用户等效性(可选项)
Oracle 11g r2 ssh也可以在安装过程中配置.
2.9.1. grid用户等效性
|
1.以下均以grid用户执行: 在两个节点的grid主目录分别创建.ssh目录,并赋予权限 |
|
linuxrac1 [grid@linuxrac1 ~]$mkdir ~/.ssh [grid@linuxrac1 ~]$chmod 755 ~/.ssh [grid@linuxrac1 ~]$ssh-keygen -t rsa Generating public/private rsa key pair. Enter file in which to save the key (/home/grid/.ssh/id_rsa): Enter passphrase (empty for no passphrase): Enter same passphrase again: Your identification has been saved in /home/grid/.ssh/id_rsa. Your public key has been saved in /home/grid/.ssh/id_rsa.pub. The key fingerprint is: 7a:7b:62:31:da:07:88:0d:22:46:46:28:d1:cc:87:e1 grid@linuxrac1 [grid@linuxrac1 ~]$ssh-keygen -t dsa Generating public/private dsa key pair. Enter file in which to save the key (/home/grid/.ssh/id_dsa): Enter passphrase (empty for no passphrase): Enter same passphrase again: Your identification has been saved in /home/grid/.ssh/id_dsa. Your public key has been saved in /home/grid/.ssh/id_dsa.pub. The key fingerprint is: 19:3b:fc:23:85:8d:f4:58:7d:f6:fd:80:99:ce:f8:52 grid@linuxrac1
linuxrac2 [grid@linuxrac2 ~]$ mkdir ~/.ssh [grid@linuxrac2 ~]$ chmod 755 ~/.ssh [grid@linuxrac2 ~]$ ssh-keygen -t rsa Generating public/private rsa key pair. Enter file in which to save the key (/home/grid/.ssh/id_rsa): Enter passphrase (empty for no passphrase): Enter same passphrase again: Your identification has been saved in /home/grid/.ssh/id_rsa. Your public key has been saved in /home/grid/.ssh/id_rsa.pub. The key fingerprint is: 69:8c:94:2b:2b:a4:8d:33:82:8f:b0:49:03:a1:1a:b9 grid@linuxrac2
[grid@linuxrac2 ~]$ ssh-keygen -t dsa Generating public/private dsa key pair. Enter file in which to save the key (/home/grid/.ssh/id_dsa): Enter passphrase (empty for no passphrase): Enter same passphrase again: Your identification has been saved in /home/grid/.ssh/id_dsa. Your public key has been saved in /home/grid/.ssh/id_dsa.pub. The key fingerprint is: 1f:4d:e7:3f:c7:4d:d8:f0:55:f0:eb:c1:ea:74:93:24 grid@linuxrac2
以上用默认配置,一路回车即可
linuxrac1 cat ~/.ssh/*.pub >> ~/.ssh/authorized_keys ssh grid@linuxrac2 cat ~/.ssh/*.pub >> ~/.ssh/authorized_keys 或 ssh grid@linuxrac2 cat ~/.ssh/id_rsa.pub >> ~/.ssh/authorized_keys ssh grid@linuxrac2 cat ~/.ssh/id_dsa.pub >> ~/.ssh/authorized_keys grid@linuxrac1 ~]$ cd .ssh [grid@linuxrac1 .ssh]$ ll total 48 -rw-r--r-- 1 grid oinstall 2000 Sep 25 00:48 authorized_keys -rw------- 1 grid oinstall 668 Sep 25 00:43 id_dsa -rw-r--r-- 1 grid oinstall 604 Sep 25 00:43 id_dsa.pub -rw------- 1 grid oinstall 1675 Sep 25 00:42 id_rsa -rw-r--r-- 1 grid oinstall 396 Sep 25 00:42 id_rsa.pub -rw-r--r-- 1 grid oinstall 404 Sep 25 00:48 known_hosts
linuxrac2 cat ~/.ssh/*.pub >> ~/.ssh/authorized_keys ssh grid@linuxrac1 cat ~/.ssh/*.pub >> ~/.ssh/authorized_keys 或 ssh grid@linuxrac1 cat ~/.ssh/id_rsa.pub >> ~/.ssh/authorized_keys ssh grid@linuxrac1 cat ~/.ssh/id_dsa.pub >> ~/.ssh/authorized_keys |
|
2.建立等效性 rac1,rac2双节点执行 |
|
[grid@linuxrac1 ~]$ exec ssh-agent $SHELL [grid@linuxrac1 ~]$ ssh-add Identity added: /home/grid/.ssh/id_rsa (/home/grid/.ssh/id_rsa) Identity added: /home/grid/.ssh/id_dsa (/home/grid/.ssh/id_dsa) [grid@linuxrac1 ~]$ ssh linuxrac1 date [grid@linuxrac1 ~]$ ssh linuxrac1-priv date [grid@linuxrac1 ~]$ ssh linuxrac2 date [grid@linuxrac1 ~]$ ssh linuxrac2-priv date ssh linuxrac1 date; ssh linuxrac2 date |
|
[grid@linuxrac2 ~]$ exec ssh-agent $SHELL [grid@linuxrac2 ~]$ ssh-add Identity added: /home/grid/.ssh/id_rsa (/home/grid/.ssh/id_rsa) Identity added: /home/grid/.ssh/id_dsa (/home/grid/.ssh/id_dsa) [grid@linuxrac2 ~]$ ssh linuxrac1 date [grid@linuxrac2 ~]$ ssh linuxrac1-priv date [grid@linuxrac2 ~]$ ssh linuxrac2 date [grid@linuxrac2 ~]$ ssh linuxrac2-priv date |
2.9.2. oracle 用户等效性
|
以下均以oracle用户执行 |
|
linuxrac1 [oracle @linuxrac1 ~]$mkdir ~/.ssh [oracle @linuxrac1 ~]$chmod 755 ~/.ssh [oracle @linuxrac1 ~]$ssh-keygen -t rsa Generating public/private rsa key pair. Enter file in which to save the key (/home/oracle/.ssh/id_rsa): Enter passphrase (empty for no passphrase): Enter same passphrase again: Your identification has been saved in /home/oracle/.ssh/id_rsa. Your public key has been saved in /home/oracle/.ssh/id_rsa.pub. The key fingerprint is: e9:2b:1a:2b:ac:5f:91:be:0f:84:17:d7:bd:b7:15:d2 oracle@linuxrac1 [oracle @linuxrac1 ~]$ssh-keygen -t dsa Generating public/private dsa key pair. Enter file in which to save the key (/home/oracle/.ssh/id_dsa): Enter passphrase (empty for no passphrase): Enter same passphrase again: Your identification has been saved in /home/oracle/.ssh/id_dsa. Your public key has been saved in /home/oracle/.ssh/id_dsa.pub. The key fingerprint is: f5:0f:f5:0c:55:37:6a:08:ef:06:07:37:65:25:4a:15 oracle@linuxrac1
linuxrac2 [oracle @linuxrac2 ~]$ mkdir ~/.ssh [oracle @linuxrac2 ~]$ chmod 755 ~/.ssh [oracle @linuxrac2 ~]$ ssh-keygen -t rsa Generating public/private rsa key pair. Enter file in which to save the key (/home/oracle/.ssh/id_rsa): Enter passphrase (empty for no passphrase): Enter same passphrase again: Your identification has been saved in /home/oracle/.ssh/id_rsa. Your public key has been saved in /home/oracle/.ssh/id_rsa.pub. The key fingerprint is: 56:47:a0:94:67:44:d9:31:12:57:44:08:9d:84:25:a1 oracle@linuxrac2
[oracle @linuxrac2 ~]$ ssh-keygen -t dsa Generating public/private dsa key pair. Enter file in which to save the key (/home/oracle/.ssh/id_dsa): Enter passphrase (empty for no passphrase): Enter same passphrase again: Your identification has been saved in /home/oracle/.ssh/id_dsa. Your public key has been saved in /home/oracle/.ssh/id_dsa.pub. The key fingerprint is: ae:f0:06:77:62:33:86:dc:f4:0d:d9:c6:38:5e:cb:61 oracle@linuxrac2
以上用默认配置,一路回车即可 linuxrac1 cat ~/.ssh/*.pub >> ~/.ssh/authorized_keys ssh oracle@linuxrac2 cat ~/.ssh/*.pub >> ~/.ssh/authorized_keys 或 ssh oracle@linuxrac2 cat ~/.ssh/id_rsa.pub >> ~/.ssh/authorized_keys ssh oracle@linuxrac2 cat ~/.ssh/id_dsa.pub >> ~/.ssh/authorized_keys [oracle@linuxrac1 ~]$ cd .ssh [oracle@linuxrac1 .ssh]$ ll total 48 -rw-r--r-- 1 oracle oinstall 2008 Sep 25 02:20 authorized_keys -rw------- 1 oracle oinstall 668 Sep 25 02:09 id_dsa -rw-r--r-- 1 oracle oinstall 606 Sep 25 02:09 id_dsa.pub -rw------- 1 oracle oinstall 1675 Sep 25 02:09 id_rsa -rw-r--r-- 1 oracle oinstall 398 Sep 25 02:09 id_rsa.pub -rw-r--r-- 1 oracle oinstall 404 Sep 25 02:20 known_hosts linuxrac2 cat ~/.ssh/*.pub >> ~/.ssh/authorized_keys ssh oracle@linuxrac1 cat ~/.ssh/*.pub >> ~/.ssh/authorized_keys 或 ssh oracle@linuxrac1 cat ~/.ssh/id_rsa.pub >> ~/.ssh/authorized_keys ssh oracle@linuxrac1 cat ~/.ssh/id_dsa.pub >> ~/.ssh/authorized_keys
|
|
建立等效性 rac1,rac2双节点执行 |
|
[oracle@linuxrac1 ~]$ exec ssh-agent $SHELL [oracle@linuxrac1 ~]$ ssh-add Identity added: /home/oracle/.ssh/id_rsa (/home/oracle/.ssh/id_rsa) Identity added: /home/oracle/.ssh/id_dsa (/home/oracle/.ssh/id_dsa) [oracle@linuxrac1 ~]$ ssh linuxrac1 date [oracle@linuxrac1 ~]$ ssh linuxrac1-priv date [oracle@linuxrac1 ~]$ ssh linuxrac2 date [oracle@linuxrac1 ~]$ ssh linuxrac2-priv date
[oracle@linuxrac2 ~]$ exec ssh-agent $SHELL [oracle@linuxrac2 ~]$ ssh-add Identity added: /home/oracle/.ssh/id_rsa (/home/oracle/.ssh/id_rsa) Identity added: /home/oracle/.ssh/id_dsa (/home/oracle/.ssh/id_dsa)
|
- The authenticity of host '<host>' can't be established.
解决办法:在连接目标机上执行ssh -o StrictHostKeyChecking=no xxxx(机器名)
2.10.配置用户NTF服务
2.10.1.配置节点RAC1
|
1) |
[root@linuxrac1 sysconfig]#sed -i 's/OPTIONS/#OPTIONS/g' /etc/sysconfig/ntpd |
|
2) |
[root@linuxrac1 sysconfig]#cat >> /etc/sysconfig/ntpd << EOF > OPTIONS="-x -u ntp:ntp -p /var/run/ntpd.pid" > EOF |
|
3) |
[root@linuxrac1 sysconfig]#mv /etc/ntp.conf /etc/ntp.confbak |
|
4) |
[root@linuxrac1 sysconfig]# cat > /etc/ntp.conf << EOF > restrict 0.0.0.0 mask 0.0.0.0 nomodify > server 127.127.1.0 > fudge 127.127.1.0 stratum 10 > driftfile /var/lib/ntp/drift > broadcastdelay 0.008 > authenticate no > keys /etc/ntp/keys > EOF |
2.10.2.配置节点RAC2
|
1) |
[root@linuxrac2 sysconfig]# sed -i 's/OPTIONS/#OPTIONS/g' /etc/sysconfig/ntpd |
|
2) |
[root@linuxrac2sysconfig]# cat >> /etc/sysconfig/ntpd << EOF > OPTIONS="-x -u ntp:ntp -p /var/run/ntpd.pid" > EOF |
|
3) |
[root@linuxrac2 sysconfig]# mv /etc/ntp.conf /etc/ntp.confbak |
|
4) |
[root@linuxrac2 sysconfig]# cat >> /etc/ntp.conf << XL > restrict default kod nomodify notrap nopeer noquery > restrict 10.10.97.0mask 255.255.255.0 nomodify notrap > restrict 127.0.0.1 > server 10.10.97.168 > server 127.127.1.0 # local clock > fudge 127.127.1.0 stratum 10 > driftfile /var/lib/ntp/drift > broadcastdelay 0.008 > keys /etc/ntp/keys > XL |
2.10.3.启动服务(双节点)
|
[root@linuxrac1 etc] #service ntpd restart |
2.10.4.系统启动自动加载
|
[root@linuxrac1 etc] #chkconfig ntpd on |
3.1.安装并配置ASM驱动
3.3.1.检查内核
|
[root@linuxrac2 etc]# uname -r 2.6.18-164.el5 |
下载以下rpm包(注意rpm包版本和Linux内核版本一致):
Oracle ASMlib下载地址:http://www.oracle.com/technetwork/server-storage/linux/downloads/rhel5-084877.html
|
oracleasm-2.6.18-164.el5-2.0.5-1.el5.x86_64.rpm oracleasmlib-2.0.4-1.el5.x86_64.rpm oracleasm-support-2.1.7-1.el5.ppc64.rpm |
3.1.2.安装oracleasm包(所有节点执行)
|
[root@linuxrac1]# su root [root@linuxrac1]# ll total 128 -rw-r--r--. 1 root root 33840 Aug 5 2014 oracleasm-2.6.18-164.el5-2.0.5-1.el5.x86_64.rpm -rw-r--r--. 1 root root 13300 Aug 5 2014 oracleasmlib-2.0.4-1.el5.x86_64.rpm -rw-r--r--. 1 root root 74984 Aug 5 2014 oracleasm-support-2.1.7-1.el5.ppc64.rpm [root@linuxrac1 ~]# rpm -ivh oracleasm-support-2.1.8-1.el5.x86_64.rpm warning: oracleasm-support-2.1.8-1.el5.x86_64.rpm: Header V3 DSA signature: NOKEY, key ID 1e5e0159 Preparing... ########################################### [100%] 1:oracleasm-support ########################################### [100%] [root@linuxrac1 ~]# rpm -ivh oracleasm-2.6.18-164.el5-2.0.5-1.el5.x86_64.rpm warning: oracleasm-2.6.18-164.el5-2.0.5-1.el5.x86_64.rpm: Header V3 DSA signature: NOKEY, key ID 1e5e0159 Preparing... ########################################### [100%] 1:oracleasm-2.6.18-164.el########################################### [100%] [root@linuxrac1 ~]# rpm -ivh oracleasmlib-2.0.4-1.el5.x86_64.rpm warning: oracleasmlib-2.0.4-1.el5.x86_64.rpm: Header V3 DSA signature: NOKEY, key ID 1e5e0159 Preparing... ########################################### [100%] 1:oracleasmlib ########################################### [100%] |
|
[oracle@linuxrac2 home]$ scp linuxrac1@192.168.2.106:/home/linuxrac1/Downloads/2.ziplinuxrac2@192.168.2.206:/home/linuxrac2/Downloads linuxrac1@192.168.2.106's password: linuxrac2@192.168.2.206's password: 2.zip 100% 110KB 110.5KB/s 00:00 Connection to 192.168.2.106 closed. [oracle@linuxrac2 home]$ su root [root@linuxrac2 linuxrac2]# cd Downloads [root@linuxrac2 Downloads]# ll total 7736 -rw-r--r--. 1 linuxrac2 linuxrac2 113141 Aug 7 19:45 2.zip drwxrwxr-x. 2 linuxrac2 linuxrac2 4096 Jul 25 15:05 rpms -rw-rw-r--. 1 linuxrac2 linuxrac2 7801347 Jul 26 01:27 rpms.zip [root@linuxrac2 Downloads]# unzip 2.zip [root@linuxrac2 ]# ll total 128 -rw-r--r--. 1 root root 33840 Aug 5 16:28 kmod-oracleasm-2.0.6.rh1-2.el6.x86_64.rpm -rw-r--r--. 1 root root 13300 Aug 5 15:59 oracleasmlib-2.0.4-1.el6.x86_64.rpm -rw-r--r--. 1 root root 74984 Aug 5 15:52 oracleasm-support-2.1.8-1.el6.x86_64.rpm Last login: Tue Sep 23 00:39:40 2014 [root@linuxrac2 ~]# rpm -ivh oracleasm-support-2.1.8-1.el5.x86_64.rpm warning: oracleasm-support-2.1.8-1.el5.x86_64.rpm: Header V3 DSA signature: NOKEY, key ID 1e5e0159 Preparing... ########################################### [100%] 1:oracleasm-support ########################################### [100%] [root@linuxrac2 ~]# rpm -ivh oracleasm-2.6.18-164.el5-2.0.5-1.el5.x86_64.rpm warning: oracleasm-2.6.18-164.el5-2.0.5-1.el5.x86_64.rpm: Header V3 DSA signature: NOKEY, key ID 1e5e0159 Preparing... ########################################### [100%] 1:oracleasm-2.6.18-164.el########################################### [100%] [root@linuxrac2 ~]# rpm -ivh oracleasmlib-2.0.4-1.el5.x86_64.rpm warning: oracleasmlib-2.0.4-1.el5.x86_64.rpm: Header V3 DSA signature: NOKEY, key ID 1e5e0159 Preparing... ########################################### [100%] 1:oracleasmlib ########################################### [100%] |
|
[root@linuxrac1 etc]# rpm -qa | grep oracleasm oracleasmlib-2.0.4-1.el5 oracleasm-support-2.1.8-1.el5 oracleasm-2.6.18-164.el5-2.0.5-1.el5 |
3.1.3. 初始化 asmlib(在所有节点执行)
|
启动oracle asmlib: |
|
[root@linuxrac1 etc]# /etc/init.d/oracleasm start Initializing the Oracle ASMLib driver: [ OK ] Scanning the system for Oracle ASMLib disks: [ OK ] |
|
启用asmlib: |
|
[root@linuxrac1 etc]# /etc/init.d/oracleasm enable Writing Oracle ASM library driver configuration: done Initializing the Oracle ASMLib driver: [ OK ] Scanning the system for Oracle ASMLib disks: [ OK ] |
|
以root用户配置节点linuxrac1 |
|
[root@linuxrac1 /]# /etc/init.d/oracleasm configure -i Configuring the Oracle ASM library driver.
This will configure the on-boot properties of the Oracle ASM library driver. The following questions will determine whether the driver is loaded on boot and what permissions it will have. The current values will be shown in brackets ('[]'). Hitting <ENTER> without typing an answer will keep that current value. Ctrl-C will abort.
Default user to own the driver interface []: grid Default group to own the driver interface []: oinstall Start Oracle ASM library driver on boot (y/n) [n]: y Scan for Oracle ASM disks on boot (y/n) [y]: y Writing Oracle ASM library driver configuration: done Initializing the Oracle ASMLib driver: [ OK ] Scanning the system for Oracle ASMLib disks: [ OK ] [root@linuxrac1 /]# /usr/sbin/oracleasm init Creating /dev/oracleasm mount point: /dev/oracleasm Loading module "oracleasm": oracleasm Mounting ASMlib driver filesystem: /dev/oracleasm |
|
以root用户配置节点linuxrac2 |
|
[root@linuxrac2 /]# oracleasm configure -i Configuring the Oracle ASM library driver.
This will configure the on-boot properties of the Oracle ASM library driver. The following questions will determine whether the driver is loaded on boot and what permissions it will have. The current values will be shown in brackets ('[]'). Hitting <ENTER> without typing an answer will keep that current value. Ctrl-C will abort.
Default user to own the driver interface []: grid Default group to own the driver interface []: oinstall Start Oracle ASM library driver on boot (y/n) [n]: y Scan for Oracle ASM disks on boot (y/n) [y]: y Writing Oracle ASM library driver configuration: done Initializing the Oracle ASMLib driver: [ OK ] Scanning the system for Oracle ASMLib disks: [ OK ] [root@linuxrac2 /]# oracleasm init Creating /dev/oracleasm mount point: /dev/oracleasm Loading module "oracleasm": oracleasm Mounting ASMlib driver filesystem: /dev/oracleasm |
3.1.4. 磁盘分区(节点1执行)
|
1.查询磁盘 |
|
[root@linuxrac1 dev]# fdisk -l
Disk /dev/sda: 32.2 GB, 32212254720 bytes 255 heads, 63 sectors/track, 3916 cylinders Units = cylinders of 16065 * 512 = 8225280 bytes Sector size (logical/physical): 512 bytes / 512 bytes I/O size (minimum/optimal): 512 bytes / 512 bytes Disk identifier: 0x0005464c
Device Boot Start End Blocks Id System /dev/sda1 * 1 39 307200 83 Linux Partition 1 does not end on cylinder boundary. /dev/sda2 39 545 4063232 82 Linux swap / Solaris Partition 2 does not end on cylinder boundary. /dev/sda3 545 3917 27085824 83 Linux
Disk /dev/sdb: 4294 MB, 4294967296 bytes 255 heads, 63 sectors/track, 522 cylinders Units = cylinders of 16065 * 512 = 8225280 bytes Sector size (logical/physical): 512 bytes / 512 bytes I/O size (minimum/optimal): 512 bytes / 512 bytes Disk identifier: 0x00000000
Disk /dev/sde: 5368 MB, 5368709120 bytes 255 heads, 63 sectors/track, 652 cylinders Units = cylinders of 16065 * 512 = 8225280 bytes Sector size (logical/physical): 512 bytes / 512 bytes I/O size (minimum/optimal): 512 bytes / 512 bytes Disk identifier: 0x00000000
Disk /dev/sdc: 21.5 GB, 21474836480 bytes 255 heads, 63 sectors/track, 2610 cylinders Units = cylinders of 16065 * 512 = 8225280 bytes Sector size (logical/physical): 512 bytes / 512 bytes I/O size (minimum/optimal): 512 bytes / 512 bytes Disk identifier: 0x00000000
Disk /dev/sdd: 21.5 GB, 21474836480 bytes 255 heads, 63 sectors/track, 2610 cylinders Units = cylinders of 16065 * 512 = 8225280 bytes Sector size (logical/physical): 512 bytes / 512 bytes I/O size (minimum/optimal): 512 bytes / 512 bytes Disk identifier: 0x00000000 |
|
2.磁盘分区,注意分区的Last cylinder的值不能选错,选择default 值就好。 |
|
[root@linuxrac1 /]# fdisk /dev/sdb Device contains neither a valid DOS partition table, nor Sun, SGI or OSF disklabel Building a new DOS disklabel with disk identifier 0x52362e93. Changes will remain in memory only, until you decide to write them. After that, of course, the previous content won't be recoverable.
Warning: invalid flag 0x0000 of partition table 4 will be corrected by w(rite)
WARNING: DOS-compatible mode is deprecated. It's strongly recommended to switch off the mode (command 'c') and change display units to sectors (command 'u').
Command (m for help): n Command action e extended p primary partition (1-4) p Partition number (1-4): 1 First cylinder (1-522, default 1): 1 Last cylinder, +cylinders or +size{K,M,G} (1-522, default 522): 522
Command (m for help): w The partition table has been altered!
Calling ioctl() to re-read partition table. Syncing disks. |
/dev/sdc,/dev/sdd,/dev/sde执行相同操作。
3.1.5.创建 asm 磁盘,在节点1执行
|
1.使用oracleasm createdisk 创建ASM磁盘label:在一个节点执行即可 |
|
[root@linuxrac1 /]# /etc/init.d/oracleasm createdisk OCR_VOTE /dev/sdb1 Marking disk "OCR_VOTE" as an ASM disk: [ OK ] [root@linuxrac1 /]# oracleasm createdisk OCR_VOTE /dev/sdb1 Device "/dev/sdb1" is already labeled for ASM disk "OCR_VOTE" [root@linuxrac1 /]# oracleasm createdisk DATA /dev/sdc1 Writing disk header: done Instantiating disk: done [root@linuxrac1 /]# oracleasm createdisk DATA2 /dev/sdd1 Writing disk header: done Instantiating disk: done [root@linuxrac1 /]# oracleasm createdisk FRA /dev/sde1 Writing disk header: done Instantiating disk: done [root@linuxrac1 /]# oracleasm scandisks Reloading disk partitions: done Cleaning any stale ASM disks... Scanning system for ASM disks... |
|
2.查看创建后的ASM磁盘 |
|
[root@linuxrac1 /]# oracleasm listdisks DATA DATA2 FRA OCR_VOTE |
|
3.检查磁盘是否已挂载在oracleasm文件系统: |
|
[root@linuxrac1 /]# ls -l /dev/oracleasm/disks total 0 brw-rw---- 1 grid oinstall 8, 33 Sep 24 18:29 DATA brw-rw---- 1 grid oinstall 8, 49 Sep 24 18:29 DATA2 brw-rw---- 1 grid oinstall 8, 65 Sep 24 18:29 FRA brw-rw---- 1 grid oinstall 8, 17 Sep 24 18:29 OCR_VOTE |
3.1.6. 节点2扫描识别ASM磁盘
|
节点2扫描识别ASM磁盘 |
|
root@linuxrac2 etc]# oracleasm scandisks Reloading disk partitions: done Cleaning any stale ASM disks... Scanning system for ASM disks... Instantiating disk "OCR_VOTE" Instantiating disk "DATA" Instantiating disk "DATA2" Instantiating disk "FRA" |
3.2.安装 cvuqdisk 软件包
3.2.1. 准备Oracle Grid安装包
|
上传Grid 、Oracle 安装文件: |
|
sftp> put E:Softwarelinux.x64_11gR2_grid.zip /root/ Uploading linux.x64_11gR2_grid.zip to /root/linux.x64_11gR2_grid.zip 100% 1028220KB 7616KB/s 00:02:15 AA/s 00:01:44 ETA sftp> put E:Softwarelinux.x64_11gR2_database_2of2.zip /root/ Uploading linux.x64_11gR2_database_2of2.zip to /root/linux.x64_11gR2_database_2of2.zip 100% 1085367KB 7333KB/s 00:02:28 0:00:03 ETA sftp> put E:Softwarelinux.x64_11gR2_database_1of2.zip /root/ Uploading linux.x64_11gR2_database_1of2.zip to /root/linux.x64_11gR2_database_1of2.zip 100% 1210223KB 7708KB/s 00:02:37 AA:08 ETA |
3.2.2.安装cvuqdisk软件包(所有节点执行)
|
1.解压linux.x64_11gR2_grid.zip |
|
[root@linuxrac1 /]#unzip linux.x64_11gR2_grid.zip -d /home/grid/ [root@linuxrac1 grid]# cd grid [root@linuxrac1 grid]# ll total 76 drwxr-xr-x 9 root root 4096 Aug 16 2009 doc drwxr-xr-x 4 root root 4096 Aug 15 2009 install drwxrwxr-x 2 root root 4096 Aug 15 2009 response drwxrwxr-x 2 root root 4096 Aug 15 2009 rpm -rwxrwxr-x 1 root root 3795 Jan 28 2009 runcluvfy.sh -rwxr-xr-x 1 root root 3227 Aug 15 2009 runInstaller drwxrwxr-x 2 root root 4096 Aug 15 2009 sshsetup drwxr-xr-x 14 root root 4096 Aug 15 2009 stage -rw-r--r-- 1 root root 4228 Aug 17 2009 welcome.html |
|
2.在两节点安装cvuqdisk |
|
[root@linuxrac1 grid]# cd rpm [root@linuxrac1 rpm]# ll total 12 -rw-rw-r-- 1 root root 8173 Jul 14 2009 cvuqdisk-1.0.7-1.rpm [root@linuxrac1 rpm]# rpm -ivh cvuqdisk-1.0.7-1.rpm Preparing... ########################################### [100%] Using default group oinstall to install package 1:cvuqdisk ########################################### [100%] [root@linuxrac2 grid]# cd grid [root@linuxrac2 grid]# ls doc install response rpm runcluvfy.sh runInstaller sshsetup stage welcome.html [root@linuxrac2 grid]# cd rpm [root@linuxrac2 rpm]# ll total 12 -rw-rw-r-- 1 root root 8173 Jul 14 2009 cvuqdisk-1.0.7-1.rpm [root@linuxrac2 rpm]# rpm -ivh cvuqdisk-1.0.7-1.rpm Preparing... ########################################### [100%] Using default group oinstall to install package 1:cvuqdisk ########################################### [100%] |
3.3. 安装前检查
|
1.检查节点连通性 |
|
[grid@linuxrac1 grid]$ ./runcluvfy.sh stage -post hwos -n linuxrac1,linuxrac2 -verbose Performing post-checks for hardware and operating system setup Checking node reachability... Check: Node reachability from node "linuxrac1" Destination Node Reachable? ------------------------------------ ------------------------ linuxrac1 yes linuxrac2 yes Result: Node reachability check passed from node "linuxrac1" Checking user equivalence... Check: User equivalence for user "grid" Node Name Comment ------------------------------------ ------------------------ linuxrac2 passed linuxrac1 passed Result: User equivalence check passed for user "grid" Checking node connectivity... Checking hosts config file... Node Name Status Comment ------------ ------------------------ ------------------------ linuxrac2 passed linuxrac1 passed
Verification of the hosts config file successful Interface information for node "linuxrac2" Name IP Address Subnet Gateway Def. Gateway HW Address MTU ------ --------------- --------------- --------------- --------------- ----------------- ------ eth0 10.10.97.167 10.10.97.0 0.0.0.0 10.10.97.232 00:0C:29:E8:8D:F9 1500 eth1 192.168.2.216 192.168.2.0 0.0.0.0 10.10.97.232 00:0C:29:E8:8D:03 1500
Interface information for node "linuxrac1" Name IP Address Subnet Gateway Def. Gateway HW Address MTU ------ --------------- --------------- --------------- --------------- ----------------- ------ eth0 10.10.97.161 10.10.97.0 0.0.0.0 10.10.97.232 00:0C:29:89:82:48 1500 eth1 192.168.2.116 192.168.2.0 0.0.0.0 10.10.97.232 00:50:56:23:6A:3E 1500
Check: Node connectivity of subnet "10.10.97.0" Source Destination Connected? ------------------------------ ------------------------------ ---------------- linuxrac2:eth0 linuxrac1:eth0 yes Result: Node connectivity passed for subnet "10.10.97.0" with node(s) linuxrac2,linuxrac1
Check: TCP connectivity of subnet "10.10.97.0" Source Destination Connected? ------------------------------ ------------------------------ ---------------- linuxrac1:10.10.97.161 linuxrac2:10.10.97.167 passed Result: TCP connectivity check passed for subnet "10.10.97.0"
Check: Node connectivity of subnet "192.168.2.0" Source Destination Connected? ------------------------------ ------------------------------ ---------------- linuxrac2:eth1 linuxrac1:eth1 yes Result: Node connectivity passed for subnet "192.168.2.0" with node(s) linuxrac2,linuxrac1
Check: TCP connectivity of subnet "192.168.2.0" Source Destination Connected? ------------------------------ ------------------------------ ---------------- linuxrac1:192.168.2.116 linuxrac2:192.168.2.216 passed Result: TCP connectivity check passed for subnet "192.168.2.0"
Interfaces found on subnet "10.10.97.0" that are likely candidates for VIP are: linuxrac2 eth0:10.10.97.167 linuxrac1 eth0:10.10.97.161
Interfaces found on subnet "192.168.2.0" that are likely candidates for a private interconnect are: linuxrac2 eth1:192.168.2.216 linuxrac1 eth1:192.168.2.116
Result: Node connectivity check passed
Checking for multiple users with UID value 0 Result: Check for multiple users with UID value 0 passed
Post-check for hardware and operating system setup was successful.
|
3.4.安装Grid Infrastructure
3.4.1.安装Grid
|
1.运行 grid的安装文件runInstaller |
|
[grid@linuxrac1 grid]$ ./runInstaller Starting Oracle Universal Installer...
Checking Temp space: must be greater than 120 MB. Actual 14708 MB Passed Checking swap space: must be greater than 150 MB. Actual 5945 MB Passed Checking monitor: must be configured to display at least 256 colors. Actual 16777216 Passed Preparing to launch Oracle Universal Installer from /tmp/OraInstall2014-09-26_12 |
安装图 略
以root用户按顺序执行
1.[root@rac1 ~]# /u01/app/oraInventory/orainstRoot.sh
2.[root@rac2 ~]# /u01/app/oraInventory/orainstRoot.sh
3.[root@rac1 ~]# /u01/app/11.2.0/grid/root.sh
4.[root@rac2 ~]# /u01/app/11.2.0/grid/root.sh 运行完脚本后,点击ok完成安装.如果不能rac-scan,那么会报错
|
|
|
[root@linuxrac1 ~]# /u01/app/oraInventory/orainstRoot.sh Changing permissions of /u01/app/oraInventory. Adding read,write permissions for group. Removing read,write,execute permissions for world.
Changing groupname of /u01/app/oraInventory to oinstall. The execution of the script is complete.
[root@linuxrac2 ~]# /u01/app/oraInventory/orainstRoot.sh Changing permissions of /u01/app/oraInventory. Adding read,write permissions for group. Removing read,write,execute permissions for world.
Changing groupname of /u01/app/oraInventory to oinstall. The execution of the script is complete.
[root@linuxrac1 ~]# /u01/app/11.2.0/grid/root.sh Running Oracle 11g root.sh script...
The following environment variables are set as: ORACLE_OWNER= grid ORACLE_HOME= /u01/app/11.2.0/grid
Enter the full pathname of the local bin directory: [/usr/local/bin]: /usr/local/bin The file "dbhome" already exists in /usr/local/bin. Overwrite it? (y/n) [n]: y Copying dbhome to /usr/local/bin ... The file "oraenv" already exists in /usr/local/bin. Overwrite it? (y/n) [n]: y Copying oraenv to /usr/local/bin ... The file "coraenv" already exists in /usr/local/bin. Overwrite it? (y/n) [n]: y Copying coraenv to /usr/local/bin ...
Entries will be added to the /etc/oratab file as needed by Database Configuration Assistant when a database is created Finished running generic part of root.sh script. Now product-specific root actions will be performed. 2014-10-17 00:24:16: Parsing the host name 2014-10-17 00:24:16: Checking for super user privileges 2014-10-17 00:24:16: User has super user privileges Using configuration parameter file: /u01/app/11.2.0/grid/crs/install/crsconfig_params Creating trace directory LOCAL ADD MODE Creating OCR keys for user 'root', privgrp 'root'.. Operation successful. root wallet root wallet cert root cert export peer wallet profile reader wallet pa wallet peer wallet keys pa wallet keys peer cert request pa cert request peer cert pa cert peer root cert TP profile reader root cert TP pa root cert TP peer pa cert TP pa peer cert TP profile reader pa cert TP profile reader peer cert TP peer user cert pa user cert Adding daemon to inittab CRS-4123: Oracle High Availability Services has been started. ohasd is starting ADVM/ACFS is not supported on centos-release-5-4.el5.centos.1 CRS-2672: Attempting to start 'ora.gipcd' on 'linuxrac1' CRS-2672: Attempting to start 'ora.mdnsd' on 'linuxrac1' CRS-2676: Start of 'ora.gipcd' on 'linuxrac1' succeeded CRS-2676: Start of 'ora.mdnsd' on 'linuxrac1' succeeded CRS-2672: Attempting to start 'ora.gpnpd' on 'linuxrac1' CRS-2676: Start of 'ora.gpnpd' on 'linuxrac1' succeeded CRS-2672: Attempting to start 'ora.cssdmonitor' on 'linuxrac1' CRS-2676: Start of 'ora.cssdmonitor' on 'linuxrac1' succeeded CRS-2672: Attempting to start 'ora.cssd' on 'linuxrac1' CRS-2672: Attempting to start 'ora.diskmon' on 'linuxrac1' CRS-2676: Start of 'ora.diskmon' on 'linuxrac1' succeeded CRS-2676: Start of 'ora.cssd' on 'linuxrac1' succeeded CRS-2672: Attempting to start 'ora.ctssd' on 'linuxrac1' CRS-2676: Start of 'ora.ctssd' on 'linuxrac1' succeeded
ASM created and started successfully.
DiskGroup OCR_VOTE created successfully.
clscfg: -install mode specified Successfully accumulated necessary OCR keys. Creating OCR keys for user 'root', privgrp 'root'.. Operation successful. CRS-2672: Attempting to start 'ora.crsd' on 'linuxrac1' CRS-2676: Start of 'ora.crsd' on 'linuxrac1' succeeded CRS-4256: Updating the profile Successful addition of voting disk 4657b29f8f874f22bfd2d3d9ace93e9f. Successfully replaced voting disk group with +OCR_VOTE. CRS-4256: Updating the profile CRS-4266: Voting file(s) successfully replaced ## STATE File Universal Id File Name Disk group -- ----- ----------------- --------- --------- 1. ONLINE 4657b29f8f874f22bfd2d3d9ace93e9f (ORCL:OCR_VOTE) [OCR_VOTE] Located 1 voting disk(s). CRS-2673: Attempting to stop 'ora.crsd' on 'linuxrac1' CRS-2677: Stop of 'ora.crsd' on 'linuxrac1' succeeded CRS-2673: Attempting to stop 'ora.asm' on 'linuxrac1' CRS-2677: Stop of 'ora.asm' on 'linuxrac1' succeeded CRS-2673: Attempting to stop 'ora.ctssd' on 'linuxrac1' CRS-2677: Stop of 'ora.ctssd' on 'linuxrac1' succeeded CRS-2673: Attempting to stop 'ora.cssdmonitor' on 'linuxrac1' CRS-2677: Stop of 'ora.cssdmonitor' on 'linuxrac1' succeeded CRS-2673: Attempting to stop 'ora.cssd' on 'linuxrac1' CRS-2677: Stop of 'ora.cssd' on 'linuxrac1' succeeded CRS-2673: Attempting to stop 'ora.gpnpd' on 'linuxrac1' CRS-2677: Stop of 'ora.gpnpd' on 'linuxrac1' succeeded CRS-2673: Attempting to stop 'ora.gipcd' on 'linuxrac1' CRS-2677: Stop of 'ora.gipcd' on 'linuxrac1' succeeded CRS-2673: Attempting to stop 'ora.mdnsd' on 'linuxrac1' CRS-2677: Stop of 'ora.mdnsd' on 'linuxrac1' succeeded CRS-2672: Attempting to start 'ora.mdnsd' on 'linuxrac1' CRS-2676: Start of 'ora.mdnsd' on 'linuxrac1' succeeded CRS-2672: Attempting to start 'ora.gipcd' on 'linuxrac1' CRS-2676: Start of 'ora.gipcd' on 'linuxrac1' succeeded CRS-2672: Attempting to start 'ora.gpnpd' on 'linuxrac1' CRS-2676: Start of 'ora.gpnpd' on 'linuxrac1' succeeded CRS-2672: Attempting to start 'ora.cssdmonitor' on 'linuxrac1' CRS-2676: Start of 'ora.cssdmonitor' on 'linuxrac1' succeeded CRS-2672: Attempting to start 'ora.cssd' on 'linuxrac1' CRS-2672: Attempting to start 'ora.diskmon' on 'linuxrac1' CRS-2676: Start of 'ora.diskmon' on 'linuxrac1' succeeded CRS-2676: Start of 'ora.cssd' on 'linuxrac1' succeeded CRS-2672: Attempting to start 'ora.ctssd' on 'linuxrac1' CRS-2676: Start of 'ora.ctssd' on 'linuxrac1' succeeded CRS-2672: Attempting to start 'ora.asm' on 'linuxrac1' CRS-2676: Start of 'ora.asm' on 'linuxrac1' succeeded CRS-2672: Attempting to start 'ora.crsd' on 'linuxrac1' CRS-2676: Start of 'ora.crsd' on 'linuxrac1' succeeded CRS-2672: Attempting to start 'ora.evmd' on 'linuxrac1' CRS-2676: Start of 'ora.evmd' on 'linuxrac1' succeeded CRS-2672: Attempting to start 'ora.asm' on 'linuxrac1' CRS-2676: Start of 'ora.asm' on 'linuxrac1' succeeded CRS-2672: Attempting to start 'ora.OCR_VOTE.dg' on 'linuxrac1' CRS-2676: Start of 'ora.OCR_VOTE.dg' on 'linuxrac1' succeeded
linuxrac1 2014/10/17 00:28:25 /u01/app/11.2.0/grid/cdata/linuxrac1/backup_20141017_002825.olr Preparing packages for installation... cvuqdisk-1.0.7-1 Configure Oracle Grid Infrastructure for a Cluster ... succeeded Updating inventory properties for clusterware Starting Oracle Universal Installer...
Checking swap space: must be greater than 500 MB. Actual 5945 MB Passed The inventory pointer is located at /etc/oraInst.loc The inventory is located at /u01/app/oraInventory 'UpdateNodeList' was successful. [root@linuxrac2 ~]# /u01/app/11.2.0/grid/root.sh Running Oracle 11g root.sh script...
The following environment variables are set as: ORACLE_OWNER= grid ORACLE_HOME= /u01/app/11.2.0/grid
Enter the full pathname of the local bin directory: [/usr/local/bin]: /usr/local/bin The file "dbhome" already exists in /usr/local/bin. Overwrite it? (y/n) [n]: y Copying dbhome to /usr/local/bin ... The file "oraenv" already exists in /usr/local/bin. Overwrite it? (y/n) [n]: y Copying oraenv to /usr/local/bin ... The file "coraenv" already exists in /usr/local/bin. Overwrite it? (y/n) [n]: y Copying coraenv to /usr/local/bin ...
Entries will be added to the /etc/oratab file as needed by Database Configuration Assistant when a database is created Finished running generic part of root.sh script. Now product-specific root actions will be performed. 2014-10-17 00:30:02: Parsing the host name 2014-10-17 00:30:02: Checking for super user privileges 2014-10-17 00:30:02: User has super user privileges Using configuration parameter file: /u01/app/11.2.0/grid/crs/install/crsconfig_params Creating trace directory LOCAL ADD MODE Creating OCR keys for user 'root', privgrp 'root'.. Operation successful. Adding daemon to inittab CRS-4123: Oracle High Availability Services has been started. ohasd is starting ADVM/ACFS is not supported on centos-release-5-4.el5.centos.1 CRS-4402: The CSS daemon was started in exclusive mode but found an active CSS daemon on node linuxrac1, number 1, and is terminating An active cluster was found during exclusive startup, restarting to join the cluster CRS-2672: Attempting to start 'ora.mdnsd' on 'linuxrac2' CRS-2676: Start of 'ora.mdnsd' on 'linuxrac2' succeeded CRS-2672: Attempting to start 'ora.gipcd' on 'linuxrac2' CRS-2676: Start of 'ora.gipcd' on 'linuxrac2' succeeded CRS-2672: Attempting to start 'ora.gpnpd' on 'linuxrac2' CRS-2676: Start of 'ora.gpnpd' on 'linuxrac2' succeeded CRS-2672: Attempting to start 'ora.cssdmonitor' on 'linuxrac2' CRS-2676: Start of 'ora.cssdmonitor' on 'linuxrac2' succeeded CRS-2672: Attempting to start 'ora.cssd' on 'linuxrac2' CRS-2672: Attempting to start 'ora.diskmon' on 'linuxrac2' CRS-2676: Start of 'ora.diskmon' on 'linuxrac2' succeeded CRS-2676: Start of 'ora.cssd' on 'linuxrac2' succeeded CRS-2672: Attempting to start 'ora.ctssd' on 'linuxrac2' CRS-2676: Start of 'ora.ctssd' on 'linuxrac2' succeeded CRS-2672: Attempting to start 'ora.asm' on 'linuxrac2' CRS-2676: Start of 'ora.asm' on 'linuxrac2' succeeded CRS-2672: Attempting to start 'ora.crsd' on 'linuxrac2' CRS-2676: Start of 'ora.crsd' on 'linuxrac2' succeeded CRS-2672: Attempting to start 'ora.evmd' on 'linuxrac2' CRS-2676: Start of 'ora.evmd' on 'linuxrac2' succeeded linuxrac2 2014/10/17 00:32:27 /u01/app/11.2.0/grid/cdata/linuxrac2/backup_20141017_003227.olr Preparing packages for installation... cvuqdisk-1.0.7-1 Configure Oracle Grid Infrastructure for a Cluster ... succeeded Updating inventory properties for clusterware Starting Oracle Universal Installer...
Checking swap space: must be greater than 500 MB. Actual 5945 MB Passed The inventory pointer is located at /etc/oraInst.loc The inventory is located at /u01/app/oraInventory 'UpdateNodeList' was successful.
|
3.4.2.确认集群软件安装成功
|
查看集群软件安装结果 |
|
[root@linuxrac1 /]# crs_stat -t Name Type Target State Host ------------------------------------------------------------ ora....ER.lsnr ora....er.type ONLINE ONLINE linuxrac1 ora....N1.lsnr ora....er.type ONLINE ONLINE linuxrac1 ora....VOTE.dg ora....up.type ONLINE ONLINE linuxrac1 ora.asm ora.asm.type ONLINE ONLINE linuxrac1 ora.eons ora.eons.type ONLINE ONLINE linuxrac1 ora.gsd ora.gsd.type OFFLINE OFFLINE ora....SM1.asm application ONLINE ONLINE linuxrac1 ora....C1.lsnr application ONLINE ONLINE linuxrac1 ora....ac1.gsd application OFFLINE OFFLINE ora....ac1.ons application ONLINE ONLINE linuxrac1 ora....ac1.vip ora....t1.type ONLINE ONLINE linuxrac1 ora....SM2.asm application ONLINE ONLINE linuxrac2 ora....C2.lsnr application ONLINE ONLINE linuxrac2 ora....ac2.gsd application OFFLINE OFFLINE ora....ac2.ons application ONLINE ONLINE linuxrac2 ora....ac2.vip ora....t1.type ONLINE ONLINE linuxrac2 ora....network ora....rk.type ONLINE ONLINE linuxrac1 ora.oc4j ora.oc4j.type OFFLINE OFFLINE ora.ons ora.ons.type ONLINE ONLINE linuxrac1 ora.scan1.vip ora....ip.type ONLINE ONLINE linuxrac1
[root@linuxrac1 /]# crs_stat -t -v Name Type R/RA F/FT Target State Host ---------------------------------------------------------------------- ora....ER.lsnr ora....er.type 0/5 0/ ONLINE ONLINE linuxrac1 ora....N1.lsnr ora....er.type 0/5 0/0 ONLINE ONLINE linuxrac1 ora....VOTE.dg ora....up.type 0/5 0/ ONLINE ONLINE linuxrac1 ora.asm ora.asm.type 0/5 0/ ONLINE ONLINE linuxrac1 ora.eons ora.eons.type 0/3 0/ ONLINE ONLINE linuxrac1 ora.gsd ora.gsd.type 0/5 0/ OFFLINE OFFLINE ora....SM1.asm application 0/5 0/0 ONLINE ONLINE linuxrac1 ora....C1.lsnr application 0/5 0/0 ONLINE ONLINE linuxrac1 ora....ac1.gsd application 0/5 0/0 OFFLINE OFFLINE ora....ac1.ons application 0/3 0/0 ONLINE ONLINE linuxrac1 ora....ac1.vip ora....t1.type 0/0 0/0 ONLINE ONLINE linuxrac1 ora....SM2.asm application 0/5 0/0 ONLINE ONLINE linuxrac2 ora....C2.lsnr application 0/5 0/0 ONLINE ONLINE linuxrac2 ora....ac2.gsd application 0/5 0/0 OFFLINE OFFLINE ora....ac2.ons application 0/3 0/0 ONLINE ONLINE linuxrac2 ora....ac2.vip ora....t1.type 0/0 0/0 ONLINE ONLINE linuxrac2 ora....network ora....rk.type 0/5 0/ ONLINE ONLINE linuxrac1 ora.oc4j ora.oc4j.type 0/5 0/0 OFFLINE OFFLINE ora.ons ora.ons.type 0/3 0/ ONLINE ONLINE linuxrac1 ora.scan1.vip ora....ip.type 0/0 0/0 ONLINE ONLINE linuxrac1 |
3.4.3.创建ASM磁盘组
本次任务将创建 3 个asm 磁盘组,分别为:DATA,FRA。其中DATA 将存放数据库文件;FRA 存放闪回文件.
在grid 用户下,执行 asmca,启动 asm 磁盘组创建向导。
|
在grid用户下,执行asmca |
|
[grid@linuxrac1 ~]$ pwd /home/grid [grid@linuxrac1 ~]$ asmca |
3.5.安装oracle11gr2 database 软件与创建数据库
3.5.1.安装Oracle 11gr2 Database
以oracle 用户登录到节点一,切换到软件安装目录,执行安装。
|
在oracle用户安装,首先将两个Oracle安装文件解压在一个文件夹中 |
|
[root@linuxrac1 ~]# su oracle [oracle@linuxrac1 root]$ cd /home/oracle [oracle@linuxrac1 ~]$ ll total 4 drwxr-xr-x 8 root root 4096 Aug 20 2009 database [oracle@linuxrac1 ~]$ cd database [oracle@linuxrac1 database]$ ./runInstaller Starting Oracle Universal Installer...
Checking Temp space: must be greater than 120 MB. Actual 5388 MB Passed Checking swap space: must be greater than 150 MB. Actual 5860 MB Passed Checking monitor: must be configured to display at least 256 colors. Actual 16777216 Passed Preparing to launch Oracle Universal Installer from /tmp/OraInstall2014-10-17_06-01-14AM. Please wait ...
|
3.5.2. 创建数据库
在节点1上用oracle用户执行dbca命令, 选择 rac数据库点击next。
|
切换到Oracle用户下,并查看下环境变量 |
|
[root@linuxrac1 ~]# su - oracle [oracle@linuxrac1 ~]$ echo $PATH /u01/app/oracle/product/11.2.0/db_1/bin:/usr/sbin:/usr/kerberos/bin: /usr/local/sbin:/usr/sbin:/sbin:/usr/local/bin:/bin:/usr/bin:/usr/java/jdk1.8.0_11/bin: /usr/java/jdk1.8.0_11/jre/bin:/u01/app/11.2.0/grid/bin:/home/oracle/bin [oracle@linuxrac1 ~]$ dbca |
3.6. 集群管理命令
3.6.1. RAC的启动与关闭
|
oracle rac默认会开机自启动,如需维护时可使用以下命令: |
|
关闭: crsctl stop cluster 停止本节点集群服务 crsctl stop cluster –all 停止所有节点服务 开启: crsctl start cluster 开启本节点集群服务 crsctl stop cluster –all 开启所有节点服务 注:以上命令需以 root用户执行 |
3.6.2.RAC检查运行状况
|
以grid 用户运行 |
|
[grid@linuxrac1 ~]$ crsctl check cluster CRS-4537: Cluster Ready Services is online CRS-4529: Cluster Synchronization Services is online CRS-4533: Event Manager is online |
3.6.3.禁止数据库启动,停止数据库
|
以grid 用户运行:prod为安装时所定义的全局服务名 |
|
[grid@linuxrac1 ~]$ srvctl disable database -d prod [grid@linuxrac1 ~]$ srvctl stop database -d prod |
3.6.4.禁止LISTNER的启动,停止所有节点LISTENER
|
以grid 用户运行 |
|
[grid@linuxrac1 ~]$ srvctl disable listener [grid@linuxrac1 ~]$ srvctl stop listener |
3.6.5.Database检查例状态
|
以grid 用户运行 |
|
[grid@linuxrac1 ~]$ srvctl status database -d prod Instance prod1 is running on node linuxrac1 Instance prod2 is running on node linuxrac2 |
3.6.6.检查节点应用状态及配置
|
以oracle 用户运行 |
|
[oracle@linuxrac1 ~]$ srvctl status nodeapps VIP linuxrac1-vip is enabled VIP linuxrac1-vip is running on node: linuxrac1 VIP linuxrac2-vip is enabled VIP linuxrac2-vip is running on node: linuxrac2 Network is enabled Network is running on node: linuxrac1 Network is running on node: linuxrac2 GSD is disabled GSD is not running on node: linuxrac1 GSD is not running on node: linuxrac2 ONS is enabled ONS daemon is running on node: linuxrac1 ONS daemon is running on node: linuxrac2 eONS is enabled eONS daemon is running on node: linuxrac1 eONS daemon is running on node: linuxrac2 [oracle@linuxrac1 ~]$ srvctl config nodeapps -a -g -s -l -l option has been deprecated and will be ignored. VIP exists.:linuxrac1 VIP exists.: /linuxrac1-vip/10.10.97.181/255.255.255.0/eth0 VIP exists.:linuxrac2 VIP exists.: /linuxrac2-vip/10.10.97.183/255.255.255.0/eth0 GSD exists. ONS daemon exists. Local port 6100, remote port 6200 Name: LISTENER Network: 1, Owner: grid Home: <CRS home> /u01/app/11.2.0/grid on node(s) linuxrac2,linuxrac1 End points: TCP:1521 |
3.6.7.查看数据库配置
|
以oracle 用户运行 |
|
[oracle@linuxrac1 ~]$ srvctl config database -d prod -a Database unique name: prod Database name: prod Oracle home: /u01/app/oracle/product/11.2.0/db_1 Oracle user: oracle Spfile: +DATA/prod/spfileprod.ora Domain: Start options: open Stop options: immediate Database role: PRIMARY Management policy: AUTOMATIC Server pools: prod Database instances: prod1,prod2 Disk Groups: DATA,FRA Services: Database is enabled Database is administrator managed |
3.6.8.检查 ASM状态及配置
|
以oracle 用户运行 |
|
[oracle@linuxrac1 ~]$ srvctl status asm ASM is running on linuxrac1,linuxrac2 [oracle@linuxrac1 ~]$ srvctl config asm -a ASM home: /u01/app/11.2.0/grid ASM listener: LISTENER ASM is enabled. |
3.6.9.检查 TNS的状态及配置
|
以oracle 用户运行 |
|
[oracle@linuxrac1 ~]$ srvctl status listener Listener LISTENER is enabled Listener LISTENER is running on node(s): linuxrac1,linuxrac2 [oracle@linuxrac1 ~]$ srvctl config listener -a Name: LISTENER Network: 1, Owner: grid Home: <CRS home> /u01/app/11.2.0/grid on node(s) linuxrac2,linuxrac1 End points: TCP:1521 |
3.6.10.检查 SCAN 的状态及配置
|
以oracle 用户运行 |
|
[oracle@linuxrac1 ~]$ srvctl status scan SCAN VIP scan1 is enabled SCAN VIP scan1 is running on node linuxrac1 [oracle@linuxrac1 ~]$ srvctl config scan SCAN name: linuxrac-scan, Network: 1/10.10.97.0/255.255.255.0/eth0 SCAN VIP name: scan1, IP: /linuxrac-scan/10.10.97.193 |
3.6.11.检查 VIP的状态及配置
|
以oracle 用户运行 |
|
[oracle@linuxrac1 ~]$ srvctl status vip -n linuxrac1 VIP linuxrac1-vip is enabled VIP linuxrac1-vip is running on node: linuxrac1 [oracle@linuxrac1 ~]$ srvctl status vip -n linuxrac2 VIP linuxrac2-vip is enabled VIP linuxrac2-vip is running on node: linuxrac2 [oracle@linuxrac1 ~]$ srvctl config vip -n linuxrac1 VIP exists.:linuxrac1 VIP exists.: /linuxrac1-vip/10.10.97.181/255.255.255.0/eth0 [oracle@linuxrac1 ~]$ srvctl config vip -n linuxrac2 VIP exists.:linuxrac2 VIP exists.: /linuxrac2-vip/10.10.97.183/255.255.255.0/eth0 |
安装过程的错误解决办法
4.1 安装Oracle RAC FAQ-4.1.系统界面报错Gnome
|
1.错误信息:登录系统后,屏幕弹出几个错误对话框,无菜单、无按钮 |
|
GConf error: Failed to contact configuration server; some possible causes are that you need to enable TCP/IP networking for ORBit, or you have stale NFS locks due to a system crash. See http://www.gnome.org/projects/gconf/ for information. (Details - 1: IOR file '/tmp/gconfd-root/lock/ior' not opened successfully, no gconfd located: No such file or directory 2: IOR file '/tmp/gconfd-root/lock/ior' not opened successfully, no gconfd located: No such file or directory) Failed to contact configuration server; some possible causes are that you need to enable TCP/IP networking for ORBit, or you have stale NFS locks due to a system crash. See http://www.gnome.org/projects/gconf/ for information. (Details - 1: IOR file '/tmp/gconfd-root/lock/ior' not opened successfully, no gconfd located: No such file or directory 2: IOR file '/tmp/gconfd-root/lock/ior' not opened successfully, no gconfd located: No such file or directory) |
|
2.解决办法: |
|
1.删除当前用户在/tmp下的相关文件:假设用户名是root,就是这样的#rm -R *root* 。 2.删除用户主目录下的.gnome 和 .gnome2两个文件夹。假设用户名是root,就是这样的#rm -R /root/.gnome 和#rm -R /root/.gnome2. 3.重启gnome环境,问题解决。 |
4.2 安装Oracle RAC FAQ-4.2.Oracleasm Createdisk ASM磁盘失败:Instantiating disk: failed
|
1.错误信息:Instantiating disk: failed |
|
[root@linuxrac1 /]# /usr/sbin/oracleasm createdisk OCR_VOTE /dev/sdb1 /etc/init.d/oracleasm createdisk OCR_VOTE /dev/sdb1 Writing disk header: done Instantiating disk: failed Clearing disk header: done |
|
2.解决办法: |
|
1.首先检查Oracle ASMlib、oracleasm与 Linux内核版本是否一致,通常版本不一致,会导致此问题。 [root@linuxrac2 etc]# uname -r 2.6.18-164.el5 若不一致,请在Oracle ASMlib下载地址下载: http://www.oracle.com/technetwork/server-storage/linux/downloads/rhel5-084877.html 2.可能selinux 阻止访问disk header [root@linuxrac1 etc]# cd selinux [root@linuxrac1 selinux]# ll total 20 -rw-r--r--. 1 root root 458 Jul 22 09:27 config -rw-r--r--. 1 root root 113 Feb 21 2013 restorecond.conf -rw-r--r--. 1 root root 76 Feb 21 2013 restorecond_user.conf -rw-r--r--. 1 root root 2271 Feb 21 2013 semanage.conf drwxr-xr-x. 6 root root 4096 Jul 22 09:33 targeted [root@linuxrac1 selinux]# cp -a /etc/selinux/config /etc/selinux/config_bak [root@linuxrac1 selinux]# vi config # This file controls the state of SELinux on the system. # SELINUX= can take one of these three values: # enforcing - SELinux security policy is enforced. # permissive - SELinux prints warnings instead of enforcing. # disabled - No SELinux policy is loaded. #SELINUX=enforcing SELINUX=disabled # SELINUXTYPE= can take one of these two values: # targeted - Targeted processes are protected, # mls - Multi Level Security protection. SELINUXTYPE=targeted [root@linuxrac1 etc]# reboot |
4.3安装Oracle RAC FAQ-4.3.Oracle 集群节点间连通失败
|
1.检查节点连通性的错误 |
|
[grid@linuxrac1 grid]$ ./runcluvfy.sh stage -post hwos -n linuxrac1,linuxrac2 -verbose
Performing post-checks for hardware and operating system setup
Checking node reachability...
Check: Node reachability from node "linuxrac1" Destination Node Reachable? ------------------------------------ ------------------------ linuxrac1 yes linuxrac2 yes Result: Node reachability check passed from node "linuxrac1"
Checking user equivalence...
Check: User equivalence for user "grid" Node Name Comment ------------------------------------ ------------------------ linuxrac2 failed linuxrac1 failed Result: PRVF-4007 : User equivalence check failed for user "grid"
ERROR: User equivalence unavailable on all the specified nodes Verification cannot proceed
Post-check for hardware and operating system setup was unsuccessful on all the nodes.
[root@linuxrac1 Downloads]# scp root@10.10.97.161:/home/linuxrac1/Downloads/test.txt root@10.10.97.167:/home/linuxrac2/Downloads root@10.10.97.161's password: root@10.10.97.167's password: test.txt 100% 0 0.0KB/s 00:00 Connection to 10.10.97.161 closed. |
|
解决办法:重新配置用户等效性 |
|
1.首先通过执行ssh linuxrac1 date; ssh linuxrac2 date,检查用户等效性是否配置好,用户等效性配置成功的特点是,执行ssh linuxrac1 date后,直接显示节点的时间,不会提示输入密码: [grid@linuxrac1 ~]$ ssh linuxrac1 date Thu Sep 25 20:09:12 PDT 2014 [grid@linuxrac1 ~]$ ssh linuxrac1-priv date Thu Sep 25 20:09:23 PDT 2014 [grid@linuxrac1 ~]$ ssh linuxrac2 date Thu Sep 25 20:09:31 PDT 2014 [grid@linuxrac1 ~]$ ssh linuxrac2-priv date Thu Sep 25 20:09:40 PDT 2014 |
4.4 安装Oracle RAC FAQ-4.4.无法图形化安装Grid Infrastructure
|
无法图形化安装: |
|
[grid@linuxrac1 grid]$ ./runInstaller Starting Oracle Universal Installer... Checking Temp space: must be greater than 120 MB. Actual 15122 MB Passed Checking swap space: must be greater than 150 MB. Actual 5945 MB Passed Checking monitor: must be configured to display at least 256 colors >>> Could not execute auto check for display colors using command /usr/bin/xdpyinfo. Check if the DISPLAY variable is set. Failed <<<< Some requirement checks failed. You must fulfill these requirements before continuing with the installation, Continue? (y/n) [n] y >>> Ignoring required pre-requisite failures. Continuing... Preparing to launch Oracle Universal Installer from /tmp/OraInstall2014-09-25_11-49-23PM. Please wait ... DISPLAY not set. Please set the DISPLAY and try again. Depending on the Unix Shell, you can use one of the following commands as examples to set the DISPLAY environment variable: - For csh: % setenv DISPLAY 192.168.1.128:0.0 - For sh, ksh and bash: $ DISPLAY=192.168.1.128:0.0; export DISPLAY Use the following command to see what shell is being used: echo $SHELL Use the following command to view the current DISPLAY environment variable setting: echo $DISPLAY - Make sure that client users are authorized to connect to the X Server. To enable client users to access the X Server, open an xterm, dtterm or xconsole as the user that started the session and type the following command: % xhost + To test that the DISPLAY environment variable is set correctly, run a X11 based program that comes with the native operating system such as 'xclock': % <full path to xclock.. see below> If you are not able to run xclock successfully, please refer to your PC-X Server or OS vendor for further assistance. Typical path for xclock: /usr/X11R6/bin/xclock |
|
2.通过Xmanager实现图形化安装 |
|
1)第一种:通过Xmanager passive实现: a).首先在本机安装Xmanager,我这里安装的是Xmanager4。安装方法跟普通软件一样,除了要输入SN号那里输入下(101210-450789-147200),其他的一直点下一步即可。 b).安装完后,打开xmanager里面的passive。 c).远程登录到“需要使用图形界面软件的终端”,执行如下命令 [grid@ linuxrac1 ~]$ export DISPLAY=10.10.97.168:0.0 #设置输出到哪个机器,就填写该机器IP [grid @ linuxrac1~]$ xhost + access control disabled, clients can connectfrom any host 注意:执行xhost +后,会告诉你“访问控制已关闭,可从任何地方的客户端连接” 2)Xbrowser 实现 Xbrowser 使用协议通过图形化桌面远程连接到linux,xftp使用SSH协议传送文件到linux服务器,xshell通过SSH终端协议连接到linux进行字符界面管理,Xstart通过xstart sample 图形化界面连接到linux。 Xbrower服务配置: a).编辑设置文件: vi /etc/gdm/custom.conf ,修改为如下所示: [root@ linuxrac1 ~]$ vi /etc/gdm/custom.conf [security] AllowRemoteRoot=true #允许root登陆 [xdmcp] Enable=true #开启xdcmp服务 Port=177 #指定服务端口 b).调整开机启动级别:vi /etc/inittab ,将默认启动级别改为5,即默认从图像化界面启动,若已经是5,则不需要修改。 [root@ linuxrac1 ~]$ vi /etc/inittab id:5 initdefault; c).然后,重启服务器:reboot [root@ linuxrac1 ~]$ reboot
d).重启后,验证服务是否开启 [root@ linuxrac1 ~]$lsof-i:177 e).使用Xbrower登陆 |
4.5安装Oracle RAC FAQ-4.5.安装Grid,创建ASM磁盘组空间不足
|
因之前分区时,分区的Last cylinder的值选了“1”,导致创建磁盘组空间不足。解决办法是先删除分区,重新创建分区并删除ASM磁盘,然后重建ASM磁盘 |
|
1. 先删除分区,重新创建分区: |
|
1)查询空间不足的分区情况: [root@linuxrac1 ~]# fdisk /dev/sdb
Command (m for help): p
Disk /dev/sdb: 4294 MB, 4294967296 bytes 255 heads, 63 sectors/track, 522 cylinders Units = cylinders of 16065 * 512 = 8225280 bytes
Device Boot Start End Blocks Id System /dev/sdb1 1 1 8001 83 Linux 2)删除分区: [root@linuxrac1 ~]# fdisk /dev/sdb Command (m for help): d Selected partition 1
Command (m for help): p
Disk /dev/sdb: 4294 MB, 4294967296 bytes 255 heads, 63 sectors/track, 522 cylinders Units = cylinders of 16065 * 512 = 8225280 bytes
Device Boot Start End Blocks Id System Command (m for help): w The partition table has been altered!
Calling ioctl() to re-read partition table. Syncing disks. 3)重建分区: [root@linuxrac1 ~]# fdisk /dev/sdb Command (m for help): n Command action e extended p primary partition (1-4) p Partition number (1-4): 1 First cylinder (1-522, default 1): 1 Last cylinder or +size or +sizeM or +sizeK (1-522, default 522): 522
Command (m for help): w The partition table has been altered!
Calling ioctl() to re-read partition table. Syncing disks. 4)删除ASM磁盘: [root@linuxrac1 ~]# oracleasm deletedisk OCR_VOTE Clearing disk header: done Dropping disk: done 5)重建ASM磁盘: [root@linuxrac1 ~]# /etc/init.d/oracleasm createdisk OCR_VOTE /dev/sdb1 Marking disk "OCR_VOTE" as an ASM disk: [ OK ] 6)查看ASM磁盘: [root@linuxrac1 ~]# oracleasm listdisks DATA DATA2 FRA OCR_VOTE 7)扫描识别ASM磁盘: [root@linuxrac1 ~]# oracleasm scandisks Reloading disk partitions: done Cleaning any stale ASM disks... Scanning system for ASM disks... [root@linuxrac1 ~]# ls -l /dev/oracleasm/disks total 0 brw-rw---- 1 grid oinstall 8, 33 Sep 26 00:52 DATA brw-rw---- 1 grid oinstall 8, 49 Sep 26 00:52 DATA2 brw-rw---- 1 grid oinstall 8, 65 Sep 26 00:52 FRA brw-rw---- 1 grid oinstall 8, 17 Sep 26 02:42 OCR_VOTE [root@linuxrac2 ~]# ls -l /dev/oracleasm/disks total 0 brw-rw---- 1 grid oinstall 8, 33 Sep 25 18:15 DATA brw-rw---- 1 grid oinstall 8, 49 Sep 25 18:15 DATA2 brw-rw---- 1 grid oinstall 8, 65 Sep 25 18:15 FRA brw-rw---- 1 grid oinstall 8, 17 Sep 25 18:15 OCR_VOTE |
4.6安装Oracle RAC FAQ-4.6.重新配置与缷载11R2 Grid Infrastructure
|
1.[root@linuxrac1 ~]# /u01/app/oraInventory/orainstRoot.sh 2.[root@linuxrac2 ~]# /u01/app/oraInventory/orainstRoot.sh 3.[root@linuxrac1 ~]# /u01/app/11.2.0/grid/root.sh 4.[root@linuxrac2 ~]# /u01/app/11.2.0/grid/root.sh 安装集群软件时,没有按上述步骤在两个节点执行相同的脚本,而是采用了下面错误的顺序: 1. [root@linuxrac1 ~]# /u01/app/oraInventory/orainstRoot.sh 2. [root@linuxrac1 ~]# /u01/app/11.2.0/grid/root.sh 3. [root@linuxrac2 ~]# /u01/app/oraInventory/orainstRoot.sh 4. [root@linuxrac2 ~]# /u01/app/11.2.0/grid/root.sh 导致集群安装失败 |
|
1. 先恢复配置:恢复配置Grid Infrastructure 并不会移除已经复制的二进制文件,仅仅是回复到配置crs之前的状态 |
|
a) 使用root用户登录,并执行下面的命令(所有节点,但 最后一个节点除外) #perl /u01/app/11.2.0/grid/crs/install/rootcrs.pl -verbose -deconfig -force [root@linuxrac1 ~]#perl /u01/app/11.2.0/grid/crs/install/rootcrs.pl -verbose -deconfig -force 2014-10-16 00:20:37: Parsing the host name 2014-10-16 00:20:37: Checking for super user privileges 2014-10-16 00:20:37: User has super user privileges Using configuration parameter file: /u01/app/11.2.0/grid/crs/install/crsconfig_params PRCR-1035 : Failed to look up CRS resource ora.cluster_vip.type for 1 PRCR-1068 : Failed to query resources Cannot communicate with crsd PRCR-1070 : Failed to check if resource ora.gsd is registered Cannot communicate with crsd PRCR-1070 : Failed to check if resource ora.ons is registered Cannot communicate with crsd PRCR-1070 : Failed to check if resource ora.eons is registered Cannot communicate with crsd
ADVM/ACFS is not supported on centos-release-5-4.el5.centos.1
ACFS-9201: Not Supported CRS-2791: Starting shutdown of Oracle High Availability Services-managed resources on 'linuxrac1' CRS-2673: Attempting to stop 'ora.crsd' on 'linuxrac1' CRS-4548: Unable to connect to CRSD CRS-2675: Stop of 'ora.crsd' on 'linuxrac1' failed CRS-2679: Attempting to clean 'ora.crsd' on 'linuxrac1' CRS-4548: Unable to connect to CRSD CRS-2678: 'ora.crsd' on 'linuxrac1' has experienced an unrecoverable failure CRS-0267: Human intervention required to resume its availability. CRS-2795: Shutdown of Oracle High Availability Services-managed resources on 'linuxrac1' has failed CRS-4687: Shutdown command has completed with error(s). CRS-4000: Command Stop failed, or completed with errors. You must kill crs processes or reboot the system to properly cleanup the processes started by Oracle clusterware Successfully deconfigured Oracle clusterware stack on this node b) 、同样使用root用户在最后一个节点执行下面的命令。该命令将清空ocr配置和voting disk #perl /u01/app/11.2.0/grid/crs/install/rootcrs.pl -verbose -deconfig -force [root@linuxrac2 ~]#perl /u01/app/11.2.0/grid/crs/install/rootcrs.pl -verbose -deconfig -force 2014-10-16 00:25:37: Parsing the host name 2014-10-16 00:25:37: Checking for super user privileges 2014-10-16 00:25:37: User has super user privileges Using configuration parameter file: /u01/app/11.2.0/grid/crs/install/crsconfig_params VIP exists.:linuxrac1 VIP exists.: /linuxrac1-vip/10.10.97.181/255.255.255.0/eth0 GSD exists. ONS daemon exists. Local port 6100, remote port 6200 eONS daemon exists. Multicast port 18049, multicast IP address 234.241.229.252, listening port 2016 PRKO-2439 : VIP does not exist.
PRKO-2313 : VIP linuxrac2 does not exist. ADVM/ACFS is not supported on centos-release-5-4.el5.centos.1
ACFS-9201: Not Supported CRS-2791: Starting shutdown of Oracle High Availability Services-managed resources on 'linuxrac2' CRS-2673: Attempting to stop 'ora.crsd' on 'linuxrac2' CRS-2790: Starting shutdown of Cluster Ready Services-managed resources on 'linuxrac2' CRS-2673: Attempting to stop 'ora.OCR_VOTE.dg' on 'linuxrac2' CRS-2677: Stop of 'ora.OCR_VOTE.dg' on 'linuxrac2' succeeded CRS-2673: Attempting to stop 'ora.asm' on 'linuxrac2' CRS-2677: Stop of 'ora.asm' on 'linuxrac2' succeeded CRS-2792: Shutdown of Cluster Ready Services-managed resources on 'linuxrac2' has completed CRS-2677: Stop of 'ora.crsd' on 'linuxrac2' succeeded CRS-2673: Attempting to stop 'ora.cssdmonitor' on 'linuxrac2' CRS-2673: Attempting to stop 'ora.ctssd' on 'linuxrac2' CRS-2673: Attempting to stop 'ora.evmd' on 'linuxrac2' CRS-2673: Attempting to stop 'ora.asm' on 'linuxrac2' CRS-2673: Attempting to stop 'ora.mdnsd' on 'linuxrac2' CRS-2677: Stop of 'ora.cssdmonitor' on 'linuxrac2' succeeded CRS-2677: Stop of 'ora.evmd' on 'linuxrac2' succeeded CRS-2677: Stop of 'ora.mdnsd' on 'linuxrac2' succeeded CRS-2677: Stop of 'ora.asm' on 'linuxrac2' succeeded CRS-2677: Stop of 'ora.ctssd' on 'linuxrac2' succeeded CRS-2673: Attempting to stop 'ora.cssd' on 'linuxrac2' CRS-2677: Stop of 'ora.cssd' on 'linuxrac2' succeeded CRS-2673: Attempting to stop 'ora.gpnpd' on 'linuxrac2' CRS-2673: Attempting to stop 'ora.diskmon' on 'linuxrac2' CRS-2677: Stop of 'ora.gpnpd' on 'linuxrac2' succeeded CRS-2673: Attempting to stop 'ora.gipcd' on 'linuxrac2' CRS-2677: Stop of 'ora.gipcd' on 'linuxrac2' succeeded CRS-2677: Stop of 'ora.diskmon' on 'linuxrac2' succeeded CRS-2793: Shutdown of Oracle High Availability Services-managed resources on 'linuxrac2' has completed CRS-4133: Oracle High Availability Services has been stopped. Successfully deconfigured Oracle clusterware stack on this node c) 如果使用了ASM磁盘,继续下面的操作以使得ASM重新作为候选磁盘(清空所有的ASM磁盘组) [root@linuxrac1 ~]#dd if=/dev/zero of=/dev/sdb1 bs=1024 count=10000 10000+0 records in 10000+0 records out 10240000 bytes (10M) copied, 0.002998 seconds, 34.2 MB/s [root@linuxrac2 ~]#dd if=/dev/zero of=/dev/sdb1 bs=1024 count=10000 10000+0 records in 10000+0 records out 10240000 bytes (10M) copied, 0.00289 seconds, 35.4 MB/s
[root@linuxrac1 /]#etc/init.d/oracleasm deletedisk OCR_VOTE /dev/sdb1 Removing ASM disk "OCR_VOTE": [ OK ] [root@linuxrac2 /]#etc/init.d/oracleasm deletedisk OCR_VOTE /dev/sdb1 Removing ASM disk "OCR_VOTE": [ OK ] [root@linuxrac1 /]#etc/init.d/oracleasm createdisk OCR_VOTE /dev/sdb1 [root@linuxrac2 /]#oracleasm scandisks Reloading disk partitions: done Cleaning any stale ASM disks... Scanning system for ASM disks... Instantiating disk "OCR_VOTE" [root@linuxrac2 /]# oracleasm listdisks DATA DATA2 FRA OCR_VOTE
|
|
2.彻底删除Grid Infrastructure 11G R2 Grid Infrastructure 也提供了彻底卸载的功能,deinstall该命令取代了使用OUI方式清除clusterware以及ASM,回复到安装grid之前的环境。 该命令将停止集群,移除二进制文件及其相关的所有配置信息。 命令位置:$GRID_HOME/deinstall 下面该命令操作的具体事例,操作期间,需要提供一些交互信息,以及在新的session以root身份。 |
|
[root@ linuxrac1/ ]# cd /u01/app/11.2.0/grid/ [root@ linuxrac1/ ]# cd bin [root@ linuxrac1 bin]# ./crsctl check crs CRS-4047: No Oracle Clusterware components configured. CRS-4000: Command Check failed, or completed with errors. [root@ linuxrac1 bin]# cd ../deinstall/ [root@ linuxrac1 deinstall]# pwd [root@ linuxrac1 deinstall]# su grid [grid@ linuxrac1 deinstall]# ./deinstall Checking for required files and bootstrapping ... Please wait ... Location of logs /tmp/deinstall2014-10-16_06-18-10-PM/logs/
############ ORACLE DEINSTALL & DECONFIG TOOL START ############
######################## CHECK OPERATION START ######################## Install check configuration START
Checking for existence of the Oracle home location /u01/app/11.2.0/grid Oracle Home type selected for de-install is: CRS Oracle Base selected for de-install is: /u01/app/grid Checking for existence of central inventory location /u01/app/oraInventory Checking for existence of the Oracle Grid Infrastructure home The following nodes are part of this cluster: linuxrac1,linuxrac2
Install check configuration END
Traces log file: /tmp/deinstall2014-10-16_06-18-10-PM/logs//crsdc.log Enter an address or the name of the virtual IP used on node "linuxrac1"[linuxrac1-vip] > The following information can be collected by running ifconfig -a on node "linuxrac1" Enter the IP netmask of Virtual IP "10.10.97.181" on node "linuxrac1"[255.255.255.0] > Enter the network interface name on which the virtual IP address "10.10.97.181" is active > Enter an address or the name of the virtual IP used on node "linuxrac2"[linuxrac2-vip] >
The following information can be collected by running ifconfig -a on node "linuxrac2" Enter the IP netmask of Virtual IP "10.10.97.183" on node "linuxrac2"[255.255.255.0] >
Enter the network interface name on which the virtual IP address "10.10.97.183" is active >
Enter an address or the name of the virtual IP[] >
Network Configuration check config START
Network de-configuration trace file location: /tmp/deinstall2014-10-16_06-18-10-PM/logs/netdc_check4793051808580150519.log
Specify all RAC listeners that are to be de-configured [LISTENER,LISTENER_SCAN1]:
Network Configuration check config END
Asm Check Configuration START
ASM de-configuration trace file location: /tmp/deinstall2014-10-16_06-18-10-PM/logs/asmcadc_check1638223369054710711.log
ASM configuration was not detected in this Oracle home. Was ASM configured in this Oracle home (y|n) [n]: y
Enter the OCR/Voting Disk diskgroup name []: Specify the ASM Diagnostic Destination [ ]: Specify the diskgroups that are managed by this ASM instance []:
######################### CHECK OPERATION END #########################
####################### CHECK OPERATION SUMMARY ####################### Oracle Grid Infrastructure Home is: The cluster node(s) on which the Oracle home exists are: (Please input nodes seperated by ",", eg: node1,node2,...)linuxrac1,linuxrac2 Oracle Home selected for de-install is: /u01/app/11.2.0/grid Inventory Location where the Oracle home registered is: /u01/app/oraInventory Following RAC listener(s) will be de-configured: LISTENER,LISTENER_SCAN1 ASM instance will be de-configured from this Oracle home Do you want to continue (y - yes, n - no)? [n]: y A log of this session will be written to: '/tmp/deinstall2014-10-16_06-18-10-PM/logs/deinstall_deconfig2014-10-16_06-18-44-PM.out' Any error messages from this session will be written to: '/tmp/deinstall2014-10-16_06-18-10-PM/logs/deinstall_deconfig2014-10-16_06-18-44-PM.err'
######################## CLEAN OPERATION START ######################## ASM de-configuration trace file location: /tmp/deinstall2014-10-16_06-18-10-PM/logs/asmcadc_clean779346077107850558.log ASM Clean Configuration START ASM Clean Configuration END
Network Configuration clean config START
Network de-configuration trace file location: /tmp/deinstall2014-10-16_06-18-10-PM/logs/netdc_clean3314924901124092411.log
De-configuring RAC listener(s): LISTENER,LISTENER_SCAN1
De-configuring listener: LISTENER Stopping listener: LISTENER Warning: Failed to stop listener. Listener may not be running. Listener de-configured successfully.
De-configuring listener: LISTENER_SCAN1 Stopping listener: LISTENER_SCAN1 Warning: Failed to stop listener. Listener may not be running. Listener de-configured successfully.
De-configuring Naming Methods configuration file on all nodes... Naming Methods configuration file de-configured successfully.
De-configuring Local Net Service Names configuration file on all nodes... Local Net Service Names configuration file de-configured successfully.
De-configuring Directory Usage configuration file on all nodes... Directory Usage configuration file de-configured successfully.
De-configuring backup files on all nodes... Backup files de-configured successfully.
The network configuration has been cleaned up successfully.
Network Configuration clean config END
----------------------------------------> Oracle Universal Installer clean START
Detach Oracle home '/u01/app/11.2.0/grid' from the central inventory on the local node : Done
Delete directory '/u01/app/11.2.0/grid' on the local node : Done
Delete directory '/u01/app/oraInventory' on the local node : Done
Delete directory '/u01/app/grid' on the local node : Done
Detach Oracle home '/u01/app/11.2.0/grid' from the central inventory on the remote nodes 'linuxrac2' : Done
Delete directory '/u01/app/11.2.0/grid' on the remote nodes 'linuxrac2' : Done
Delete directory '/u01/app/oraInventory' on the remote nodes 'linuxrac2' : Done
Delete directory '/u01/app/grid' on the remote nodes 'linuxrac2' : Done
Oracle Universal Installer cleanup was successful.
Oracle Universal Installer clean END
Oracle install clean START
Clean install operation removing temporary directory '/tmp/install' on node 'linuxrac1' Clean install operation removing temporary directory '/tmp/install' on node 'linuxrac2'
Oracle install clean END
######################### CLEAN OPERATION END #########################
####################### CLEAN OPERATION SUMMARY ####################### ASM instance was de-configured successfully from the Oracle home Following RAC listener(s) were de-configured successfully: LISTENER,LISTENER_SCAN1 Oracle Clusterware was already stopped and de-configured on node "linuxrac2" Oracle Clusterware was already stopped and de-configured on node "linuxrac1" Oracle Clusterware is stopped and de-configured successfully. Successfully detached Oracle home '/u01/app/11.2.0/grid' from the central inventory on the local node. Successfully deleted directory '/u01/app/11.2.0/grid' on the local node. Successfully deleted directory '/u01/app/oraInventory' on the local node. Successfully deleted directory '/u01/app/grid' on the local node. Successfully detached Oracle home '/u01/app/11.2.0/grid' from the central inventory on the remote nodes 'linuxrac2'. Successfully deleted directory '/u01/app/11.2.0/grid' on the remote nodes 'linuxrac2'. Successfully deleted directory '/u01/app/oraInventory' on the remote nodes 'linuxrac2'. Successfully deleted directory '/u01/app/grid' on the remote nodes 'linuxrac2'. Oracle Universal Installer cleanup was successful.
Run 'rm -rf /etc/oraInst.loc' as root on node(s) 'linuxrac1,linuxrac2' at the end of the session.
Oracle install successfully cleaned up the temporary directories. #######################################################################
############# ORACLE DEINSTALL & DECONFIG TOOL END ############# |
4.74.安装Oracle RAC FAQ-4.7.Oracle 11G R2 RAC修改public网络IP
|
问题:Linuxrac2节点的public网IP被占用,导致集群节点2无法访问 |
|
1.禁止相关CRS资源的启动,停止这些资源(vip,listener,scan,scan_listener,database) |
|
1.1所有节点上禁止数据库启动,停止数据库 [grid@linuxrac1 ~]$ srvctl disable database -d prod [grid@linuxrac1 ~]$ srvctl stop database -d prod 1.2所有节点的LISTNER的启动,停止所有节点上的LISTENER [grid@linuxrac1 ~]$ srvctl disable listener [grid@linuxrac1 ~]$ srvctl stop listener 1.3禁止所有节点的VIP的启动,停止所有节点的VIP(a.操作VIP的时候提供的/etc/hosts中配置的是VIP的名字,b.只有root用户才能DISABLE VIP资源) [root@linuxrac1 ~]$ /u01/app/11.2.0/grid/bin/srvctl disable vip -i "linuxrac1-vip" [root@linuxrac1 ~]$ /u01/app/11.2.0/grid/bin/srvctl disable vip -i "linuxrac2-vip" [grid@linuxrac1 ~]$ srvctl stop vip -n linuxrac1 [grid@linuxrac1 ~]$ srvctl stop vip -n linuxrac2 1.4禁止所有节点的SCAN_LISTENER的启动,停止所有节点上的SCAN_LISTENER [grid@linuxrac1 ~]$ srvctl disable scan_listener [grid@linuxrac1 ~]$ srvctl stop scan_listener 1.5禁止所有节点的SCAN的启动,停止所有节点上的LISTENER [root@linuxrac1 ~]$ /u01/app/11.2.0/grid/bin/srvctl disable scan [grid@linuxrac1 ~]$ srvctl stop scan |
|
2.网络基础设施配置(交换机,路由器,DNS),DNS服务器中的相关条目要反映新的IP |
|
3.操作系统网络配置修改(/etc/hosts,ifcfg-eth0,/etc/resolve.conf) |
|
3.1修改/etc/hosts [root@linuxrac1 ~]# vi /etc/hosts [root@linuxrac2 ~]# vi /etc/hosts [root@linuxrac2 ~]# cd /etc/sysconfig/network-scripts [root@linuxrac2 network-scripts]# vi ifcfg-eth0 [root@linuxrac2 etc]# cat resolv.conf ; generated by /sbin/dhclient-script search comtop.local nameserver 10.10.5.12 nameserver 10.10.5.11 |
|
4.CRS网络相关资源的重新配置和启动(集群的public网络和网卡设置,vip配置和LISTENER得启动,scan的重新设置和SCAN_LISTENER的启动) 第3步操作完成,配置生效后才能进行下面操作;另外public ip ,vip不需要特别的配置,修改完/etc/hosts文件中的对应条目后,集群会自动使用新的IP,ORACLE应该主要使用主机名来配置这些IP的. |
|
4.1集群的public 网络和网卡设置 [root@linuxrac2 ~]$ /u01/app/11.2.0/grid/bin/oifcfg getif eth0 10.10.97.0 global public eth1 192.168.2.0 global cluster_interconnect [root@linuxrac2 ~]$ /u01/app/11.2.0/grid/bin/oifcfg delif -global eth0 [root@linuxrac2 ~]$ /u01/app/11.2.0/grid/bin/oifcfg setif -global eth0/10.10.97.163:public 修改完成后在所有节点调用下面的命令验证更改是否在所有节点上生效: [root@linuxrac2 ~]$ /u01/app/11.2.0/grid/bin/oifcfg getif eth1 192.168.2.0 global cluster_interconnect eth0 10.10.97.163 global public 4.2集群的public 网络和网卡设置 [root@linuxrac2 ~]$ /u01/app/11.2.0/grid/bin/srvctl enable vip -i "linuxrac1-vip" [root@linuxrac2 ~]$ /u01/app/11.2.0/grid/bin/srvctl enable vip -i "linuxrac2-vip" [root@linuxrac2 ~]$ /u01/app/11.2.0/grid/bin/srvctl start vip -n linuxrac1 [root@linuxrac2 ~]$ /u01/app/11.2.0/grid/bin/srvctl start vip -n linuxrac2 [root@linuxrac2 ~]$ /u01/app/11.2.0/grid/bin/srvctl enable listener [root@linuxrac2 ~]$ /u01/app/11.2.0/grid/bin/srvctl start listener 4.3 scan 的重新配置和SCAN_LISTENER的启动 经过试验发现scan中的subnet依赖于资源ora.net1.network的USR_ORA_SUBNET属性,所以修改SCAN前先修改该属性,修改资源ora.net1.network的USR_ORA_SUBNET属性为新的网络号。 [root@linuxrac2 ~]$ /u01/app/11.2.0/grid/bin/crsctl modify res "ora.net1.network" -attr "USR_ORA_SUBNET=10.10.97.163" 修改linuxrac-scan的值,srvctl只提供了一个用域名来修改scan配置的选项,猜测ORACLE是通过DNS来获取对应的IP,从而实现配置的。 [root@linuxrac2 ~]$ /u01/app/11.2.0/grid/bin/crsctl modify scan -n linuxrac-scan.comtop.local [root@linuxrac2 ~]$ /u01/app/11.2.0/grid/bin/srvctl enable scan [root@linuxrac2 ~]$ /u01/app/11.2.0/grid/bin/srvctl start scan [root@linuxrac2 ~]$ /u01/app/11.2.0/grid/bin/srvctl enable scan_listener [root@linuxrac2 ~]$ /u01/app/11.2.0/grid/bin/srvctl start scan_listener 4.4启动数据库,完成oracle rac 环境public 网络的切换。 [root@linuxrac2 ~]$ /u01/app/11.2.0/grid/bin/srvctl enable database -d prod [root@linuxrac2 ~]$ /u01/app/11.2.0/grid/bin/srvctl start database -d prod |