一、value属性操作
1、具有value属性的三个标签:input、select、textarea
2、value的获取:ele.value
        input=document.getElementById('input')
        console.log(input.value);

<!DOCTYPE html>
<html lang="en">
<head>
    <meta charset="UTF-8">
    <title>value属性操作</title>
    <!-- input slect textarea -->
</head>
<body>
    姓名:
    <input type="text" name="user" id='input'><hr>
    省份:
    <select id='select'>
        <optgroup>
            <option value="1">江西省</option>
            <option value="2">湖南省</option>
            <option value="3">辽宁省</option>
        </optgroup>
    </select><hr>
    简介
    <textarea id='textarea' cols='30px' rows="10px">

    </textarea>
    <script type="text/javascript">
        input=document.getElementById('input')
        select=document.getElementById('select');
        textarea=document.getElementById('textarea');
        input.onclick=function(){
            console.log(input.value);

        }
        select.onclick=function(){
            console.log(select.value);
        }
        textarea.onclick=function(){
            console.log(textarea.value);
        }

    </script>

</body>
</html>
二、node节点的增删改查
1、创建节点
createElement(标签名) :创建一个指定名称的元素。
2、添加节点
父项.appendChild(新节点) //在父项后面追加一个子节点
父项.insertBefore(新节点,某节点) //在某节点后面插入新节点
3、删除节点
父项.removeChild(待删除的节点):删除节点
4、替换节点(先删除后添加)
父项.replaceChild(新节点,旧节点) \把旧节点替换成新节点

<!DOCTYPE html>
<html lang="en">
<head>
    <meta charset="UTF-8">
    <title>节点操作</title>
    <style type="text/css">
        button{
            width: 300px;
            height:50px;
            line-height: 50px;
            background-color: #11A7C9FF;
            text-align:center;
            font-size: 20px;
            color:white;
        }

    </style>
</head>
<body>
    <div id='d0'><h1>welcome</h1></div>

    <div id='d1'>
        <p><button>插入图片</button></p>
    </div>

    <div id='d2'>
        <button>点我删除</button>
        <div>我写错了,请删除我</div>
    </div>
    <button id='bb'>替换标题</button>
    <script type="text/javascript">

        // 节点的添加
        document.getElementById('d1').children[0].onclick=function(){

            // 1、创建一个节点
            image=document.createElement("img");
            image.setAttribute("src","赵奕欢.png");
            image.setAttribute('width','200px');


            // 2、找到触发插入图片的节点
            let pele=document.getElementById('d1').children[0];
            //添加节点
            document.getElementById('d1').appendChild(image);

        }

        //节点的删除
        document.getElementById('d2').firstElementChild.onclick=function(){

            //1、获取到删除的节点
            del_ele=document.getElementById('d2').firstElementChild.nextElementSibling;
            if (del_ele){
                button_del=document.getElementById('d2').firstElementChild;
            //2、调用语法删除
                document.getElementById('d2').removeChild(del_ele);

            }


        }

        //节点替换 welcome ->欢迎您的到来!

        document.getElementById('bb').onclick=function(){
            new_node=document.createElement('h1');
            new_node.innerText='欢迎您的到来!';

            replace_button=document.getElementById('bb');
            replace_ele=document.getElementById('d0').firstElementChild;
            fu_ele=document.getElementById('d0');
            fu_ele.replaceChild(new_node, replace_ele);

        }

    </script>

</body>
</html>
节点操作总结:
1、找到需要加事件的元素.如:button
2、找到需要更改的元素;
3、新数据的创建;
4、根据节点操作语法进行操作即可。
三、JS常用事件
onclick        当用户点击某个对象时调用的事件句柄。
ondblclick     当用户双击某个对象时调用的事件句柄。

onfocus        元素获得焦点。               练习:输入框
onblur         元素失去焦点。               应用场景:用于表单验证,用户离开某个输入框时,代表已经输入完了,我们可以对它进行验证.
onchange       域的内容被改变。             应用场景:通常用于表单元素,当元素内容被改变时触发.(三级联动)

onkeydown      某个键盘按键被按下。          应用场景: 当用户在最后一个输入框按下回车按键时,表单提交.
onkeypress     某个键盘按键被按下并松开。
onkeyup        某个键盘按键被松开。

onload         一张页面或一幅图像完成加载。

onmousedown    鼠标按钮被按下。
onmousemove    鼠标被移动。
onmouseout     鼠标从某元素移开。
onmouseover    鼠标移到某元素之上。
onmouseleave   鼠标从元素离开

onselect       文本被选中。
onsubmit       确认按钮被点击。
事件示例待补充
1、onload:
2、onsubmit:
3、事件传播:
4、onselect:
5、onchange:
6、onkeydown:
7、onmouseout与onmouseleave事件的区别:
四、二级联动实例
cslect标签.options.length=1;设置select标签option的个数为1个;

<!DOCTYPE html>
<html lang="en">
<head>
    <meta charset="UTF-8">
    <title>二级菜单</title>
</head>
<body>
    <select id='pro'>
        <option value="0">请选择省份</option>
        <option value="1">河北省</option>
        <option value="2">广东省</option>
        <option value="3">湖南省</option>
    </select>
    <select name='' id='city'>
        <option>请选择城市</option>
    </select>

    <script type="text/javascript">
        let data={
            "1":["石家庄","邯郸","邢台","衡水","保定"],
            "2":["东莞","惠州"," 广州","汕头","深圳"],
            "3":["长沙","张家界","湘潭","娄底"],
        }
        let pro=document.getElementById('pro');
        let city=document.getElementById('city');
        pro.onchange=function(){
            pro_va=pro.value;
            console.log(pro_va)
            city_da=data[pro_va];
            city.options.length=1;
            for (var i=0;i<city_da.length;i++){
                n=0;
                let opt=document.createElement('option');
                opt.innerText=city_da[i];
                opt.value=n;
                n+=1;
                console.log(opt);
                city.appendChild(opt);

            }
        }
    </script>

</body>
</html>
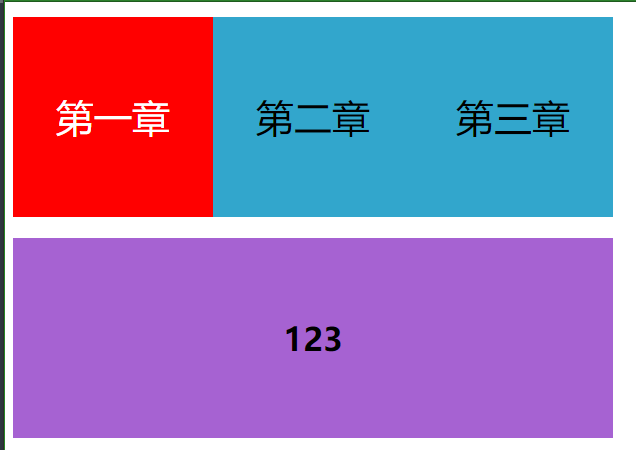
五、原窗口切换显示不同内容实例
if(arr_nav[j]!==this)//arr_nav[j]

<!DOCTYPE html>
<html lang="en">
<head>
    <meta charset="UTF-8">
    <title>导航图</title>
    <style type="text/css">
        div{
            margin-top: 15px;
            width:600px;
            height: 200px;
            line-height: 200px;
            background-color: #32A6CCFF;
            text-align:center;

        }
        ul{
            margin: 0;
            padding: 0;
            font-size: 0;

        }
        ul li{
            display: inline-block;
            line-height: 200px;
            font-size: 38px;
            text-align: center;
            width: 200px;
        }
        .c1{
            background-color: #A662D2FF;
        }
        .hide{
            display:none;
        }
    </style>
</head>
<body>
    <div>
        <ul>
            <li class='nav'>第一章</li>
            <li class='nav'>第二章</li>
            <li class='nav'>第三章</li>
        </ul>
    </div>
    <div class='hide c1'><h1>123</h1></div>
    <div class='hide c1'><h1>456</h1></div>
    <div class='hide c1'><h1>789</h1></div>
    <script type="text/javascript">
        let arr_nav=document.getElementsByClassName('nav');

        let arr_ye=document.getElementsByClassName('c1');
        for (var i=0;i<arr_nav.length;i++)
        {

            arr_nav[i].onclick=function(){
                this.style.backgroundColor = 'red';
                console.log(this);
                this.style.color='white';

                for (let j=0;j<arr_ye.length;j++ )
                {

                    if(arr_nav[j]!==this)//arr_nav[j]
                    {

                        arr_ye[j].classList.add('hide');
                        arr_nav[j].style.backgroundColor = '#32A6CCFF';
                        arr_nav[j].style.color='black';

                    }
                    else
                    {
                        arr_ye[j].classList.remove('hide');

                    }

                }
            }

        }
    </script>
</body>
</html>

